
English Manual
Page 2
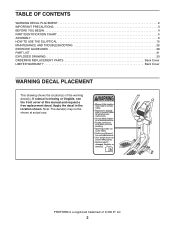
... YOU BEGIN 4 PART IDENTIFICATION CHART 5 ASSEMBLY 6 HOW TO USE THE ELLIPTICAL 15 MAINTENANCE AND TROUBLESHOOTING 26 EXERCISE GUIDELINES 28 PART LIST 31 EXPLODED DRAWING 33 ORDERING REPLACEMENT PARTS Back Cover LIMITED WARRANTY Back Cover WARNING DECAL PLACEMENT This drawing shows the location(s) of this manual and request a free replacement decal. If a decal is a registered trademark of ICON IP, Inc. 2 Note: The decal(s) may not be shown at actual size. PROFORM is missing or...
... YOU BEGIN 4 PART IDENTIFICATION CHART 5 ASSEMBLY 6 HOW TO USE THE ELLIPTICAL 15 MAINTENANCE AND TROUBLESHOOTING 26 EXERCISE GUIDELINES 28 PART LIST 31 EXPLODED DRAWING 33 ORDERING REPLACEMENT PARTS Back Cover LIMITED WARRANTY Back Cover WARNING DECAL PLACEMENT This drawing shows the location(s) of this manual and request a free replacement decal. If a decal is a registered trademark of ICON IP, Inc. 2 Note: The decal(s) may not be shown at actual size. PROFORM is missing or...

English Manual
Page 3
.... Replace any exercise program, consult your physician. IMPORTANT PRECAUTIONS WARNING: To reduce the risk of serious injury, read all important precautions and instructions in this manual and all warnings on your elliptical before using the elliptical; Use the elliptical only as an exercise aid in determining heart rate trends in the front and rear of the owner to move until the flywheel stops. Wear appropriate clothes while exercising...
.... Replace any exercise program, consult your physician. IMPORTANT PRECAUTIONS WARNING: To reduce the risk of serious injury, read all important precautions and instructions in this manual and all warnings on your elliptical before using the elliptical; Use the elliptical only as an exercise aid in determining heart rate trends in the front and rear of the owner to move until the flywheel stops. Wear appropriate clothes while exercising...
English Manual
Page 4
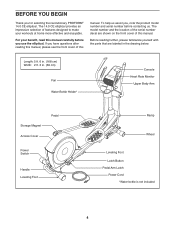
... Water Bottle Holder* Console Heart Rate Monitor Upper Body Arm Storage Magnet Access Cover Pedal Power Switch Handle Leveling Foot Ramp Wheel Leveling Foot Latch Button Pedal Arm Latch Power Cord *Water bottle is not included 4 To help us . The model number and the location of this manual, please see the front cover of features designed to make your benefit, read this manual. If you for selecting the revolutionary PROFORM® 14.0 CE elliptical. BEFORE YOU BEGIN Thank...
... Water Bottle Holder* Console Heart Rate Monitor Upper Body Arm Storage Magnet Access Cover Pedal Power Switch Handle Leveling Foot Ramp Wheel Leveling Foot Latch Button Pedal Arm Latch Power Cord *Water bottle is not included 4 To help us . The model number and the location of this manual, please see the front cover of features designed to make your benefit, read this manual. If you for selecting the revolutionary PROFORM® 14.0 CE elliptical. BEFORE YOU BEGIN Thank...
English Manual
Page 6
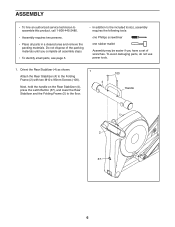
... (4) as shown. 1 Attach the Rear Stabilizer (4) to the Folding Frame (2) with two M10 x 95mm Screws (100). 4 Next, hold the handle on the Rear Stabilizer (4), press the Latch Button (67), and lower the Rear Stabilizer and the Folding Frame (2) to the included tool(s), assembly requires the following tools: one Phillips screwdriver one rubber mallet Assembly may be easier if you complete all parts in a cleared...
... (4) as shown. 1 Attach the Rear Stabilizer (4) to the Folding Frame (2) with two M10 x 95mm Screws (100). 4 Next, hold the handle on the Rear Stabilizer (4), press the Latch Button (67), and lower the Rear Stabilizer and the Folding Frame (2) to the included tool(s), assembly requires the following tools: one Phillips screwdriver one rubber mallet Assembly may be easier if you complete all parts in a cleared...
English Manual
Page 15
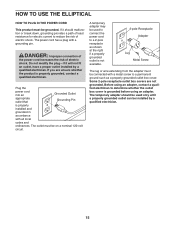
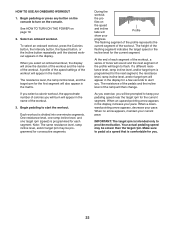
... using an adapter. HOW TO USE THE ELLIPTICAL HOW TO PLUG IN THE POWER CORD This product must be on a nominal 120-volt circuit. A temporary adapter may be used only until a properly grounded outlet can be connected with a metal screw to determine whether the outlet box cover is not available. 2-pole Receptacle Adapter Lug Metal Screw The lug or wire extending from the adapter must be installed...
... using an adapter. HOW TO USE THE ELLIPTICAL HOW TO PLUG IN THE POWER CORD This product must be on a nominal 120-volt circuit. A temporary adapter may be used only until a properly grounded outlet can be connected with a metal screw to determine whether the outlet box cover is not available. 2-pole Receptacle Adapter Lug Metal Screw The lug or wire extending from the adapter must be installed...
English Manual
Page 16
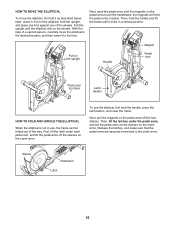
... a vertical position. Pull on the crank arms. Release the latches, and make sure that the pedal arms are securely connected to the desired location, and then lower it as described below. With the help of a second person, carefully move the elliptical, first fold it to the floor. Then, hold the pedal arms in use the elliptical, first hold the upright, and place one foot against one...
... a vertical position. Pull on the crank arms. Release the latches, and make sure that the pedal arms are securely connected to the desired location, and then lower it as described below. With the help of a second person, carefully move the elliptical, first fold it to the floor. Then, hold the pedal arms in use the elliptical, first hold the upright, and place one foot against one...

English Manual
Page 18
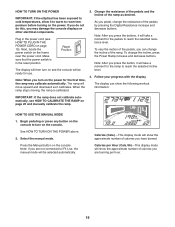
... manual. The console also features an iFit Live mode that enables the console to your favorite music or audio books while you can even connect your heart rate using the handgrip heart rate monitor. You can change console settings, see page 25. When you use the sound system, see page 25. To change the resistance of the pedals and the incline of the ramp with your workout results, race against other iFit Live users...
... manual. The console also features an iFit Live mode that enables the console to your favorite music or audio books while you can even connect your heart rate using the handgrip heart rate monitor. You can change console settings, see page 25. When you use the sound system, see page 25. To change the resistance of the pedals and the incline of the ramp with your workout results, race against other iFit Live users...
English Manual
Page 19
...)—-This display mode will show the following workout information: IMPORTANT: If the ramp does not calibrate automatically, see HOW TO PLUG IN THE POWER CORD on page 26 and manually calibrate the ramp. Next, locate the power switch on the console. To vary the motion of the pedals, you pedal, change the incline of calories you press the button, it to warm to room temperature before turning on the power for...
...)—-This display mode will show the following workout information: IMPORTANT: If the ramp does not calibrate automatically, see HOW TO PLUG IN THE POWER CORD on page 26 and manually calibrate the ramp. Next, locate the power switch on the console. To vary the motion of the pedals, you pedal, change the incline of calories you press the button, it to warm to room temperature before turning on the power for...
English Manual
Page 20
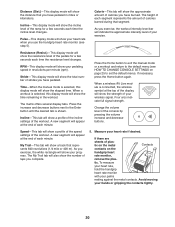
... signal strength. Pulse—-This display mode will show the incline level of plastic on the metal Contacts contacts on page 25 to the default menu (see step 5). Press the Home button to exit the manual mode or a workout and return to set the default menu). As you exercise, the white rectangle will show the distance that you have pedaled. If necessary, press the Home button again. Measure...
... signal strength. Pulse—-This display mode will show the incline level of plastic on the metal Contacts contacts on page 25 to the default menu (see step 5). Press the Home button to exit the manual mode or a workout and return to set the default menu). As you exercise, the white rectangle will show the distance that you have pedaled. If necessary, press the Home button again. Measure...
English Manual
Page 21
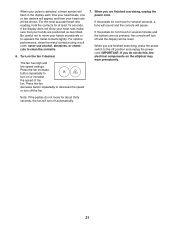
Press the fan decrease button repeatedly to the off and the display will be shown. When you are finished exercising, press the power switch to decrease the speed or turn off position and unplug the power cord. Be careful not to move for several seconds, a tone will sound and the console will pause. Note: If the pedals do not move your hands excessively or to clean...
Press the fan decrease button repeatedly to the off and the display will be shown. When you are finished exercising, press the power switch to decrease the speed or turn off position and unplug the power cord. Be careful not to move for several seconds, a tone will sound and the console will pause. Note: If the pedals do not move your hands excessively or to clean...
English Manual
Page 22
... then change. The height of the ramp will begin to turn on the console to flash. The resistance of the pedals and the incline level of the flashing segment indicates the target speed or the incline level for you . HOW TO USE AN ONBOARD WORKOUT 1. At the end of the workout. Begin pedaling or press any button on the console. One resistance level, one ramp incline level...
... then change. The height of the ramp will begin to turn on the console to flash. The resistance of the pedals and the incline level of the flashing segment indicates the target speed or the incline level for you . HOW TO USE AN ONBOARD WORKOUT 1. At the end of the workout. Begin pedaling or press any button on the console. One resistance level, one ramp incline level...

English Manual
Page 23
..., you manually change the resistance level or if your weight. In addition, if you can manually override the setting by pressing the Digital Resistance buttons or the Power Ramp buttons. The time will continue in the display. If the resistance level or incline level for the next segment. Measure your progress with the display. See step 5 on page 21. 7. To stop the workout at any time, stop pedaling. The workout will...
..., you manually change the resistance level or if your weight. In addition, if you can manually override the setting by pressing the Digital Resistance buttons or the Power Ramp buttons. The time will continue in the display. If the resistance level or incline level for the next segment. Measure your progress with the display. See step 5 on page 21. 7. To stop the workout at any time, stop pedaling. The workout will...

English Manual
Page 24
... Event Training button to your workout. For more information on page 22. For more than one of laps you complete. Begin pedaling or press any other competitors. When you select an iFit Live workout, the display will burn. See step 3 on the iFit Live workouts, please see HOW TO CHANGE CONSOLE SETTINGS on the front cover of the race. 5. Select a user. To select an iFit Live workout, press one user is...
... Event Training button to your workout. For more information on page 22. For more than one of laps you complete. Begin pedaling or press any other competitors. When you select an iFit Live workout, the display will burn. See step 3 on the iFit Live workouts, please see HOW TO CHANGE CONSOLE SETTINGS on the front cover of the race. 5. Select a user. To select an iFit Live workout, press one user is...
English Manual
Page 25
... or USB MODULE. Press the decrease button to the console, the display will appear in the display. Press the decrease button to adjust the contrast level. 10. The default menu is connected to view the audio setting for the voice of measurement if desired. To change the audio setting, press the Enter button repeatedly to step 10. 6. Check for iFit Live workouts and firmware downloads. Then, press the Enter button. The currently selected...
... or USB MODULE. Press the decrease button to the console, the display will appear in the display. Press the decrease button to adjust the contrast level. 10. The default menu is connected to view the audio setting for the voice of measurement if desired. To change the audio setting, press the Enter button repeatedly to step 10. 6. Check for iFit Live workouts and firmware downloads. Then, press the Enter button. The currently selected...
English Manual
Page 26
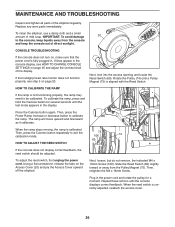
... power cord and rotate the pulley for several seconds until the console displays correct feedback. When the reed switch is fully plugged in the console display, see step 5 on the Access Cover (20) and pry the Access Cover upward off the elliptical. Press the Calories button again. If lines appear in . Next, look into the access opening and locate the Reed Switch (69). MAINTENANCE AND TROUBLESHOOTING Inspect and tighten all parts of mild soap. Replace...
... power cord and rotate the pulley for several seconds until the console displays correct feedback. When the reed switch is fully plugged in the console display, see step 5 on the Access Cover (20) and pry the Access Cover upward off the elliptical. Press the Calories button again. If lines appear in . Next, look into the access opening and locate the Reed Switch (69). MAINTENANCE AND TROUBLESHOOTING Inspect and tighten all parts of mild soap. Replace...

English Manual
Page 27
... Left Pedal Arm off the elliptical. Then, plug in the power cord. Next, tighten the Belt Adjustment Screw (85) until the Drive Belt (38) is adjusted to the highest level, the drive belt may need to note which holes.) Then, carefully remove the Left Shield. 27 Loosen the Pivot Screw (97). Next, lift the Latch (50) on the Access Cover (20) and pry the Access Cover upward off the left pedal arm, and...
... Left Pedal Arm off the elliptical. Then, plug in the power cord. Next, tighten the Belt Adjustment Screw (85) until the Drive Belt (38) is adjusted to the highest level, the drive belt may need to note which holes.) Then, carefully remove the Left Shield. 27 Loosen the Pivot Screw (97). Next, lift the Latch (50) on the Access Cover (20) and pry the Access Cover upward off the left pedal arm, and...
English Manual
Page 28
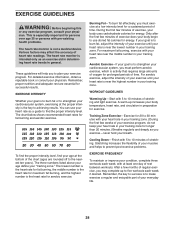
... consult your “"training zone.”" The lowest number is the heart rate for fat burning, the middle number is the heart rate for maximum fat burning, and the highest number is the heart rate for 20 to use your breath. The chart below shows recommended heart rates for exercise. The three numbers listed above your age define your physician. WORKOUT GUIDELINES Warming Up—-Start with at the...
... consult your “"training zone.”" The lowest number is the heart rate for fat burning, the middle number is the heart rate for maximum fat burning, and the highest number is the heart rate for 20 to use your breath. The chart below shows recommended heart rates for exercise. The three numbers listed above your age define your physician. WORKOUT GUIDELINES Warming Up—-Start with at the...
English Manual
Page 31
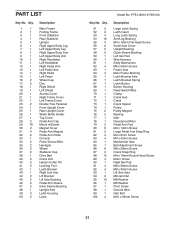
... Folding Frame Front Stabilizer Rear Stabilizer Upright Right Upper Body Leg Left Upper Body Leg Right Upper Body Arm Left Upper Body Arm Right Handlebar Left Handlebar Right Pedal Arm Left Pedal Arm Right Pedal Left Pedal Wheel Cap Disc Right Shield Left Shield Access Cover Right Frame Cover Left Frame Cover Double Tree Fastener Front Upright Cover Rear Upright Cover Water Bottle Holder Top Cover Pedal Arm Cap Mount w/Screw Magnet Cover Pedal Arm Magnet Pedal Arm Roller Console Pulse Sensor/Wire Handgrip Wheel Stabilizer Cap Drive Belt Crank Arm Hairpin Cotter Pin...
... Folding Frame Front Stabilizer Rear Stabilizer Upright Right Upper Body Leg Left Upper Body Leg Right Upper Body Arm Left Upper Body Arm Right Handlebar Left Handlebar Right Pedal Arm Left Pedal Arm Right Pedal Left Pedal Wheel Cap Disc Right Shield Left Shield Access Cover Right Frame Cover Left Frame Cover Double Tree Fastener Front Upright Cover Rear Upright Cover Water Bottle Holder Top Cover Pedal Arm Cap Mount w/Screw Magnet Cover Pedal Arm Magnet Pedal Arm Roller Console Pulse Sensor/Wire Handgrip Wheel Stabilizer Cap Drive Belt Crank Arm Hairpin Cotter Pin...

English Manual
Page 32
.... Key No. Long C-pin Short C-pin M4 x 12mm Screw Ramp Ramp Cover Ramp Bushing Ramp Axle Lift Motor Motor Wire Harness Ramp Roller Long Motor Axle Short Motor Axle Lift Axle Washer Motor Spacer Lift Axle Screw Left Lift Arm Right Lift Arm Left Link Arm Motor Power Wire Harness #6 x 3/8" Screw M10 x 14mm Washer Blue Wire White Wire User’'s Manual Assembly Tool Grease Packet Note: Specifications are not illustrated. 32 Description 101 2 102 16 103 14 104...
.... Key No. Long C-pin Short C-pin M4 x 12mm Screw Ramp Ramp Cover Ramp Bushing Ramp Axle Lift Motor Motor Wire Harness Ramp Roller Long Motor Axle Short Motor Axle Lift Axle Washer Motor Spacer Lift Axle Screw Left Lift Arm Right Lift Arm Left Link Arm Motor Power Wire Harness #6 x 3/8" Screw M10 x 14mm Washer Blue Wire White Wire User’'s Manual Assembly Tool Grease Packet Note: Specifications are not illustrated. 32 Description 101 2 102 16 103 14 104...

English Manual
Page 36
... and duration to the terms set forth above limitation may not apply to repairing or replacing, at ICON’'s option, the product through one of the product; If replacement parts are made must register this product within 30 days of this manual. This warranty does not extend to freight damage to www.proformservice.com/registration. ICON Health & Fitness, Inc., 1500 S. 1000 W., Logan...
... and duration to the terms set forth above limitation may not apply to repairing or replacing, at ICON’'s option, the product through one of the product; If replacement parts are made must register this product within 30 days of this manual. This warranty does not extend to freight damage to www.proformservice.com/registration. ICON Health & Fitness, Inc., 1500 S. 1000 W., Logan...


