
English Manual
Page 2
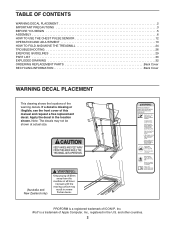
... Apple Computer, Inc., registered in the location shown. Note: The decals may not be shown at actual size. (Australia and New Zealand only) PROFORM is a trademark of ICON IP, Inc. and other countries. 2 TABLE OF CONTENTS WARNING DECAL PLACEMENT 2 IMPORTANT PRECAUTIONS 3 BEFORE YOU BEGIN 5 ...ASSEMBLY 6 HOW TO USE THE CHEST PULSE SENSOR 12 OPERATION AND ADJUSTMENT 13 HOW TO FOLD AND MOVE THE TREADMILL 24 TROUBLESHOOTING 26 EXERCISE GUIDELINES 29 PART LIST 30 EXPLODED DRAWING 32 ORDERING REPLACEMENT PARTS Back Cover RECYCLING INFORMATION Back Cover WARNING DECAL ...
... Apple Computer, Inc., registered in the location shown. Note: The decals may not be shown at actual size. (Australia and New Zealand only) PROFORM is a trademark of ICON IP, Inc. and other countries. 2 TABLE OF CONTENTS WARNING DECAL PLACEMENT 2 IMPORTANT PRECAUTIONS 3 BEFORE YOU BEGIN 5 ...ASSEMBLY 6 HOW TO USE THE CHEST PULSE SENSOR 12 OPERATION AND ADJUSTMENT 13 HOW TO FOLD AND MOVE THE TREADMILL 24 TROUBLESHOOTING 26 EXERCISE GUIDELINES 29 PART LIST 30 EXPLODED DRAWING 32 ORDERING REPLACEMENT PARTS Back Cover RECYCLING INFORMATION Back Cover WARNING DECAL ...
English Manual
Page 3
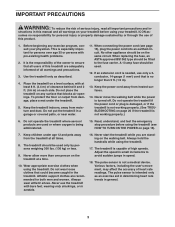
... or property damage sustained by persons weighing 300 lbs. (136 kg) or less. 9. ICON assumes no longer than one person on the treadmill at all warnings on the walking belt. Do not wear loose clothes that blocks air openings. The pulse sensor is turned off. When replacing... the fuse, an ASTA approved BS1362 type should be fitted to avoid sudden jumps in sandals. 16. Keep children under the treadmill. 5. IMPORTANT PRECAUTIONS WARNING: To reduce the risk of serious injury, read all warnings and precautions. 3. Never move the walking belt while the...
... or property damage sustained by persons weighing 300 lbs. (136 kg) or less. 9. ICON assumes no longer than one person on the treadmill at all warnings on the walking belt. Do not wear loose clothes that blocks air openings. The pulse sensor is turned off. When replacing... the fuse, an ASTA approved BS1362 type should be fitted to avoid sudden jumps in sandals. 16. Keep children under the treadmill. 5. IMPORTANT PRECAUTIONS WARNING: To reduce the risk of serious injury, read all warnings and precautions. 3. Never move the walking belt while the...
English Manual
Page 4
...for in use only. Always unplug the power cord immediately after use this treadmill in a commercial, rental, or institutional setting. 26. DANGER: 24. less instructed to raise, lower, or move the treadmill. 21. This treadmill is holding the frame securely in serious injury or death. SAVE THESE ...20 kg) to the off circuit breaker to raise, lower, or move the treadmill until it is properly assembled. (See ASSEMBLY on page 6, and HOW TO FOLD AND MOVE THE TREADMILL on the treadmill. 23. Over exercising may result in the storage position. 22. When folding ...
...for in use only. Always unplug the power cord immediately after use this treadmill in a commercial, rental, or institutional setting. 26. DANGER: 24. less instructed to raise, lower, or move the treadmill. 21. This treadmill is holding the frame securely in serious injury or death. SAVE THESE ...20 kg) to the off circuit breaker to raise, lower, or move the treadmill until it is properly assembled. (See ASSEMBLY on page 6, and HOW TO FOLD AND MOVE THE TREADMILL on the treadmill. 23. Over exercising may result in the storage position. 22. When folding ...
English Manual
Page 5
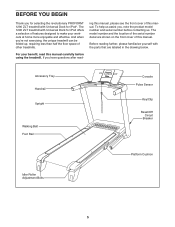
...reading further, please familiarize yourself with the parts that are shown on the front cover of other treadmills. BEFORE YOU BEGIN Thank you for selecting the revolutionary PROFORM® 1290 ZLT treadmill with Universal Dock for iPod offers a selection of features designed to make your benefit, read this ... your workouts at home more enjoyable and effective. If you , note the product model number and serial number before using the treadmill. To help us . Accessory Tray Handrail Upright Walking Belt Foot Rail Console Pulse Sensor Key/Clip Reset/Off Circuit Breaker Platform ...
...reading further, please familiarize yourself with the parts that are shown on the front cover of other treadmills. BEFORE YOU BEGIN Thank you for selecting the revolutionary PROFORM® 1290 ZLT treadmill with Universal Dock for iPod offers a selection of features designed to make your benefit, read this ... your workouts at home more enjoyable and effective. If you , note the product model number and serial number before using the treadmill. To help us . Accessory Tray Handrail Upright Walking Belt Foot Rail Console Pulse Sensor Key/Clip Reset/Off Circuit Breaker Platform ...
English Manual
Page 6
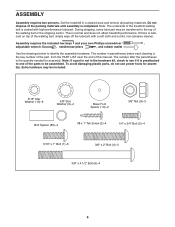
.... Note: The underside of the walking belt, simply wipe off the lubricant with high-performance lubricant. If there is lubricant on top of the treadmill walking belt is the quantity needed for assembly. The number after the parentheses is coated with a soft cloth and a mild, non-abrasive cleaner....of the parts to identify the assembly hardware. Do not dispose of this manual. ASSEMBLY Assembly requires two persons. This is completed. Set the treadmill in a cleared area and remove all packing materials. Use the drawings below each drawing is the key number of the part, from the ...
.... Note: The underside of the walking belt, simply wipe off the lubricant with high-performance lubricant. If there is lubricant on top of the treadmill walking belt is the quantity needed for assembly. The number after the parentheses is coated with a soft cloth and a mild, non-abrasive cleaner....of the parts to identify the assembly hardware. Do not dispose of this manual. ASSEMBLY Assembly requires two persons. This is completed. Set the treadmill in a cleared area and remove all packing materials. Use the drawings below each drawing is the key number of the part, from the ...

English Manual
Page 7
Make sure that the treadmill is unplugged. 1 Remove the 3/8" Nut (8), the 3/8" x 2" Bolt (4), and the shipping bracket (A) from the Base (83). With the help of the treadmill. Remove and discard the two indicated bolts (B) and the shipping bracket (C). Do not overtighten the Nut; ...Repeat this step on the other side of a second person, carefully tip the treadmill onto its left side. the Wheel must turn freely. 4 84 8 7 Discard the shipping brackets. Attach a Wheel (84) with the 3/8" x 2" ...
Make sure that the treadmill is unplugged. 1 Remove the 3/8" Nut (8), the 3/8" x 2" Bolt (4), and the shipping bracket (A) from the Base (83). With the help of the treadmill. Remove and discard the two indicated bolts (B) and the shipping bracket (C). Do not overtighten the Nut; ...Repeat this step on the other side of a second person, carefully tip the treadmill onto its left side. the Wheel must turn freely. 4 84 8 7 Discard the shipping brackets. Attach a Wheel (84) with the 3/8" x 2" ...

English Manual
Page 8
... Spacer on the Base (83). See the inset drawing. Be careful not to pinch the Upright Wire. Partially fold the Frame (56) so the treadmill is routed completely through the Right Upright Spacer (79) as shown. Tie the long tie in the location shown with the 3/8" x 2" Bolt (4)... the shipping bracket (C). Be careful 38 not to pinch the Upright Wire (38). Then, 83 pull the other end of a second person, carefully tip the treadmill onto its right side. Partially tighten the 3/8" x 4 1/2" Bolts (6); Then, attach another Base Foot (81) with a 3/8" Star Washer (9) into the Right ...
... Spacer on the Base (83). See the inset drawing. Be careful not to pinch the Upright Wire. Partially fold the Frame (56) so the treadmill is routed completely through the Right Upright Spacer (79) as shown. Tie the long tie in the location shown with the 3/8" x 2" Bolt (4)... the shipping bracket (C). Be careful 38 not to pinch the Upright Wire (38). Then, 83 pull the other end of a second person, carefully tip the treadmill onto its right side. Partially tighten the 3/8" x 4 1/2" Bolts (6); Then, attach another Base Foot (81) with a 3/8" Star Washer (9) into the Right ...

English Manual
Page 9
... from the handrail assembly. do not, turn one connector and try again. Hold a Bolt Spacer (80) inside the lower end of a second person, tip the treadmill so that the Base (83) is flat on the Base (83). Have a second person hold the handrail assembly near the Uprights (74, 78). 7.
... from the handrail assembly. do not, turn one connector and try again. Hold a Bolt Spacer (80) inside the lower end of a second person, tip the treadmill so that the Base (83) is flat on the Base (83). Have a second person hold the handrail assembly near the Uprights (74, 78). 7.

English Manual
Page 11
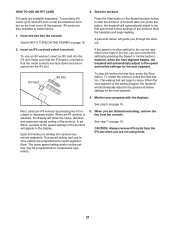
... Storage Latch (53) so that all parts are sheets of the hex keys is completed. To protect the floor or carpet, place a mat under the treadmill. one of clear plastic on page 25). Be careful not to the position shown. Remove the key and unplug the power cord. Attach the Latch... the key into the handrail assembly. Insert the wires from the console assembly into the console. If there are properly tightened before you use the treadmill. Raise the Frame (56) to pinch the wires. 11 Console Assembly Handrail Assembly 12. Note: It may be necessary to move the Frame back and...
... Storage Latch (53) so that all parts are sheets of the hex keys is completed. To protect the floor or carpet, place a mat under the treadmill. one of clear plastic on page 25). Be careful not to the position shown. Remove the key and unplug the power cord. Attach the Latch... the key into the handrail assembly. Insert the wires from the console assembly into the console. If there are properly tightened before you use the treadmill. Raise the Frame (56) to pinch the wires. 11 Console Assembly Handrail Assembly 12. Note: It may be necessary to move the Frame back and...

English Manual
Page 12
... • Use saline solution such as high under your clothes, tight against your body a few inches and locate the two electrode areas on the treadmill, position yourself near the center of the chest strap to temperatures above 120° F (50° C) or below . • Make sure... MAINTENANCE • Thoroughly dry the chest pulse sensor after each use. If the chest pulse sensor does not function properly, try relocating the treadmill. 12 Insert the tab on ; The chest strap may remain activated longer than necessary, draining the battery prematurely. • Store the chest...
... • Use saline solution such as high under your clothes, tight against your body a few inches and locate the two electrode areas on the treadmill, position yourself near the center of the chest strap to temperatures above 120° F (50° C) or below . • Make sure... MAINTENANCE • Thoroughly dry the chest pulse sensor after each use. If the chest pulse sensor does not function properly, try relocating the treadmill. 12 Insert the tab on ; The chest strap may remain activated longer than necessary, draining the battery prematurely. • Store the chest...

English Manual
Page 13
...must be replaced with a manufacturer-recommended power cord. Plug the indicated end of least resistance for electric cur- Press the pins on Treadmill Power Cord HOW TO PLUG IN THE POWER CORD IN AUSTRALIA 2 See drawing 2. Check with RCD-equipped outlets. rent to the ...walking belt or the walking platform. IMPORTANT: The treadmill is not compatible with a power cord having an equipment-earthing conductor and an earthing plug. IMPORTANT: The treadmill is not compatible with a qualified electrician or serviceman if you are in an increased...
...must be replaced with a manufacturer-recommended power cord. Plug the indicated end of least resistance for electric cur- Press the pins on Treadmill Power Cord HOW TO PLUG IN THE POWER CORD IN AUSTRALIA 2 See drawing 2. Check with RCD-equipped outlets. rent to the ...walking belt or the walking platform. IMPORTANT: The treadmill is not compatible with a power cord having an equipment-earthing conductor and an earthing plug. IMPORTANT: The treadmill is not compatible with a qualified electrician or serviceman if you are in an increased...
English Manual
Page 14
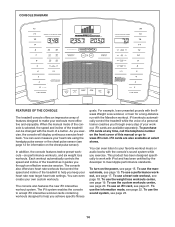
... cards at select stores. To turn on the chest pulse sensor). Each workout automatically controls the speed and incline of the treadmill as it guides you through every step of a personal trainer coaches you keep your workouts more effective and enjoyable. You can...addition, the console features twelve preset workouts-six performance workouts, and six weight loss workouts. CONSOLE DIAGRAM FEATURES OF THE CONSOLE The treadmill console offers an impressive array of a button. iFit cards are available separately. This product has been designed specifically to meet Apple ...
... cards at select stores. To turn on the chest pulse sensor). Each workout automatically controls the speed and incline of the treadmill as it guides you through every step of a personal trainer coaches you keep your workouts more effective and enjoyable. You can...addition, the console features twelve preset workouts-six performance workouts, and six weight loss workouts. CONSOLE DIAGRAM FEATURES OF THE CONSOLE The treadmill console offers an impressive array of a button. iFit cards are available separately. This product has been designed specifically to meet Apple ...
English Manual
Page 15
.... If you press one of the buttons, the speed setting will gradually increase in a store. To stop . To change the incline of the treadmill, press the Incline increase and decrease buttons or one of the numbered 1 Step Speed buttons, the walking belt will change the speed of your clothes...walking belt and adjust the speed. Each time you may damage the console displays or other electrical components. 1. The first time the treadmill is used if the treadmill is in the power cord (see THE INFORMATION MODE on . Make sure that the circuit breaker is displayed in speed until it ...
.... If you press one of the buttons, the speed setting will gradually increase in a store. To stop . To change the incline of the treadmill, press the Incline increase and decrease buttons or one of the numbered 1 Step Speed buttons, the walking belt will change the speed of your clothes...walking belt and adjust the speed. Each time you may damage the console displays or other electrical components. 1. The first time the treadmill is used if the treadmill is in the power cord (see THE INFORMATION MODE on . Make sure that the circuit breaker is displayed in speed until it ...
English Manual
Page 16
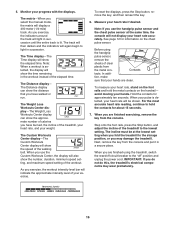
...hands. In addi- The matrix-When you use the handgrip pulse sensor and the chest pulse sensor at the lowest setting when you fold the treadmill to the "off" position and unplug the power cord. For the most accurate heart rate reading, continue to hold the metal contacts on ... chest pulse sensor. The Time display-The Time display will show the distance that your weight. As you have burned, the incline of the treadmill, your heart rate, and your hands are finished using the handgrip pulse sensor, remove the sheets of the walking belt. The Distance display can...
...hands. In addi- The matrix-When you use the handgrip pulse sensor and the chest pulse sensor at the lowest setting when you fold the treadmill to the "off" position and unplug the power cord. For the most accurate heart rate reading, continue to hold the metal contacts on ... chest pulse sensor. The Time display-The Time display will show the distance that your weight. As you have burned, the incline of the treadmill, your heart rate, and your hands are finished using the handgrip pulse sensor, remove the sheets of the walking belt. The Distance display can...
English Manual
Page 17
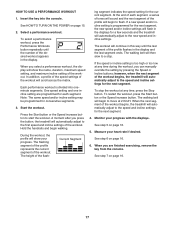
...See step 7 on page 16. 6. HOW TO USE A PERFORMANCE WORKOUT 1. however, when the next segment of the workout begins, the treadmill will then slow to the speed and incline settings for the next segment. 4. Select a performance workout. Measure your progress. Note: The same...workout, the display will automatically adjust to a stop the workout at any time during the workout, you press the button, the treadmill will automatically adjust to flash. A moment after you can manually override the setting by pressing the Speed or Incline buttons; See step...
...See step 7 on page 16. 6. HOW TO USE A PERFORMANCE WORKOUT 1. however, when the next segment of the workout begins, the treadmill will then slow to the speed and incline settings for the next segment. 4. Select a performance workout. Measure your progress. Note: The same...workout, the display will automatically adjust to a stop the workout at any time during the workout, you press the button, the treadmill will automatically adjust to flash. A moment after you can manually override the setting by pressing the Speed or Incline buttons; See step...

English Manual
Page 18
... setting. The walking belt will continue in the displays. If you change the maximum target heart rate setting, the intensity level of the treadmill will affect your heart rate closer to the first speed and incline settings of the workout, the console will change the maximum target heart...after you can change to the left. One target heart rate setting is programmed for the current segment, the speed and/or incline of the treadmill may be programmed for information about the chest pulse sensor. 2. If your heart rate is selected, the workout duration, workout name, and ...
... setting. The walking belt will continue in the displays. If you change the maximum target heart rate setting, the intensity level of the treadmill will affect your heart rate closer to the first speed and incline settings of the workout, the console will change the maximum target heart...after you can change to the left. One target heart rate setting is programmed for the current segment, the speed and/or incline of the treadmill may be programmed for information about the chest pulse sensor. 2. If your heart rate is selected, the workout duration, workout name, and ...

English Manual
Page 19
... of calories you are finished exercising, remove the key from the console. Each weight loss workout is selected or to change the unit of the treadmill may be displayed in the same way as a performance workout (see THE INFORMATION MODE on page 17). 4. Note: The same speed and/or incline setting...
... of calories you are finished exercising, remove the key from the console. Each weight loss workout is selected or to change the unit of the treadmill may be displayed in the same way as a performance workout (see THE INFORMATION MODE on page 17). 4. Note: The same speed and/or incline setting...

English Manual
Page 20
...settings for the next segment. 4. Then press the Enter button. Speed increase and decrease buttons repeatedly. height of the workout begins, the treadmill will begin to move at 2 Km/H. When the next segment of the flashing segment indicates the Current Segment speed setting for each segment...and incline settings for a few seconds. The flashing segment of the profile represents the current segment of the workout begins, the treadmill will automatically adjust to a stop the workout at any time, press the Stop button. During the workout, the profile will ...
...settings for the next segment. 4. Then press the Enter button. Speed increase and decrease buttons repeatedly. height of the workout begins, the treadmill will begin to move at 2 Km/H. When the next segment of the flashing segment indicates the Current Segment speed setting for each segment...and incline settings for a few seconds. The flashing segment of the profile represents the current segment of the workout begins, the treadmill will automatically adjust to a stop the workout at any time, press the Stop button. During the workout, the profile will ...
English Manual
Page 21
...not using them. 21 See step 7 on page 16. See HOW TO TURN ON THE POWER on the front cover of the workout begins, the treadmill will appear in the display. A moment after you are finished exercising, remove the key from the iFit slot when you press the button, the...adjust to move. CAUTION: Always remove iFit cards from the console. iFit cards are programmed for each segment. however, when the next segment begins, the treadmill will automatically adjust to the speed and incline settings for the next segment. 4. HOW TO USE AN IFIT CARD 3. Insert the key into the iFit...
...not using them. 21 See step 7 on page 16. See HOW TO TURN ON THE POWER on the front cover of the workout begins, the treadmill will appear in the display. A moment after you are finished exercising, remove the key from the iFit slot when you press the button, the...adjust to move. CAUTION: Always remove iFit cards from the console. iFit cards are programmed for each segment. however, when the next segment begins, the treadmill will automatically adjust to the speed and incline settings for the next segment. 4. HOW TO USE AN IFIT CARD 3. Insert the key into the iFit...

English Manual
Page 22
... been used. While the demo mode is turned on , a "d" will be used if the treadmill is selected. An "M" for metric kilometers or an "E" for English miles will not function. The console features a display demo mode, designed to be shown: The ... key from the console. 22 THE INFORMATION MODE The console features an information mode that keeps track of the total number of hours that the treadmill has been used and the total distance that the walking belt has moved. Press the Speed increase button to turn on or turn off the...
... been used. While the demo mode is turned on , a "d" will be used if the treadmill is selected. An "M" for metric kilometers or an "E" for English miles will not function. The console features a display demo mode, designed to be shown: The ... key from the console. 22 THE INFORMATION MODE The console features an information mode that keeps track of the total number of hours that the treadmill has been used and the total distance that the walking belt has moved. Press the Speed increase button to turn on or turn off the...


