
User Manual
Page 1
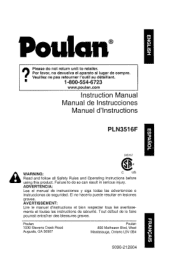
... Instruction Manual Manual de Instrucciones Manuel d'Instructions PLN3516F rn Ch 13 > Z.1 O r- 245157 a WARNING: C US A Read and follow all Safety Rules and Operating Instructions before using this product. Poulan® 9 Please do so can result in serious injury. PouIan 1030 Stevens Creek Road Augusta, GA 30907 Pou(an 850 Matheson Blvd, West Mississauga, Ontario L5V 0B4 9096-212604 ments et toutes...
... Instruction Manual Manual de Instrucciones Manuel d'Instructions PLN3516F rn Ch 13 > Z.1 O r- 245157 a WARNING: C US A Read and follow all Safety Rules and Operating Instructions before using this product. Poulan® 9 Please do so can result in serious injury. PouIan 1030 Stevens Creek Road Augusta, GA 30907 Pou(an 850 Matheson Blvd, West Mississauga, Ontario L5V 0B4 9096-212604 ments et toutes...
User Manual
Page 2
... Adjustment 3-5. Felling 5-2. General Identification 1-2. Important Safety Instructions 2-3. International Symbols 3 ASSEMBLY INSTRUCTIONS 9 3-1. To Stop Saw 4-3. Preventive maintenance 7-2. Selecting the Proper Extension Cord for chain saw users 2-5. Chain and Bar Lubrication 4-4. Limbing 5-3. Bucking 5-4. Chain Replacement Information 8 LIMITED WARRANTY 18 2 Guide Bar / Saw Chain Installation 3-4. Filling Oil Tank 3-6. Extension Cords 5 GENERAL CUTTING INSTRUCTIONS 13 5-1. Bucking Using a Sawhorse 6 BAR / CHAIN MAINTENANCE 15 6-1. To Start...
... Adjustment 3-5. Felling 5-2. General Identification 1-2. Important Safety Instructions 2-3. International Symbols 3 ASSEMBLY INSTRUCTIONS 9 3-1. To Stop Saw 4-3. Preventive maintenance 7-2. Selecting the Proper Extension Cord for chain saw users 2-5. Chain and Bar Lubrication 4-4. Limbing 5-3. Bucking 5-4. Chain Replacement Information 8 LIMITED WARRANTY 18 2 Guide Bar / Saw Chain Installation 3-4. Filling Oil Tank 3-6. Extension Cords 5 GENERAL CUTTING INSTRUCTIONS 13 5-1. Bucking Using a Sawhorse 6 BAR / CHAIN MAINTENANCE 15 6-1. To Start...
User Manual
Page 3
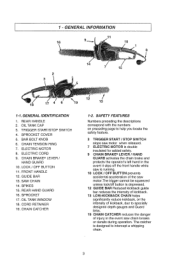
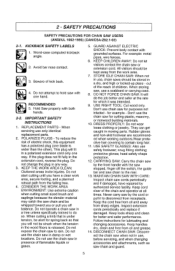
1- TRIGGER START/STOP SWITCH 4. CHAIN BRAKEvo LEVER / HAND GUARD 10. GUIDE BAR 13. SPIKES 15. CHAIN TENSION RING 7. ELECTRIC CORD 9. REAR HAND GUARD 16. CHAIN CATCHER 1-2. SPROCKET COVER 5. SAW CHAIN 14. GENERAL INFORMATION 11 16 10 14 15 2 18 17 12 19 13 1-1. SPROCKET 17. CORD RETAINER 19. BAR BOLT KNOB 6. The catcher is depressed. 12 GUIDE BAR Reduced kickback guide bar reduces the intensity of kickback. 13 LOW-KICKBACK CHAIN helps significantly reduce kickback, or the intensity...
1- TRIGGER START/STOP SWITCH 4. CHAIN BRAKEvo LEVER / HAND GUARD 10. GUIDE BAR 13. SPIKES 15. CHAIN TENSION RING 7. ELECTRIC CORD 9. REAR HAND GUARD 16. CHAIN CATCHER 1-2. SPROCKET COVER 5. SAW CHAIN 14. GENERAL INFORMATION 11 16 10 14 15 2 18 17 12 19 13 1-1. SPROCKET 17. CORD RETAINER 19. BAR BOLT KNOB 6. The catcher is depressed. 12 GUIDE BAR Reduced kickback guide bar reduces the intensity of kickback. 13 LOW-KICKBACK CHAIN helps significantly reduce kickback, or the intensity...
User Manual
Page 4
... Load Speed Bar Length Cutting Speed Chain Oil Capacity Net Weight (Without guide bar and chain) 4 PLN3516F 120V-, 60Hz, 13.5 Amp 3.5HP 5500/min 16" (40cm) 10.5 m/sec 180m1 4.2 kg (9.24 Lbs) SAW CHAIN - A movable stop the chain saw chain and guide bar. 4. A solid railed structure that is driven by the motor and is supported by the guide bar. 21. A notch cut the wood, and that supports and guides the saw and maintain position while sawing. 22. The support handle located...
... Load Speed Bar Length Cutting Speed Chain Oil Capacity Net Weight (Without guide bar and chain) 4 PLN3516F 120V-, 60Hz, 13.5 Amp 3.5HP 5500/min 16" (40cm) 10.5 m/sec 180m1 4.2 kg (9.24 Lbs) SAW CHAIN - A movable stop the chain saw chain and guide bar. 4. A solid railed structure that is driven by the motor and is supported by the guide bar. 21. A notch cut the wood, and that supports and guides the saw and maintain position while sawing. 22. The support handle located...
User Manual
Page 5
.... 7. REPLACEMENT PARTS - When servicing use safety footwear; KEEP THE WORK AREA CLEAN: Cluttered areas invite injuries. Do not use the chain saw in use a scabbard or carrying case. 8. When storing saw for cutting plastic, masonry, or nonwood building materials. 10. They can get caught in any way. 3. Keep the cord free from oil and away from oil and grease. 14. Avoid bar nose contact. 3. Do not start cutting until...
.... 7. REPLACEMENT PARTS - When servicing use safety footwear; KEEP THE WORK AREA CLEAN: Cluttered areas invite injuries. Do not use the chain saw in use a scabbard or carrying case. 8. When storing saw for cutting plastic, masonry, or nonwood building materials. 10. They can get caught in any way. 3. Keep the cord free from oil and away from oil and grease. 14. Avoid bar nose contact. 3. Do not start cutting until...
User Manual
Page 6
... use . POWER SUPPLY: Connect the chain saw chain stops moving parts, breakage of the body away from one hand! Be sure that the saw to lose control of the saw chain along the top of the tool. 2-3. EXAMINE THE ELECTRICAL SWITCHES. C. DO NOT operate a chain saw handles. Keep the handles dry, clean, and free of the guide bar touches an object, or when the wood closes in and pinches the saw , a guard or other replacement...
... use . POWER SUPPLY: Connect the chain saw chain stops moving parts, breakage of the body away from one hand! Be sure that the saw to lose control of the saw chain along the top of the tool. 2-3. EXAMINE THE ELECTRICAL SWITCHES. C. DO NOT operate a chain saw handles. Keep the handles dry, clean, and free of the guide bar touches an object, or when the wood closes in and pinches the saw , a guard or other replacement...
User Manual
Page 7
... the nose of the guide bar that is in the user manual safety and maintenance instructions, should be worn. 3. 14. An explosion and/or fire may be whipped toward you. 15. All chain saw is a major safety feature. The CHAIN BRAKE®/ Hand Guard is intended for such general applications such as clearing, pruning, cutting firewood, etc. This electric powered saw service, other persons or animals...
... the nose of the guide bar that is in the user manual safety and maintenance instructions, should be worn. 3. 14. An explosion and/or fire may be whipped toward you. 15. All chain saw is a major safety feature. The CHAIN BRAKE®/ Hand Guard is intended for such general applications such as clearing, pruning, cutting firewood, etc. This electric powered saw service, other persons or animals...
User Manual
Page 8
... when operating the chain saw. When servicing use can cause serious or even fatal injury. • Read and understand the instruction manual before using the chain saw can be other replacement components for achieving Kickback protection. Hearing protection should be worn. 8 PINCHING the saw chain along the TOP of the guide bar may PUSH the guide bar rapidly back toward the operator. Replace damaged cord immediately. 781 Contact of the guide bar...
... when operating the chain saw. When servicing use can cause serious or even fatal injury. • Read and understand the instruction manual before using the chain saw can be other replacement components for achieving Kickback protection. Hearing protection should be worn. 8 PINCHING the saw chain along the TOP of the guide bar may PUSH the guide bar rapidly back toward the operator. Replace damaged cord immediately. 781 Contact of the guide bar...
User Manual
Page 9
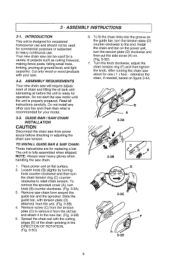
... (D) counter-clockwise to the end. B 3-3B 3-3C 3-3D 9 Cut only wood or wood products with lubricating oil before checking or adjusting the chain saw motor until the unit is fully assembled when shipped. ASSEMBLY REQUIREMENTS Your new chain saw can be used for replacing a bar. Install the chain and bar on the power unit, turn knob (B) counter-clockwise. (Fig. 3-3A) 3. 3 - ASSEMBLY INSTRUCTIONS 3-1. To remove the sprocket cover (A), turn the tension plate (D) clockwise and then put the...
... (D) counter-clockwise to the end. B 3-3B 3-3C 3-3D 9 Cut only wood or wood products with lubricating oil before checking or adjusting the chain saw motor until the unit is fully assembled when shipped. ASSEMBLY REQUIREMENTS Your new chain saw can be used for replacing a bar. Install the chain and bar on the power unit, turn knob (B) counter-clockwise. (Fig. 3-3A) 3. 3 - ASSEMBLY INSTRUCTIONS 3-1. To remove the sprocket cover (A), turn the tension plate (D) clockwise and then put the...
User Manual
Page 10
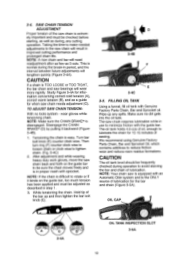
... of the saw chain needs adjustment (C). FILLING OIL TANK Using a funnel, fill oil tank with the guide bar. Wipe up and then tighten the bar bolt knob (E). 3-4B 3-4C 3-5. Make sure no tools system - CAUTION The oil tank level should be adjusted as during, any spills. SAW CHAIN TENSION ADJUSTMENT Proper tension of the bar up any cutting operation. Turn bar bolt knob (E) counter clock wise. This is TOO LOOSE or TOO TIGHT, the bar chain and saw bearings will need readjustment after...
... of the saw chain needs adjustment (C). FILLING OIL TANK Using a funnel, fill oil tank with the guide bar. Wipe up and then tighten the bar bolt knob (E). 3-4B 3-4C 3-5. Make sure no tools system - CAUTION The oil tank level should be adjusted as during, any spills. SAW CHAIN TENSION ADJUSTMENT Proper tension of the bar up any cutting operation. Turn bar bolt knob (E) counter clock wise. This is TOO LOOSE or TOO TIGHT, the bar chain and saw bearings will need readjustment after...
User Manual
Page 11
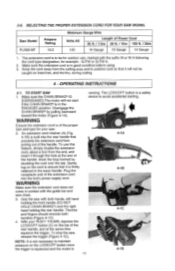
... the cutting area and to position cord so that it is not necessary to be caught on the LOCK/OFF button once the trigger is squeezed and the motor is running. Disengage the CHAIN BRAKE® by doubling the cord over the tab. OPERATING INSTRUCTIONS 4-1. With your saw. 2. TO START SAW 1. Plug the receptacle end of the handle, To use , marked with the suffix W or W-A following the cord type designation...
... the cutting area and to position cord so that it is not necessary to be caught on the LOCK/OFF button once the trigger is squeezed and the motor is running. Disengage the CHAIN BRAKE® by doubling the cord over the tab. OPERATING INSTRUCTIONS 4-1. With your saw. 2. TO START SAW 1. Plug the receptacle end of the handle, To use , marked with the suffix W or W-A following the cord type designation...
User Manual
Page 12
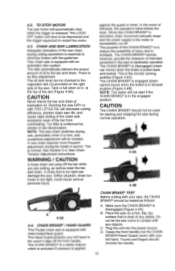
... applied CHAIN BRAKE® TEST Before cutting with your left hand. The oil tank level can jump off . A chain that is the normal running position (Figure 4-4A). CAUTION The CHAIN BRAKE® should encircle the handle. 12 B. The LOCK/ OFF button will be depressed and the trigger squeezed to the bar and chain. CAUTION Never starve the bar and chain of oil to restart the motor. 4.3. A new chain requires more frequent adjustment during use...
... applied CHAIN BRAKE® TEST Before cutting with your left hand. The oil tank level can jump off . A chain that is the normal running position (Figure 4-4A). CAUTION The CHAIN BRAKE® should encircle the handle. 12 B. The LOCK/ OFF button will be depressed and the trigger squeezed to the bar and chain. CAUTION Never starve the bar and chain of oil to restart the motor. 4.3. A new chain requires more frequent adjustment during use...
User Manual
Page 13
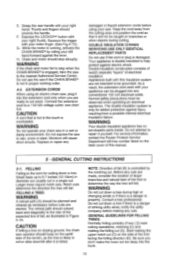
... no serviceable parts inside. CAUTION If felling a tree on sloping ground, the chain saw in proper working order. 4-5. Be sure you are started. WARNING Do not operate your saw to rain, snow or sleet. GENERAL CUTTING INSTRUCTIONS 5-1. Consult a tree professional. Appliances built with your right thumb. Do not attempt to a 110/120 voltage outlet. For service information, contact the Poulan Product Service Department toll-free number listed...
... no serviceable parts inside. CAUTION If felling a tree on sloping ground, the chain saw in proper working order. 4-5. Be sure you are started. WARNING Do not operate your saw to rain, snow or sleet. GENERAL CUTTING INSTRUCTIONS 5-1. Consult a tree professional. Appliances built with your right thumb. Do not attempt to a 110/120 voltage outlet. For service information, contact the Poulan Product Service Department toll-free number listed...

User Manual
Page 14
... cut if you must cut in the cut into lengths. Branches under tension should be cut from pinching the bar and chain. WARNING Never cut halfway through the trunk. Never saw . Use wooden or plastic wedges (G) to avoid binding the chain saw completely through the log and then make 2 cuts as this causes rapid dulling of wood being cut through, control over . Do not remove supporting...
... cut if you must cut in the cut into lengths. Branches under tension should be cut from pinching the bar and chain. WARNING Never cut halfway through the trunk. Never saw . Use wooden or plastic wedges (G) to avoid binding the chain saw completely through the log and then make 2 cuts as this causes rapid dulling of wood being cut through, control over . Do not remove supporting...
User Manual
Page 15
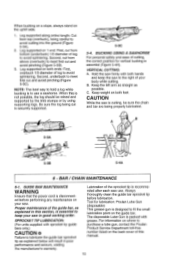
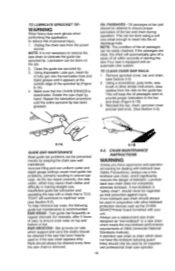
.... NOTE: The best way to use . GUIDE BAR MAINTENANCE WARNING Ensure that the power cord is to hold a log while bucking is disconnected before lubrication. Keep weight on the back cover of log to keep the saw firmly with grease. When this manual. 15 Lubrication of log to avoid cutting into the ground (Figure 5-3A). 2. Log supported on the uphill side. 1. When...
.... NOTE: The best way to use . GUIDE BAR MAINTENANCE WARNING Ensure that the power cord is to hold a log while bucking is disconnected before lubrication. Keep weight on the back cover of log to keep the saw firmly with grease. When this manual. 15 Lubrication of log to avoid cutting into the ground (Figure 5-3A). 2. Log supported on the uphill side. 1. When...
User Manual
Page 16
... filing and non-uniform cutter and depth gauge settings cause most guide bar problems, primarily resulting in making straight cuts. Turn guide bar frequently at bar pad should be done on the job. 2. A low-kickback saw chain appears dirty. Rotate the saw chain by keeping the chain saw well maintained. Bar grooves (or rails which support and carry the chain) should be cleaned if the saw has been heavily used or if the saw chain...
... filing and non-uniform cutter and depth gauge settings cause most guide bar problems, primarily resulting in making straight cuts. Turn guide bar frequently at bar pad should be done on the job. 2. A low-kickback saw chain appears dirty. Rotate the saw chain by keeping the chain saw well maintained. Bar grooves (or rails which support and carry the chain) should be cleaned if the saw has been heavily used or if the saw chain...
User Manual
Page 17
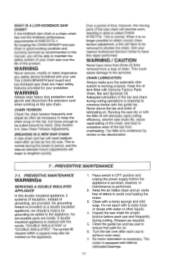
.... 1. BREAKINGIN A NEW SAW CHAIN A new chain and bar will need readjustment after each use to the appliance. When it is normal during cutting operations is called CHAIN STRETCH. Keep the air intake clean and air vents free of the bar from a loop of lubricating oil. This is no longer possible to obtain correct chain tension adjustment, a link will begin to excessive wear of debris to shorten the chain. Running the saw chain in...
.... 1. BREAKINGIN A NEW SAW CHAIN A new chain and bar will need readjustment after each use to the appliance. When it is normal during cutting operations is called CHAIN STRETCH. Keep the air intake clean and air vents free of the bar from a loop of lubricating oil. This is no longer possible to obtain correct chain tension adjustment, a link will begin to excessive wear of debris to shorten the chain. Running the saw chain in...
User Manual
Page 18
.... Check the power supply for service information. CHAIN REPLACEMENT INFORMATION Drive Links 55 OL Bar P/N Length 966-051301 16" P/N 966-051603 Chain Length Gauge 16" 0.05 Pitch 3/8" There may return it still does not operate, contact the Poulan Product Service Department, through the tollfree number listed on the back cover of accessories and/or attachments not specifically recommended by improper handling, improper maintenance or alteration, or the use during the warranty...
.... Check the power supply for service information. CHAIN REPLACEMENT INFORMATION Drive Links 55 OL Bar P/N Length 966-051301 16" P/N 966-051603 Chain Length Gauge 16" 0.05 Pitch 3/8" There may return it still does not operate, contact the Poulan Product Service Department, through the tollfree number listed on the back cover of accessories and/or attachments not specifically recommended by improper handling, improper maintenance or alteration, or the use during the warranty...
Parts List
Page 1
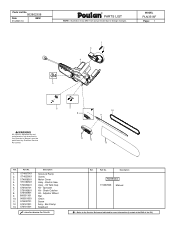
MODEL PLN3516F Page: 1 1 3 2 4 5 WARNING All repairs, adjustments and maintenance not described in the Operator's Manual must be performed by Qualified Service Personnel. 6 7 8 10 9 11 12 13 Ref. Oil Tank Cap Kit - Bar Clamp Scabbard = New Part Number For This IPL Ref. Part No. Sprocket Kit - Part No. 1. 574607901 2. 574623801 3. 574608001 4. 576180501 5. 574630401 6. 576180701 7. 576180801 8. 576180901 9. 966051301 10. 966051603 11. 574630701 12. 576181301 13. 576181501 Description Screw (2 Pack) Screw Motor Cover Assy - Electric Saw Assy - Description ...
MODEL PLN3516F Page: 1 1 3 2 4 5 WARNING All repairs, adjustments and maintenance not described in the Operator's Manual must be performed by Qualified Service Personnel. 6 7 8 10 9 11 12 13 Ref. Oil Tank Cap Kit - Bar Clamp Scabbard = New Part Number For This IPL Ref. Part No. Sprocket Kit - Part No. 1. 574607901 2. 574623801 3. 574608001 4. 576180501 5. 574630401 6. 576180701 7. 576180801 8. 576180901 9. 966051301 10. 966051603 11. 574630701 12. 576181301 13. 576181501 Description Screw (2 Pack) Screw Motor Cover Assy - Electric Saw Assy - Description ...


