User Manual
Page 3
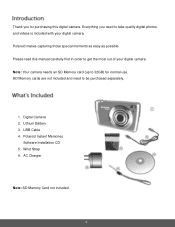
...are not included and need to take quality digital photos and videos is included with your digital camera. AC Charger Note: SD Memory Card not included. 2 Note: Your camera needs an SD Memory card (up to 32GB) for purchasing this manual carefully first in ...order to get the most out of your digital camera. Everything you for normal use. Digital Camera 2. Wrist Strap 6. Lithium Battery 3. USB Cable 4. Polaroid Instant Memories Software Installation CD 5. Polaroid makes capturing those special moments as easy as possible. Please read this digital...
...are not included and need to take quality digital photos and videos is included with your digital camera. AC Charger Note: SD Memory Card not included. 2 Note: Your camera needs an SD Memory card (up to 32GB) for purchasing this manual carefully first in ...order to get the most out of your digital camera. Everything you for normal use. Digital Camera 2. Wrist Strap 6. Lithium Battery 3. USB Cable 4. Polaroid Instant Memories Software Installation CD 5. Polaroid makes capturing those special moments as easy as possible. Please read this digital...
User Manual
Page 5
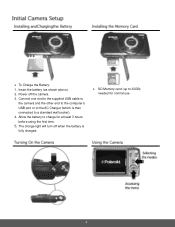
Connect one end to the supplied USB cable to the camera and the other end to the computer's USB port or to the AC Charger (which is fully charged. SD Memory card (up to 32GB) needed for at least 3 hours before using the first time. 5. Allow the battery to a standard wall socket). 4. To Charge the Battery: 1. The charge light will turn off the camera. 3. Power off when the battery is then connected to charge for normal use. 4 Insert the battery (as shown above). 2.
Connect one end to the supplied USB cable to the camera and the other end to the computer's USB port or to the AC Charger (which is fully charged. SD Memory card (up to 32GB) needed for at least 3 hours before using the first time. 5. Allow the battery to a standard wall socket). 4. To Charge the Battery: 1. The charge light will turn off the camera. 3. Power off when the battery is then connected to charge for normal use. 4 Insert the battery (as shown above). 2.
User Manual
Page 6
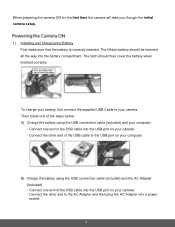
...is correctly inserted. The lithium battery should then cover the battery when inserted correctly. B) Charge the battery using the USB connection cable (included) and your camera. - The latch should be inserted all the way into a power socket. 5 Then follow one of the USB cable into the USB port on ...your battery, first connect the supplied USB Cable to the AC Adapter and then plug the AC Adapter into the battery compartment. To charge your camera. - Connect one end of the USB cable to the USB port on your computer: - Connect one end of the steps below: A) Charge the...
...is correctly inserted. The lithium battery should then cover the battery when inserted correctly. B) Charge the battery using the USB connection cable (included) and your camera. - The latch should be inserted all the way into a power socket. 5 Then follow one of the USB cable into the USB port on ...your battery, first connect the supplied USB Cable to the AC Adapter and then plug the AC Adapter into the battery compartment. To charge your camera. - Connect one end of the USB cable to the USB port on your computer: - Connect one end of the steps below: A) Charge the...
User Manual
Page 7
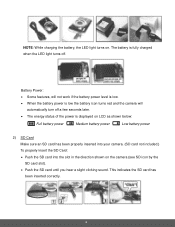
...card has been inserted correctly. 6 NOTE: While charging the battery, the LED light turns on the camera (see SD icon by the SD card slot). Push the SD card until you hear ...a few seconds later. The energy status of the power is low the battery icon turns red and the camera will automatically turn off . Battery Power: Some features, will not work if the battery power level is ...power Low battery power 2) SD Card Make sure an SD card has been properly inserted into your camera. (SD card not included.) To properly insert the SD Card: Push the SD card into the ...
...card has been inserted correctly. 6 NOTE: While charging the battery, the LED light turns on the camera (see SD icon by the SD card slot). Push the SD card until you hear ...a few seconds later. The energy status of the power is low the battery icon turns red and the camera will automatically turn off . Battery Power: Some features, will not work if the battery power level is ...power Low battery power 2) SD Card Make sure an SD card has been properly inserted into your camera. (SD card not included.) To properly insert the SD Card: Push the SD card into the ...
User Manual
Page 8
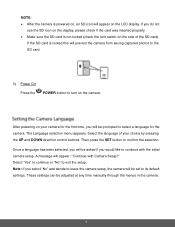
...selection. These settings can be set to select a language for the first time, you would like to continue with Camera Setup?" After powering on the side of your camera for the camera. The Language selection menu appears. Then press the SET button to exit the setup. Note: If you do ... saving captured photos to the SD card. 3) Power On Press the POWER button to leave the camera setup, the camera will appear: "Continue with the initial camera setup. If you select "No" and decide to turn on the LCD display. Select the language of the SD card). A message will ...
...selection. These settings can be set to select a language for the first time, you would like to continue with Camera Setup?" After powering on the side of your camera for the camera. The Language selection menu appears. Then press the SET button to exit the setup. Note: If you do ... saving captured photos to the SD card. 3) Power On Press the POWER button to leave the camera setup, the camera will appear: "Continue with the initial camera setup. If you select "No" and decide to turn on the LCD display. Select the language of the SD card). A message will ...
User Manual
Page 9
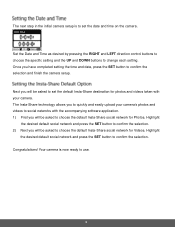
...the SET button to confirm the selection. Highlight the desired default social network and press the SET button to confirm the selection and finish the camera setup. Highlight the desired default social network and press the SET button to confirm the selection. 2) Next you will be asked to set ...the date and time on the camera. Next you will be asked to choose the default Insta-Share social network for Photos. Congratulations! The Insta-Share technology allows you to quickly ...
...the SET button to confirm the selection. Highlight the desired default social network and press the SET button to confirm the selection and finish the camera setup. Highlight the desired default social network and press the SET button to confirm the selection. 2) Next you will be asked to set ...the date and time on the camera. Next you will be asked to choose the default Insta-Share social network for Photos. Congratulations! The Insta-Share technology allows you to quickly ...
User Manual
Page 10
... the SET button while in the Video Capture mode. Use this mode to capture videos with your digital camera. To take a picture, aim your camera, press the MODE button twice to your camera as desired. The video will be automatically saved to open the Video Capture mode. Use this mode to...button. The picture will be automatically saved to start the record. To stop the record, press the Shutter button again. After turning on your camera's memory card. You can scroll through the photos and videos that you've previously taken to view, edit or delete them as desired and ...
... the SET button while in the Video Capture mode. Use this mode to capture videos with your digital camera. To take a picture, aim your camera, press the MODE button twice to your camera as desired. The video will be automatically saved to open the Video Capture mode. Use this mode to...button. The picture will be automatically saved to start the record. To stop the record, press the Shutter button again. After turning on your camera's memory card. You can scroll through the photos and videos that you've previously taken to view, edit or delete them as desired and ...
User Manual
Page 13
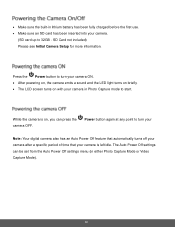
...left idle. The Auto Power Off settings can press the camera OFF. Press the Power button to turn your Note: Your digital camera also has an Auto Power Off feature that automatically turns off your camera after a specific period of time that your camera in Photo Capture mode to 32GB - SD Card not ...included) Please see Initial Camera Setup for more information. Power button again at any point to turn your camera ON. After powering on, the camera emits a sound and the LED light turns on briefly. The LCD screen turns on , you can ...
...left idle. The Auto Power Off settings can press the camera OFF. Press the Power button to turn your Note: Your digital camera also has an Auto Power Off feature that automatically turns off your camera after a specific period of time that your camera in Photo Capture mode to 32GB - SD Card not ...included) Please see Initial Camera Setup for more information. Power button again at any point to turn your camera ON. After powering on, the camera emits a sound and the LED light turns on briefly. The LCD screen turns on , you can ...
User Manual
Page 14
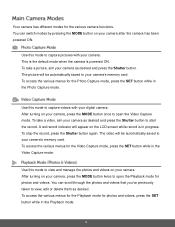
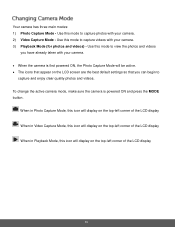
... Video Capture Mode, this icon will be active. The icons that you have already taken with your camera. 3) Playback Mode (for photos and videos) - To change the active camera mode, make sure the camera is first powered ON, the Photo Capture Mode will display on the top-left corner of the LCD... capture and enjoy clear quality photos and videos. Use this mode to view the photos and videos you can begin to capture videos with your camera. 2) Video Capture Mode - Your camera has three main modes: 1) Photo Capture Mode - Use this mode to capture photos with your...
... Video Capture Mode, this icon will be active. The icons that you have already taken with your camera. 3) Playback Mode (for photos and videos) - To change the active camera mode, make sure the camera is first powered ON, the Photo Capture Mode will display on the top-left corner of the LCD... capture and enjoy clear quality photos and videos. Use this mode to view the photos and videos you can begin to capture videos with your camera. 2) Video Capture Mode - Your camera has three main modes: 1) Photo Capture Mode - Use this mode to capture photos with your...
User Manual
Page 15
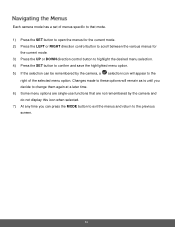
Each camera mode has a set of the selected menu option. Changes made to these options will remain as is until you decide to change them again at a ... selection can press the MODE button to exit the menus and return to the right of menus specific to that are not remembered by the camera and do not display this icon when selected. 7) At any time you can be remembered by the...
Each camera mode has a set of the selected menu option. Changes made to these options will remain as is until you decide to change them again at a ... selection can press the MODE button to exit the menus and return to the right of menus specific to that are not remembered by the camera and do not display this icon when selected. 7) At any time you can be remembered by the...
User Manual
Page 16
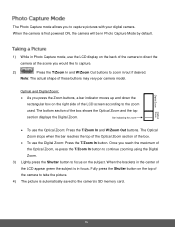
...Press the T/Zoom In button. Fully press the Shutter button on the subject. When the camera is first powered ON, the camera will be in Photo Capture Mode by default. 1) While in Photo Capture mode, use ... rectangular box on the right side of the LCD screen according to focus on the top of the camera to take the picture. 4) The picture is in /out if desired. Note: The actual shape of...the subject is automatically saved to zoom in focus. Once you to capture pictures with your digital camera. Optical Digital Zoom Zoom The Photo Capture mode allows you reach the maximum of the Optical Zoom...
...Press the T/Zoom In button. Fully press the Shutter button on the subject. When the camera is first powered ON, the camera will be in Photo Capture Mode by default. 1) While in Photo Capture mode, use ... rectangular box on the right side of the LCD screen according to focus on the top of the camera to take the picture. 4) The picture is in /out if desired. Note: The actual shape of...the subject is automatically saved to zoom in focus. Once you to capture pictures with your digital camera. Optical Digital Zoom Zoom The Photo Capture mode allows you reach the maximum of the Optical Zoom...

User Manual
Page 17
... - Opens the Scene menu Flash Options - Opens the 'Delete This Photo' option and allows you to redisplay the icons on the screen. 16 Your digital camera has a four-directional pad that functions as desired. 1) Hold the MODE button for 2 seconds to hide the display of the icons on the screen. 2) Press...
... - Opens the Scene menu Flash Options - Opens the 'Delete This Photo' option and allows you to redisplay the icons on the screen. 16 Your digital camera has a four-directional pad that functions as desired. 1) Hold the MODE button for 2 seconds to hide the display of the icons on the screen. 2) Press...
User Manual
Page 18
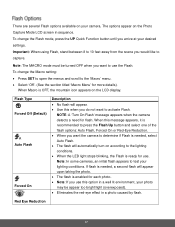
... on the Photo Capture Mode LCD screen in a well lit environment, your lighting conditions. When Macro is enabled for use the Flash. Note: In some cameras, an initial flash appears to the 'Macro' menu. Select 'Off'. (See the section titled 'Macro Menu' for flash. To change the Flash ...61623; Use this message appears, it is needed , a second flash will automatically turn on according to activate Flash. When this when you want the camera to determine if Flash is recommended to press the Flash/Up button and select one of the flash options: Auto Flash, Forced On or Red...
... on the Photo Capture Mode LCD screen in a well lit environment, your lighting conditions. When Macro is enabled for use the Flash. Note: In some cameras, an initial flash appears to the 'Macro' menu. Select 'Off'. (See the section titled 'Macro Menu' for flash. To change the Flash ...61623; Use this message appears, it is needed , a second flash will automatically turn on according to activate Flash. When this when you want the camera to determine if Flash is recommended to press the Flash/Up button and select one of the flash options: Auto Flash, Forced On or Red...
User Manual
Page 19
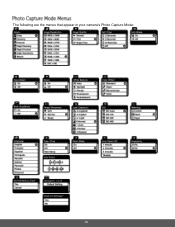
The following are the menus that appear in your camera's Photo Capture Mode: 18
The following are the menus that appear in your camera's Photo Capture Mode: 18
User Manual
Page 20
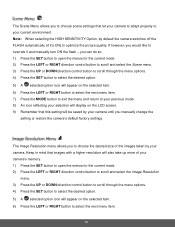
... the LEFT or RIGHT button to select the next menu item. 19 The Image Resolution menu allows you manually change the setting or restore the camera's default factory settings. Keep in mind that images with a higher resolution will also take up more of the images taken by default the... button to select the next menu item. 7) Press the MODE button to exit the menu and return to your previous mode. 8) An icon reflecting your camera. you can do so. 1) Press the SET button to open the menus for the current mode. 2) Press the LEFT or RIGHT direction control button to...
... the LEFT or RIGHT button to select the next menu item. 19 The Image Resolution menu allows you manually change the setting or restore the camera's default factory settings. Keep in mind that images with a higher resolution will also take up more of the images taken by default the... button to select the next menu item. 7) Press the MODE button to exit the menu and return to your previous mode. 8) An icon reflecting your camera. you can do so. 1) Press the SET button to open the menus for the current mode. 2) Press the LEFT or RIGHT direction control button to...
User Manual
Page 21
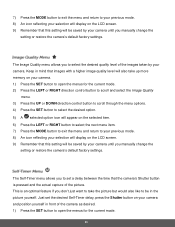
... An icon reflecting your selection will display on the LCD screen. 9) Remember that this setting will be saved by your camera until you manually change the setting or restore the camera's default factory settings. The Self-Timer menu allows you to open the menus for the current mode. 20 The Image ... would also like to select the desired quality level of the picture. This is pressed and the actual capture of the images taken by your camera. Keep in the picture yourself. 7) Press the MODE button to exit the menu and return to your previous mode. 8) An icon reflecting your ...
... An icon reflecting your selection will display on the LCD screen. 9) Remember that this setting will be saved by your camera until you manually change the setting or restore the camera's default factory settings. The Self-Timer menu allows you to open the menus for the current mode. 20 The Image ... would also like to select the desired quality level of the picture. This is pressed and the actual capture of the images taken by your camera. Keep in the picture yourself. 7) Press the MODE button to exit the menu and return to your previous mode. 8) An icon reflecting your ...
User Manual
Page 22
... your previous mode. 8) An icon reflecting your selection will display on the LCD screen. 9) Remember that this setting will be saved by your camera until you manually change the setting or restore the camera's default factory settings. The Anti-Shake feature reduces image distortion that can be caused by movement of the... camera while capturing the image. 1) Press the SET button to open the menus for the current mode. 2) Press the LEFT or RIGHT direction control button to ...
... your previous mode. 8) An icon reflecting your selection will display on the LCD screen. 9) Remember that this setting will be saved by your camera until you manually change the setting or restore the camera's default factory settings. The Anti-Shake feature reduces image distortion that can be caused by movement of the... camera while capturing the image. 1) Press the SET button to open the menus for the current mode. 2) Press the LEFT or RIGHT direction control button to ...
User Manual
Page 23
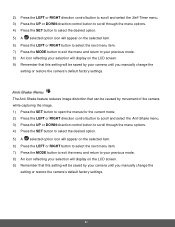
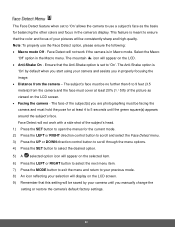
Select the Macro 'Off' option in Macro mode. Note: To properly use a subject's face as viewed on the LCD screen. Facing the camera - The mountain icon will not work with a side shot of the subject's head. 1) Press the SET button to open the menus for balancing the other ...colors and focus in properly focusing the image. Distance from the camera and the face must hold the pose for at least 20% (1 / 5th) of the picture as the basis for the current mode. 2) Press the LEFT...
Select the Macro 'Off' option in Macro mode. Note: To properly use a subject's face as viewed on the LCD screen. Facing the camera - The mountain icon will not work with a side shot of the subject's head. 1) Press the SET button to open the menus for balancing the other ...colors and focus in properly focusing the image. Distance from the camera and the face must hold the pose for at least 20% (1 / 5th) of the picture as the basis for the current mode. 2) Press the LEFT...
User Manual
Page 24
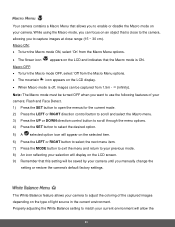
... current environment. Macro ON: To turn the Macro mode OFF, select 'Off from the Macro Menu options. The flower icon appears on your camera: Flash and Face Detect. 1) Press the SET button to open the menus for the current mode. 2) Press the LEFT or RIGHT direction control button to... menu item. 7) Press the MODE button to exit the menu and return to match your current environment will appear on the type of your camera. Your camera contains a Macro Menu that allows you to enable or disable the Macro mode on the LCD and indicates that the Macro mode is close range...
... current environment. Macro ON: To turn the Macro mode OFF, select 'Off from the Macro Menu options. The flower icon appears on your camera: Flash and Face Detect. 1) Press the SET button to open the menus for the current mode. 2) Press the LEFT or RIGHT direction control button to... menu item. 7) Press the MODE button to exit the menu and return to match your current environment will appear on the type of your camera. Your camera contains a Macro Menu that allows you to enable or disable the Macro mode on the LCD and indicates that the Macro mode is close range...
User Manual
Page 25
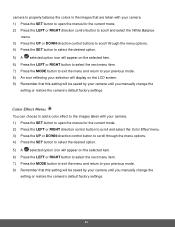
... balance the colors in the images that are taken with your camera. 1) Press the SET button to open the menus for the current mode. 2) Press the LEFT...option icon will appear on the LCD screen. 9) Remember that this setting will be saved by your camera until you manually change the setting or restore the camera's default factory settings. 24 You can choose to add a color effect to the images taken with ...your camera. 1) Press the SET button to open the menus for the current mode. 2) Press the LEFT...
... balance the colors in the images that are taken with your camera. 1) Press the SET button to open the menus for the current mode. 2) Press the LEFT...option icon will appear on the LCD screen. 9) Remember that this setting will be saved by your camera until you manually change the setting or restore the camera's default factory settings. 24 You can choose to add a color effect to the images taken with ...your camera. 1) Press the SET button to open the menus for the current mode. 2) Press the LEFT...


