
User Guide
Page 2
USB port 3 7 7. Microphone 8. Playback mode button 11. Zoom in button 17. Self-timer LED 4. Macro / Left button 13. Set / Display button 21. Menu button 18. Flash / Right button 20. Wrist strap holder 16. Product Overview 1. Lens 8 9. Mode button 22. Power button 5. Delete button 15. Play / Pause / Up button 19. Power / Auto Focus LED 12. Stop / Down button 14. Battery / SD card door 2 15 9 16 10 17 11 18 12 19 13 20 14 21 22 23 Polaroid i733 Digital Camera User Guide www.polaroid.com Flash 1 4 3. Tripod mount 23. Zoom out...
USB port 3 7 7. Microphone 8. Playback mode button 11. Zoom in button 17. Self-timer LED 4. Macro / Left button 13. Set / Display button 21. Menu button 18. Flash / Right button 20. Wrist strap holder 16. Product Overview 1. Lens 8 9. Mode button 22. Power button 5. Delete button 15. Play / Pause / Up button 19. Power / Auto Focus LED 12. Stop / Down button 14. Battery / SD card door 2 15 9 16 10 17 11 18 12 19 13 20 14 21 22 23 Polaroid i733 Digital Camera User Guide www.polaroid.com Flash 1 4 3. Tripod mount 23. Zoom out...
User Guide
Page 3
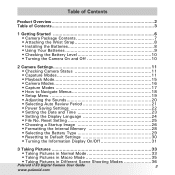
Reset Setting 25 • Choosing a Startup Image 26 • Formatting the Internal Memory 28 • Selecting the Battery Type 29 • Resetting to Navigate Menus 18 • Setup Menu 19 • Adjusting the Sounds 20 • Selecting Auto Review Period 21 • Power Saving Settings 22 • Setting the Date and Time 23 • Setting the Display Language 24 • File No. Table of Contents Product Overview 2 Table of Contents 3 1 Getting Started 6 • Camera Package Contents 7 •...
Reset Setting 25 • Choosing a Startup Image 26 • Formatting the Internal Memory 28 • Selecting the Battery Type 29 • Resetting to Navigate Menus 18 • Setup Menu 19 • Adjusting the Sounds 20 • Selecting Auto Review Period 21 • Power Saving Settings 22 • Setting the Date and Time 23 • Setting the Display Language 24 • File No. Table of Contents Product Overview 2 Table of Contents 3 1 Getting Started 6 • Camera Package Contents 7 •...

User Guide
Page 4
...; Using the Q Mode 38 • Setting Flash Mode 39 • Setting Self-timer 41 • Taking Continuous Pictures 42 • Zoom Feature 42 • Setting the Image Size and Quality 44 • Setting Light Metering 45 • Setting White Balance 46 • Setting the ISO 47 • Setting Exposure Compensation 48 • Setting the AEB 49 • Setting the Highlight 49 • Setting the Sharpness 50 • Setting the Photo Effect 51 • Setting Date/Time, Display On/Off 52 4 Recording Video Clips 53 • Recording Video...
...; Using the Q Mode 38 • Setting Flash Mode 39 • Setting Self-timer 41 • Taking Continuous Pictures 42 • Zoom Feature 42 • Setting the Image Size and Quality 44 • Setting Light Metering 45 • Setting White Balance 46 • Setting the ISO 47 • Setting Exposure Compensation 48 • Setting the AEB 49 • Setting the Highlight 49 • Setting the Sharpness 50 • Setting the Photo Effect 51 • Setting Date/Time, Display On/Off 52 4 Recording Video Clips 53 • Recording Video...
User Guide
Page 5
...; Connecting to Your Computer 88 • Transferring Pictures and Video Clips to a Computer 99 11 Troubleshooting Problems 91 12 Getting Help 94 • Polaroid Online Services 94 • ArcSoft Software Help 94 13 Appendix 95 • Technical specifications 95 • Storage Capacities 97 • Uninstalling Polaroid i733 Driver (PC only 101 • Camera Default Settings 102 • Tips, Your Safety & Maintenance 103 • Regulatory Information 104 Polaroid i733 Digital Camera User Guide 5 www.polaroid...
...; Connecting to Your Computer 88 • Transferring Pictures and Video Clips to a Computer 99 11 Troubleshooting Problems 91 12 Getting Help 94 • Polaroid Online Services 94 • ArcSoft Software Help 94 13 Appendix 95 • Technical specifications 95 • Storage Capacities 97 • Uninstalling Polaroid i733 Driver (PC only 101 • Camera Default Settings 102 • Tips, Your Safety & Maintenance 103 • Regulatory Information 104 Polaroid i733 Digital Camera User Guide 5 www.polaroid...
User Guide
Page 6
... a powerful 7.0 Megapixels CCD sensor, 2.5-inch bright color TFT LCD, high quality optics and many manual settings and options. Outstanding features that your i733 digital camera has: • A high quality glass lens system for more accurate reproduction of pictures. 6 Polaroid i733 Digital Camera User Guide www.polaroid.com The i733 comes equipped with five modes (auto, red-eye reduction, Flash aways on, Slow Sync and Flash off). • Free to edit your images and print your imaging needs.
... a powerful 7.0 Megapixels CCD sensor, 2.5-inch bright color TFT LCD, high quality optics and many manual settings and options. Outstanding features that your i733 digital camera has: • A high quality glass lens system for more accurate reproduction of pictures. 6 Polaroid i733 Digital Camera User Guide www.polaroid.com The i733 comes equipped with five modes (auto, red-eye reduction, Flash aways on, Slow Sync and Flash off). • Free to edit your images and print your imaging needs.

User Guide
Page 9
... for future reference. Polaroid i733 Digital Camera User Guide 9 www.polaroid.com • Using Your Batteries IMPORTANT NOTE: For best performance and prolonged battery life, we recommend the use of the flash. Limit the following activities that reduces battery life: • Reviewing your pictures on the LCD screen. • Using the LCD screen to take pictures. • Excessive use of AA lithium or rechargeable Ni-MH. WARNING! • Batteries should be replaced by an adult...
... for future reference. Polaroid i733 Digital Camera User Guide 9 www.polaroid.com • Using Your Batteries IMPORTANT NOTE: For best performance and prolonged battery life, we recommend the use of the flash. Limit the following activities that reduces battery life: • Reviewing your pictures on the LCD screen. • Using the LCD screen to take pictures. • Excessive use of AA lithium or rechargeable Ni-MH. WARNING! • Batteries should be replaced by an adult...

User Guide
Page 13
Description 1 Video Mode 2 Video Size 3 White balance 4 Light Metering 5 Focus Mark 6 Battery Power Level 7 Macro Mode Internal Memory 8 SD Card 9 Remaining Recording Time 10 Optical & Digital Zoom Bar 5 6 Icon , , , , , H , HL , , AUTO , , , , IN 00:01:30 Ref. Page 53 54 46 45 --10 35 ------42 Polaroid i733 Digital Camera User Guide 13 www.polaroid.com Video Mode 1 2 3 10 00:01:30 9 IN 8 7 4 No.
Description 1 Video Mode 2 Video Size 3 White balance 4 Light Metering 5 Focus Mark 6 Battery Power Level 7 Macro Mode Internal Memory 8 SD Card 9 Remaining Recording Time 10 Optical & Digital Zoom Bar 5 6 Icon , , , , , H , HL , , AUTO , , , , IN 00:01:30 Ref. Page 53 54 46 45 --10 35 ------42 Polaroid i733 Digital Camera User Guide 13 www.polaroid.com Video Mode 1 2 3 10 00:01:30 9 IN 8 7 4 No.
User Guide
Page 20
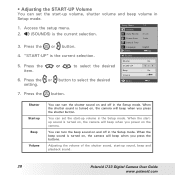
... camera will beep when you power on , the camera will beep when you press the buttons. Adjusting the volume of the shutter sound, start-up sound, beep and playback sound. 20 Polaroid i733 Digital Camera User Guide www.polaroid.com Press the button. Access the setup menu. 2. (SOUNDS) is the current selection. 5. Setup Menu Sounds Auto Review Power Save Date & Time Language Select Sounds 1/3 3 s ec 1 min English Exit Shutter On START-UP 1 Beep On Volume Select Ok 7. • Adjusting the START-UP Volume You can set the start-up volume in the Setup mode.
... camera will beep when you power on , the camera will beep when you press the buttons. Adjusting the volume of the shutter sound, start-up sound, beep and playback sound. 20 Polaroid i733 Digital Camera User Guide www.polaroid.com Press the button. Access the setup menu. 2. (SOUNDS) is the current selection. 5. Setup Menu Sounds Auto Review Power Save Date & Time Language Select Sounds 1/3 3 s ec 1 min English Exit Shutter On START-UP 1 Beep On Volume Select Ok 7. • Adjusting the START-UP Volume You can set the start-up volume in the Setup mode.

User Guide
Page 22
Access the setup menu. 2. Press setting. 5. Setup Menu Sounds Auto Review Power Save 1/3 1 Min. 3 Min. 5 Min. NOTE: This setting is designed to switch off automatically to save operation to conserve battery power. Press the or button. Press the or to select Sounds Auto Review Power Save 3 sec. 1 min (POWER SAVE). 3. Date & Time Language Select Ok 1/3/5 MIN The camera is also available in (Video) and (Playback) modes. 22 Polaroid i733 Digital Camera User Guide www.polaroid.com Setup Menu 1/3 1. Date & Time Language Select English Exit 4. Press the...
Access the setup menu. 2. Press setting. 5. Setup Menu Sounds Auto Review Power Save 1/3 1 Min. 3 Min. 5 Min. NOTE: This setting is designed to switch off automatically to save operation to conserve battery power. Press the or button. Press the or to select Sounds Auto Review Power Save 3 sec. 1 min (POWER SAVE). 3. Date & Time Language Select Ok 1/3/5 MIN The camera is also available in (Video) and (Playback) modes. 22 Polaroid i733 Digital Camera User Guide www.polaroid.com Setup Menu 1/3 1. Date & Time Language Select English Exit 4. Press the...

User Guide
Page 23
..., hour, minute, and date format. 5. Press the or button to select TIME). 3. Press or button to adjust the value in (Video) and (Playback) modes. Polaroid i733 Digital Camera User Guide 23 www.polaroid.com Press the or button. (DATE & 4. Setup Menu Sounds Auto Review Power Save Date & Time Language Select 1/3 3 sec 1 min English Exit Date & Time 2006 / 07 / 01 18:59 YY/MM/DD Select Ok NOTE: • If the batteries are removed for about two days, the TIME setting will be lost. •...
..., hour, minute, and date format. 5. Press the or button to select TIME). 3. Press or button to adjust the value in (Video) and (Playback) modes. Polaroid i733 Digital Camera User Guide 23 www.polaroid.com Press the or button. (DATE & 4. Setup Menu Sounds Auto Review Power Save Date & Time Language Select 1/3 3 sec 1 min English Exit Date & Time 2006 / 07 / 01 18:59 YY/MM/DD Select Ok NOTE: • If the batteries are removed for about two days, the TIME setting will be lost. •...
User Guide
Page 25
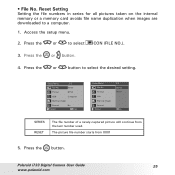
... No Exit Setup Menu File No. Press the or button. 4. Polaroid i733 Digital Camera User Guide 25 www.polaroid.com • File No. Reset Setting Setting the file numbers in series for all pictures taken on the internal memory or a memory card avoids file name duplication when images are downloaded to a computer. 1. Series TV Out NTSC USB Computer Start-up image Format Select 2/3 Series Reset Ok SERIES RESET The file number of a newly-captured picture will continue from 0001 5. The picture file number starts from the last number used. Setup Menu 2/3 File No...
... No Exit Setup Menu File No. Press the or button. 4. Polaroid i733 Digital Camera User Guide 25 www.polaroid.com • File No. Reset Setting Setting the file numbers in series for all pictures taken on the internal memory or a memory card avoids file name duplication when images are downloaded to a computer. 1. Series TV Out NTSC USB Computer Start-up image Format Select 2/3 Series Reset Ok SERIES RESET The file number of a newly-captured picture will continue from 0001 5. The picture file number starts from the last number used. Setup Menu 2/3 File No...

User Guide
Page 28
... (Playback) modes. 28 Polaroid i733 Digital Camera User Guide www.polaroid.com Press or to select the 5. button to select (FORMAT). 3. Series TV Out NTSC USB Computer Start-up Image Format Select Ok NOTE: • Data deleted by a format operation is also available in it. 1. • Formatting the Internal Memory Formatting the internal memory deletes all the pictures, even those are protected. • With a memory card inserted, the above operation would format the inserted memory card only. Access the setup menu. 2. Press the or button. Setup Menu 2/3 File No...
... (Playback) modes. 28 Polaroid i733 Digital Camera User Guide www.polaroid.com Press or to select the 5. button to select (FORMAT). 3. Series TV Out NTSC USB Computer Start-up Image Format Select Ok NOTE: • Data deleted by a format operation is also available in it. 1. • Formatting the Internal Memory Formatting the internal memory deletes all the pictures, even those are protected. • With a memory card inserted, the above operation would format the inserted memory card only. Access the setup menu. 2. Press the or button. Setup Menu 2/3 File No...

User Guide
Page 39
Press the button to cycle through the flash settings and select the one you take pictures at night, indoors, or outdoors in heavy shadows. Set the camera to the flash setting you selected) will appear on the LCD screen. 9999 7M IN 2 50 +2.0EV Flash The camera has five flash modes (default setting is Auto Flash). Polaroid i733 Digital Camera User Guide 39 www.polaroid.com • Setting Flash Mode Flash Range: Wide Angle: 1.6 ~ 8.2 ft (50 cm ~ 2.5 m) Telephoto: 1.6 ~ 5 ft (50 cm ~ 1.5 m) 1. Use the flash when you need. The icon (according to Still Image mode. 2.
Press the button to cycle through the flash settings and select the one you take pictures at night, indoors, or outdoors in heavy shadows. Set the camera to the flash setting you selected) will appear on the LCD screen. 9999 7M IN 2 50 +2.0EV Flash The camera has five flash modes (default setting is Auto Flash). Polaroid i733 Digital Camera User Guide 39 www.polaroid.com • Setting Flash Mode Flash Range: Wide Angle: 1.6 ~ 8.2 ft (50 cm ~ 2.5 m) Telephoto: 1.6 ~ 5 ft (50 cm ~ 1.5 m) 1. Use the flash when you need. The icon (according to Still Image mode. 2.

User Guide
Page 44
... Resolution WB ISO 5. Polaroid i733 Digital Camera User Guide www.polaroid.com Press the and desired setting. button to Still Image mode. 2. Press the or button to Still Image mode. 2. Resolution setting 1. Set the camera to select (QUALITY). Press the button. 3. Higher resolution and less compression make better quality which occupies more memory space. Press the button. 3. Press the or button to the number of pixels in a digital picture. Quality setting 1. • Setting the Image Size and Quality Picture resolution...
... Resolution WB ISO 5. Polaroid i733 Digital Camera User Guide www.polaroid.com Press the and desired setting. button to Still Image mode. 2. Press the or button to Still Image mode. 2. Resolution setting 1. Set the camera to select (QUALITY). Press the button. 3. Higher resolution and less compression make better quality which occupies more memory space. Press the button. 3. Press the or button to the number of pixels in a digital picture. Quality setting 1. • Setting the Image Size and Quality Picture resolution...

User Guide
Page 51
...; Setting the Photo Effect. Press the or button to select the desired setting. Press the button. 3. Press the and button to select (EFFECT). Option Off B&W Sepia Negative Mosaic Red Green Blue Description No effect is added to the image Convert image to black & white Recorded image will be set in Playback mode. Off B&W Sepia Negative Red Effect 4. Polaroid i733 Digital Camera User Guide 51 www.polaroid.com Set the camera to the images The images becomes reddish The images...
...; Setting the Photo Effect. Press the or button to select the desired setting. Press the button. 3. Press the and button to select (EFFECT). Option Off B&W Sepia Negative Mosaic Red Green Blue Description No effect is added to the image Convert image to black & white Recorded image will be set in Playback mode. Off B&W Sepia Negative Red Effect 4. Polaroid i733 Digital Camera User Guide 51 www.polaroid.com Set the camera to the images The images becomes reddish The images...

User Guide
Page 80
... i733 camera, and valuable data in the i733 camera. However, you must remove the write protection whenever you want to record new files onto it, format it back to lock. 1 2 3 a b b a The icon will appear on the LCD screen when a SD card is inserted in your SD card due to protect files from accidental deletion. The manufacturer is inserted the correct position as illustrated. 3. IMPORTANT! • Make sure you turn off the camera...
... i733 camera, and valuable data in the i733 camera. However, you must remove the write protection whenever you want to record new files onto it, format it back to lock. 1 2 3 a b b a The icon will appear on the LCD screen when a SD card is inserted in your SD card due to protect files from accidental deletion. The manufacturer is inserted the correct position as illustrated. 3. IMPORTANT! • Make sure you turn off the camera...

User Guide
Page 89
... use the Arcsoft software to edit and manage the pictures, video or audio clips. For Macintosh Users Mac NOTE: For Mac user, directly plug-in the camera, no need to Playback mode. 3. Set the camera to install the driver. 1. Connect the camera to a computer via the USB cable, the systems will automatically recognize the MASS STORAGE drive. (System will see a "Removable Disk" drive. 4. Double click "Removable Disk" -> double click "DCIM"-> double click any mode. 1. All the pictures, video...
... use the Arcsoft software to edit and manage the pictures, video or audio clips. For Macintosh Users Mac NOTE: For Mac user, directly plug-in the camera, no need to Playback mode. 3. Set the camera to install the driver. 1. Connect the camera to a computer via the USB cable, the systems will automatically recognize the MASS STORAGE drive. (System will see a "Removable Disk" drive. 4. Double click "Removable Disk" -> double click "DCIM"-> double click any mode. 1. All the pictures, video...
User Guide
Page 91
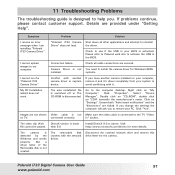
... cable connections are not shown Video cable is not Make sure the video cable is not created. The auto installation file is switched off or The CD-ROM is lower file cannot be played. The video clip (AVI) DirectX version is disconnected. Click "Properties". But a driver letter of the Removable disk is connected to the TV "Video on your computer, remove it and it's driver completely from your PC. Connection failure. Polaroid i733 Digital Camera User Guide...
... cable connections are not shown Video cable is not Make sure the video cable is not created. The auto installation file is switched off or The CD-ROM is lower file cannot be played. The video clip (AVI) DirectX version is disconnected. Click "Properties". But a driver letter of the Removable disk is connected to the TV "Video on your computer, remove it and it's driver completely from your PC. Connection failure. Polaroid i733 Digital Camera User Guide...

User Guide
Page 92
... my Digital Camera by pressing the Power switch. battery is being used for near subjects. Or Recharge the battery. Or Flash unit is complete. Or Wait until flash unit charging finishes. Or Set the camera to Macro mode for far subjects. LCD screen image is activated. Problem Solution Insufficient battery power or Recharge the battery or install the battery. Auto Power Off function is out of focus. Turn the camera on . Recorded pictures are not saved in memory. Or Delete images you no longer need, or use another memory card. Battery...
... my Digital Camera by pressing the Power switch. battery is being used for near subjects. Or Recharge the battery. Or Flash unit is complete. Or Wait until flash unit charging finishes. Or Set the camera to Macro mode for far subjects. LCD screen image is activated. Problem Solution Insufficient battery power or Recharge the battery or install the battery. Auto Power Off function is out of focus. Turn the camera on . Recorded pictures are not saved in memory. Or Delete images you no longer need, or use another memory card. Battery...

User Guide
Page 93
... camera. A memory card with non-DCF pictures recorded with the camera-TV connection Or TV setup is wrong Or Video system is incompatible. Pictures are Unprotect the pictures you want protected. Images do not display in its video mode Or Select the proper video output system. Symptom Problem Solution Colour of the playback pictures is different from the picture on TV. Remove and re-install the battery or batteries to the help files & User Guides that accompany the enclosed applications. Use...
... camera. A memory card with non-DCF pictures recorded with the camera-TV connection Or TV setup is wrong Or Video system is incompatible. Pictures are Unprotect the pictures you want protected. Images do not display in its video mode Or Select the proper video output system. Symptom Problem Solution Colour of the playback pictures is different from the picture on TV. Remove and re-install the battery or batteries to the help files & User Guides that accompany the enclosed applications. Use...


