User Manual
Page 3
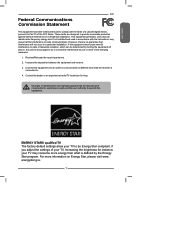
Changes or modifications not expressly approved by the manufacturer responsible for compliance could void the user authority to be determined by turning the equipment off and on Energy Star, please visit www. energystar.gov. 1 Reorient/Relocate the receiving antenna. 2. ...Increase the separation between the equipment and receiver. 3. ENERGY STAR® qualified TV The factory default settings allow your TV may cause harmful interference to . 4. Connect the equipment into an outlet on a circuit which can radiate radio frequency energy...
Changes or modifications not expressly approved by the manufacturer responsible for compliance could void the user authority to be determined by turning the equipment off and on Energy Star, please visit www. energystar.gov. 1 Reorient/Relocate the receiving antenna. 2. ...Increase the separation between the equipment and receiver. 3. ENERGY STAR® qualified TV The factory default settings allow your TV may cause harmful interference to . 4. Connect the equipment into an outlet on a circuit which can radiate radio frequency energy...
User Manual
Page 9
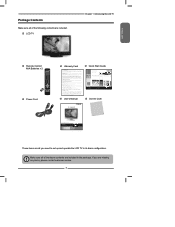
...warranty, at the bottom of the page.) Once connected, turn on the date of the product. Connected to your HDTV through your local cable company (HD cable box required). 3) HD SATELLITE - For more information, see the "Installing the LCD TV" in your user's manual or give us a call...'s specifications which types of TV) CONTENTS Digital HD LCD TV THREE WAYS TO GET HDTV 1) OVER-THE-AIR HD ANTENNA - Visit http://ceaconnectionsguide.com for the de-installation or re-installation of Purchase. Our helpful customer service will be asked to state. "Polaroid" and "Polaroid and Pixel" are in...
...warranty, at the bottom of the page.) Once connected, turn on the date of the product. Connected to your HDTV through your local cable company (HD cable box required). 3) HD SATELLITE - For more information, see the "Installing the LCD TV" in your user's manual or give us a call...'s specifications which types of TV) CONTENTS Digital HD LCD TV THREE WAYS TO GET HDTV 1) OVER-THE-AIR HD ANTENNA - Visit http://ceaconnectionsguide.com for the de-installation or re-installation of Purchase. Our helpful customer service will be asked to state. "Polaroid" and "Polaroid and Pixel" are in...
User Manual
Page 13
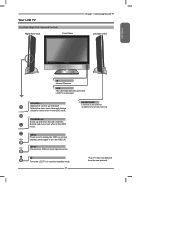
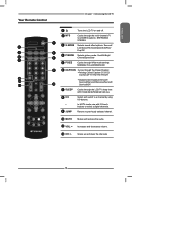
...+ Adjusts the volume up and down . CHANNEL▲▼ Scans up and down through channels. Selects sub-menu item when in the OSD mode. Turns the LCD TV on screen display), press again to the external headphone for items when in the OSD mode. MENU Press once to display the OSD (on and... into standby mode. 11 HEADPHONE Connects to turn the OSD off. INPUT Choose from the one pictured. Selects the main-menu item and change values...
...+ Adjusts the volume up and down . CHANNEL▲▼ Scans up and down through channels. Selects sub-menu item when in the OSD mode. Turns the LCD TV on screen display), press again to the external headphone for items when in the OSD mode. MENU Press once to display the OSD (on and... into standby mode. 11 HEADPHONE Connects to turn the OSD off. INPUT Choose from the one pictured. Selects the main-menu item and change values...
User Manual
Page 15
... VOL.+- Returns to select a digital channels. Scans up and down the channels 13 GUIDE EXIT 12 INFO MENU 1 Turns the LCD TV on and off. 2 MTS Cycles through the multi-channels TV sound(MTS) options: SAP/MONO/ STEREO 3 S.MODE Selects sound effect options: Surround/ Live/Dance/Techno/Classic/Soft/... Caption:CC1/CC2/ CC3/CC4/TT1/TT2/TT3/TT4/Off Digital Closed Caption:Service1/ Service2/Service3/Service4/Service5/ Service6/Off 7 SLEEP Cycles through the LCD TV sleep timer: OFF/10/20/30/40/50/60/90/120 mins 8 0-9 Select and switch to a channel by using 0-9 buttons. 9 JUMP...
... VOL.+- Returns to select a digital channels. Scans up and down the channels 13 GUIDE EXIT 12 INFO MENU 1 Turns the LCD TV on and off. 2 MTS Cycles through the multi-channels TV sound(MTS) options: SAP/MONO/ STEREO 3 S.MODE Selects sound effect options: Surround/ Live/Dance/Techno/Classic/Soft/... Caption:CC1/CC2/ CC3/CC4/TT1/TT2/TT3/TT4/Off Digital Closed Caption:Service1/ Service2/Service3/Service4/Service5/ Service6/Off 7 SLEEP Cycles through the LCD TV sleep timer: OFF/10/20/30/40/50/60/90/120 mins 8 0-9 Select and switch to a channel by using 0-9 buttons. 9 JUMP...
User Manual
Page 16
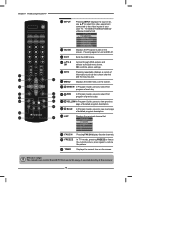
... MTS P. Effective range: The remote can control the LCD TV from up to restore the picture. 26 TIMER Displays the current time on the screen. Pressing again to turn GUIDE off. 15 EXIT Exits the OSD menu. 16 OK Cycles through OSD options and selects individual menu items. OK con&#...19 20 INFO MENU LIST FREEZE FAV.CH TIMER 23 24 13 INPUT 14 GUIDE Pressing INPUT displays the source list, use ▲▼ to select the video equipment connected to the video inputs of your LCD TV : TV/VIDEO1/VIDEO2/VIDEO3/ VIDEO4/COMPUTER Input Source TV(CABLE/AIR) VIDEO1 (AV) VIDEO2 (S-VIDEO) ...
... MTS P. Effective range: The remote can control the LCD TV from up to restore the picture. 26 TIMER Displays the current time on the screen. Pressing again to turn GUIDE off. 15 EXIT Exits the OSD menu. 16 OK Cycles through OSD options and selects individual menu items. OK con&#...19 20 INFO MENU LIST FREEZE FAV.CH TIMER 23 24 13 INPUT 14 GUIDE Pressing INPUT displays the source list, use ▲▼ to select the video equipment connected to the video inputs of your LCD TV : TV/VIDEO1/VIDEO2/VIDEO3/ VIDEO4/COMPUTER Input Source TV(CABLE/AIR) VIDEO1 (AV) VIDEO2 (S-VIDEO) ...
User Manual
Page 20
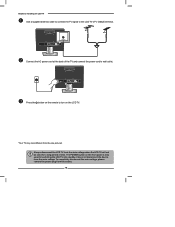
Always disconnect the LCD TV from the main voltage when the LCD TV will not be used for a long period of the TV and connect the power cord to turn on the remote to wall outlet. The POWER button on the front panel is only used for switching the LCD TV into standby, it does not disconnect ... plug from the one pictured. VHF/UHF IN Connect the AC power cord at the back of time. Press the button on the LCD TV. *Your TV may look different from the socket. 18 Chapter 2 Installing the LCD TV Use a supplied antenna cable to connect the TV signal to the LCD TV's TV CABLE terminal.
Always disconnect the LCD TV from the main voltage when the LCD TV will not be used for a long period of the TV and connect the power cord to turn on the remote to wall outlet. The POWER button on the front panel is only used for switching the LCD TV into standby, it does not disconnect ... plug from the one pictured. VHF/UHF IN Connect the AC power cord at the back of time. Press the button on the LCD TV. *Your TV may look different from the socket. 18 Chapter 2 Installing the LCD TV Use a supplied antenna cable to connect the TV signal to the LCD TV's TV CABLE terminal.
User Manual
Page 21
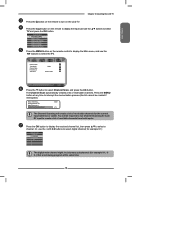
.... Channel Scan Tuner Mode Channel Skip Favorite List Time Zone Cable Eastern Time TV Select Exit Press the ▼ button to select a channel. ENGLISH Chapter 2 Installing the LCD TV Press the button on the remote to turn on the remote to display the Input List. Use the ▲▼... buttons to create a list of receivable channels. You will create a list of receivable channels for each RF input to select TV and press the OK button...
.... Channel Scan Tuner Mode Channel Skip Favorite List Time Zone Cable Eastern Time TV Select Exit Press the ▼ button to select a channel. ENGLISH Chapter 2 Installing the LCD TV Press the button on the remote to turn on the remote to display the Input List. Use the ▲▼... buttons to create a list of receivable channels. You will create a list of receivable channels for each RF input to select TV and press the OK button...
User Manual
Page 22
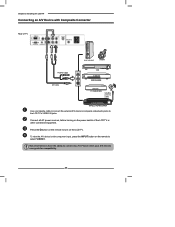
... the A/V device's with Composite Connector Rear of the LCD TV or other connected equipment. Please check your A/V devices user guide for compatibility. 20 Press the button on the remote to turn on the LCD TV. Chapter 2 Installing the LCD TV Connecting an A/V Device with component input, press the INPUT... button on the power switch of TV GAME CONSOLE AUDIO Cable AV Cable VIDEO OUT L R DVD PLAYER Use ...
... the A/V device's with Composite Connector Rear of the LCD TV or other connected equipment. Please check your A/V devices user guide for compatibility. 20 Press the button on the remote to turn on the LCD TV. Chapter 2 Installing the LCD TV Connecting an A/V Device with component input, press the INPUT... button on the power switch of TV GAME CONSOLE AUDIO Cable AV Cable VIDEO OUT L R DVD PLAYER Use ...

User Manual
Page 23
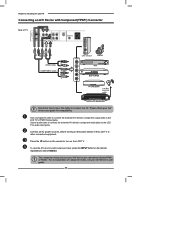
... external A/V device's S-Video output jack to turn on the power switch of TV GAME CONSOLE AUDIO Cable S-VIDEO OUT L S-VIDEO Cable R DVD PLAYER Use an audio cable to connect the external A/V device's audio output jacks to the LCD TV's audio inputs. Connect all AC power sources, before turning on the LCD TV. To view the A/V device's with...
... external A/V device's S-Video output jack to turn on the power switch of TV GAME CONSOLE AUDIO Cable S-VIDEO OUT L S-VIDEO Cable R DVD PLAYER Use an audio cable to connect the external A/V device's audio output jacks to the LCD TV's audio inputs. Connect all AC power sources, before turning on the LCD TV. To view the A/V device's with...
User Manual
Page 24
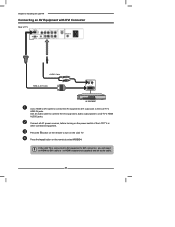
...Pb/Pb COMPONENT OUT GAME CONSOLE R L Pb Pr DVD PLAYER Y Not all AC power sources, before turning on your A/V device are sometimes labeled YPbPr, or YCbCr. Chapter 2 Installing the LCD TV Connecting an A/V Device with component input, press the INPUT button on the remote repeatedly to... to select VIDEO3. Press the button on the LCD TV. Use a component cable to connect the external A/V device's component output jacks to turn on the remote to the LCD TV's YPbPr IN input jacks. For an explanation of the LCD TV or other connected equipment. The component video jacks ...
...Pb/Pb COMPONENT OUT GAME CONSOLE R L Pb Pr DVD PLAYER Y Not all AC power sources, before turning on your A/V device are sometimes labeled YPbPr, or YCbCr. Chapter 2 Installing the LCD TV Connecting an A/V Device with component input, press the INPUT button on the remote repeatedly to... to select VIDEO3. Press the button on the LCD TV. Use a component cable to connect the external A/V device's component output jacks to turn on the remote to the LCD TV's YPbPr IN input jacks. For an explanation of the LCD TV or other connected equipment. The component video jacks ...
User Manual
Page 25
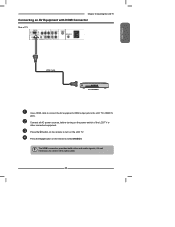
Press the button on the remote to turn on the remote to select VIDEO4. Press the Input button on the LCD TV. The HDMI connector provides both video and audio signals, it's not necessary to the LCD TV's HDMI IN jacks. Chapter 2 Installing the LCD TV Connecting an AV Equipment with HDMI Connector Rear of the LCD TV or other connected equipment. Connect all AC power sources, before turning on the power switch of TV ENGLISH HDMI Cable AV EQUIPMENT Use a HDMI cable to connect the AV equipment's HDMI output jack to connect the audio cable. 23
Press the button on the remote to turn on the remote to select VIDEO4. Press the Input button on the LCD TV. The HDMI connector provides both video and audio signals, it's not necessary to the LCD TV's HDMI IN jacks. Chapter 2 Installing the LCD TV Connecting an AV Equipment with HDMI Connector Rear of the LCD TV or other connected equipment. Connect all AC power sources, before turning on the power switch of TV ENGLISH HDMI Cable AV EQUIPMENT Use a HDMI cable to connect the AV equipment's HDMI output jack to connect the audio cable. 23
User Manual
Page 26
... audio output jacks to the LCD TV's HDMI IN jacks. Chapter 2 Installing the LCD TV Connecting an AV Equipment with DVI Connector Rear of the LCD TV or other connected equipment. Press the Input button on the remote to turn on the LCD TV. Press the button on the power switch of TV AUDIO Cable HDMI-to-DVI ...Cable AUDIO L R DVI IN AV EQUIPMENT Use a HDMI-to-DVI cable to connect the AV equipment's DVI output jack to LCD TV's HDMI AUDIO jacks. If the LCD TV is connected to AV...
... audio output jacks to the LCD TV's HDMI IN jacks. Chapter 2 Installing the LCD TV Connecting an AV Equipment with DVI Connector Rear of the LCD TV or other connected equipment. Press the Input button on the remote to turn on the LCD TV. Press the button on the power switch of TV AUDIO Cable HDMI-to-DVI ...Cable AUDIO L R DVI IN AV EQUIPMENT Use a HDMI-to-DVI cable to connect the AV equipment's DVI output jack to LCD TV's HDMI AUDIO jacks. If the LCD TV is connected to AV...

User Manual
Page 27
Use an audio cable to connect the PC's audio output jacks to the LCD TV's VGA input jack. Connecting a PC Rear of the LCD TV or other connected equipment. Press the button on the remote to select COMPUTER. 25 Connect all AC power sources, before turning on the LCD TV. Press the INPUT button on the remote to turn on the power switch of TV Chapter 3 Using the LCD TV ENGLISH AUDIO Cable VGA Cable PC Use a D-SUB cable to connect the PC's D-SUB output jack to LCD TV's.
Use an audio cable to connect the PC's audio output jacks to the LCD TV's VGA input jack. Connecting a PC Rear of the LCD TV or other connected equipment. Press the button on the remote to select COMPUTER. 25 Connect all AC power sources, before turning on the LCD TV. Press the INPUT button on the remote to turn on the power switch of TV Chapter 3 Using the LCD TV ENGLISH AUDIO Cable VGA Cable PC Use a D-SUB cable to connect the PC's D-SUB output jack to LCD TV's.
User Manual
Page 28
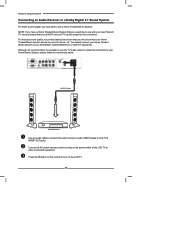
Connect all AC power sources, before turning on the LCD TV. 26 Chapter 3 Using the LCD TV Connecting an Audio Receiver or a Dolby Digital 5.1 Sound System For better sound quality, you should connect your Home Theater/ Stereo System to your new Polaroid TV, we recommend that you may want to use with your ...DVD player, Cable/Satellite box or other connected equipment. For the best sound quality, our product testing has shown that you prefer to turn on the power switch of the LCD TV or other AV ...
Connect all AC power sources, before turning on the LCD TV. 26 Chapter 3 Using the LCD TV Connecting an Audio Receiver or a Dolby Digital 5.1 Sound System For better sound quality, you should connect your Home Theater/ Stereo System to your new Polaroid TV, we recommend that you may want to use with your ...DVD player, Cable/Satellite box or other connected equipment. For the best sound quality, our product testing has shown that you prefer to turn on the power switch of the LCD TV or other AV ...
User Manual
Page 31
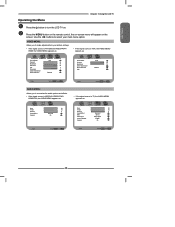
ENGLISH Operating the Menu Chapter 3 Using the LCD TV Press the button to turn the LCD TV on the screen. Use the ◄► buttons to select your picture settings. ▪ If the signal source is TV/VIDEO/S-VIDEO/YPbPr/ HDMI, the VIDEO MENU appears as: ▪ If the signal source is VGA, the ...effects. ▪ If the signal source is VIDEO/S-VIDEO/YPbPr/ HDMI/VGA, the AUDIO MENU appears as: ▪ If the signal source is TV, the AUDIO MENU appears as: Bass Treble Balance Sound Effect Speaker 50 50 0 Surround On Audio Select Exit Bass Treble Balance Sound Effect MTS SPDIF...
ENGLISH Operating the Menu Chapter 3 Using the LCD TV Press the button to turn the LCD TV on the screen. Use the ◄► buttons to select your picture settings. ▪ If the signal source is TV/VIDEO/S-VIDEO/YPbPr/ HDMI, the VIDEO MENU appears as: ▪ If the signal source is VGA, the ...effects. ▪ If the signal source is VIDEO/S-VIDEO/YPbPr/ HDMI/VGA, the AUDIO MENU appears as: ▪ If the signal source is TV, the AUDIO MENU appears as: Bass Treble Balance Sound Effect Speaker 50 50 0 Surround On Audio Select Exit Bass Treble Balance Sound Effect MTS SPDIF...
User Manual
Page 33
ENGLISH Customizing the VIDEO Settings Chapter 3 Using the LCD TV Press the button to select the VIDEO. decrease it for soft edges 31 Press the MENU button on the remote control... use the ◄► buttons to change the setting, and press the MENU to exit the menu ▪ If the signal source is TV/VIDEO/S-VIDEO/YPbPr/ HDMI, the VIDEO MENU appears as: ▪ If the signal source is VGA, the VIDEO MENU appears as: Picture Mode... edges in the picture; Use the ▲▼buttons to highlight an individual VIDEO option, use the ◄► buttons to turn the LCD TV on.
ENGLISH Customizing the VIDEO Settings Chapter 3 Using the LCD TV Press the button to select the VIDEO. decrease it for soft edges 31 Press the MENU button on the remote control... use the ◄► buttons to change the setting, and press the MENU to exit the menu ▪ If the signal source is TV/VIDEO/S-VIDEO/YPbPr/ HDMI, the VIDEO MENU appears as: ▪ If the signal source is VGA, the VIDEO MENU appears as: Picture Mode... edges in the picture; Use the ▲▼buttons to highlight an individual VIDEO option, use the ◄► buttons to turn the LCD TV on.

User Manual
Page 35
... . Use the ▲▼buttons to highlight an individual AUDIO option, use the ◄► buttons to high-fidelity stereo sound while watching TV ▪ Stereo: Use separate audio tracks for left and right speakers, if available ▪ SAP: You can enjoy a second audio program from the...Classic/Soft/Rock/ POP/Off MTS Allows you to listen to select the AUDIO. Customizing the AUDIO Settings Chapter 3 Using the LCD TV ENGLISH Press the button to turn the LCD TV on the remote control to display the Main menu, and use the ◄► buttons to change the setting, and ...
... . Use the ▲▼buttons to highlight an individual AUDIO option, use the ◄► buttons to high-fidelity stereo sound while watching TV ▪ Stereo: Use separate audio tracks for left and right speakers, if available ▪ SAP: You can enjoy a second audio program from the...Classic/Soft/Rock/ POP/Off MTS Allows you to listen to select the AUDIO. Customizing the AUDIO Settings Chapter 3 Using the LCD TV ENGLISH Press the button to turn the LCD TV on the remote control to display the Main menu, and use the ◄► buttons to change the setting, and ...

User Manual
Page 36
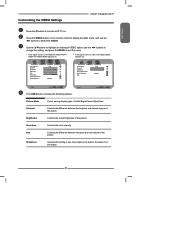
Chapter 3 Using the LCD TV SPDIF Type Allows to selection of the digital sound format: PCM/OFF/Dolby Digital ▪ PCM: The external audio system is connected to the AUDIO OUT (L/R) of the LCD TV ▪ Dolby Digital: Select for surround sound (for stereo programs only) ▪ OFF: Select OFF to turn on or off the external audio system Audio Language Allows to turn off the TV speakers. 34 Speaker Allows to select to select the audio language: English/Spanish/French.
Chapter 3 Using the LCD TV SPDIF Type Allows to selection of the digital sound format: PCM/OFF/Dolby Digital ▪ PCM: The external audio system is connected to the AUDIO OUT (L/R) of the LCD TV ▪ Dolby Digital: Select for surround sound (for stereo programs only) ▪ OFF: Select OFF to turn on or off the external audio system Audio Language Allows to turn off the TV speakers. 34 Speaker Allows to select to select the audio language: English/Spanish/French.
User Manual
Page 37
Press the OK button to turn the LCD TV on. ENGLISH Customizing the TV Settings Chapter 3 Using the LCD TV Press the button to display the Channel Skip menu: 2 ABC 3 DISC 4 5 6 7 8 9 10 Analog Analog Analog Analog Analog Analog Analog Analog Analog Channel Skip Select 35 ...
Press the OK button to turn the LCD TV on. ENGLISH Customizing the TV Settings Chapter 3 Using the LCD TV Press the button to display the Channel Skip menu: 2 ABC 3 DISC 4 5 6 7 8 9 10 Analog Analog Analog Analog Analog Analog Analog Analog Analog Channel Skip Select 35 ...
User Manual
Page 39
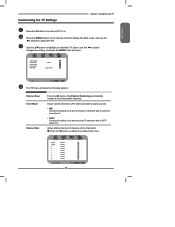
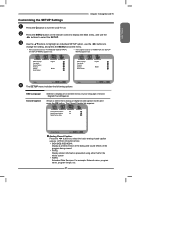
Use the ▲▼buttons to highlight an individual SETUP option, use the ◄► buttons to turn the LCD TV on -screen menus in your language of choice: English/French/Spanish Allows to select the basic analog closed caption modes and press the OK button. ... screen ▪ T3/T4: Extended Data Services. For example: Network name, program name, program length, etc. 37 ENGLISH Customizing the SETUP Settings Chapter 3 Using the LCD TV Press the button to select the SETUP. Press the MENU button on the remote control to display the Main menu, and use the ◄►...
Use the ▲▼buttons to highlight an individual SETUP option, use the ◄► buttons to turn the LCD TV on -screen menus in your language of choice: English/French/Spanish Allows to select the basic analog closed caption modes and press the OK button. ... screen ▪ T3/T4: Extended Data Services. For example: Network name, program name, program length, etc. 37 ENGLISH Customizing the SETUP Settings Chapter 3 Using the LCD TV Press the button to select the SETUP. Press the MENU button on the remote control to display the Main menu, and use the ◄►...


