User Guide
Page 1
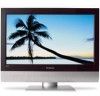
40" HD Widescreen LCD Television TLA-04011C and 4011-TLXB
40" HD Widescreen LCD Television TLA-04011C and 4011-TLXB
User Guide
Page 7
... CONTENTS Federal Communications Commission Statement 1 Warnings and Precautions Important Safety Instructions 2 Antenna Safety Instructions 4 Chapter 1 Introducing the LCD TV Key Features ...6 Package Contents ...7 Setting Your LCD TV...8 Your LCD TV...11 Your Remote Control 13 Chapter 2 Installing the LCD TV Connecting a TV Cable or an Antenna 15 Connecting a VCR ...20 Connecting a Video Camera or Game Console 21 Connecting a DVD...
... CONTENTS Federal Communications Commission Statement 1 Warnings and Precautions Important Safety Instructions 2 Antenna Safety Instructions 4 Chapter 1 Introducing the LCD TV Key Features ...6 Package Contents ...7 Setting Your LCD TV...8 Your LCD TV...11 Your Remote Control 13 Chapter 2 Installing the LCD TV Connecting a TV Cable or an Antenna 15 Connecting a VCR ...20 Connecting a Video Camera or Game Console 21 Connecting a DVD...

User Guide
Page 8
... can automatically detect content derived from film and adjust the interlacer's frame matching to provide better picture quality. Chapter 1 Introducing the LCD TV Chapter 1 Introducing the LCD TV Key Features Various Audio/Video terminals for DVD (1080i, 720p) and digital set-top-box (1080i, 720p) connections. 3D Digital Noise... Interface (HDMI) ▪ High Definition Multimedia Interface (HDMI) is a small, user-friendly interconnect that can carry up to receive HD ATSC ▪ This function allows the reception of HD broadcasting without the addition of a set top box.
... can automatically detect content derived from film and adjust the interlacer's frame matching to provide better picture quality. Chapter 1 Introducing the LCD TV Chapter 1 Introducing the LCD TV Key Features Various Audio/Video terminals for DVD (1080i, 720p) and digital set-top-box (1080i, 720p) connections. 3D Digital Noise... Interface (HDMI) ▪ High Definition Multimedia Interface (HDMI) is a small, user-friendly interconnect that can carry up to receive HD ATSC ▪ This function allows the reception of HD broadcasting without the addition of a set top box.
User Guide
Page 9
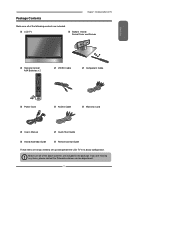
... Quick Start Guide Stand Assembly Guide Remote control Guide These items are all you are missing any items, please contact the Polaroid customer service department. 7 If you need to set up and operate the LCD TV in the package. Make sure all of the following contents are included. Package Contents Chapter 1 Introducing the...
... Quick Start Guide Stand Assembly Guide Remote control Guide These items are all you are missing any items, please contact the Polaroid customer service department. 7 If you need to set up and operate the LCD TV in the package. Make sure all of the following contents are included. Package Contents Chapter 1 Introducing the...
User Guide
Page 10
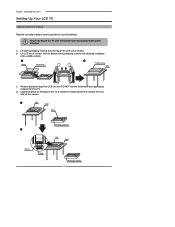
... bottom foam packaging material from the top of the LCD out of the TV to the LCD with all instructions before continuing with the stand installation. Chapter 1 Introducing the LCD TV Setting Up Your LCD TV How to install the TV Stand Read all four screws. Attach the Stand the TV with the bottom foam packaging material still attached...
... bottom foam packaging material from the top of the LCD out of the TV to the LCD with all instructions before continuing with the stand installation. Chapter 1 Introducing the LCD TV Setting Up Your LCD TV How to install the TV Stand Read all four screws. Attach the Stand the TV with the bottom foam packaging material still attached...
User Guide
Page 11
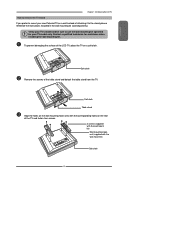
... damaging the surface of attaching it to the stand, please reference the instructions included in the wall mounting kit (sold separately). Verify your TV's model and be sure to use the wall mounting kit specified for assistance when installing the wall mounting kit. ENGLISH Chapter 1... Introducing the LCD TV How to remove the TV Stand If you prefer to mount your TV model only. Contact a qualified technician for your new Polaroid TV on a wall instead of the LCD TV, place the TV on the wall mounting hook units with the wall mount...
... damaging the surface of attaching it to the stand, please reference the instructions included in the wall mounting kit (sold separately). Verify your TV's model and be sure to use the wall mounting kit specified for assistance when installing the wall mounting kit. ENGLISH Chapter 1... Introducing the LCD TV How to remove the TV Stand If you prefer to mount your TV model only. Contact a qualified technician for your new Polaroid TV on a wall instead of the LCD TV, place the TV on the wall mounting hook units with the wall mount...
User Guide
Page 12
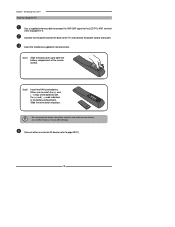
...the power cord to wall outlet. Slide the cover back into place. Insert the 2 batteries supplied in the battery compartment. Make sure to the LCD TV's ANT. Do not use caustic cleaners (porcelain, stainless steel, toilet, or oven cleaner etc.) on the remote, as it may suffer damage.... an external AV device (refer to page15-17). Step2 Insert two AAA size batteries. terminal (refer to page19-27). 10 Chapter 1 Introducing the LCD TV How to setup the TV Use a supplied antenna cable to connect the VHF/UHF signal to match the (+) and ( - ) ends of the batteries with the (+) and ...
...the power cord to wall outlet. Slide the cover back into place. Insert the 2 batteries supplied in the battery compartment. Make sure to the LCD TV's ANT. Do not use caustic cleaners (porcelain, stainless steel, toilet, or oven cleaner etc.) on the remote, as it may suffer damage.... an external AV device (refer to page15-17). Step2 Insert two AAA size batteries. terminal (refer to page19-27). 10 Chapter 1 Introducing the LCD TV How to setup the TV Use a supplied antenna cable to connect the VHF/UHF signal to match the (+) and ( - ) ends of the batteries with the (+) and ...
User Guide
Page 13
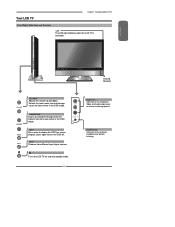
... down through channels. VIDEO L R VIDEO1 IN MENU Press once to the external headphone for items when in the OSD mode. Turns the LCD TV on screen display), press again to the composite Video and Audio output jacks on external video equipment. Selects the main-menu item and change values... for private listening. Selects sub-menu item when in the OSD mode. Your LCD TV Chapter 1 Introducing the LCD TV Front/Right Side View and Controls LED The LED light indicates when the LCD TV is activated. VIDEO1 IN Connects to turn the OSD off.
... down through channels. VIDEO L R VIDEO1 IN MENU Press once to the external headphone for items when in the OSD mode. Turns the LCD TV on screen display), press again to the composite Video and Audio output jacks on external video equipment. Selects the main-menu item and change values... for private listening. Selects sub-menu item when in the OSD mode. Your LCD TV Chapter 1 Introducing the LCD TV Front/Right Side View and Controls LED The LED light indicates when the LCD TV is activated. VIDEO1 IN Connects to turn the OSD off.

User Guide
Page 14
VGA IN Connects the PC, or other AV equipment with component(YPbPr) video and audio output jacks. HDTV/TV Air/CABLE VHF/UHF IN TV CABLE/AIR Connects RF input from VHF/UHF antenna or cable to the AC power cord. 12 AC IN Connects to receive high/standard de&#.... The AUDIO(L/R) of HDMI IN is for DVI connection. AUDIO OUT-STEREO Connects to the AUDIO(L/R) input jacks on external video equipment. Chapter 1 Introducing the LCD TV Rear View and Jacks VIDEO2 IN Connects to the composite VIDEO and AUDIO(L/R) output jacks on AV equipment. HDMI1 IN/HDMI2 IN Connects all digital...
VGA IN Connects the PC, or other AV equipment with component(YPbPr) video and audio output jacks. HDTV/TV Air/CABLE VHF/UHF IN TV CABLE/AIR Connects RF input from VHF/UHF antenna or cable to the AC power cord. 12 AC IN Connects to receive high/standard de&#.... The AUDIO(L/R) of HDMI IN is for DVI connection. AUDIO OUT-STEREO Connects to the AUDIO(L/R) input jacks on external video equipment. Chapter 1 Introducing the LCD TV Rear View and Jacks VIDEO2 IN Connects to the composite VIDEO and AUDIO(L/R) output jacks on AV equipment. HDMI1 IN/HDMI2 IN Connects all digital...
User Guide
Page 15
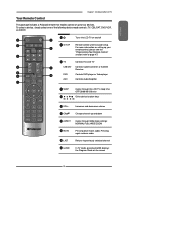
.../90/120 mins Other device function keys 6 VOL+- ENGLISH Your Remote Control Chapter 1 Introducing the LCD TV This package includes a Polaroid remote that enables control of the following device mode controls: TV, CBL/SAT, DVD/VCR, or AUDIO. 2 SET UP 1 3 TV CAB/ SAT DVD AUX SLEEP 4 DVD MENU 5 6 VOL CH PAGE 7 8 9 MUTE ASPECT LAST 10...
.../90/120 mins Other device function keys 6 VOL+- ENGLISH Your Remote Control Chapter 1 Introducing the LCD TV This package includes a Polaroid remote that enables control of the following device mode controls: TV, CBL/SAT, DVD/VCR, or AUDIO. 2 SET UP 1 3 TV CAB/ SAT DVD AUX SLEEP 4 DVD MENU 5 6 VOL CH PAGE 7 8 9 MUTE ASPECT LAST 10...
User Guide
Page 16
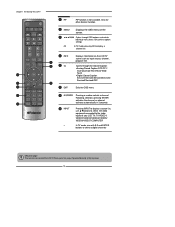
...Pressing INPUT to display a source list, use ▲▼buttons to select the video equipment connected to the video inputs of your LCD TV: TV/VIDEO1/ VIDEO2/VIDEO3/VIDEO4/VIDEO5/ VIDEO6/VIDEO7/COMPUTER ▪ In TV mode, use with 0-9 and ENTER buttons to select a digital channels Effective range: The remote can control the... LCD TV from up to display a channel list 15 INFO Displays information on the screen. 14 OK Cycles through the Closed Caption: Analog Closed Caption:OFF...
...Pressing INPUT to display a source list, use ▲▼buttons to select the video equipment connected to the video inputs of your LCD TV: TV/VIDEO1/ VIDEO2/VIDEO3/VIDEO4/VIDEO5/ VIDEO6/VIDEO7/COMPUTER ▪ In TV mode, use with 0-9 and ENTER buttons to select a digital channels Effective range: The remote can control the... LCD TV from up to display a channel list 15 INFO Displays information on the screen. 14 OK Cycles through the Closed Caption: Analog Closed Caption:OFF...

User Guide
Page 17
...brief explanation of the type of any AC power cords to wall outlets until all other connections are more important than those for good color TV reception are completed. F-type connector 75-ohm coaxial cable (round) ■ A 300-ohm system is a flat twin-lead cable (... any external equipment to be connected. For this reason, a good quality outdoor antenna is strongly recommended. ENGLISH Chapter 2 Installing the LCD TV Chapter 2 Installing the LCD TV Refer to the owner's manual of connection that is provided with the various antenna systems. ■ A 75-ohm system is generally...
...brief explanation of the type of any AC power cords to wall outlets until all other connections are more important than those for good color TV reception are completed. F-type connector 75-ohm coaxial cable (round) ■ A 300-ohm system is a flat twin-lead cable (... any external equipment to be connected. For this reason, a good quality outdoor antenna is strongly recommended. ENGLISH Chapter 2 Installing the LCD TV Chapter 2 Installing the LCD TV Refer to the owner's manual of connection that is provided with the various antenna systems. ■ A 75-ohm system is generally...
User Guide
Page 18
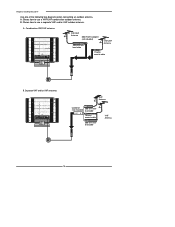
A: Shows how to use a VHF/UHF combination outdoor antenna. Combination VHF/UHF antenna VHF/UHF Antenna 300/75-ohm adapter (not included) 300-ohm twinlead cable VHF/UHF Antenna 75-ohm coaxial cable B. Chapter 2 Installing the LCD TV Use one of the following two diagrams when connecting an outdoor antenna. A. B: Shows how to use a separate VHF and/or UHF outdoor antenna. Separate VHF and/or UHF antennas UHF Antenna Combiner (not included) O U T IN 300-ohm twinlead cable 75-ohm coaxial cable 300-ohm twinlead cable VHF Antenna 16
A: Shows how to use a VHF/UHF combination outdoor antenna. Combination VHF/UHF antenna VHF/UHF Antenna 300/75-ohm adapter (not included) 300-ohm twinlead cable VHF/UHF Antenna 75-ohm coaxial cable B. Chapter 2 Installing the LCD TV Use one of the following two diagrams when connecting an outdoor antenna. A. B: Shows how to use a separate VHF and/or UHF outdoor antenna. Separate VHF and/or UHF antennas UHF Antenna Combiner (not included) O U T IN 300-ohm twinlead cable 75-ohm coaxial cable 300-ohm twinlead cable VHF Antenna 16

User Guide
Page 19
...not included) is required to provide two inputs (A and B). ENGLISH Chapter 2 Installing the LCD TV Cable TV (CATV) Connection This reminder is provided to call the CATV system installer's attention to Article 820-40 of the National Electrical Code (NEC) that the cable ground shall be connected to the ...grounding system of the building accurately, or as close to the point of programs broadcasted on installing cable TV, consult your cable TV company.) For more speci&#...
...not included) is required to provide two inputs (A and B). ENGLISH Chapter 2 Installing the LCD TV Cable TV (CATV) Connection This reminder is provided to call the CATV system installer's attention to Article 820-40 of the National Electrical Code (NEC) that the cable ground shall be connected to the ...grounding system of the building accurately, or as close to the point of programs broadcasted on installing cable TV, consult your cable TV company.) For more speci&#...

User Guide
Page 20
...a 4A 250V - 5x20mm Time Lag Fuse (Slow Blow) to protect your TV. Firm Plastic Prying Tool (Using a metal tool may cause shock) Back of the TV and connect the power cord to the LCD TV's TV CABLE terminal. Always disconnect the LCD TV from the socket. 18 If the fuse is equipped with a safety fuse.... The POWER button on the LCD TV. HDTV/TV Air/CABLE VHF/UHF IN Connect the AC power cord...
...a 4A 250V - 5x20mm Time Lag Fuse (Slow Blow) to protect your TV. Firm Plastic Prying Tool (Using a metal tool may cause shock) Back of the TV and connect the power cord to the LCD TV's TV CABLE terminal. Always disconnect the LCD TV from the socket. 18 If the fuse is equipped with a safety fuse.... The POWER button on the LCD TV. HDTV/TV Air/CABLE VHF/UHF IN Connect the AC power cord...

User Guide
Page 21
...press the OK button. Use the ▪ (INPUT button) with 0-9 buttons to select digital channel (for example 9.1) Channel List 5-2 RF5-2 9-1 KQED-HD 9-2 KOED-SD 8 CCT 12 13 15 The digital main channel might include many subchannels (for each RF input to create a list of receivable channels ...92..) that are showing program at the same time. 19 ENGLISH Chapter 2 Installing the LCD TV Press the button on the remote to turn on the LCD TV. (Scroll down using the UP/DOWN buttons to see Computer-VGA option) Main TV(CABLE/AIR) VIDEO1 (SIDE) VIDEO2 (REAR) VIDEO3 (S-VIDEO) VIDEO4 (YPbPr1) VIDEO5 ...
...press the OK button. Use the ▪ (INPUT button) with 0-9 buttons to select digital channel (for example 9.1) Channel List 5-2 RF5-2 9-1 KQED-HD 9-2 KOED-SD 8 CCT 12 13 15 The digital main channel might include many subchannels (for each RF input to create a list of receivable channels ...92..) that are showing program at the same time. 19 ENGLISH Chapter 2 Installing the LCD TV Press the button on the remote to turn on the LCD TV. (Scroll down using the UP/DOWN buttons to see Computer-VGA option) Main TV(CABLE/AIR) VIDEO1 (SIDE) VIDEO2 (REAR) VIDEO3 (S-VIDEO) VIDEO4 (YPbPr1) VIDEO5 ...

User Guide
Page 22
... to connect the VCR's s-video output jack to the LCD TV's audio inputs. Chapter 2 Installing the LCD TV Connecting a VCR Rear of the LCD TV or other connected equipment. METHOD B: Use an audio cable to connect the VCR's audio output jacks to the LCD TV's S-VIDEO IN input jack. Connect all AC power sources..., before turning on the remote to select VIDEO2( METHOD A), or VIDEO3 (METHOD B). 20 To watch a videotape, press the INPUT button on the power switch of TV HDMI 2 IN HDMI 1 IN AUDIO...
... to connect the VCR's s-video output jack to the LCD TV's audio inputs. Chapter 2 Installing the LCD TV Connecting a VCR Rear of the LCD TV or other connected equipment. METHOD B: Use an audio cable to connect the VCR's audio output jacks to the LCD TV's S-VIDEO IN input jack. Connect all AC power sources..., before turning on the remote to select VIDEO2( METHOD A), or VIDEO3 (METHOD B). 20 To watch a videotape, press the INPUT button on the power switch of TV HDMI 2 IN HDMI 1 IN AUDIO...

User Guide
Page 23
...cable to connect the video camera's or game console's audio output jacks to a TV. Connect all cameras have the ability to connect to the LCD TV's audio inputs. Not all AC power sources, before turning on the LCD TV. Use an S-Video cable to connect the video camera's or game console's s-... jacks or VIDEO1 IN jacks. A METHOD A: Use a composite cable to connect the video camera's or game console's composite video/audio jacks to the LCD TV's S-VIDEO IN input jack. Press the button on the remote to select VIDEO2/VIDEO1( METHOD A), or VIDEO3 (METHOD B). To watch a video vis camera...
...cable to connect the video camera's or game console's audio output jacks to a TV. Connect all cameras have the ability to connect to the LCD TV's audio inputs. Not all AC power sources, before turning on the LCD TV. Use an S-Video cable to connect the video camera's or game console's s-... jacks or VIDEO1 IN jacks. A METHOD A: Use a composite cable to connect the video camera's or game console's composite video/audio jacks to the LCD TV's S-VIDEO IN input jack. Press the button on the remote to select VIDEO2/VIDEO1( METHOD A), or VIDEO3 (METHOD B). To watch a video vis camera...
User Guide
Page 24
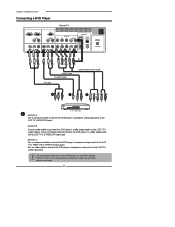
... jacks on your DVD player's user guide. 22 METHOD C: Use a component cable to connect the DVD player's component output jacks to the LCD TV's audio inputs. For an explanation of TV HDMI 2 IN HDMI 1 IN AUDIO L R VGA IN AUDIO L R L R VIDEO AUDIO VIDEO2 IN S-VIDEO L AUDIO R S-VIDEO IN ... to connect the DVD player's component audio jacks to the LCD TV's S-VIDEO IN input jack. Use an S-Video cable to connect the DVD player's s-video output jack to the LCD TV's audio input jacks. Chapter 2 Installing the LCD TV Connecting a DVD Player Rear of component video, see your ...
... jacks on your DVD player's user guide. 22 METHOD C: Use a component cable to connect the DVD player's component output jacks to the LCD TV's audio inputs. For an explanation of TV HDMI 2 IN HDMI 1 IN AUDIO L R VGA IN AUDIO L R L R VIDEO AUDIO VIDEO2 IN S-VIDEO L AUDIO R S-VIDEO IN ... to connect the DVD player's component audio jacks to the LCD TV's S-VIDEO IN input jack. Use an S-Video cable to connect the DVD player's s-video output jack to the LCD TV's audio input jacks. Chapter 2 Installing the LCD TV Connecting a DVD Player Rear of component video, see your ...

User Guide
Page 25
ENGLISH Chapter 2 Installing the LCD TV Connect all AC power sources, before turning on the power switch of a composite video or S-video cable. 23 To watch a DVD, press the INPUT button on the LCD TV. For best picture quality, if your equipment has component video output, use a component cable instead of the LCD TV or other connected equipment. Press the button on the remote to turn on the remote to select VIDEO2( METHOD A), or VIDEO3 ( METHOD B), or VIDEO4/VIDEO5 (METHOD C).
ENGLISH Chapter 2 Installing the LCD TV Connect all AC power sources, before turning on the power switch of a composite video or S-video cable. 23 To watch a DVD, press the INPUT button on the LCD TV. For best picture quality, if your equipment has component video output, use a component cable instead of the LCD TV or other connected equipment. Press the button on the remote to turn on the remote to select VIDEO2( METHOD A), or VIDEO3 ( METHOD B), or VIDEO4/VIDEO5 (METHOD C).


