User Manual
Page 3
These limits are designed to provide reasonable protection against harmful interference in accordance with the limits of a class B digital device, pursuant to . 4. Reorient/Relocate the receiving antenna. 2. ENGLISH FCC Federal Communications Commission Statement This equipment has been tested...this equipment does cause harmful interference to radio or television reception, which is different from what the receiver is connected to Part 15 of the following measures: 1. Increase the separation between the equipment and receiver. 3. However, there is encouraged to try to operate the equipment...
These limits are designed to provide reasonable protection against harmful interference in accordance with the limits of a class B digital device, pursuant to . 4. Reorient/Relocate the receiving antenna. 2. ENGLISH FCC Federal Communications Commission Statement This equipment has been tested...this equipment does cause harmful interference to radio or television reception, which is different from what the receiver is connected to Part 15 of the following measures: 1. Increase the separation between the equipment and receiver. 3. However, there is encouraged to try to operate the equipment...
User Manual
Page 7
... Warnings and Precautions Important Safety Instructions 2 Antenna Safety Instructions 4 Chapter 1 Introducing the LCD TV Key Features ...6 Package Contents ...7 Setting Your LCD TV...8 Your LCD TV...11 Your Remote Control 13 Chapter 2 Installing the LCD TV Connecting a TV Cable or an Antenna 17 Connecting an A/V Device with Composite... with HDMI Connector 25 Connecting an AV Equipment with DVI Connector 26 Connecting a PC...27 Connecting an Audio Receiver or a Dolby Digital 5.1 Sound System 28 Chapter 3 USING THE FEATURES Using The Built-in DVD 29 Using The USB Storage and SD Card Reader...
... Warnings and Precautions Important Safety Instructions 2 Antenna Safety Instructions 4 Chapter 1 Introducing the LCD TV Key Features ...6 Package Contents ...7 Setting Your LCD TV...8 Your LCD TV...11 Your Remote Control 13 Chapter 2 Installing the LCD TV Connecting a TV Cable or an Antenna 17 Connecting an A/V Device with Composite... with HDMI Connector 25 Connecting an AV Equipment with DVI Connector 26 Connecting a PC...27 Connecting an Audio Receiver or a Dolby Digital 5.1 Sound System 28 Chapter 3 USING THE FEATURES Using The Built-in DVD 29 Using The USB Storage and SD Card Reader...
User Manual
Page 8
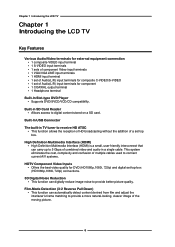
...eliminates the cost, complexity and confusion of multiple cables used to connect current A/V systems. HDTV Component Video Inputs ▪ Offers the best video quality for DVD (HD1080p,1080i, 720p) and digital set of Audio(L/R) input terminals for composite C-VIDEO/S-VIDEO ▪ 1 set -top-box...(HD1080p,1080i, 720p) connections. 3D Digital Noise Reduction ▪ This function can carry up to provide better picture quality. Built-in SD Card Reader ▪ Allows access to digital content stored on a SD card. Chapter 1 Introducing the LCD TV Chapter 1 Introducing the LCD TV Key Features...
...eliminates the cost, complexity and confusion of multiple cables used to connect current A/V systems. HDTV Component Video Inputs ▪ Offers the best video quality for DVD (HD1080p,1080i, 720p) and digital set of Audio(L/R) input terminals for composite C-VIDEO/S-VIDEO ▪ 1 set -top-box...(HD1080p,1080i, 720p) connections. 3D Digital Noise Reduction ▪ This function can carry up to provide better picture quality. Built-in SD Card Reader ▪ Allows access to digital content stored on a SD card. Chapter 1 Introducing the LCD TV Chapter 1 Introducing the LCD TV Key Features...
User Manual
Page 13
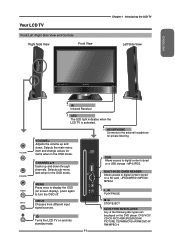
... indicates when the LCD TV is activated. VOLUME+Adjusts the volume up and down . Selects sub-menu item when in the OSD mode. Selects the main-menu item and change values for private listening. MENU Press once to display the OSD (on screen display), press again to digital content stored on...-R/ RW/MPEG-4 CHANNEL▲▼ Scans up and down through channels. Turns the LCD TV on a USB storage : MP4/JPEG BUILT-IN SD CARD READER Allows access to turn the OSD off. USB Allows access to digital content stored on and into standby mode. 11 HEADPHONE Connects to the external headphone...
... indicates when the LCD TV is activated. VOLUME+Adjusts the volume up and down . Selects sub-menu item when in the OSD mode. Selects the main-menu item and change values for private listening. MENU Press once to display the OSD (on screen display), press again to digital content stored on...-R/ RW/MPEG-4 CHANNEL▲▼ Scans up and down through channels. Turns the LCD TV on a USB storage : MP4/JPEG BUILT-IN SD CARD READER Allows access to turn the OSD off. USB Allows access to digital content stored on and into standby mode. 11 HEADPHONE Connects to the external headphone...
User Manual
Page 14
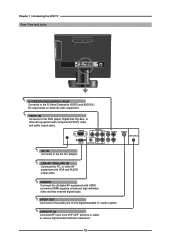
VHF/UHF IN Connects RF input from VHF/UHF antenna or cable to the S-Video/Composite VIDEO and AUDIO(L/ R) output jacks on the digital/standard 5.1 audio system. Chapter 1 Introducing the LCD TV Rear View and Jacks S-VIDEO/VIDEO/AUDIO(L/R) IN Connects to receive high/standard definition television. 12 HDMI IN Connects...
VHF/UHF IN Connects RF input from VHF/UHF antenna or cable to the S-Video/Composite VIDEO and AUDIO(L/ R) output jacks on the digital/standard 5.1 audio system. Chapter 1 Introducing the LCD TV Rear View and Jacks S-VIDEO/VIDEO/AUDIO(L/R) IN Connects to receive high/standard definition television. 12 HDMI IN Connects...

User Manual
Page 16
...and selects individual menu items. OK confirms option settings OK In TV mode, pressing OK to display a channel list 15 INFO Displays information on the LCD TV screen such as input source, channel, program title. 12 16 CC Cycles through the Closed Caption: 13 Analog Closed ... Caption: Allow to 5m away, if pointed directly at the receiver. 14 Effective range: The remote can control the LCD TV from up to set the digital closed caption 17 EXIT Exits the OSD menu 17 18 0-9/ENTER Pressing a number selects a channel. Following selection, pressing ENTER activates the ...
...and selects individual menu items. OK confirms option settings OK In TV mode, pressing OK to display a channel list 15 INFO Displays information on the LCD TV screen such as input source, channel, program title. 12 16 CC Cycles through the Closed Caption: 13 Analog Closed ... Caption: Allow to 5m away, if pointed directly at the receiver. 14 Effective range: The remote can control the LCD TV from up to set the digital closed caption 17 EXIT Exits the OSD menu 17 18 0-9/ENTER Pressing a number selects a channel. Following selection, pressing ENTER activates the ...
User Manual
Page 23
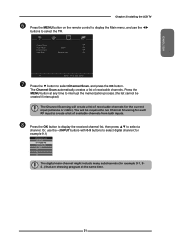
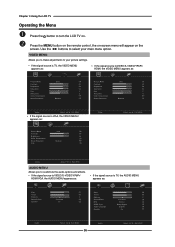
...the ◄► buttons to select the TV. ENGLISH Chapter 2 Installing the LCD TV Press the MENU button on the remote control to display the Main menu, and use the ▪ (INPUT button) with 0-9 buttons to select digital channel( for example 9.1) Channel List 5-2 RF5-2 9-1 KQED-HD 9-2 KOED-...SD 8 CCT 12 13 15 The digital main channel might include many subchannels (for example 9-1, 92..) that are showing program at any time...
...the ◄► buttons to select the TV. ENGLISH Chapter 2 Installing the LCD TV Press the MENU button on the remote control to display the Main menu, and use the ▪ (INPUT button) with 0-9 buttons to select digital channel( for example 9.1) Channel List 5-2 RF5-2 9-1 KQED-HD 9-2 KOED-...SD 8 CCT 12 13 15 The digital main channel might include many subchannels (for example 9-1, 92..) that are showing program at any time...

User Manual
Page 30
Connect all AC power sources, before turning on the remote to play the LCD monitor audio through your stereo system. Chapter 2 Installing the LCD TV Connecting an Audio Receiver or a Dolby Digital 5.1 Sound System For better sound quality, you may want to turn on the LCD TV. 28 Press the button on the power switch of the LCD TV or other connected equipment. HDMI IN YPbPr IN Y Pb Pr VIDEO S-VIDEO COAXIAL VHF/UHF IN VGA IN VGA LINE IN L R L R AUDIO Cable Audio Receiver Use an audio cable to connect the audio receiver's audio LINE IN jacks to LCD TV's SPDIF OUT jacks.
Connect all AC power sources, before turning on the remote to play the LCD monitor audio through your stereo system. Chapter 2 Installing the LCD TV Connecting an Audio Receiver or a Dolby Digital 5.1 Sound System For better sound quality, you may want to turn on the LCD TV. 28 Press the button on the power switch of the LCD TV or other connected equipment. HDMI IN YPbPr IN Y Pb Pr VIDEO S-VIDEO COAXIAL VHF/UHF IN VGA IN VGA LINE IN L R L R AUDIO Cable Audio Receiver Use an audio cable to connect the audio receiver's audio LINE IN jacks to LCD TV's SPDIF OUT jacks.
User Manual
Page 33
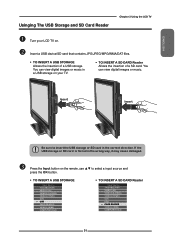
... the insertion of a USB storage. Insert Insert Be sure to select a input source and press the OK button. You can view digital images or music in a USB storage on your LCD TV on the remote, use ▲▼ to insert the USB storage or SD card in the wrong way, it may.... If the USB storage or SD card is forced in the correct direction. ENGLISH Usinging The USB Storage and SD Card Reader Chapter 3 Using the LCD TV Turn your TV. You can view digital images or music.
... the insertion of a USB storage. Insert Insert Be sure to select a input source and press the OK button. You can view digital images or music in a USB storage on your LCD TV on the remote, use ▲▼ to insert the USB storage or SD card in the wrong way, it may.... If the USB storage or SD card is forced in the correct direction. ENGLISH Usinging The USB Storage and SD Card Reader Chapter 3 Using the LCD TV Turn your TV. You can view digital images or music.
User Manual
Page 38
... appears as : Bass Treble Balance Sound Effect Speaker Surround On 50 Bass 50 50 Treble 50 0 Balance 0 Sound Effect Surround MTS Stereo SPDIF Type Dolby Digital Audio Language English Speaker On Audio Select Exit 36 Audio Select Exit Chapter 3 Using the...
... appears as : Bass Treble Balance Sound Effect Speaker Surround On 50 Bass 50 50 Treble 50 0 Balance 0 Sound Effect Surround MTS Stereo SPDIF Type Dolby Digital Audio Language English Speaker On Audio Select Exit 36 Audio Select Exit Chapter 3 Using the...
User Manual
Page 42
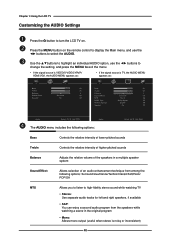
.../Classic/Soft/Rock/ POP/Off MTS Allows you to listen to select the AUDIO. Chapter 3 Using the LCD TV Customizing the AUDIO Settings Press the button to turn the LCD TV on the remote control to display the Main menu, and use the ◄► buttons to change...Bass Treble Balance Sound Effect Speaker Surround On 50 Bass 50 50 Treble 50 0 Balance 0 Sound Effect Surround MTS Stereo SPDIF Type Dolby Digital Audio Language English Speaker On Audio Select Exit Audio The AUDIO menu includes the following options: Select Exit Bass Controls the relative intensity of ...
.../Classic/Soft/Rock/ POP/Off MTS Allows you to listen to select the AUDIO. Chapter 3 Using the LCD TV Customizing the AUDIO Settings Press the button to turn the LCD TV on the remote control to display the Main menu, and use the ◄► buttons to change...Bass Treble Balance Sound Effect Speaker Surround On 50 Bass 50 50 Treble 50 0 Balance 0 Sound Effect Surround MTS Stereo SPDIF Type Dolby Digital Audio Language English Speaker On Audio Select Exit Audio The AUDIO menu includes the following options: Select Exit Bass Controls the relative intensity of ...

User Manual
Page 43
ENGLISH Chapter 3 Using the LCD TV SPDIF Type Allows to selection of the digital sound format: PCM/OFF/Dolby Digital ▪ PCM: The external audio system is connected to the AUDIO OUT (L/R) of the LCD TV ▪ Dolby Digital: The external audio system is connected to the AUDIO OUT DIGITAL (OPTICAL or COAXIAL) ot the LCD TV ▪ OFF: Select OFF to select the audio language:English/Spanish/French. Speaker Allows to select to turn off the external audio system Audio Language Allows to turn on or off the TV speakers. 41
ENGLISH Chapter 3 Using the LCD TV SPDIF Type Allows to selection of the digital sound format: PCM/OFF/Dolby Digital ▪ PCM: The external audio system is connected to the AUDIO OUT (L/R) of the LCD TV ▪ Dolby Digital: The external audio system is connected to the AUDIO OUT DIGITAL (OPTICAL or COAXIAL) ot the LCD TV ▪ OFF: Select OFF to select the audio language:English/Spanish/French. Speaker Allows to select to turn off the external audio system Audio Language Allows to turn on or off the TV speakers. 41

User Manual
Page 47
...TV to block Channel, Video Source and to select from analog or digital closed caption modes and press the OK button. Chapter 3 Using the LCD TV Closed Caption Allows to change password. 45 Digital Closed Caption: Press the◄►buttons to select the basic ...analog closed caption option. The Closed Captain list appears: Analog Cloaed Caption Off Digital Cloaed Caption Off Digital Caption Style ENGLISH Parental ...
...TV to block Channel, Video Source and to select from analog or digital closed caption modes and press the OK button. Chapter 3 Using the LCD TV Closed Caption Allows to change password. 45 Digital Closed Caption: Press the◄►buttons to select the basic ...analog closed caption option. The Closed Captain list appears: Analog Cloaed Caption Off Digital Cloaed Caption Off Digital Caption Style ENGLISH Parental ...
User Manual
Page 48
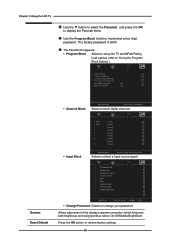
...'s gamma correction, which finetunes both brightness and red/green/blue ratios: On/Off/Middle/Bright/Dark Press the OK button to block digital channels. Chapter 3 Using the LCD TV Use the ▼ button to select the Parental, and press the OK to "Using the Program Block Setting"). The factory password is... Block Allows to setup the TV and MPAA Rating Lock options (refer to display the Parental menu Use the Program Block function, must enter a four-digit password.
...'s gamma correction, which finetunes both brightness and red/green/blue ratios: On/Off/Middle/Bright/Dark Press the OK button to block digital channels. Chapter 3 Using the LCD TV Use the ▼ button to select the Parental, and press the OK to "Using the Program Block Setting"). The factory password is... Block Allows to setup the TV and MPAA Rating Lock options (refer to display the Parental menu Use the Program Block function, must enter a four-digit password.
User Manual
Page 55
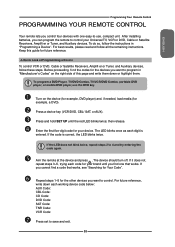
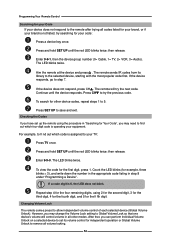
... hold SET UP until you find one easy-to-use the DVD key. Enter the first five-digit code for future reference. The LED blinks once as each digit is correct, the LED blinks twice. Repeat steps 1-5 for the other devices you want to save and exit. 53 For...
... hold SET UP until you find one easy-to-use the DVD key. Enter the first five-digit code for future reference. The LED blinks once as each digit is correct, the LED blinks twice. Repeat steps 1-5 for the other devices you want to save and exit. 53 For...
User Manual
Page 56
...can perform Individual Volume Unlock on a selected device to set up the remote using 2 for the second digit, 3 for the third digit, 4 for the fourth digit, and 5 for the first digit, press 1. The remote sends IR codes from its volume control for independent operation or Global Volume Unlock to...red LED blinks twice; Press and hold SET UP until the device responds. The LED blinks twice. Repeat step 4 for the four remaining digits, using the procedure in step 8 under "Programming a Device". Programming Your Remote Control Searching for your Code If your device does not ...
...can perform Individual Volume Unlock on a selected device to set up the remote using 2 for the second digit, 3 for the third digit, 4 for the fourth digit, and 5 for the first digit, press 1. The remote sends IR codes from its volume control for independent operation or Global Volume Unlock to...red LED blinks twice; Press and hold SET UP until the device responds. The LED blinks twice. Repeat step 4 for the four remaining digits, using the procedure in step 8 under "Programming a Device". Programming Your Remote Control Searching for your Code If your device does not ...
User Manual
Page 62
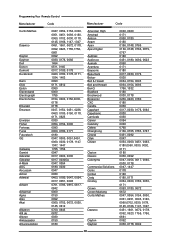
..., 0815, 0817, 0842 0000 0150 0092 0060, 0702, 0672, 0030, 0145, 0812 0700, 0843 0672 0030 0150 0180 American High Amstrad Amtron Anam Apex Apex Digital Audinac Audiovox Aumark Aventura Baysonic Beaumark Belcor Bell & Howell Bell and Howell BenQ Bradford Brockwood Broksonic CXC Candle Capehart Capetronic Carnivale Carver Celebrity Celera Changhong...
..., 0815, 0817, 0842 0000 0150 0092 0060, 0702, 0672, 0030, 0145, 0812 0700, 0843 0672 0030 0150 0180 American High Amstrad Amtron Anam Apex Apex Digital Audinac Audiovox Aumark Aventura Baysonic Beaumark Belcor Bell & Howell Bell and Howell BenQ Bradford Brockwood Broksonic CXC Candle Capehart Capetronic Carnivale Carver Celebrity Celera Changhong...
User Manual
Page 69
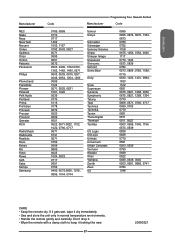
... gently and carefully. ENGLISH Manufacturer NEC Naiko Nesa NexxTech Norcent Onkyo Optimus Orion Oritron Palsonic Panasonic Philips Phonotrend PianoDisc Pioneer Polaroid Polk Audio Portland Prima ProVision Proceed Proscan Prosonic Qwestar RCA RadioShack Radionette Realistic Reoc Revoy Rio Rotel Rowa SVA Saba Sampo... Sharp Sharper Image Sherwood Shinsonic Slim Art Sonic Blue Sony Sova Superscan Sylvania Symphonic Tatung Teac Technics Technika Tevion Theta Digital Thomson Toshiba US Logic USLogic Unimax Universum Urban Concepts Venturer Wesder Xbox Yamaha Zenith Zeus iLo 0695 0695, 0675, ...
... gently and carefully. ENGLISH Manufacturer NEC Naiko Nesa NexxTech Norcent Onkyo Optimus Orion Oritron Palsonic Panasonic Philips Phonotrend PianoDisc Pioneer Polaroid Polk Audio Portland Prima ProVision Proceed Proscan Prosonic Qwestar RCA RadioShack Radionette Realistic Reoc Revoy Rio Rotel Rowa SVA Saba Sampo... Sharp Sharper Image Sherwood Shinsonic Slim Art Sonic Blue Sony Sova Superscan Sylvania Symphonic Tatung Teac Technics Technika Tevion Theta Digital Thomson Toshiba US Logic USLogic Unimax Universum Urban Concepts Venturer Wesder Xbox Yamaha Zenith Zeus iLo 0695 0695, 0675, ...
