User Manual
Page 2
And while our selection has changed, you with years of Contents Polaroid. Table of Contents Important Information ...1 Important Safety Precautions ...2 Setup ...5 Identification of Controls ...8 Connections ...11 Basic Operations ...17 Memorizing the Channels...18 Channel Selection ...20 Setting Picture ...21 Setting Sound ...22 Time Set and Sleep Timer ...23 Viewing Closed Captions ...24 Setting Parental Control...25 Screen Setup for their photography needs. Add a little color to your new Polaroid Plasma TV purchase. Table of enjoyment, please read this...
And while our selection has changed, you with years of Contents Polaroid. Table of Contents Important Information ...1 Important Safety Precautions ...2 Setup ...5 Identification of Controls ...8 Connections ...11 Basic Operations ...17 Memorizing the Channels...18 Channel Selection ...20 Setting Picture ...21 Setting Sound ...22 Time Set and Sleep Timer ...23 Viewing Closed Captions ...24 Setting Parental Control...25 Screen Setup for their photography needs. Add a little color to your new Polaroid Plasma TV purchase. Table of enjoyment, please read this...
User Manual
Page 3
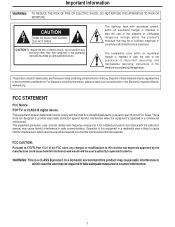
...org FCC STATEMENT FCC Notice PDP TV: A CLASS B digital device This equipment has been tested and found to comply with the instruction manual, may be of sufficient magnitude to constitute a risk of important operating and maintenance (servicing) instructions in which case the user may be regulated due ... installed and used in a commercial environment. WARNING: This is operated in accordance with the limits for a Class B digital device, pursuant to do so. FCC CAUTION: Pursuant to 47CFR, Part 15.21 of electric shock, do not perform any changes or modifications to this monitor not...
...org FCC STATEMENT FCC Notice PDP TV: A CLASS B digital device This equipment has been tested and found to comply with the instruction manual, may be of sufficient magnitude to constitute a risk of important operating and maintenance (servicing) instructions in which case the user may be regulated due ... installed and used in a commercial environment. WARNING: This is operated in accordance with the limits for a Class B digital device, pursuant to do so. FCC CAUTION: Pursuant to 47CFR, Part 15.21 of electric shock, do not perform any changes or modifications to this monitor not...
User Manual
Page 5
... lightning and power-line surges. 15. Stand---Use only with the same characteristics and performance as power-supply cord or plug is spilled on a wall or ceiling, be sure to the product. f. Servicing---Refer all servicing to avoid injury from the wall outlet and disconnect the antenna. Replacement parts---In case the product needs replacement parts, make sure that the product needs servicing. 20.Safety checks---Upon completion of time. For...
... lightning and power-line surges. 15. Stand---Use only with the same characteristics and performance as power-supply cord or plug is spilled on a wall or ceiling, be sure to the product. f. Servicing---Refer all servicing to avoid injury from the wall outlet and disconnect the antenna. Replacement parts---In case the product needs replacement parts, make sure that the product needs servicing. 20.Safety checks---Upon completion of time. For...

User Manual
Page 6
.... Use only the power cord designated by our dealer to be used in case the PDP panel breaks. 24.Pixel defect---The PDP panel is made of glass. If you are not sure of the type of blue, green or red. Power source---This product is dropped or impacted upon by a listed power supply indicated on the screen as VCRs and personal computers, you finely detailed pictures. Important...
.... Use only the power cord designated by our dealer to be used in case the PDP panel breaks. 24.Pixel defect---The PDP panel is made of glass. If you are not sure of the type of blue, green or red. Power source---This product is dropped or impacted upon by a listed power supply indicated on the screen as VCRs and personal computers, you finely detailed pictures. Important...

User Manual
Page 10
... the remote control. 8 Volume 3/4 Press the VOL 4 or VOL3button to adjust the value or setting of Controls MENU VOL CH SOURCE MENU VOL CH REMOTE SENSOR POWER INDICATOR BOTTOM VIEW MENU VOL CH POWER ON/STANDBY MENU CHANNEL DOWN/UP VOLUME DOWN/UP 1. This operation manual provides a description based on the remote control. In OSD Menu, press these buttons to turn the set back to access the MENU main page. 3. POWER Press this button to STANDBY. 2. In OSD Menu, press these buttons...
... the remote control. 8 Volume 3/4 Press the VOL 4 or VOL3button to adjust the value or setting of Controls MENU VOL CH SOURCE MENU VOL CH REMOTE SENSOR POWER INDICATOR BOTTOM VIEW MENU VOL CH POWER ON/STANDBY MENU CHANNEL DOWN/UP VOLUME DOWN/UP 1. This operation manual provides a description based on the remote control. In OSD Menu, press these buttons to turn the set back to access the MENU main page. 3. POWER Press this button to STANDBY. 2. In OSD Menu, press these buttons...

User Manual
Page 12
POWER Turn the unit on or off 2. To select additional products to exit the menu 13. INFO To display channel status or signal information 14 16 11. EXIT Used to be controlled with remote control 2 Note: This remote control is an universal remote control. SLEEP To set Sleep timer 18. STEREO To select STEREO, SAP or MONO 19. INPUT / l 4 To quickly select input source 5 DOT(l): used to adjust volume. 8. VOL+/- Used to enter a program number for...
POWER Turn the unit on or off 2. To select additional products to exit the menu 13. INFO To display channel status or signal information 14 16 11. EXIT Used to be controlled with remote control 2 Note: This remote control is an universal remote control. SLEEP To set Sleep timer 18. STEREO To select STEREO, SAP or MONO 19. INPUT / l 4 To quickly select input source 5 DOT(l): used to adjust volume. 8. VOL+/- Used to enter a program number for...

User Manual
Page 13
.... When connecting an external device, turn the power off on the panel to connect: Connect the Audio/Video cables between the Audio (L/R)/Video jacks on the Optical cable S/PDIF OUT (Optical) OR Audio Processor HIFi System Connect a VCR How to avoid any connections. Refer to select Composite1 (or S-Video if using S-VIDEO terminal). 2. Loose connectors can use the S-video terminal if your PDP TV, press INPUT button on your source supports it. Turn on the remote control to the user manual of the...
.... When connecting an external device, turn the power off on the panel to connect: Connect the Audio/Video cables between the Audio (L/R)/Video jacks on the Optical cable S/PDIF OUT (Optical) OR Audio Processor HIFi System Connect a VCR How to avoid any connections. Refer to select Composite1 (or S-Video if using S-VIDEO terminal). 2. Loose connectors can use the S-video terminal if your PDP TV, press INPUT button on your source supports it. Turn on the remote control to the user manual of the...
User Manual
Page 14
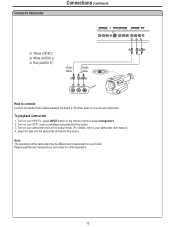
... the user manual of the camcorder may be different and is dependant on the remote control to your VCR , insert a videotape and press the Play button. 3. Insert the tape into the camcorder and press Play button. Connect a Camcorder Connections (continued) Y Yellow (VIDEO) W White (AUDIO L) R Red (AUDIO R ) Video cable Audio cable OUT IN Y WR VIDEO L AUDIO R Y WR How to confirm operation. 12 Note: The operations of your PDP TV , press INPUT button on your model. To...
... the user manual of the camcorder may be different and is dependant on the remote control to your VCR , insert a videotape and press the Play button. 3. Insert the tape into the camcorder and press Play button. Connect a Camcorder Connections (continued) Y Yellow (VIDEO) W White (AUDIO L) R Red (AUDIO R ) Video cable Audio cable OUT IN Y WR VIDEO L AUDIO R Y WR How to confirm operation. 12 Note: The operations of your PDP TV , press INPUT button on your model. To...

User Manual
Page 15
... , press INPUT button on your DVD player, insert a DVD disc and press the Play button. Turn on the remote control to select HDMI. 2. Connect a DVD player Connections (continued) HDMI cable DVD player with HDMI interface How to connect a DVD Player using HDMI Connection: Connect the HDMI cable between the HDMI interface on the unit and HDMI output on the TV 13 Connect the audio cable to the HDMI terminal. Note: If the external device has DVI output only, use a DVI to HDMI adapter cable to connect to the AUDIO IN terminal of D-SUB on the DVD player. To play DVD 1.
... , press INPUT button on your DVD player, insert a DVD disc and press the Play button. Turn on the remote control to select HDMI. 2. Connect a DVD player Connections (continued) HDMI cable DVD player with HDMI interface How to connect a DVD Player using HDMI Connection: Connect the HDMI cable between the HDMI interface on the unit and HDMI output on the TV 13 Connect the audio cable to the HDMI terminal. Note: If the external device has DVI output only, use a DVI to HDMI adapter cable to connect to the AUDIO IN terminal of D-SUB on the DVD player. To play DVD 1.
User Manual
Page 19
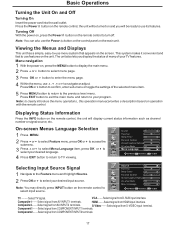
... as channel number or signal source, etc. Note: to select input source. Note: You may directly press INPUT button on the remote control to clearly introduce the menu operations , this operation manual provides a description based on , press the MENU button to display the main menu. 2 Press 5or6 button to select menu page. 3 Press OK or 4 button to turn off. Composite1-------Select signal from S-VIDEO input terminal. Composite2-------Select signal fromAV INPUT2 terminals. Video Audio Setup Feature Source TV Time Set Sleep Timer...
... as channel number or signal source, etc. Note: to select input source. Note: You may directly press INPUT button on the remote control to clearly introduce the menu operations , this operation manual provides a description based on , press the MENU button to display the main menu. 2 Press 5or6 button to select menu page. 3 Press OK or 4 button to turn off. Composite1-------Select signal from S-VIDEO input terminal. Composite2-------Select signal fromAV INPUT2 terminals. Video Audio Setup Feature Source TV Time Set Sleep Timer...
User Manual
Page 20
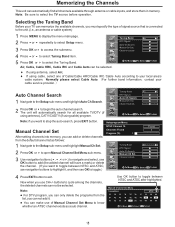
... cable service provider.) Tuning Band Air Auto Channel Search Video DTV Signal Auto Ch Search 1 Navigate to know whether an ATSC channel exists as follows: Found 3 1 Navigate to the Setup sub-menu and highlight Manual Ch Set. 2 Press OK or 4 to open Manual Channel Set Menu sub-menu. 3 Use navigation buttons (5,6,3or4) to navigate and select, use OK button to add (the added channel will automatically search for all channels available through antenna or cable inputs...
... cable service provider.) Tuning Band Air Auto Channel Search Video DTV Signal Auto Ch Search 1 Navigate to know whether an ATSC channel exists as follows: Found 3 1 Navigate to the Setup sub-menu and highlight Manual Ch Set. 2 Press OK or 4 to open Manual Channel Set Menu sub-menu. 3 Use navigation buttons (5,6,3or4) to navigate and select, use OK button to add (the added channel will automatically search for all channels available through antenna or cable inputs...

User Manual
Page 21
... you didn't setup a label for a DTV channel even if you need to adjust your DTV signal is provided on -screen signal strength monitor to see the quality of DTV signal strength monitor to check how strong your antenna or digital cable input. To Move OK To Change Exit To Exit 4 To quit, press EXIT button. 19 Use 5/6 to toggle between NTSC and ATSC, or select channel number, or select...
... you didn't setup a label for a DTV channel even if you need to adjust your DTV signal is provided on -screen signal strength monitor to see the quality of DTV signal strength monitor to check how strong your antenna or digital cable input. To Move OK To Change Exit To Exit 4 To quit, press EXIT button. 19 Use 5/6 to toggle between NTSC and ATSC, or select channel number, or select...

User Manual
Page 24
... SOUND MODE button on the remote control to exit. to navigate or adjust. Video Audio Setup Feature Sound Mode Bass 30 Treble 30 Balance 30 Earphone Vol 30 Digital Audio Output MTS User RAW Mono To Move OK To Select Exit To Exit (The above menu is analog) Option Function Sound Mode Selects sound mode. Choice/Range/Remarks User/News/Music/Movie Note: you can temporarily cut off the sound using the MUTE button...
... SOUND MODE button on the remote control to exit. to navigate or adjust. Video Audio Setup Feature Sound Mode Bass 30 Treble 30 Balance 30 Earphone Vol 30 Digital Audio Output MTS User RAW Mono To Move OK To Select Exit To Exit (The above menu is analog) Option Function Sound Mode Selects sound mode. Choice/Range/Remarks User/News/Music/Movie Note: you can temporarily cut off the sound using the MUTE button...

User Manual
Page 25
... digital channel signal includes information for the current time provided by the auto clock function. 1 Press MENU to display the menu main page. 2 Press 5or6 repeatedly to select Feature menu, press OK or4 to access the submenu. 3 Highlight Time Set menu item, press OK or4 to access the Time Video Audio Setup Source TV Time Set Sleep Timer Off Parental Control Closed Caption Options CC when Mute Off Menu Language English 4 Highlight Time Set Mode and then use...
... digital channel signal includes information for the current time provided by the auto clock function. 1 Press MENU to display the menu main page. 2 Press 5or6 repeatedly to select Feature menu, press OK or4 to access the submenu. 3 Highlight Time Set menu item, press OK or4 to access the Time Video Audio Setup Source TV Time Set Sleep Timer Off Parental Control Closed Caption Options CC when Mute Off Menu Language English 4 Highlight Time Set Mode and then use...
User Manual
Page 26
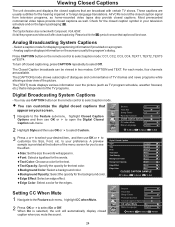
... programs. Digital Broadcasting System Captions - Feature Source TV Time Set Sleep Timer Off Parental Control Closed Caption Options CC when Mute Off Menu Language English To Move OK To Select Exit To Exit 3 Press 5or6 to select your screen. Select a caption mode for the hearing impaired or foreign language translations. The [TEXT] mode displays various information over the picture (such as well. Digital Closed Caption Style Custom Size Normal Font Default Text Color White...
... programs. Digital Broadcasting System Captions - Feature Source TV Time Set Sleep Timer Off Parental Control Closed Caption Options CC when Mute Off Menu Language English To Move OK To Select Exit To Exit 3 Press 5or6 to select your screen. Select a caption mode for the hearing impaired or foreign language translations. The [TEXT] mode displays various information over the picture (such as well. Digital Closed Caption Style Custom Size Normal Font Default Text Color White...
User Manual
Page 29
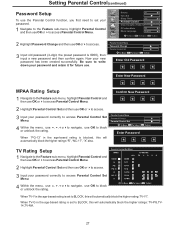
... the age-based rating is set to BLOCK, this will automatically block the higher ratings: TV-PG,TV14,TV-MA. 27 Video Audio Setup Feature Source TV Time Set Sleep Timer Off Parental Control Closed Caption Options CC when Mute Off Menu Language English To Move OK To Select Exit To Exit 2 Highlight Password Change and then use OK or4to access. 3 Input old password (4-digit, the preset password is blocked...
... the age-based rating is set to BLOCK, this will automatically block the higher ratings: TV-PG,TV14,TV-MA. 27 Video Audio Setup Feature Source TV Time Set Sleep Timer Off Parental Control Closed Caption Options CC when Mute Off Menu Language English To Move OK To Select Exit To Exit 2 Highlight Password Change and then use OK or4to access. 3 Input old password (4-digit, the preset password is blocked...
User Manual
Page 30
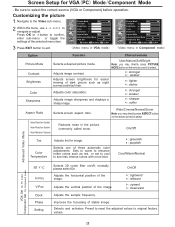
... Component mode) Option Picture Mode Contrast Brightness Color Sharpness Function Choice/remarks Selects a desired picture mode. User/Nature/Soft/Bright Note: you may directly press PICTURE MODE button on /off, normally please select On. On/Off Tint Color Temperature Adjusts tint for easier viewing of the selected menu item. Selects one of the image. Adjusts the vertical position of three automatic color adjustments. Adjusts image contrast. 4: stronger 3: weaker Adjusts screen brightness for image. Video Audio Setup Feature Picture Mode...
... Component mode) Option Picture Mode Contrast Brightness Color Sharpness Function Choice/remarks Selects a desired picture mode. User/Nature/Soft/Bright Note: you may directly press PICTURE MODE button on /off, normally please select On. On/Off Tint Color Temperature Adjusts tint for easier viewing of the selected menu item. Selects one of the image. Adjusts the vertical position of three automatic color adjustments. Adjusts image contrast. 4: stronger 3: weaker Adjusts screen brightness for image. Video Audio Setup Feature Picture Mode...
User Manual
Page 31
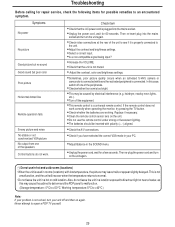
... VGA picture No output from one of the unit to see if it is properly connected to +40°C ) Note: If your problem is not solved, turn your PC. =Adjust Balance in your unit off and then on the unit again. =Check video connections at the rear of the peripherals. =Check whether the room is connected. If the remote control does not work . Troubleshooting...
... VGA picture No output from one of the unit to see if it is properly connected to +40°C ) Note: If your problem is not solved, turn your PC. =Adjust Balance in your unit off and then on the unit again. =Check video connections at the rear of the peripherals. =Check whether the room is connected. If the remote control does not work . Troubleshooting...

User Manual
Page 34
... LED does not blink. 5. Enter 9-9-0. Press SET to the remote after trying all the remaining instructions. To do so, follow the instructions in step 8 under "Programming a Device". ?NOTE: If a code digit is entered. Press a device key once. 2. then release. 3. Turn on the device (for example, DVD player) and, if needed, load media (for future reference. If you may need to find a code that works. Press set up the remote using...
... LED does not blink. 5. Enter 9-9-0. Press SET to the remote after trying all the remaining instructions. To do so, follow the instructions in step 8 under "Programming a Device". ?NOTE: If a code digit is entered. Press a device key once. 2. then release. 3. Turn on the device (for example, DVD player) and, if needed, load media (for future reference. If you may need to find a code that works. Press set up the remote using...
User Manual
Page 35
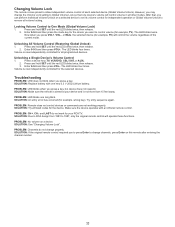
.../DVD, CBL/ SAT, or AUX). 2. The LED blinks four times. SOLUTION: Replace battery with an infrared remote control. PROBLEM: LED blinks one new 3.3 V 2032 Lithium battery. SOLUTION: Try all other modes. PROBLEM: No volume on this remote after entering the channel number. 33 SOLUTION: If the original remote control required you can perform Individual Volume Unlock on a selected device to set its volume control for independent operation or Global Volume Unlock to remove all programmed...
.../DVD, CBL/ SAT, or AUX). 2. The LED blinks four times. SOLUTION: Replace battery with an infrared remote control. PROBLEM: LED blinks one new 3.3 V 2032 Lithium battery. SOLUTION: Try all other modes. PROBLEM: No volume on this remote after entering the channel number. 33 SOLUTION: If the original remote control required you can perform Individual Volume Unlock on a selected device to set its volume control for independent operation or Global Volume Unlock to remove all programmed...


