
User Manual
Page 2
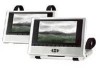
... the unit will not the used for a long time, disconnect the plug from the outlet. POWER SUPPLY: Connect the supplied adapter to the side of the power cord to persons. Plug the two-prong end of the DVD player in the literature accompanying the appliance. Important Safety Instructions CAUTION: TO REDUCE THE RISK OF ELECTRIC SHOCK, DO NOT REMOVE COVER (OR BACK). CAUTION: Laser radiation when open. CAUTION: USE...
... the unit will not the used for a long time, disconnect the plug from the outlet. POWER SUPPLY: Connect the supplied adapter to the side of the power cord to persons. Plug the two-prong end of the DVD player in the literature accompanying the appliance. Important Safety Instructions CAUTION: TO REDUCE THE RISK OF ELECTRIC SHOCK, DO NOT REMOVE COVER (OR BACK). CAUTION: Laser radiation when open. CAUTION: USE...
User Manual
Page 3
... when the apparatus has been damaged in the operating instructions unless you are for use near any way, such as power-supply cord or plug is damaged, liquid has been spilled or objects have fallen into your safety. Note: Do not touch the color TFT LCD screen by qualified service personnel only. A polarized plug has two blades with one wider than that...
... when the apparatus has been damaged in the operating instructions unless you are for use near any way, such as power-supply cord or plug is damaged, liquid has been spilled or objects have fallen into your safety. Note: Do not touch the color TFT LCD screen by qualified service personnel only. A polarized plug has two blades with one wider than that...
User Manual
Page 4
... code information: DVD players and discs are no user serviceable parts inside the unit. CLASS 1 LASER PRODUCT 2. Avoid direct exposure to the Region number of this copyright protection technology must be authorized by Macrovision. This unit complies with FDA regulation for home and other intellectual property rights. Reverse engineering or disassembly is 1. 4 CAUTION: Do not open and interlock failed or defeated. Important Safety Instructions...
... code information: DVD players and discs are no user serviceable parts inside the unit. CLASS 1 LASER PRODUCT 2. Avoid direct exposure to the Region number of this copyright protection technology must be authorized by Macrovision. This unit complies with FDA regulation for home and other intellectual property rights. Reverse engineering or disassembly is 1. 4 CAUTION: Do not open and interlock failed or defeated. Important Safety Instructions...
User Manual
Page 9
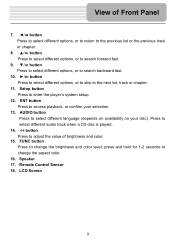
... and hold for 1-2 seconds to change the aspect ratio. 16. Remote Control Sensor 18. Press to select different audio track when a CD disc is played. 14. -/+ button Press to enter the player's system setup. 12. LCD Screen 9 FUNC button Press to change the brightness and color level; Speaker 17. AUDIO button Press to the next list, track or chapter. 11. Setup button Press to adjust the value of Front Panel 7. ◄...
... and hold for 1-2 seconds to change the aspect ratio. 16. Remote Control Sensor 18. Press to select different audio track when a CD disc is played. 14. -/+ button Press to enter the player's system setup. 12. LCD Screen 9 FUNC button Press to change the brightness and color level; Speaker 17. AUDIO button Press to the next list, track or chapter. 11. Setup button Press to adjust the value of Front Panel 7. ◄...
User Manual
Page 10
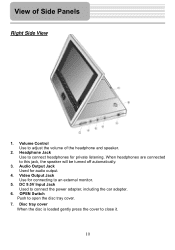
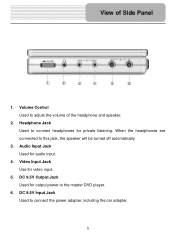
... speaker will be turned off automatically. 3. When headphones are connected to connect headphones for private listening. Audio Output Jack Used for connecting to connect the power adapter, including the car adapter. 6. DC 9.5V Input Jack Used to an external monitor. 5. Video Output Jack Use for audio output. 4. Disc tray cover When the disc is loaded gently press the cover to open the disc tray cover. 7. OPEN Switch Push to close it. 10 View of the headphone and speaker. 2. Volume Control Use to adjust the volume...
... speaker will be turned off automatically. 3. When headphones are connected to connect headphones for private listening. Audio Output Jack Used for connecting to connect the power adapter, including the car adapter. 6. DC 9.5V Input Jack Used to an external monitor. 5. Video Output Jack Use for audio output. 4. Disc tray cover When the disc is loaded gently press the cover to open the disc tray cover. 7. OPEN Switch Push to close it. 10 View of the headphone and speaker. 2. Volume Control Use to adjust the volume...

User Manual
Page 11
Headphone Jack Use to this jack, the speaker will be turned off . 11 When headphones are connected to connect headphones for private listening. Power Switch Used to turn power on or off automatically. 2. Left Side View View of Side Panels 1.
Headphone Jack Use to this jack, the speaker will be turned off . 11 When headphones are connected to connect headphones for private listening. Power Switch Used to turn power on or off automatically. 2. Left Side View View of Side Panels 1.

User Manual
Page 12
Rechargeable Battery Contacts For connecting the rechargeable battery pack. 12 View of Main Unit Bottom 1.
Rechargeable Battery Contacts For connecting the rechargeable battery pack. 12 View of Main Unit Bottom 1.
User Manual
Page 16
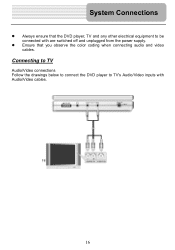
z Ensure that the DVD player, TV and any other electrical equipment to TV's Audio/Video inputs with are switched off and unplugged from the power supply. System Connections z Always ensure that you observe the color coding when connecting audio and video cables. Connecting to TV Audio/Video connections Follow the drawings below to connect the DVD player to be connected with Audio/Video cables. 16
z Ensure that the DVD player, TV and any other electrical equipment to TV's Audio/Video inputs with are switched off and unplugged from the power supply. System Connections z Always ensure that you observe the color coding when connecting audio and video cables. Connecting to TV Audio/Video connections Follow the drawings below to connect the DVD player to be connected with Audio/Video cables. 16
User Manual
Page 17
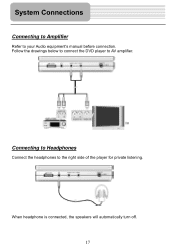
Follow the drawings below to connect the DVD player to the right side of the player for private listening. Connecting to Headphones Connect the headphones to AV amplifier. When headphone is connected, the speakers will automatically turn off. 17 System Connections Connecting to Amplifier Refer to your Audio equipment's manual before connection.
Follow the drawings below to connect the DVD player to the right side of the player for private listening. Connecting to Headphones Connect the headphones to AV amplifier. When headphone is connected, the speakers will automatically turn off. 17 System Connections Connecting to Amplifier Refer to your Audio equipment's manual before connection.
User Manual
Page 18
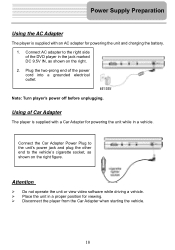
... right figure. Connect the Car Adapter Power Plug to the unit's power jack and plug the other end to the right side of the DVD player in the jack marked DC 9.5V IN, as shown on the right. 2. Plug the two-prong end of Car Adapter The player is supplied with a Car Adapter for powering the unit while in a vehicle. Attention ¾ Do not operate the unit or view video software while driving...
... right figure. Connect the Car Adapter Power Plug to the unit's power jack and plug the other end to the right side of the DVD player in the jack marked DC 9.5V IN, as shown on the right. 2. Plug the two-prong end of Car Adapter The player is supplied with a Car Adapter for powering the unit while in a vehicle. Attention ¾ Do not operate the unit or view video software while driving...
User Manual
Page 20
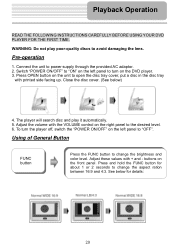
... INSTRUCTIONS CAREFULLY BEFORE USING YOUR DVD PLAYER FOR THE FIRST TIME. WARNING: Do not play it automatically. 5. Using of General Button FUNC button Press the FUNC button to change the brightness and color level. See below ) 4. Pre-operation 1. To turn on the right panel to "OFF". Close the disc cover. (See below for about 1 or 2 seconds to change the aspect ration between 16:9 and 4:3. Press OPEN button on the unit...
... INSTRUCTIONS CAREFULLY BEFORE USING YOUR DVD PLAYER FOR THE FIRST TIME. WARNING: Do not play it automatically. 5. Using of General Button FUNC button Press the FUNC button to change the brightness and color level. See below ) 4. Pre-operation 1. To turn on the right panel to "OFF". Close the disc cover. (See below for about 1 or 2 seconds to change the aspect ration between 16:9 and 4:3. Press OPEN button on the unit...
User Manual
Page 23
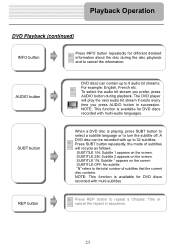
... 2/N: Subtitle 2 appears on the screen SUBTITLE OFF: No subtitle. "N" refers to turn the subtitle off. To select the audio bit stream you press AUDIO button in sequence. 23 When a DVD disc is playing, press SUBT button to select a subtitle language or to the total number of subtitles will play the next audio bit stream if exists every time you prefer, press AUDIO button during the disc playback...
... 2/N: Subtitle 2 appears on the screen SUBTITLE OFF: No subtitle. "N" refers to turn the subtitle off. To select the audio bit stream you press AUDIO button in sequence. 23 When a DVD disc is playing, press SUBT button to select a subtitle language or to the total number of subtitles will play the next audio bit stream if exists every time you prefer, press AUDIO button during the disc playback...
User Manual
Page 33
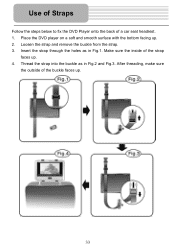
Loosen the strap and remove the buckle from the strap. 3. Insert the strap through the holes as in Fig.1. Place the DVD player on a soft and smooth surface with the bottom facing up . 4. Make sure the inside of the strap faces up . 2. After threading, make sure the outside of a car seat headrest. 1. Thread the strap into the buckle as in Fig.2 and Fig.3. Use of Straps Follow the steps below to fix the DVD Player onto the back of the buckle faces up. 33
Loosen the strap and remove the buckle from the strap. 3. Insert the strap through the holes as in Fig.1. Place the DVD player on a soft and smooth surface with the bottom facing up . 4. Make sure the inside of the strap faces up . 2. After threading, make sure the outside of a car seat headrest. 1. Thread the strap into the buckle as in Fig.2 and Fig.3. Use of Straps Follow the steps below to fix the DVD Player onto the back of the buckle faces up. 33
User Manual
Page 36
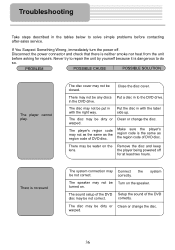
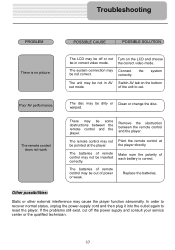
... as the region code of DVD disc. The sound setup of the DVD Setup the sound of the DVD disc may be not correct. Troubleshooting Take steps described in the tables below to do so. If You Suspect Something Wrong, immediately turn the power off for repairs. PROBLEM POSSIBLE CAUSE POSSIBLE SOLUTION The player cannot play. The disc may be dirty or Clean or change the disc. The disc may be...
... as the region code of DVD disc. The sound setup of the DVD Setup the sound of the DVD disc may be not correct. Troubleshooting Take steps described in the tables below to do so. If You Suspect Something Wrong, immediately turn the power off for repairs. PROBLEM POSSIBLE CAUSE POSSIBLE SOLUTION The player cannot play. The disc may be dirty or Clean or change the disc. The disc may be...
User Manual
Page 37
... power-supply cord and then plug it into the outlet again to out. The remote control does not work The disc may not be dirty or Clean or change the disc. The batteries of remote control may be inserted correctly. of each battery is no picture. warped. The remote control may be not in correct video mode. Make sure the polarity of the unit to reset the player. the correct video mode. system The unit...
... power-supply cord and then plug it into the outlet again to out. The remote control does not work The disc may not be dirty or Clean or change the disc. The batteries of remote control may be inserted correctly. of each battery is no picture. warped. The remote control may be not in correct video mode. Make sure the polarity of the unit to reset the player. the correct video mode. system The unit...

User Manual
Page 42
... the plug provided doesn't fit in the manual. Note: Do not touch the color TFT LCD screen by the manufacturer, or sold with the apparatus. Notes 1) Read these instructions. 2) Keep these instructions. 3) Heed all warnings. 4) Follow all servicing to "dangerous voltage" which could cause electric shock. Servicing is used, use caution when moving the cart/apparatus combination to read important operating and maintenance instructions in...
... the plug provided doesn't fit in the manual. Note: Do not touch the color TFT LCD screen by the manufacturer, or sold with the apparatus. Notes 1) Read these instructions. 2) Keep these instructions. 3) Heed all warnings. 4) Follow all servicing to "dangerous voltage" which could cause electric shock. Servicing is used, use caution when moving the cart/apparatus combination to read important operating and maintenance instructions in...

User Manual
Page 43
MODE button Press to change the brightness and color level, press and hold for 1-2 seconds to adjust the value of Front Panel 1. POWER button Press to access to or exit from the standby mode. 2. -/+ button Press to change the aspect ratio. 4. Power Indicator In normal playback status, it doesn't indicate and it turns red in standby mode. 6. LCD Screen 4 Speaker 5. View of brightness and color 3.
MODE button Press to change the brightness and color level, press and hold for 1-2 seconds to adjust the value of Front Panel 1. POWER button Press to access to or exit from the standby mode. 2. -/+ button Press to change the aspect ratio. 4. Power Indicator In normal playback status, it doesn't indicate and it turns red in standby mode. 6. LCD Screen 4 Speaker 5. View of brightness and color 3.
User Manual
Page 44
View of the headphone and speaker. 2. Video Input Jack Use for output power to the master DVD player. 6. DC 9.5V Output Jack Used for video input. 5. DC 9.5V Input Jack Used to this jack, the speaker will be turned off automatically. 3. Headphone Jack Used to adjust the volume of Side Panel 1. Audio Input Jack Used for private listening. When the headphones are connected to connect the power adapter, including the car adapter. 5 Volume Control Used to connect headphones for audio input. 4.
View of the headphone and speaker. 2. Video Input Jack Use for output power to the master DVD player. 6. DC 9.5V Output Jack Used for video input. 5. DC 9.5V Input Jack Used to this jack, the speaker will be turned off automatically. 3. Headphone Jack Used to adjust the volume of Side Panel 1. Audio Input Jack Used for private listening. When the headphones are connected to connect the power adapter, including the car adapter. 5 Volume Control Used to connect headphones for audio input. 4.

User Manual
Page 45
... connect to the slave LCD screen. Connect the AC adapter to the slave LCD screen and connect the slave LCD screen with the master DVD player so that the master DVD player, slave LCD screen and any other electrical equipment are off . 6 System Connections Connect to the master DVD player. 3. When headphone is connected, the speakers will have no power supply. Make sure that the master DVD player can input audio and video to the slave LCD screen, or the slave screen will automatically turn off before connection...
... connect to the slave LCD screen. Connect the AC adapter to the slave LCD screen and connect the slave LCD screen with the master DVD player so that the master DVD player, slave LCD screen and any other electrical equipment are off . 6 System Connections Connect to the master DVD player. 3. When headphone is connected, the speakers will have no power supply. Make sure that the master DVD player can input audio and video to the slave LCD screen, or the slave screen will automatically turn off before connection...
User Manual
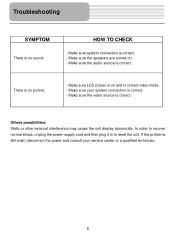
Page 47
... turned on and in to recover normal status, unplug the power-supply cord and then plug it in correct video mode. - Make sure the audio source is correct. Make sure your service center or a qualified technician. 8 In order to reset the unit. HOW TO CHECK - There is on . - Make sure LCD screen is no sound. Others possibilities: Static or other external interference may cause the unit display abnormally. Make sure system connection...
... turned on and in to recover normal status, unplug the power-supply cord and then plug it in correct video mode. - Make sure the audio source is correct. Make sure your service center or a qualified technician. 8 In order to reset the unit. HOW TO CHECK - There is on . - Make sure LCD screen is no sound. Others possibilities: Static or other external interference may cause the unit display abnormally. Make sure system connection...


