User Manual
Page 2
...APPLIANCE TO RAIN OF MOISTURE. If you are for use by qualified service personnel only. POWER SUPPLY: Connect the supplied adapter to do not perform any servicing other than that contained in the slot marked "Power In". CAUTION: Laser radiation when open. To reduce the risk of the DVD player... the plug, turn it over and reinsert it, if the unit will not the used for servicing instructions. 2 NOTE: Before plugging the power cord into beam. NO USE-SERVICEABLE PARTS INSIDE. Important Safety Instructions CAUTION: TO REDUCE THE RISK OF ELECTRIC SHOCK, DO NOT REMOVE COVER ...
...APPLIANCE TO RAIN OF MOISTURE. If you are for use by qualified service personnel only. POWER SUPPLY: Connect the supplied adapter to do not perform any servicing other than that contained in the slot marked "Power In". CAUTION: Laser radiation when open. To reduce the risk of the DVD player... the plug, turn it over and reinsert it, if the unit will not the used for servicing instructions. 2 NOTE: Before plugging the power cord into beam. NO USE-SERVICEABLE PARTS INSIDE. Important Safety Instructions CAUTION: TO REDUCE THE RISK OF ELECTRIC SHOCK, DO NOT REMOVE COVER ...
User Manual
Page 3
... apparatus. When a cart is used, use caution when moving the cart/apparatus combination to dripping or splashing and no objects filled with liquids, such as power-supply cord or plug is provided for your outlet, consult an electrician for long periods of the obsolete outlet. 10) Protect the... power cord from being walked on bed, sofa or anything that produce heat. 9) Do not defeat the safety purpose of the polarized or grounding-type plug. ...
... apparatus. When a cart is used, use caution when moving the cart/apparatus combination to dripping or splashing and no objects filled with liquids, such as power-supply cord or plug is provided for your outlet, consult an electrician for long periods of the obsolete outlet. 10) Protect the... power cord from being walked on bed, sofa or anything that produce heat. 9) Do not defeat the safety purpose of the polarized or grounding-type plug. ...
User Manual
Page 7
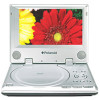
Contents Important Safety Instructions 2 Features 3 Accessories 6 View of Main Unit View of Side Panels 8 10 View of Main Unit Bottom 11 System Connections 12 Power Supply Preparation 14 Rechargeable Battery 15 Notes on Discs 18 Playback Operation System Setup Definitions 19 DVD Playback 20 CD Playback 23 Picture CD Playback 24 26 32 Troubleshooting 33 Specifications 35 7
Contents Important Safety Instructions 2 Features 3 Accessories 6 View of Main Unit View of Side Panels 8 10 View of Main Unit Bottom 11 System Connections 12 Power Supply Preparation 14 Rechargeable Battery 15 Notes on Discs 18 Playback Operation System Setup Definitions 19 DVD Playback 20 CD Playback 23 Picture CD Playback 24 26 32 Troubleshooting 33 Specifications 35 7
User Manual
Page 10
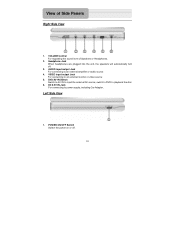
DC 9.5V IN Jack For connecting to an external amplifier or audio source 4. AUDIO input/output Jack For connecting to power supply, including Car Adapter. VIDEO input/output Jack For connecting to playback the disc 6. switch to DVD to an external monitor or video source 5. Left Side ...View 1. DVD/AV IN Switch Switch to AV IN to input the external AV source; POWER ON/OFF Switch Switch the power on or off . 3. VOLUME Control For regulating the sound level of Side Panels Right Side View 1. Headphone Jack When headphones are plugged...
DC 9.5V IN Jack For connecting to an external amplifier or audio source 4. AUDIO input/output Jack For connecting to power supply, including Car Adapter. VIDEO input/output Jack For connecting to playback the disc 6. switch to DVD to an external monitor or video source 5. Left Side ...View 1. DVD/AV IN Switch Switch to AV IN to input the external AV source; POWER ON/OFF Switch Switch the power on or off . 3. VOLUME Control For regulating the sound level of Side Panels Right Side View 1. Headphone Jack When headphones are plugged...
User Manual
Page 12
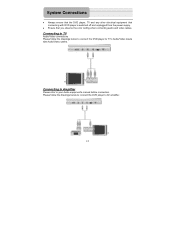
Connecting to TV Audio/Video connections Please follow the drawings below to connect the DVD player to your Audio equipment's manual before connection. z Ensure that connecting with Audio/Video cables. Please follow the drawings below to connect the DVD player to AV amplifier. 12 Connecting to Amplifier Please refer to TV's Audio/Video inputs with DVD player is switched off and unplugged from the power supply. System Connections z Always ensure that the DVD player, TV and any other electrical equipment that you observe the color coding when connecting audio and video cables.
Connecting to TV Audio/Video connections Please follow the drawings below to connect the DVD player to your Audio equipment's manual before connection. z Ensure that connecting with Audio/Video cables. Please follow the drawings below to connect the DVD player to AV amplifier. 12 Connecting to Amplifier Please refer to TV's Audio/Video inputs with DVD player is switched off and unplugged from the power supply. System Connections z Always ensure that the DVD player, TV and any other electrical equipment that you observe the color coding when connecting audio and video cables.
User Manual
Page 14
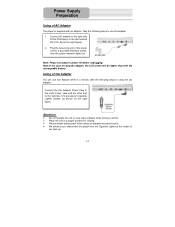
... view video software while driving a vehicle. ¾ Place the unit in a vehicle, take the following steps to using the car adapter. Power Supply Preparation Using of AC Adapter The player is supplied with the rechargeable battery. Take the following steps to use Car Adapter while in a proper position for viewing. ¾ Please detach...
... view video software while driving a vehicle. ¾ Place the unit in a vehicle, take the following steps to using the car adapter. Power Supply Preparation Using of AC Adapter The player is supplied with the rechargeable battery. Take the following steps to use Car Adapter while in a proper position for viewing. ¾ Please detach...
User Manual
Page 16
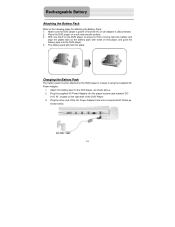
...DVD player to prevent it using the supplied AC Power Adapter. 1. The battery pack will click into the player's power jack marked "DC 9.5V IN", located on a soft and smooth surface. 2. Plug the supplied AC Power Adapter into place. Make sure the DVD player is power off and the AC or car adapter... is disconnected. 2. Attach the battery pack to the following steps for attaching the Battery Pack: 1. Place the DVD player on the right side of the AC Power Adapter Cord ...
...DVD player to prevent it using the supplied AC Power Adapter. 1. The battery pack will click into the player's power jack marked "DC 9.5V IN", located on a soft and smooth surface. 2. Plug the supplied AC Power Adapter into place. Make sure the DVD player is power off and the AC or car adapter... is disconnected. 2. Attach the battery pack to the following steps for attaching the Battery Pack: 1. Place the DVD player on the right side of the AC Power Adapter Cord ...
User Manual
Page 19
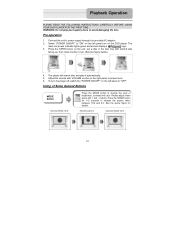
... "ON" on the left panel to change the level of brightness, contrast and color. Switch "POWER ON/OFF" to power supply through the provided AC adaptor. 2. To turn on the left panel turn the player off, switch the "POWER ON/OFF" on the DVD player. Press the MODE button for details: 19 Adjust the... aspect ration between 16:9 and 4:3. Playback Operation PLEASE READ THE FOLLOWING INSTRUCTIONS CAREFULLY BEFORE USING YOUR DVD PLAYER FOR THE FIRST TIME. The main unit power indicator lights green and screen displays logo. 3.
... "ON" on the left panel to change the level of brightness, contrast and color. Switch "POWER ON/OFF" to power supply through the provided AC adaptor. 2. To turn on the left panel turn the player off, switch the "POWER ON/OFF" on the DVD player. Press the MODE button for details: 19 Adjust the... aspect ration between 16:9 and 4:3. Playback Operation PLEASE READ THE FOLLOWING INSTRUCTIONS CAREFULLY BEFORE USING YOUR DVD PLAYER FOR THE FIRST TIME. The main unit power indicator lights green and screen displays logo. 3.
User Manual
Page 34
... correct video mode. warped. Other possibilities: Static or other external interference may be off the power supply and consult your service center or the qualified technician. 34 In order to recover normal status, please unplug the power-supply cord and then plug it into the outlet again to out. of the unit to reset...
... correct video mode. warped. Other possibilities: Static or other external interference may be off the power supply and consult your service center or the qualified technician. 34 In order to recover normal status, please unplug the power-supply cord and then plug it into the outlet again to out. of the unit to reset...