User Manual
Page 3
... Changing the LCD Screen Display 26 5 Recording Photos, Videos and Voices 28 • Taking Photos 28 • Using the Image Stabilizer 29 • Setting the Zoom Control 29 • Using Flash 30 • Setting the Focus Mode 31 • Using the Function Manual 31 My Mode 32 Resolution 32 Quality 33 EV Compensation 33 White Balance 34 ISO...35 Metering 35 Color Mode 36 • Using the Record Manual 37 • Setting Scene Mode 37 Using Smile Capture Mode 40 Using Intelligent Scene Mode 41 Using Blink Detection Mode 43 Using Aperture...
... Changing the LCD Screen Display 26 5 Recording Photos, Videos and Voices 28 • Taking Photos 28 • Using the Image Stabilizer 29 • Setting the Zoom Control 29 • Using Flash 30 • Setting the Focus Mode 31 • Using the Function Manual 31 My Mode 32 Resolution 32 Quality 33 EV Compensation 33 White Balance 34 ISO...35 Metering 35 Color Mode 36 • Using the Record Manual 37 • Setting Scene Mode 37 Using Smile Capture Mode 40 Using Intelligent Scene Mode 41 Using Blink Detection Mode 43 Using Aperture...
User Manual
Page 4
...; Setting the Digital Zoom 50 • Setting the Date Stamp 50 • Setting the Auto Review 51 • Recording Movies 52 Setting Movie Size 52 YouTube Mode 52 • Recording Voices 54 6 Playback 55 • Viewing in Single Navigation 55 • Viewing Thumbnails 55 • Zooming images 56 • Playing Movies 57 • Playing Voice Recording 58 • Playing Voice Memo 59 • Deleting an Image/Video/Audio 59 Using the Delete Button 59 • Setting Playback Menu 60 • Setting Slideshow 61 • Deleting Files 62 To delete a photo/video...
...; Setting the Digital Zoom 50 • Setting the Date Stamp 50 • Setting the Auto Review 51 • Recording Movies 52 Setting Movie Size 52 YouTube Mode 52 • Recording Voices 54 6 Playback 55 • Viewing in Single Navigation 55 • Viewing Thumbnails 55 • Zooming images 56 • Playing Movies 57 • Playing Voice Recording 58 • Playing Voice Memo 59 • Deleting an Image/Video/Audio 59 Using the Delete Button 59 • Setting Playback Menu 60 • Setting Slideshow 61 • Deleting Files 62 To delete a photo/video...
User Manual
Page 5
...; Setting LCD Save 74 • Setting Date & Time 75 • Setting Language 75 • Setting File Numbering 75 • Setting TV Out 76 • Setting LCD Brightness 76 • Setting Battery Type 76 • Setting Memory Kit 76 • Reset All 77 8 Installing the Software onto a Computer 78 • Installing the Software 78 • Software Included with Your Camer 79 • Fast and Easy YouTube™ Upload 80 • System Requirements 80 • Uninstalling Polaroid i1036 Camera Driver 81 9 Making Connections...
...; Setting LCD Save 74 • Setting Date & Time 75 • Setting Language 75 • Setting File Numbering 75 • Setting TV Out 76 • Setting LCD Brightness 76 • Setting Battery Type 76 • Setting Memory Kit 76 • Reset All 77 8 Installing the Software onto a Computer 78 • Installing the Software 78 • Software Included with Your Camer 79 • Fast and Easy YouTube™ Upload 80 • System Requirements 80 • Uninstalling Polaroid i1036 Camera Driver 81 9 Making Connections...
User Manual
Page 14
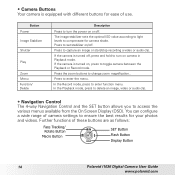
... function menu. In the Record mode, press to enter the menu. Further functions of use. Button Power Image Stabilizer Shutter Play Zoom Menu Function/ Delete Description Press to access the various menus available from the On Screen Display (OSD). In the Playback mode, press to delete an image, video or audio clip. • Navigation Control The 4-way Navigation Control and the SET button allows you to turn on /off. • Camera Buttons Your camera is equipped with different buttons for your photos and videos...
... function menu. In the Record mode, press to enter the menu. Further functions of use. Button Power Image Stabilizer Shutter Play Zoom Menu Function/ Delete Description Press to access the various menus available from the On Screen Display (OSD). In the Playback mode, press to delete an image, video or audio clip. • Navigation Control The 4-way Navigation Control and the SET button allows you to turn on /off. • Camera Buttons Your camera is equipped with different buttons for your photos and videos...

User Manual
Page 15
... Record mode, press to scroll through the menu and submenu selections. 4. In the Record mode, press to change the LCD screen display to show or hide OSD icons. 2. Polaroid i1036 Digital Camera User Guide 15 www.polaroid.com In the Playback Video/ Audio mode, press to view the next image, video or audio clip. 3. Button SET Flash/ Right Macro/ Left Up/Face Tracking/ Rotate Display/ Down Usage 1. In the Playback mode, press to stop video/audio playback. In the Playback mode, press to change LCD screen display...
... Record mode, press to scroll through the menu and submenu selections. 4. In the Record mode, press to change the LCD screen display to show or hide OSD icons. 2. Polaroid i1036 Digital Camera User Guide 15 www.polaroid.com In the Playback Video/ Audio mode, press to view the next image, video or audio clip. 3. Button SET Flash/ Right Macro/ Left Up/Face Tracking/ Rotate Display/ Down Usage 1. In the Playback mode, press to stop video/audio playback. In the Playback mode, press to change LCD screen display...

User Manual
Page 28
... blinks, the subject is set to Record mode. 2. See illustration on the camera by pressing the 10M Power button. When the camera is ready to take the photo, the focus frame turns green, the shutter speed and aperture value are now ready to take your photos. F 3.0 1/ 30 Release the shutter button, recompose the scene and press the shutter button halfway to get a better picture. 28 Polaroid i1036 Digital Camera User Guide www.polaroid.com You may need to turn on the LCD display...
... blinks, the subject is set to Record mode. 2. See illustration on the camera by pressing the 10M Power button. When the camera is ready to take the photo, the focus frame turns green, the shutter speed and aperture value are now ready to take your photos. F 3.0 1/ 30 Release the shutter button, recompose the scene and press the shutter button halfway to get a better picture. 28 Polaroid i1036 Digital Camera User Guide www.polaroid.com You may need to turn on the LCD display...

User Manual
Page 30
... shutter button regardless of lighting conditions. The flash is needed. The flash fires with five flash modes: Auto. The flash fires 10M twice to get the correct exposure. • Using Flash When taking pictures in Burst and AEB modes. • Do not charge the flash while pressing the zoom button. Auto flash is displayed on . Charge the flash after releasing the zoom button if necessary. 30 Polaroid i1036 Digital Camera User Guide www.polaroid.com Off. The flash fires automatically whenever extra lighting is turned off. SET...
... shutter button regardless of lighting conditions. The flash is needed. The flash fires with five flash modes: Auto. The flash fires 10M twice to get the correct exposure. • Using Flash When taking pictures in Burst and AEB modes. • Do not charge the flash while pressing the zoom button. Auto flash is displayed on . Charge the flash after releasing the zoom button if necessary. 30 Polaroid i1036 Digital Camera User Guide www.polaroid.com Off. The flash fires automatically whenever extra lighting is turned off. SET...

User Manual
Page 46
... shutter button. 2 2 Sec Self-timer Sets a 2-second delay to take consecutive shots. Off Captures an image without time delay. 46 Polaroid i1036 Digital Camera User Guide www.polaroid.com Performs delay and capture twice: x2 Double Self-timer • Performs a 10-second delay, then captures the image. • Performs another 2-second delay then captures the image again. AF Area AF Lamp Sharpness To set in the Drive mode function in recording still images. • Setting...
... shutter button. 2 2 Sec Self-timer Sets a 2-second delay to take consecutive shots. Off Captures an image without time delay. 46 Polaroid i1036 Digital Camera User Guide www.polaroid.com Performs delay and capture twice: x2 Double Self-timer • Performs a 10-second delay, then captures the image. • Performs another 2-second delay then captures the image again. AF Area AF Lamp Sharpness To set in the Drive mode function in recording still images. • Setting...

User Manual
Page 50
... Polaroid i1036 Digital Camera User Guide www.polaroid.com Use the or DISP keys to a maximum of your camera. This feature is not available in playback, but the image quality deteriorates. To set Digital Zoom 1. NOTE: • Digital Zoom is available for still images only. Press the SET button to add the recorded date and time they were taken on the image type and resolution. • Setting the Date Stamp The Date Stamp function allows you picture. • Setting the Digital Zoom...
... Polaroid i1036 Digital Camera User Guide www.polaroid.com Use the or DISP keys to a maximum of your camera. This feature is not available in playback, but the image quality deteriorates. To set Digital Zoom 1. NOTE: • Digital Zoom is available for still images only. Press the SET button to add the recorded date and time they were taken on the image type and resolution. • Setting the Date Stamp The Date Stamp function allows you picture. • Setting the Digital Zoom...

User Manual
Page 51
...i1036 Digital Camera User Guide 51 www.polaroid.com From the Record menu, select Auto Review. 2. From the Record menu, select Date Stamp. Digital Zoom OFF 2. Use the or DISP keys to go through the Date Stamp Auto Review OFF selection. 3. To set Date Stamp Saturation Contrast 1. Press the SET button to save and apply changes. Date Stamp If Auto review is automatically turned off. • In vertical or rotated images, the date Saturation Contrast Digital ZooDmate OFF Date StamDpate & Time Auto ORFeFvieOwff OFF and time on the LCD display. Press...
...i1036 Digital Camera User Guide 51 www.polaroid.com From the Record menu, select Auto Review. 2. From the Record menu, select Date Stamp. Digital Zoom OFF 2. Use the or DISP keys to go through the Date Stamp Auto Review OFF selection. 3. To set Date Stamp Saturation Contrast 1. Press the SET button to save and apply changes. Date Stamp If Auto review is automatically turned off. • In vertical or rotated images, the date Saturation Contrast Digital ZooDmate OFF Date StamDpate & Time Auto ORFeFvieOwff OFF and time on the LCD display. Press...

User Manual
Page 71
... The Digital Print Order Format (DPOF) function allows you turn on your memory card for printing and allows you to specify the number of copies that you want to print at a later date. Select Startup Image. Use camera default image. Use the or keys to mark. • All. Startup Image 1. The menu selection appears. When all DPOF settings to launch the Playback menu. 2. To set DPOF 1. Availablesettings are marked, take the memory card to a digital printing service, or use a DPOF compatible printer. Polaroid i1036 Digital Camera User Guide...
... The Digital Print Order Format (DPOF) function allows you turn on your memory card for printing and allows you to specify the number of copies that you want to print at a later date. Select Startup Image. Use camera default image. Use the or keys to mark. • All. Startup Image 1. The menu selection appears. When all DPOF settings to launch the Playback menu. 2. To set DPOF 1. Availablesettings are marked, take the memory card to a digital printing service, or use a DPOF compatible printer. Polaroid i1036 Digital Camera User Guide...

User Manual
Page 72
... you to print images captured by your camera to reset DPOF settings. Use the or DISP to save DPOF settings. A confirmation message appears. 2. Press the SET button to a PictBridge compatible printer using the USB cable. NOTE: If the printer does not support date stamp, the date stamp function will be disabled in PictBridge. 72 Polaroid i1036 Digital Camera User Guide www.polaroid.com DPOF 00 Copies Date stamp off the date stamp. 5. Select Reset on a single image/all images: 1. Yes Reset DPOF? To activate PictBridge: Connect your camera without connecting the camera to...
... you to print images captured by your camera to reset DPOF settings. Use the or DISP to save DPOF settings. A confirmation message appears. 2. Press the SET button to a PictBridge compatible printer using the USB cable. NOTE: If the printer does not support date stamp, the date stamp function will be disabled in PictBridge. 72 Polaroid i1036 Digital Camera User Guide www.polaroid.com DPOF 00 Copies Date stamp off the date stamp. 5. Select Reset on a single image/all images: 1. Yes Reset DPOF? To activate PictBridge: Connect your camera without connecting the camera to...
User Manual
Page 74
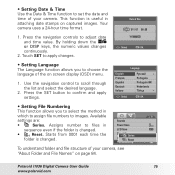
... Operation Volume Available Settings Sound 1, Sound 2, Sound 3, Off On, Off On, Off 0-4 Description Selects the startup sound when camera is idle for 20 seconds, the LCD darkens. Shutter sound is pressed. LOaFnFguOafgfe File Numbering • Setting LCD Save Enable the LCD Save function to automatically decrease the LCD brightness to save power. Power Save LCD SOaNve On Date &OFTFimOeff 1min OFF Language File Numbering 74 Polaroid i1036 Digital Camera User Guide www.polaroid.com Enables or disables shutter sound when shutter button is not available when recording movies...
... Operation Volume Available Settings Sound 1, Sound 2, Sound 3, Off On, Off On, Off 0-4 Description Selects the startup sound when camera is idle for 20 seconds, the LCD darkens. Shutter sound is pressed. LOaFnFguOafgfe File Numbering • Setting LCD Save Enable the LCD Save function to automatically decrease the LCD brightness to save power. Power Save LCD SOaNve On Date &OFTFimOeff 1min OFF Language File Numbering 74 Polaroid i1036 Digital Camera User Guide www.polaroid.com Enables or disables shutter sound when shutter button is not available when recording movies...
User Manual
Page 75
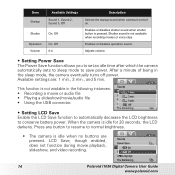
• Setting Date & Time Use the Date & Time function to set the date and time of the on screen display (OSD) menu. 1. Press the navigation controls to apply changes. Date & Time 2009 / 01 / 01 08 :50 YY/MM/DD Select OK • Setting Language The Language function allows you to select the method in which to assign file numbers to images. Available settings are: Sounds • Series. LCD Save OFF • 0001 Reset. Touch SET to adjust date and time value. Language English Français...
• Setting Date & Time Use the Date & Time function to set the date and time of the on screen display (OSD) menu. 1. Press the navigation controls to apply changes. Date & Time 2009 / 01 / 01 08 :50 YY/MM/DD Select OK • Setting Language The Language function allows you to select the method in which to assign file numbers to images. Available settings are: Sounds • Series. LCD Save OFF • 0001 Reset. Touch SET to adjust date and time value. Language English Français...
User Manual
Page 76
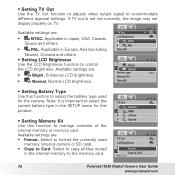
... regional settings. • Setting TV Out Use the TV Out function to adjusts video output signal to Card Reset All 76 Polaroid i1036 Digital Camera User Guide www.polaroid.com Reset All • Setting Battery Type Use this function to manage contents of the internal memory or memory card. Note: It is not set correctly, the image may not display properly on TV. Select to format the currently used for this product. • Setting Memory Kit Use this function to the memory card. If...
... regional settings. • Setting TV Out Use the TV Out function to adjusts video output signal to Card Reset All 76 Polaroid i1036 Digital Camera User Guide www.polaroid.com Reset All • Setting Battery Type Use this function to manage contents of the internal memory or memory card. Note: It is not set correctly, the image may not display properly on TV. Select to format the currently used for this product. • Setting Memory Kit Use this function to the memory card. If...
User Manual
Page 77
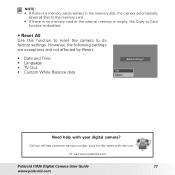
... Digital Camera User Guide 77 www.polaroid.com However, the following settings are exceptions and not affected by Reset. • Date and Time • Language • TV Out • Custom White Balance data Reset all files to the memory card. • If there is no memory card or the internal memory is disabled. • Reset All Use this icon: Or visit www.polaroid.com. Yes Cancel Need help with this function to reset the camera to Card function is empty, the Copy to its factory settings...
... Digital Camera User Guide 77 www.polaroid.com However, the following settings are exceptions and not affected by Reset. • Date and Time • Language • TV Out • Custom White Balance data Reset all files to the memory card. • If there is no memory card or the internal memory is disabled. • Reset All Use this icon: Or visit www.polaroid.com. Yes Cancel Need help with this function to reset the camera to Card function is empty, the Copy to its factory settings...
User Manual
Page 80
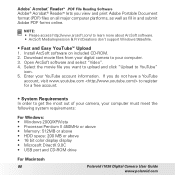
... 80 Polaroid i1036 Digital Camera User Guide www.polaroid.com Install ArcSoft software on all major computer platforms, as well as fill in and submit Adobe PDF forms online. Select the movie file you want to upload and click "Upload to your YouTube account information. NOTE: • Please access http://www.arcsoft.com/ to learn more about ArcSoft software. • ArcSoft MediaImpression & PrintCreations don't support Windows 98se...
... 80 Polaroid i1036 Digital Camera User Guide www.polaroid.com Install ArcSoft software on all major computer platforms, as well as fill in and submit Adobe PDF forms online. Select the movie file you want to upload and click "Upload to your YouTube account information. NOTE: • Please access http://www.arcsoft.com/ to learn more about ArcSoft software. • ArcSoft MediaImpression & PrintCreations don't support Windows 98se...
User Manual
Page 82
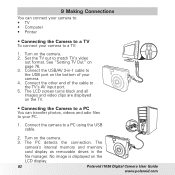
... camera. 4. The camera's internal memory and memory card display as removable drives in -1 cable to the TV's AV input port. 5. Connect the USB/AV 3-in the file manager. Turn on the LCD display. 82 Polaroid i1036 Digital Camera User Guide www.polaroid.com No image is displayed on the camera. 3. The LCD screen turns black and all images and video clips are displayed on the bottom of the cable to the USB port on the TV. • Connecting the Camera to a PC You can connect your camera...
... camera. 4. The camera's internal memory and memory card display as removable drives in -1 cable to the TV's AV input port. 5. Connect the USB/AV 3-in the file manager. Turn on the LCD display. 82 Polaroid i1036 Digital Camera User Guide www.polaroid.com No image is displayed on the camera. 3. The LCD screen turns black and all images and video clips are displayed on the bottom of the cable to the USB port on the TV. • Connecting the Camera to a PC You can connect your camera...
User Manual
Page 86
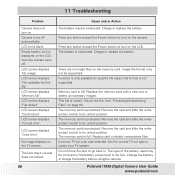
... 'File locked' LCD screen displays 'Card locked'. LCD screen displays 'Copy error'. Charge or replace the battery. See "Protecting/Unprotecting Files" on the memory card. The memory card is locked. Set the correct TV-out type to go back in. Change the battery or charge the battery before usingthe camera. LCD screen displays 'Not available for specific file types. LCD screen displays 'Format error'. File format is protected. Do not force the lens to match your TV system. Polaroid i1036 Digital Camera User Guide www.polaroid.com 11 Troubleshooting Problem Camera does not turn on...
... 'File locked' LCD screen displays 'Card locked'. LCD screen displays 'Copy error'. Charge or replace the battery. See "Protecting/Unprotecting Files" on the memory card. The memory card is locked. Set the correct TV-out type to go back in. Change the battery or charge the battery before usingthe camera. LCD screen displays 'Not available for specific file types. LCD screen displays 'Format error'. File format is protected. Do not force the lens to match your TV system. Polaroid i1036 Digital Camera User Guide www.polaroid.com 11 Troubleshooting Problem Camera does not turn on...
User Manual
Page 88
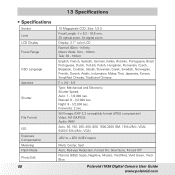
13 Specifications • Specifications Sensor Lens LCD Display Focus Range OSD Language Aperture Shutter File Format ISO Exposure Compensation Metering Flash Mode Photo Edit 88 10 Megapixels CCD, Size: 1/2.3 Focal Length: f = 6.2 - 18.6 mm, 3X optical zoom, 5x digital zoom Display: 2.7" color LCD Normal: 80cm - Still Image: EXIF 2.2 compatible format (JPEG compression) Video: AVI (MJPEG) Audio: WAV Auto, 50, 100, 200, 400, 800, 1600,3200 (3M, 16:9, VGA), 6400 (16:9, VGA) -2EV to + 2EV (1/3EV steps) Multi, Center, Spot Auto, Red-eye Reduction, Forced...
13 Specifications • Specifications Sensor Lens LCD Display Focus Range OSD Language Aperture Shutter File Format ISO Exposure Compensation Metering Flash Mode Photo Edit 88 10 Megapixels CCD, Size: 1/2.3 Focal Length: f = 6.2 - 18.6 mm, 3X optical zoom, 5x digital zoom Display: 2.7" color LCD Normal: 80cm - Still Image: EXIF 2.2 compatible format (JPEG compression) Video: AVI (MJPEG) Audio: WAV Auto, 50, 100, 200, 400, 800, 1600,3200 (3M, 16:9, VGA), 6400 (16:9, VGA) -2EV to + 2EV (1/3EV steps) Multi, Center, Spot Auto, Red-eye Reduction, Forced...


