
User Guide
Page 1
Savi® Office WO100 Wireless Headset System with Optional HL10™ Lifter User Guide
Savi® Office WO100 Wireless Headset System with Optional HL10™ Lifter User Guide
User Guide
Page 3
Advanced 22 9 Troubleshooting and Common Questions............23 Plantronics Savi User Guide Contents 1 Package Contents and Features 4 1.1 Savi Base 4 1.2 Savi Headset 5 1.3 HL10 Lifter (Optional 6 2 Base Set Up 7 2.1 Attaching Charge Cradle to Base 7 2.2 Connecting Base to Desk Phone 7 2.3 Connecting Power Supply to Base 7 2.4 Positioning Base 7 3 Headset Set Up 8 3.1 Fitting ...
Advanced 22 9 Troubleshooting and Common Questions............23 Plantronics Savi User Guide Contents 1 Package Contents and Features 4 1.1 Savi Base 4 1.2 Savi Headset 5 1.3 HL10 Lifter (Optional 6 2 Base Set Up 7 2.1 Attaching Charge Cradle to Base 7 2.2 Connecting Base to Desk Phone 7 2.3 Connecting Power Supply to Base 7 2.4 Positioning Base 7 3 Headset Set Up 8 3.1 Fitting ...

User Guide
Page 4
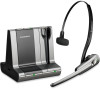
1 Package Contents and Features 1.1 Savi WO1 Base CD includes: • Plantronics Software • Animated Setup Guide • Complete User Guide Base Power Supply Base Telephone Interface Cable Savi WO1 Base Features PC Talk Button Indicator Light Desk Phone Talk Button Indicator Light USB Cable Desk Phone Speaking Volume Configuration Switch Desk Phone Listening Volume Subscription Button and Indicator Light Charging Indicator Light Plantronics Savi User Guide Power Jack USB Port Telephone Interface Cable Jack Handset Lifter Jack 4
1 Package Contents and Features 1.1 Savi WO1 Base CD includes: • Plantronics Software • Animated Setup Guide • Complete User Guide Base Power Supply Base Telephone Interface Cable Savi WO1 Base Features PC Talk Button Indicator Light Desk Phone Talk Button Indicator Light USB Cable Desk Phone Speaking Volume Configuration Switch Desk Phone Listening Volume Subscription Button and Indicator Light Charging Indicator Light Plantronics Savi User Guide Power Jack USB Port Telephone Interface Cable Jack Handset Lifter Jack 4

User Guide
Page 7
... junction box. 5 Place the handset back on the headset to the base. In this configuration, you will not be using the HL10 lifter. Push firmly on the cradle until the cradle snaps in headset port, you should only use the headset port if you must press both...your phone and the call control button on the telephone cradle. 2.4 Positioning Base The minimum recommended separation between the base and computer is 6 inches. Plantronics Savi User Guide 7 Incorrect position can cause noise and interference problems. Note If your desk phone and the base is 12 inches. 2 Base Set Up...
... junction box. 5 Place the handset back on the headset to the base. In this configuration, you will not be using the HL10 lifter. Push firmly on the cradle until the cradle snaps in headset port, you should only use the headset port if you must press both...your phone and the call control button on the telephone cradle. 2.4 Positioning Base The minimum recommended separation between the base and computer is 6 inches. Plantronics Savi User Guide 7 Incorrect position can cause noise and interference problems. Note If your desk phone and the base is 12 inches. 2 Base Set Up...
User Guide
Page 10
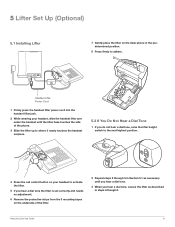
... predetermined position. 8 Press firmly to adhere. Plantronics Savi User Guide 10 Handset Lifter Power Cord 1 Firmly press the handset lifter power cord into the handset lifter jack. 2 While wearing your headset, slide the handset lifter arm under the handset until the lifter base touches the side of the phone. 3 Slide the lifter up to where it nearly touches...
... predetermined position. 8 Press firmly to adhere. Plantronics Savi User Guide 10 Handset Lifter Power Cord 1 Firmly press the handset lifter power cord into the handset lifter jack. 2 While wearing your headset, slide the handset lifter arm under the handset until the lifter base touches the side of the phone. 3 Slide the lifter up to where it nearly touches...

User Guide
Page 11
Remove adhesive tape and attach. For Nortel i2004 Phones Only Plantronics Savi User Guide 11 5.3 Additional Parts (If Required) Extender Arm Stabilizers Ringer Microphone 1 3 2 1 2 Use extender arm when the handset lifter needs additional stability lifting and returning handset to gently grip the phone. 2...the telephone speaker is not located directly under the handset. 1 Remove cover from ringer microphone jack on outsides of lifter. 2 Connect ringer microphone plug. 3 Place ringer microphone over phone speaker. Position stabilizers on back of handset to cradle. 1 ...
Remove adhesive tape and attach. For Nortel i2004 Phones Only Plantronics Savi User Guide 11 5.3 Additional Parts (If Required) Extender Arm Stabilizers Ringer Microphone 1 3 2 1 2 Use extender arm when the handset lifter needs additional stability lifting and returning handset to gently grip the phone. 2...the telephone speaker is not located directly under the handset. 1 Remove cover from ringer microphone jack on outsides of lifter. 2 Connect ringer microphone plug. 3 Place ringer microphone over phone speaker. Position stabilizers on back of handset to cradle. 1 ...

User Guide
Page 13
...short press base desk phone talk button 2. Short press call 1. Return handset to cradle** * Assumes your Savi Office system will operate without Handset Lifter or Electronic Hookswitch 1. Short press call Phones with desk phones that you will limit the system's full capabilities...phone. ** To place, answer, and end calls with Handset Lifter or Electronic Hookswitch 1. The headset does not have a headset button and without a handset lifter, you install the Plantronics software. 7 Using Your Savi Office Wireless Headset System Important It is highly recommended that have...
...short press base desk phone talk button 2. Short press call 1. Return handset to cradle** * Assumes your Savi Office system will operate without Handset Lifter or Electronic Hookswitch 1. Short press call Phones with desk phones that you will limit the system's full capabilities...phone. ** To place, answer, and end calls with Handset Lifter or Electronic Hookswitch 1. The headset does not have a headset button and without a handset lifter, you install the Plantronics software. 7 Using Your Savi Office Wireless Headset System Important It is highly recommended that have...

User Guide
Page 22
...* Range can be minimized to MEDIUM a user will be solid yellow until a link is supported by Plantronics software. Help for Device Settings - When Range is set to help with desk phone and/or use of a lifter or EHS cable with PC buzzing, improve user density, or restrict range of systems that is...
...* Range can be minimized to MEDIUM a user will be solid yellow until a link is supported by Plantronics software. Help for Device Settings - When Range is set to help with desk phone and/or use of a lifter or EHS cable with PC buzzing, improve user density, or restrict range of systems that is...

User Guide
Page 23
...configuration switch on your telephone. If adjusting the distance doesn't help, your headset is heard. If your phone. People I hear static. Plantronics Savi User Guide 23 Press the call control button. The sound is going out of the headset to make sure the microphone is too low for... your desk phone has a volume control, lower until a dial tone is charged. Base power supply is position 3. Be sure the handset lifter power cord is subscribed to the base. Make sure your telephone. set to operate the hookswitch; my desk phone. Make sure there is ...
...configuration switch on your telephone. If adjusting the distance doesn't help, your headset is heard. If your phone. People I hear static. Plantronics Savi User Guide 23 Press the call control button. The sound is going out of the headset to make sure the microphone is too low for... your desk phone has a volume control, lower until a dial tone is charged. Base power supply is position 3. Be sure the handset lifter power cord is subscribed to the base. Make sure your telephone. set to operate the hookswitch; my desk phone. Make sure there is ...


