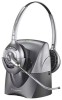
User Guide
Page 2
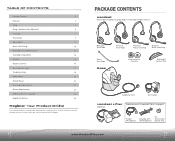
... Package Contents 3 Features 4 Setup 6 Setup - Ringer Microphone Extender Arm with the best possible service and technical support. Handset Lifter (Optional) 8 Charging 9 Positioning 9 Adjusting Fit 10 Multi-shift Pairing 10 Making/Answering/Ending Calls 11 Checking Compatibility 13 Volume...Replacement 20 Battery Replacement 21 Additional Parts (if required) 22 Regulatory Notices 23 Register Your Product Online Visit www.plantronics.com/productregistration to register your product online so we can provide you with Stabilizers For Nortel i2004 phones only ...
... Package Contents 3 Features 4 Setup 6 Setup - Ringer Microphone Extender Arm with the best possible service and technical support. Handset Lifter (Optional) 8 Charging 9 Positioning 9 Adjusting Fit 10 Multi-shift Pairing 10 Making/Answering/Ending Calls 11 Checking Compatibility 13 Volume...Replacement 20 Battery Replacement 21 Additional Parts (if required) 22 Regulatory Notices 23 Register Your Product Online Visit www.plantronics.com/productregistration to register your product online so we can provide you with Stabilizers For Nortel i2004 phones only ...

User Guide
Page 5
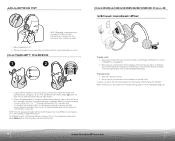
... handset IntelliStand on your phone. the earpiece with the call control button on lifter with the microphone goes into handset lifter jack on the headset to ensure that the lifter is located on top of mounting tape backing to attach the ringer microphone as... Gently press down on base. CHARGING 1 2 POSITIONING 1. NOTE: Remove only a tiny piece of the telephone speaker. SETUP-HANDSET LIFTER (Optional) 1 2 1. Plug handset lifter power cord into the cradle. 2. Set the IntelliStand switch to IntelliStand on base will flash while charging and will need to move ...
... handset IntelliStand on your phone. the earpiece with the call control button on lifter with the microphone goes into handset lifter jack on the headset to ensure that the lifter is located on top of mounting tape backing to attach the ringer microphone as... Gently press down on base. CHARGING 1 2 POSITIONING 1. NOTE: Remove only a tiny piece of the telephone speaker. SETUP-HANDSET LIFTER (Optional) 1 2 1. Plug handset lifter power cord into the cradle. 2. Set the IntelliStand switch to IntelliStand on base will flash while charging and will need to move ...
User Guide
Page 6
... tube or noise-canceling microphone until the power indicator light flashes. Place a charged headset in talk mode (i.e. on a call : 1. MAKING/ANSWERING/ENDING CALLS Without Handset lifter 1 2 To make a call ) to indicate pairing mode, and goes out after successful pairing. Dial tone should sound through handset (if not, check compatibility-see page...
... tube or noise-canceling microphone until the power indicator light flashes. Place a charged headset in talk mode (i.e. on a call : 1. MAKING/ANSWERING/ENDING CALLS Without Handset lifter 1 2 To make a call ) to indicate pairing mode, and goes out after successful pairing. Dial tone should sound through handset (if not, check compatibility-see page...
User Guide
Page 7
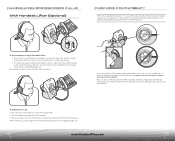
...tone, you experience buzzing/hissing, please follow the directions below. 2 4 3 4 1 1 2 2 To first test proper set at the factory to secure handset lifter in position. 2 2 1 1 1 1 If you or the recipient have trouble hearing, please check compatibility (page 13). 12 www.HeadsetPlus.com 13 Use mounting .... Place a call control button to someone you or the recipient is raised high enough. 2. Press the call to raise the handset lifter. 2. While speaking, turn the configuration dial through your headset, use a coin or small screwdriver to dial the number. Make sure ...
...tone, you experience buzzing/hissing, please follow the directions below. 2 4 3 4 1 1 2 2 To first test proper set at the factory to secure handset lifter in position. 2 2 1 1 1 1 If you or the recipient have trouble hearing, please check compatibility (page 13). 12 www.HeadsetPlus.com 13 Use mounting .... Place a call control button to someone you or the recipient is raised high enough. 2. Press the call to raise the handset lifter. 2. While speaking, turn the configuration dial through your headset, use a coin or small screwdriver to dial the number. Make sure ...
User Guide
Page 9
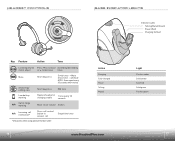
to answer call * Only works when using optional Handset Lifter. 3 repetitive tones A Base Features Key Feature 123ActLiiosntening volume 4 major adjust B C D ChaSrgpienagking volume Fullmy Cahjoarrgaeddjust PowSepreaking volume minor adjust Talking Muted Action Tone Slide switchLight Increase ...
to answer call * Only works when using optional Handset Lifter. 3 repetitive tones A Base Features Key Feature 123ActLiiosntening volume 4 major adjust B C D ChaSrgpienagking volume Fullmy Cahjoarrgaeddjust PowSepreaking volume minor adjust Talking Muted Action Tone Slide switchLight Increase ...
User Guide
Page 12
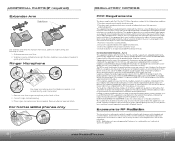
... to the telephone network, the telephone company will notify the customer as soon as determined by consumers. Visit www.plantronics.com for use by the REN, contact your line, as possible. R1i.nSlgideeextrendMer aircm ronoto lpiftehr. These limits .... Stabilizers AEDxDtIeTnIOdNerAALrPmARTS (If require2 d) 1 Stabilizers 2 Extender Arm 2 1 2 Stabilizers 2 1 2 Use extender arm when the handset lifter needs additional stability lifting and returning to AC power sources. Position stabilizers on another circuit. 4. Consult the dealer or an experienced radio/TV...
... to the telephone network, the telephone company will notify the customer as soon as determined by consumers. Visit www.plantronics.com for use by the REN, contact your line, as possible. R1i.nSlgideeextrendMer aircm ronoto lpiftehr. These limits .... Stabilizers AEDxDtIeTnIOdNerAALrPmARTS (If require2 d) 1 Stabilizers 2 Extender Arm 2 1 2 Stabilizers 2 1 2 Use extender arm when the handset lifter needs additional stability lifting and returning to AC power sources. Position stabilizers on another circuit. 4. Consult the dealer or an experienced radio/TV...


