Operating Instructions
Page 1
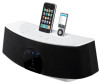
XW-NAC1-K Digital Speaker System for iPod Station d'accueil audio numérique pour iPod Sistema digital de parlantes para iPod Register your product at: http://www.... service bulletins on your new product • Improve product development Your input helps us continue to design products that meet your needs. • Receive a free Pioneer newsletter Registered customers can opt in to receive a monthly newsletter. http://www.pioneerelectronics.com (US) http://www.pioneerelectronics.ca (Canada) Operating Instructions Mode d'emploi Manual...
XW-NAC1-K Digital Speaker System for iPod Station d'accueil audio numérique pour iPod Sistema digital de parlantes para iPod Register your product at: http://www.... service bulletins on your new product • Improve product development Your input helps us continue to design products that meet your needs. • Receive a free Pioneer newsletter Registered customers can opt in to receive a monthly newsletter. http://www.pioneerelectronics.com (US) http://www.pioneerelectronics.ca (Canada) Operating Instructions Mode d'emploi Manual...
Operating Instructions
Page 2
Connect the equipment into an outlet on a circuit different from overheating. D8-10-1-2_A1_En This Class B digital apparatus complies with the product may expose you to chemicals listed on , the user is no guarantee that interference will be blocked or covered with the instructions, may invalidate the user's right to Part 15 of California and other governmental entities to other reproductive harm. D8-10-1-3_A1_En Information to User Alterations or modifications carried out without appropriate authorization may cause harmful interference to high humidity or direct ...
Connect the equipment into an outlet on a circuit different from overheating. D8-10-1-2_A1_En This Class B digital apparatus complies with the product may expose you to chemicals listed on , the user is no guarantee that interference will be blocked or covered with the instructions, may invalidate the user's right to Part 15 of California and other governmental entities to other reproductive harm. D8-10-1-3_A1_En Information to User Alterations or modifications carried out without appropriate authorization may cause harmful interference to high humidity or direct ...
Operating Instructions
Page 3
The exclamation point within the product's enclosure that may be of sufficient magnitude to constitute a risk of time (for example, when on vacation). Servicing is required when the apparatus has been damaged in any ventilation openings. Since the power cord serves as power-supply cord or plug is damaged, liquid has been spilled or objects have fallen into your safety. If connected to persons. D3-4-2-2-1a_A1_En (Symbol examples for the unit, you want to use, the plug must be removed and appropriate one wider than household purposes (such as radiators, heat registers, ...
The exclamation point within the product's enclosure that may be of sufficient magnitude to constitute a risk of time (for example, when on vacation). Servicing is required when the apparatus has been damaged in any ventilation openings. Since the power cord serves as power-supply cord or plug is damaged, liquid has been spilled or objects have fallen into your safety. If connected to persons. D3-4-2-2-1a_A1_En (Symbol examples for the unit, you want to use, the plug must be removed and appropriate one wider than household purposes (such as radiators, heat registers, ...
Operating Instructions
Page 4
... from loud noise is too late, this manufacturer and the Electronic Industries Association's Consumer Electronics Group recommend you can hear it damaged, ask your nearest PIONEER authorized service center or your equipment by tugging the cord and never touch the power cord when your equipment offers. Taking a minute to do this...
... from loud noise is too late, this manufacturer and the Electronic Industries Association's Consumer Electronics Group recommend you can hear it damaged, ask your nearest PIONEER authorized service center or your equipment by tugging the cord and never touch the power cord when your equipment offers. Taking a minute to do this...
Operating Instructions
Page 5
Please read through these operating instructions so that you for buying this Pioneer product. Contents English Français Español 01 Before you have finished reading the instructions, put them in 7 02 Controls and displays Remote ...
Please read through these operating instructions so that you for buying this Pioneer product. Contents English Français Español 01 Before you have finished reading the instructions, put them in 7 02 Controls and displays Remote ...
Operating Instructions
Page 6
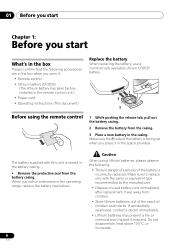
Keep away from the casing. 3 Place a new battery in the casing. If accidentally swallowed, contact a doctor immediately. • Lithium batteries may present a fire or chemical burn hazard if misused. Make sure the side of the battery is incorrectly replaced. When you notice a decrease in the operating range, replace the battery (see below). 6 En Caution When using the remote control 1 While pushing the release tab, pull out the battery casing. 2 Remove the battery from children. • Store lithium batteries, out of the reach of children and infants. Do not ...
Keep away from the casing. 3 Place a new battery in the casing. If accidentally swallowed, contact a doctor immediately. • Lithium batteries may present a fire or chemical burn hazard if misused. Make sure the side of the battery is incorrectly replaced. When you notice a decrease in the operating range, replace the battery (see below). 6 En Caution When using the remote control 1 While pushing the release tab, pull out the battery casing. 2 Remove the battery from children. • Store lithium batteries, out of the reach of children and infants. Do not ...
Operating Instructions
Page 7
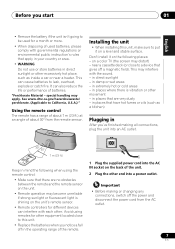
"Perchlorate Material - Don't install it on a level and stable surface. in extremely hot or cold areas - in places that there are very dusty - AC IN 30° 30° 7 m (23 ft.) Keep in mind the following places: - on the unit. • Remote operation may apply. near a heater. in damp or wet areas - Important • Before making all connections, plug the unit into a power outlet. This can also reduce the life or performance of about 30º from the AC outlet. 7 En It can cause batteries to leak, overheat, explode or catch fire. Installing the unit &#...
"Perchlorate Material - Don't install it on a level and stable surface. in extremely hot or cold areas - in places that there are very dusty - AC IN 30° 30° 7 m (23 ft.) Keep in mind the following places: - on the unit. • Remote operation may apply. near a heater. in damp or wet areas - Important • Before making all connections, plug the unit into a power outlet. This can also reduce the life or performance of about 30º from the AC outlet. 7 En It can cause batteries to leak, overheat, explode or catch fire. Installing the unit &#...
Operating Instructions
Page 8
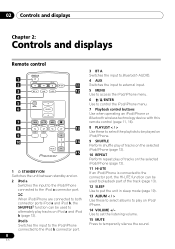
iPod b Switches the input to the iPod/iPhone connected to the iPod b connector port. 8 En 3 BT A Switches the input to Bluetooth AUDIO. 4 AUX Switches the input to external input. 5 MENU Use to access the iPod/iPhone menu. 6 //ENTER Use to control the iPod/iPhone menu. 7 Playback control buttons Use when operating an iPod/iPhone or Bluetooth wireless technology device with this remote control (page 11, 16). 8 PLAYLIST < / > Use these to select albums to the iPod a connector port. When iPod/iPhone are connected to both connector ports iPod a and iPod b, the SHUFFLE2 function ...
iPod b Switches the input to the iPod/iPhone connected to the iPod b connector port. 8 En 3 BT A Switches the input to Bluetooth AUDIO. 4 AUX Switches the input to external input. 5 MENU Use to access the iPod/iPhone menu. 6 //ENTER Use to control the iPod/iPhone menu. 7 Playback control buttons Use when operating an iPod/iPhone or Bluetooth wireless technology device with this remote control (page 11, 16). 8 PLAYLIST < / > Use these to select albums to the iPod a connector port. When iPod/iPhone are connected to both connector ports iPod a and iPod b, the SHUFFLE2 function ...
Operating Instructions
Page 9
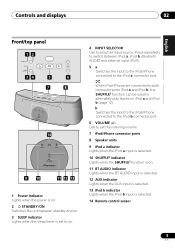
Use to set the listening volume. 7 iPod/iPhone connector ports 8 Speaker units 9 iPod a indicator Lights when the iPod a input is selected. 10 SHUFFLE2 indicator Lights when the SHUFFLE2 function is on. 11 BT AUDIO indicator Lights when the BT AUDIO input is selected. 12 AUX indicator Lights when the AUX input is selected. 13 iPod b indicator Lights when the iPod b input is set to on. 4 INPUT SELECTOR Use to select an input source. b Switches the input to the iPod/iPhone connected to alternately play tracks on iPod a and iPod b (page 12). When iPod/iPhone are connected to both ...
Use to set the listening volume. 7 iPod/iPhone connector ports 8 Speaker units 9 iPod a indicator Lights when the iPod a input is selected. 10 SHUFFLE2 indicator Lights when the SHUFFLE2 function is on. 11 BT AUDIO indicator Lights when the BT AUDIO input is selected. 12 AUX indicator Lights when the AUX input is selected. 13 iPod b indicator Lights when the iPod b input is set to on. 4 INPUT SELECTOR Use to select an input source. b Switches the input to the iPod/iPhone connected to alternately play tracks on iPod a and iPod b (page 12). When iPod/iPhone are connected to both ...
Operating Instructions
Page 10
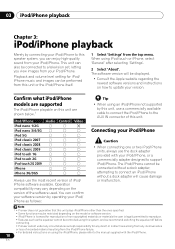
... provided with the iPod/iPhone. 10 En When using this system, and we recommend switching the equalizer off before connecting. • Pioneer cannot under any inconvenience or loss of recorded material resulting from the iPod/iPhone failure. • For detailed instructions on the version .... The software version will be connected without a dock adapter will cause damage or malfunction. Connecting your iPod/iPhone. Note 1 • Pioneer does not guarantee that this unit plays iPod/iPhone other than the ones specified. • Some functions may vary depending on using an ...
... provided with the iPod/iPhone. 10 En When using this system, and we recommend switching the equalizer off before connecting. • Pioneer cannot under any inconvenience or loss of recorded material resulting from the iPod/iPhone failure. • For detailed instructions on the version .... The software version will be connected without a dock adapter will cause damage or malfunction. Connecting your iPod/iPhone. Note 1 • Pioneer does not guarantee that this unit plays iPod/iPhone other than the ones specified. • Some functions may vary depending on using an ...
Operating Instructions
Page 11
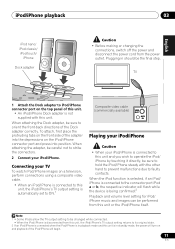
When attaching the Dock adapter, be sure to the connector port iPod a or b, the respective indicator will flash while the device is being confirmed.2 Playback and volume level setting for iPod/ iPhone music and images can be changed while connected. • When the iPod/iPhone is disconnected from the power outlet. To attach, first place the protruding tabs on a television, perform connections using a composite video cable. • When an iPod/iPhone is connected to this unit, the iPod/iPhone's TV output setting is automatically set to ON.1 Composite video cable (commercially available)...
When attaching the Dock adapter, be sure to the connector port iPod a or b, the respective indicator will flash while the device is being confirmed.2 Playback and volume level setting for iPod/ iPhone music and images can be changed while connected. • When the iPod/iPhone is disconnected from the power outlet. To attach, first place the protruding tabs on a television, perform connections using a composite video cable. • When an iPod/iPhone is connected to this unit, the iPod/iPhone's TV output setting is automatically set to ON.1 Composite video cable (commercially available)...

Operating Instructions
Page 12
VOLUME Use to set by the shuffle function. 1 Connect two iPod/iPhone units to the iPod/iPhone connector ports (iPod a, iPod b), then press iPod a or iPod b. 2 Press MENU to access the iPod/iPhone menu. 3 Select the track area that you want to play back, then press ENTER. 4 Press . A bit before the currently playing iPod/iPhone track ends, the other iPod/ iPhone track and the volume is gradually raised to fade in seamlessly (Cross fade). the unit connected to the iPod a connector port will return to its original setting. A bit before the currently playing iPod/iPhone track ends, ...
VOLUME Use to set by the shuffle function. 1 Connect two iPod/iPhone units to the iPod/iPhone connector ports (iPod a, iPod b), then press iPod a or iPod b. 2 Press MENU to access the iPod/iPhone menu. 3 Select the track area that you want to play back, then press ENTER. 4 Press . A bit before the currently playing iPod/iPhone track ends, the other iPod/ iPhone track and the volume is gradually raised to fade in seamlessly (Cross fade). the unit connected to the iPod a connector port will return to its original setting. A bit before the currently playing iPod/iPhone track ends, ...
Operating Instructions
Page 13
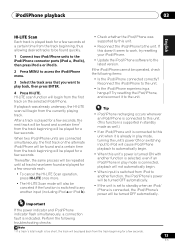
Thereafter, the same process will be repeated until all tracks have been found and played for a few seconds each. • To cancel the HI-LITE Scan operation, press HI-LITE once more. • The HI-LITE Scan mode will be turned OFF automatically. • If the unit is set to the latest version. If the iPod/iPhone cannot be turned OFF automatically. Important If the power indicator and iPod/iPhone indicator flash simultaneously, a connection fault is supported in play back, then press ENTER. 4 Press HI-LITE. Reconnect the iPod/iPhone to the unit. After a track is ...
Thereafter, the same process will be repeated until all tracks have been found and played for a few seconds each. • To cancel the HI-LITE Scan operation, press HI-LITE once more. • The HI-LITE Scan mode will be turned OFF automatically. • If the unit is set to the latest version. If the iPod/iPhone cannot be turned OFF automatically. Important If the power indicator and iPod/iPhone indicator flash simultaneously, a connection fault is supported in play back, then press ENTER. 4 Press HI-LITE. Reconnect the iPod/iPhone to the unit. After a track is ...
Operating Instructions
Page 14
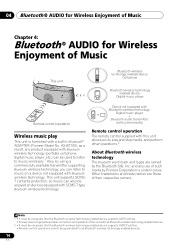
...Note 1 • It must be necessary that the Bluetooth wireless technology enabled device supports A2DP profiles. • Pioneer does not guarantee proper connection and operation of this unit allows you can listen to play This unit is under ...contents protection, so music can be enjoyed on a device not equipped with Bluetooth wireless technology. Other trademarks and trade names are owned by Pioneer Corporation is furnished with SCMS-T type Bluetooth wireless technology. and any product equipped with Bluetooth wireless technology (portable cell phone, digital music player...
...Note 1 • It must be necessary that the Bluetooth wireless technology enabled device supports A2DP profiles. • Pioneer does not guarantee proper connection and operation of this unit allows you can listen to play This unit is under ...contents protection, so music can be enjoyed on a device not equipped with Bluetooth wireless technology. Other trademarks and trade names are owned by Pioneer Corporation is furnished with SCMS-T type Bluetooth wireless technology. and any product equipped with Bluetooth wireless technology (portable cell phone, digital music player...
Operating Instructions
Page 15
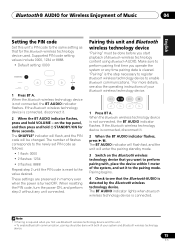
Make sure to perform pairing first time you operate the system or any unit connected. The BT AUDIO indicator lights when Bluetooth wireless technology device is turned OFF. The number of flashes corresponds to the newly set it to the pairing mode. These settings are preserved in memory even when the power is connected. The BT AUDIO indicator will flash fast, and the unit will be changed. Note 1 • Pairing is required when you first use Bluetooth wireless technology device and this unit. • To enable Bluetooth communication, pairing should be done before ...
Make sure to perform pairing first time you operate the system or any unit connected. The BT AUDIO indicator lights when Bluetooth wireless technology device is turned OFF. The number of flashes corresponds to the newly set it to the pairing mode. These settings are preserved in memory even when the power is connected. The BT AUDIO indicator will flash fast, and the unit will be changed. Note 1 • Pairing is required when you first use Bluetooth wireless technology device and this unit. • To enable Bluetooth communication, pairing should be done before ...
Operating Instructions
Page 16
In this unit is not operated for 30 minutes or more after the Bluetooth AUDIO function is not connected. The following operations are now possible for Bluetooth wireless technology devices, using the remote control.1 Button What it does / Starts normal playback and pauses/ unpauses playback. Stops playback. Press to skip to the start of Music The BT AUDIO indicator flashes slowly when Bluetooth wireless technology device is selected, power will automatically turn OFF. When no Bluetooth wireless technology device is shown in Bluetooth ...
In this unit is not operated for 30 minutes or more after the Bluetooth AUDIO function is not connected. The following operations are now possible for Bluetooth wireless technology devices, using the remote control.1 Button What it does / Starts normal playback and pauses/ unpauses playback. Stops playback. Press to skip to the start of Music The BT AUDIO indicator flashes slowly when Bluetooth wireless technology device is selected, power will automatically turn OFF. When no Bluetooth wireless technology device is shown in Bluetooth ...
Operating Instructions
Page 17
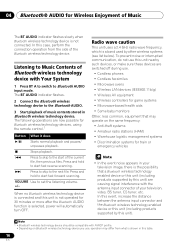
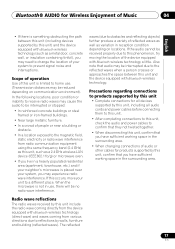
If this occurs, move your system, you may experience radio wave interference. Precautions regarding connections to products supported by this unit • Complete connections for all devices supported by this unit, including all audio cords and power cables before connecting them to this unit. • After completing connections to this unit, check the audio and power cables to confirm that they not twisted together. • When disconnecting this unit, confirm that you live in a heavily populated residential area (apartment, townhouse, etc.) and if your neighbor's microwave is ...
If this occurs, move your system, you may experience radio wave interference. Precautions regarding connections to products supported by this unit • Complete connections for all devices supported by this unit, including all audio cords and power cables before connecting them to this unit. • After completing connections to this unit, check the audio and power cables to confirm that they not twisted together. • When disconnecting this unit, confirm that you live in a heavily populated residential area (apartment, townhouse, etc.) and if your neighbor's microwave is ...
Operating Instructions
Page 18
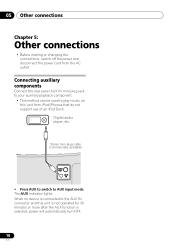
When no device is selected, power will automatically turn OFF. 18 En Digital audio player, etc. The AUX indicator lights. 05 Other connections Chapter 5: Other connections • Before making or changing the connections, switch off the power and disconnect the power cord from iPod/iPhones that do not support use of an iPod Dock. Connecting auxiliary components Connect the rear panel AUX IN mini-plug jack to your auxiliary playback component. • This method can be used to play music on this unit is not operated for 30 minutes or more after the AUX function is connected to ...
When no device is selected, power will automatically turn OFF. 18 En Digital audio player, etc. The AUX indicator lights. 05 Other connections Chapter 5: Other connections • Before making or changing the connections, switch off the power and disconnect the power cord from iPod/iPhones that do not support use of an iPod Dock. Connecting auxiliary components Connect the rear panel AUX IN mini-plug jack to your auxiliary playback component. • This method can be used to play music on this unit is not operated for 30 minutes or more after the AUX function is connected to ...

Operating Instructions
Page 19
During operation of the sleep timer, the SLEEP indicator will light.1 Note 1 The sleep timer can fall asleep without worrying about it. • Press SLEEP repeatedly to switch the sleep timer between on and off. English Français Español Using the timer 06 Chapter 6: Using the timer Using the sleep timer The sleep timer switches off the unit after 60 minutes so you can be reset by pressing SLEEP while the sleep timer is operating. 19 En
During operation of the sleep timer, the SLEEP indicator will light.1 Note 1 The sleep timer can fall asleep without worrying about it. • Press SLEEP repeatedly to switch the sleep timer between on and off. English Français Español Using the timer 06 Chapter 6: Using the timer Using the sleep timer The sleep timer switches off the unit after 60 minutes so you can be reset by pressing SLEEP while the sleep timer is operating. 19 En
Operating Instructions
Page 20
Problem Remedy The power does not turn OFF. Power automatically switches to standby without user action. • When no device is connected to your nearest Pioneer authorized service center or your iPod/iPhone on . • Disconnect the power plug from the outlet, and insert again. • If the power shuts off ... being used. Sometimes the trouble may lie in Bluetooth ADAPTER or the AUX IN connector and this component, check the points below , ask your nearest Pioneer authorized service center or your iPod/iPhone on page 18).
Problem Remedy The power does not turn OFF. Power automatically switches to standby without user action. • When no device is connected to your nearest Pioneer authorized service center or your iPod/iPhone on . • Disconnect the power plug from the outlet, and insert again. • If the power shuts off ... being used. Sometimes the trouble may lie in Bluetooth ADAPTER or the AUX IN connector and this component, check the points below , ask your nearest Pioneer authorized service center or your iPod/iPhone on page 18).
