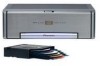
Owner's Manual
Page 4
... the Picture Mode 1 Loading Discs - Working with the Information Display 2 of a DVD 30 - To Ensure Safe Driving - Preventing the Battery from a Specified Time - Condition Memory - Removing the Magazine Basic Operations 17 Switching Power ON/OFF 17 - Specifying Track Disc Fast Forward/Reverse 22 - Slow Motion Playback Changing Audio Language during Playback (Multi-Audio 26 Changing Audio Output during Playback 26 Changing the Subtitle Language during Playback (Multi-Subtitle) ........ 27 Changing the Viewing Angle during...
... the Picture Mode 1 Loading Discs - Working with the Information Display 2 of a DVD 30 - To Ensure Safe Driving - Preventing the Battery from a Specified Time - Condition Memory - Removing the Magazine Basic Operations 17 Switching Power ON/OFF 17 - Specifying Track Disc Fast Forward/Reverse 22 - Slow Motion Playback Changing Audio Language during Playback (Multi-Audio 26 Changing Audio Output during Playback 26 Changing the Subtitle Language during Playback (Multi-Subtitle) ........ 27 Changing the Viewing Angle during...
Owner's Manual
Page 5
... Your Code Number 59 Error Message 59 Language Code Chart 60 Terms 61 Installation 63 Connecting the Units 63 - Searching for a Desired Scene, Starting Playback from a Specified Time - Setting Random Play - Setting the Subtitle Language Setting the Audio Language (AUDIO LANG 43 Setting the Menu Language (MENU LANG 44 Setting the Parental Lock (PARENTAL) .... 44 - Setting the Code Number and Level - MODE Switch Setting - Connecting the Power Cord - Installing the DVD Player Unit Installing the Remote Sensor 75 Appendix 77 Index 77 Specifications 78 2 Operating with...
... Your Code Number 59 Error Message 59 Language Code Chart 60 Terms 61 Installation 63 Connecting the Units 63 - Searching for a Desired Scene, Starting Playback from a Specified Time - Setting Random Play - Setting the Subtitle Language Setting the Audio Language (AUDIO LANG 43 Setting the Menu Language (MENU LANG 44 Setting the Parental Lock (PARENTAL) .... 44 - Setting the Code Number and Level - MODE Switch Setting - Connecting the Power Cord - Installing the DVD Player Unit Installing the Remote Sensor 75 Appendix 77 Index 77 Specifications 78 2 Operating with...
Owner's Manual
Page 7
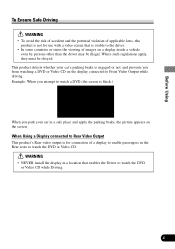
.... When Using a Display connected to Rear Video Output This product's Rear video output is for use with a video screen that enables the Driver to watch a DVD (the screen is black.) When you park your car's parking brake is visible to the driver. • In some countries or states the viewing of a display to enable passengers in a safe place and apply the parking brake, the picture appears on the display connected to Front Video Output while driving. Example: When you from watching a DVD or Video CD...
.... When Using a Display connected to Rear Video Output This product's Rear video output is for use with a video screen that enables the Driver to watch a DVD (the screen is black.) When you park your car's parking brake is visible to the driver. • In some countries or states the viewing of a display to enable passengers in a safe place and apply the parking brake, the picture appears on the display connected to Front Video Output while driving. Example: When you from watching a DVD or Video CD...
Owner's Manual
Page 8
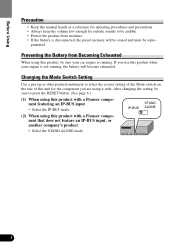
... moisture. • If the battery is disconnected, the preset memory will become exhausted. Changing the Mode Switch Setting Use a pen tip or other pointed instrument to select the correct setting of the Mode switch on the rear of this unit for outside sounds to press the RESET button. (See page 6.) (1) When using this product with a Pioneer component that does not feature an IP-BUS input, or another company's product...
... moisture. • If the battery is disconnected, the preset memory will become exhausted. Changing the Mode Switch Setting Use a pen tip or other pointed instrument to select the correct setting of the Mode switch on the rear of this unit for outside sounds to press the RESET button. (See page 6.) (1) When using this product with a Pioneer component that does not feature an IP-BUS input, or another company's product...
Owner's Manual
Page 9
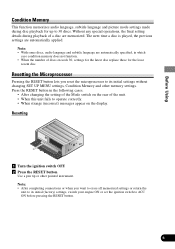
The next time a disc is played, the previous settings are memorized. Press the RESET button in which case condition memory does not function. • When the number of the Mode switch on the display. Note: • With some discs, audio language and subtitle language are automatically specified, in the following cases. • After changing the setting of discs exceeds 30, settings for the latest disc replace those for up to ACC...
The next time a disc is played, the previous settings are memorized. Press the RESET button in which case condition memory does not function. • When the number of the Mode switch on the display. Note: • With some discs, audio language and subtitle language are automatically specified, in the following cases. • After changing the setting of discs exceeds 30, settings for the latest disc replace those for up to ACC...

Owner's Manual
Page 12
... DVD-R/DVD-RW discs, only recordings made in the Video format (Video mode) can be possible with a PC using the correct format is possible, but depending on the disc. Note: • With some DVD-Video discs, you purchased the application software.) • Playback of CD-TEXT discs is possible, but display of CD-R/RW and DVD-R/RW discs that display the logos shown below can be played back on disc jackets...
... DVD-R/DVD-RW discs, only recordings made in the Video format (Video mode) can be possible with a PC using the correct format is possible, but depending on the disc. Note: • With some DVD-Video discs, you purchased the application software.) • Playback of CD-TEXT discs is possible, but display of CD-R/RW and DVD-R/RW discs that display the logos shown below can be played back on disc jackets...

Owner's Manual
Page 15
... kinds of repeat play. Repeat Play Still Image & Frame-By-Frame Playback Slow Motion Playback Multi-Aspect Cinema/Animation/Standard Mode Switching Multi-Audio Multi-Subtitle Multi-Angle Video CDs featuring PBC Compatibility Parental Lock Dolby* Digital/DTS** Compatibility (When combining the product with a Pioneer Multi-Channel AV Master Unit, you can switch among these three modes for home and other limited viewing uses only unless otherwise...
... kinds of repeat play. Repeat Play Still Image & Frame-By-Frame Playback Slow Motion Playback Multi-Aspect Cinema/Animation/Standard Mode Switching Multi-Audio Multi-Subtitle Multi-Angle Video CDs featuring PBC Compatibility Parental Lock Dolby* Digital/DTS** Compatibility (When combining the product with a Pioneer Multi-Channel AV Master Unit, you can switch among these three modes for home and other limited viewing uses only unless otherwise...
Owner's Manual
Page 21
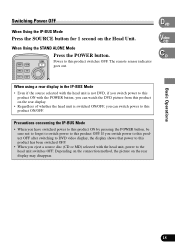
... remote sensor indicator goes out. Depending on the connection method, the picture on the Head Unit. Power to the head unit switches OFF. If you switch power to this product OFF after switching to DVD video display, the display shows that power to this product has been switched OFF. • When you eject a source disc (CD or MD) selected with the POWER button, you can watch the DVD picture from this product on the rear display...
... remote sensor indicator goes out. Depending on the connection method, the picture on the Head Unit. Power to the head unit switches OFF. If you switch power to this product OFF after switching to DVD video display, the display shows that power to this product has been switched OFF. • When you eject a source disc (CD or MD) selected with the POWER button, you can watch the DVD picture from this product on the rear display...

Owner's Manual
Page 33
... the input number is explained using an information display you switch discs for playback, use the Search function to specify a title or chapter to search for a desired scene, use the Search function to search for a desired scene, select the desired audio and subtitle language, and select the angle. • Displaying all the discs loaded in blue. 2 Press the number buttons to select a desired option. Title Chapter Time...
... the input number is explained using an information display you switch discs for playback, use the Search function to specify a title or chapter to search for a desired scene, use the Search function to search for a desired scene, select the desired audio and subtitle language, and select the angle. • Displaying all the discs loaded in blue. 2 Press the number buttons to select a desired option. Title Chapter Time...
Owner's Manual
Page 51
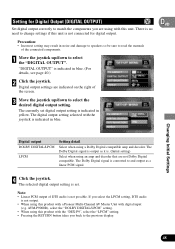
... setting) Select when using a Dolby Digital compatible amp and decoder. "DIGITAL OUTPUT" is converted to the previous display. 48 The selected digital output setting is set digital output setting is not connected for Digital Output (DIGITAL OUTPUT) VD Set digital output correctly to change settings if this product with a Pioneer Multi-Channel AV Master Unit with the joystick is not possible. The Dolby Digital signal is indicated in blue. There is no need to...
... setting) Select when using a Dolby Digital compatible amp and decoder. "DIGITAL OUTPUT" is converted to the previous display. 48 The selected digital output setting is set digital output setting is not connected for Digital Output (DIGITAL OUTPUT) VD Set digital output correctly to change settings if this product with a Pioneer Multi-Channel AV Master Unit with the joystick is not possible. The Dolby Digital signal is indicated in blue. There is no need to...

Owner's Manual
Page 52
... kHz signal is output with a Multi-Channel AV Master Unit (e.g. Note: • With discs featuring 96 kHz recording, if you can set linear PCM audio output for both digital and analog output. Output setting 48kHz 96kHz Setting detail Select this setting when using digital connections. The signal is converted to select the "OUT SELECTION". Changing Initial Settings Setting Digital and Analog Audio Output (OUT SELECTION) You can enjoy exceptionally high sound quality...
... kHz signal is output with a Multi-Channel AV Master Unit (e.g. Note: • With discs featuring 96 kHz recording, if you can set linear PCM audio output for both digital and analog output. Output setting 48kHz 96kHz Setting detail Select this setting when using digital connections. The signal is converted to select the "OUT SELECTION". Changing Initial Settings Setting Digital and Analog Audio Output (OUT SELECTION) You can enjoy exceptionally high sound quality...
Owner's Manual
Page 57
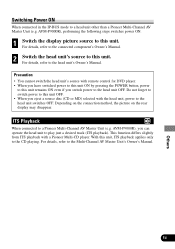
... the POWER button, power to this unit. ITS Playback When connected to the head unit's Owner's Manual. AVM-P9000R), you switch power to the head unit switches OFF. This function differs slightly from ITS playback with the head unit, power to the head unit OFF. Precaution • You cannot switch the head unit's source with remote control for DVD player. • When you eject a source disc (CD or MD) selected with a Pioneer Multi-CD player. Switching Power ON When connected in...
... the POWER button, power to this unit. ITS Playback When connected to the head unit's Owner's Manual. AVM-P9000R), you switch power to the head unit switches OFF. This function differs slightly from ITS playback with the head unit, power to the head unit OFF. Precaution • You cannot switch the head unit's source with remote control for DVD player. • When you eject a source disc (CD or MD) selected with a Pioneer Multi-CD player. Switching Power ON When connected in...
Owner's Manual
Page 60
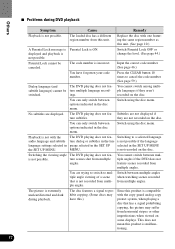
... audio language and subtitle language settings selected in the disc menu. ings. switched. Subtitles are displayed. You can only switch between options indicated in the SET UP MENU. Playback is not possible. Switching the viewing angle The DVD playing does not fea- You are not recorded on the disc. This does not mean this product is compatible with one featuring the same region number as this unit. Input...
... audio language and subtitle language settings selected in the disc menu. ings. switched. Subtitles are displayed. You can only switch between options indicated in the SET UP MENU. Playback is not possible. Switching the viewing angle The DVD playing does not fea- You are not recorded on the disc. This does not mean this product is compatible with one featuring the same region number as this unit. Input...

Owner's Manual
Page 61
... display operation is switched OFF. Switch the output setting to 48 kHz. (See page 49.) Indications are not correctly connected. Repeat play and Track/Time PBC is not compatible with Video CDs not featuring PBC. Remedy This operation is not possible with a 96 kHz signal. Connect optical digital cables correctly. Search are not possible. 7 Problems during Multi-Channel AV Master Unit connection Symptom There's no sound. The Multi-Channel AV Master Unit...
... display operation is switched OFF. Switch the output setting to 48 kHz. (See page 49.) Indications are not correctly connected. Repeat play and Track/Time PBC is not compatible with Video CDs not featuring PBC. Remedy This operation is not possible with a 96 kHz signal. Connect optical digital cables correctly. Search are not possible. 7 Problems during Multi-Channel AV Master Unit connection Symptom There's no sound. The Multi-Channel AV Master Unit...

Owner's Manual
Page 64
... surround sound system used to the optical digital input jacks of a book. Some DVDs feature scenes shot from one camera at a time are numbered in theaters. This system is the signal recording system used for Moving Pictures Experts Group, and is sound quality even higher than that provided by music CDs. The result is an international video image compression standard. To enjoy discs featuring DTS audio...
... surround sound system used to the optical digital input jacks of a book. Some DVDs feature scenes shot from one camera at a time are numbered in theaters. This system is the signal recording system used for Moving Pictures Experts Group, and is sound quality even higher than that provided by music CDs. The result is an international video image compression standard. To enjoy discs featuring DTS audio...
Owner's Manual
Page 66
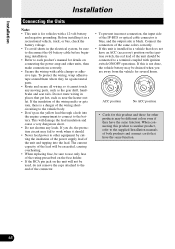
... have the same function. 63 Connect the connectors of the same colors correctly. • If this product to another product, refer to the supplied Installation manuals of both products and connect cords that have an ACC (accessory) position on connecting the power amp and other units, then make connections correctly. • Secure the wiring with cable clamps or adhesive tape. When connecting this unit is installed in a vehicle that...
... have the same function. 63 Connect the connectors of the same colors correctly. • If this product to another product, refer to the supplied Installation manuals of both products and connect cords that have an ACC (accessory) position on connecting the power amp and other units, then make connections correctly. • Secure the wiring with cable clamps or adhesive tape. When connecting this unit is installed in a vehicle that...
Owner's Manual
Page 69
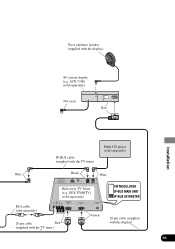
Voice guidance speaker (supplied with the display) 66 AVX-7300) (sold separately) Blue Black Blue Hide-away TV Tuner (e.g. Red Installation IP-BUS cable (supplied with the TV tuner) Multi-CD player (sold separately) Not used. GEX-P7000TV) (sold separately) RCA cable (sold separately) 20 pin cable Red (supplied with the TV tuner) Green 20 pin cable (supplied with the display) AV system display (e.g.
Voice guidance speaker (supplied with the display) 66 AVX-7300) (sold separately) Blue Black Blue Hide-away TV Tuner (e.g. Red Installation IP-BUS cable (supplied with the TV tuner) Multi-CD player (sold separately) Not used. GEX-P7000TV) (sold separately) RCA cable (sold separately) 20 pin cable Red (supplied with the TV tuner) Green 20 pin cable (supplied with the display) AV system display (e.g.
Owner's Manual
Page 72
... rear of video output for viewing on a front display, you can connect for video output enabling viewing on the next page. 69 Installation 7 When connecting the display with RCA input jacks IP-BUS STAND ALONE This Product Black Audio outputs Left (White) 15 cm (5/8 in.) Right (Red) Video output Yellow (FRONT VIDEO OUTPUT) 6 m (19 ft. 8 in.) Remote sensor (supplied with the CD-R7) RCA cable (sold separately) To audio inputs RCA cable (sold separately) To video input Display with RCA input jacks Connecting a rear display Instead of the car...
... rear of video output for viewing on a front display, you can connect for video output enabling viewing on the next page. 69 Installation 7 When connecting the display with RCA input jacks IP-BUS STAND ALONE This Product Black Audio outputs Left (White) 15 cm (5/8 in.) Right (Red) Video output Yellow (FRONT VIDEO OUTPUT) 6 m (19 ft. 8 in.) Remote sensor (supplied with the CD-R7) RCA cable (sold separately) To audio inputs RCA cable (sold separately) To video input Display with RCA input jacks Connecting a rear display Instead of the car...

Owner's Manual
Page 73
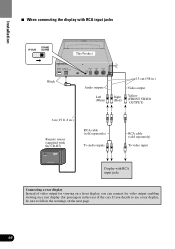
This Product Audio outputs Left (White) 15 cm (5/8 in a location that enables the Driver to watch the DVD or Video CD while Driving. 7 When Using a Display connected Rear Video Output This product's Rear video output is for connection of a display to enable passengers in the Rear seats to watch the DVD or Video CD. WARNING • NEVER install the display in .) Right (Red) Video output Yellow (REAR VIDEO OUTPUT) RCA cable (sold separately) To audio inputs RCA cable (sold separately) To video input Display with RCA input jacks Installation 70
This Product Audio outputs Left (White) 15 cm (5/8 in a location that enables the Driver to watch the DVD or Video CD while Driving. 7 When Using a Display connected Rear Video Output This product's Rear video output is for connection of a display to enable passengers in the Rear seats to watch the DVD or Video CD. WARNING • NEVER install the display in .) Right (Red) Video output Yellow (REAR VIDEO OUTPUT) RCA cable (sold separately) To audio inputs RCA cable (sold separately) To video input Display with RCA input jacks Installation 70

Owner's Manual
Page 75
... not break free while the car is moving, and cause injury or an accident. • If this product from performing correctly or could cause malfunction. Installation Note: • Before finally installing the unit, connect the wiring temporarily, making sure it is all leads and cords carefully around the sliding mechanism so they do not get in the driver's way and...
... not break free while the car is moving, and cause injury or an accident. • If this product from performing correctly or could cause malfunction. Installation Note: • Before finally installing the unit, connect the wiring temporarily, making sure it is all leads and cords carefully around the sliding mechanism so they do not get in the driver's way and...


