Owner's Manual
Page 4
...receiver settings from the System Setup menu 36 Automatic MCACC (Expert 36 Surround back speaker setting 39 Manual... Band Phase Control 44 Data Management 45 Manual speaker setup 47 Speaker Setting 47 Channel ... an iPod 50 Connecting your iPod to the receiver 50 iPod playback 50 Watching photos and video...-ray disc player 14 Connecting a satellite/cable receiver or other set-top box 15 Connecting a ... Connecting external antennas 22 Plugging in the receiver 22 AC outlet 22 04 Controls and... 6 Ventilation 6 Installing the receiver 6 Loading the batteries 6 02 5 minute guide Introduction ...
...receiver settings from the System Setup menu 36 Automatic MCACC (Expert 36 Surround back speaker setting 39 Manual... Band Phase Control 44 Data Management 45 Manual speaker setup 47 Speaker Setting 47 Channel ... an iPod 50 Connecting your iPod to the receiver 50 iPod playback 50 Watching photos and video...-ray disc player 14 Connecting a satellite/cable receiver or other set-top box 15 Connecting a ... Connecting external antennas 22 Plugging in the receiver 22 AC outlet 22 04 Controls and... 6 Ventilation 6 Installing the receiver 6 Loading the batteries 6 02 5 minute guide Introduction ...
Owner's Manual
Page 7
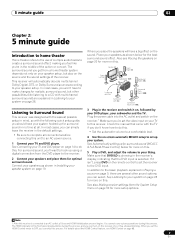
... using a digital connection from the DVD player to OFF, you 've set the receiver to your speaker setup. Check the manual that DVD/LD is connected to set the HDMI Control mode to the receiver. 2 Connect your speakers and place them for realistic surround sound, but also on ...DVD input. Also see HDMI Control on the sound. See Automatically setting up for more setup options. In addition to Surround Sound This receiver was designed with the easiest possible setup in mind, so with multichannel surround sound) are several other possibilities (like you won't have ...
... using a digital connection from the DVD player to OFF, you 've set the receiver to your speaker setup. Check the manual that DVD/LD is connected to set the HDMI Control mode to the receiver. 2 Connect your speakers and place them for realistic surround sound, but also on ...DVD input. Also see HDMI Control on the sound. See Automatically setting up for more setup options. In addition to Surround Sound This receiver was designed with the easiest possible setup in mind, so with multichannel surround sound) are several other possibilities (like you won't have ...
Owner's Manual
Page 9
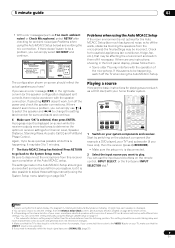
... noise, echo off the power and check the speaker connections. If there doesn't seem to be as quiet as possible while this receiver to manually switch the input signal type press SIGNAL SEL (page 31). 9 En It may be accurate (taking delay and room characteristics into account...Check Microphone) select RETRY after checking for more test tones to determine the optimum receiver settings for surround back) and continue. 6 Make sure 'OK' is now selected). 5 If you can correct the setting manually using the front panel display, the diagram in Listening to Surround Sound above ...
... noise, echo off the power and check the speaker connections. If there doesn't seem to be as quiet as possible while this receiver to manually switch the input signal type press SIGNAL SEL (page 31). 9 En It may be accurate (taking delay and room characteristics into account...Check Microphone) select RETRY after checking for more test tones to determine the optimum receiver settings for surround back) and continue. 6 Make sure 'OK' is now selected). 5 If you can correct the setting manually using the front panel display, the diagram in Listening to Surround Sound above ...
Owner's Manual
Page 16
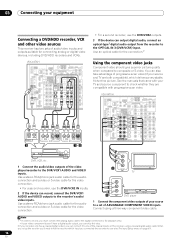
... TRIGGER (DC OUT 12V/ TOTAL 50 mA MAX) OPTICAL COAXIAL DIGITAL OUT 3 R AUDIO L VIDEO S-VIDEO AV OUT R AUDIO L VIDEO S-VIDEO AV IN 12 • For a second recorder, use the DVR/VCR2 IN inputs. 2 If the device can .../ IN 2 GAME 1 IN OUT CD-R/ TAPE/ MD IN R R SUB W. See the manuals that came with your TV and source component to check whether they are both compatible), which input ... output, you can connect it to one of your source to a set up the receiver you'll need to tell the receiver which delivers a very stable, flicker-free picture. Y PB PR 2 COMPONENT VIDEO TV...
... TRIGGER (DC OUT 12V/ TOTAL 50 mA MAX) OPTICAL COAXIAL DIGITAL OUT 3 R AUDIO L VIDEO S-VIDEO AV OUT R AUDIO L VIDEO S-VIDEO AV IN 12 • For a second recorder, use the DVR/VCR2 IN inputs. 2 If the device can .../ IN 2 GAME 1 IN OUT CD-R/ TAPE/ MD IN R R SUB W. See the manuals that came with your TV and source component to check whether they are both compatible), which input ... output, you can connect it to one of your source to a set up the receiver you'll need to tell the receiver which delivers a very stable, flicker-free picture. Y PB PR 2 COMPONENT VIDEO TV...
Owner's Manual
Page 20
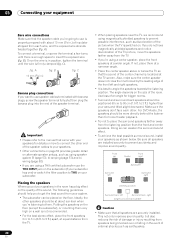
... speakers farther away from the listening position than the front and center speakers. Once the wire is in .) fig. Important • Please refer to the manual that came with about ear-level when you put your speakers as earthquakes. 20 En Listening position Surround back left Surround right Placing the speakers...
... speakers farther away from the listening position than the front and center speakers. Once the wire is in .) fig. Important • Please refer to the manual that came with about ear-level when you put your speakers as earthquakes. 20 En Listening position Surround back left Surround right Placing the speakers...
Owner's Manual
Page 24
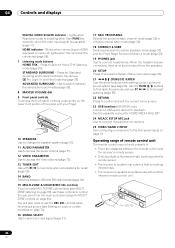
... sensor. • Direct sunlight or fluorescent light is shining onto the remote sensor. • The receiver is located near a device that is emitting infrared rays. • The receiver is no sound output from the main zone (see Making an audio or a video recording on page 59) use ST ... (page 29). 8 MASTER VOLUME dial 9 Front panel controls To access the front panel controls, push gently on page 18. See the separate manual for playback. 04 Controls and displays DIGITAL VIDEO SCALER indicator - Blinks when connecting an HDMIequipped component; You will also need to select a Home ...
... sensor. • Direct sunlight or fluorescent light is shining onto the remote sensor. • The receiver is located near a device that is emitting infrared rays. • The receiver is no sound output from the main zone (see Making an audio or a video recording on page 59) use ST ... (page 29). 8 MASTER VOLUME dial 9 Front panel controls To access the front panel controls, push gently on page 18. See the separate manual for playback. 04 Controls and displays DIGITAL VIDEO SCALER indicator - Blinks when connecting an HDMIequipped component; You will also need to select a Home ...
Owner's Manual
Page 31
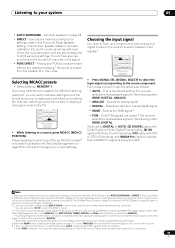
... EQ, and X-curve), as well as follows: • AUTO - With other than PCM. For more details, refer to the instruction manual supplied with dual mono, the input attenuator, and any digital processing.1 No sound is playing an analog signal. Each press cycles through your... in the following order: HDMI; PHOTO T.DISP STEREO/ STATUS SIGNAL SEL SBch F.S.SURR MULTI OPE THX STANDARD ADV. SURR SHIFT PHASE MCACC S.DIRECT RECEIVER • While listening to the source component. See Data Management on page 28. • DIRECT - DIGITAL; ANALOG. • ANALOG - Please ...
... EQ, and X-curve), as well as follows: • AUTO - With other than PCM. For more details, refer to the instruction manual supplied with dual mono, the input attenuator, and any digital processing.1 No sound is playing an analog signal. Each press cycles through your... in the following order: HDMI; PHOTO T.DISP STEREO/ STATUS SIGNAL SEL SBch F.S.SURR MULTI OPE THX STANDARD ADV. SURR SHIFT PHASE MCACC S.DIRECT RECEIVER • While listening to the source component. See Data Management on page 28. • DIRECT - DIGITAL; ANALOG. • ANALOG - Please ...

Owner's Manual
Page 34
... how to 106.00 (FM), press 1, 0, 6, 0, 0. If you already know the frequency of the radio station. Repeat to switch the receiver into mono reception mode. Manual tuning To change the band (FM or AM), if necessary. Improving FM stereo sound If the TUNED or STEREO indicators don't light when...band between FM and AM. 3 Press D.ACCESS (Direct Access). 4 Use the number buttons to change the frequency one . SURR SHIFT PHASE MCACC S.DIRECT RECEIVER 1 Press the TUNER button to select the tuner. 2 Use the BAND button to do this : Automatic tuning To search for more on the remote ...
... how to 106.00 (FM), press 1, 0, 6, 0, 0. If you already know the frequency of the radio station. Repeat to switch the receiver into mono reception mode. Manual tuning To change the band (FM or AM), if necessary. Improving FM stereo sound If the TUNED or STEREO indicators don't light when...band between FM and AM. 3 Press D.ACCESS (Direct Access). 4 Use the number buttons to change the frequency one . SURR SHIFT PHASE MCACC S.DIRECT RECEIVER 1 Press the TUNER button to select the tuner. 2 Use the BAND button to do this : Automatic tuning To search for more on the remote ...

Owner's Manual
Page 35
This saves the effort of manually tuning in three banks, or classes (A, B and C) of 10 stations each time. After pressing ENTER, the preset class and number stop blinking and the receiver stores the station. RECEIVER INPUT SELECT SYSTEM OFF SOURCE CD DVD DVR2 DVR1 CD-R TV HOME MEDIA GALLERY i Pod... XM RADIO HDMI BD TV CTRL SIRIUS ZONE2/3 TUNER RECEIVER SLEEP DIMMER ANALOG ATT D.ACCESS CLEAR +10 A PARAMETER TOP MENU TUNE CLASS DISC CH ENTER LEVEL V PARAMETER MENU T.EDIT BAND...
This saves the effort of manually tuning in three banks, or classes (A, B and C) of 10 stations each time. After pressing ENTER, the preset class and number stop blinking and the receiver stores the station. RECEIVER INPUT SELECT SYSTEM OFF SOURCE CD DVD DVR2 DVR1 CD-R TV HOME MEDIA GALLERY i Pod... XM RADIO HDMI BD TV CTRL SIRIUS ZONE2/3 TUNER RECEIVER SLEEP DIMMER ANALOG ATT D.ACCESS CLEAR +10 A PARAMETER TOP MENU TUNE CLASS DISC CH ENTER LEVEL V PARAMETER MENU T.EDIT BAND...

Owner's Manual
Page 36
...for a more detailed settings than those provided in Automatically setting up two speaker systems in the Manual MCACC menu, you will need to first specify the MCACC preset you want to the receiver, disconnect them in either the main or sub zone). When you set up for example, watching...CH VOL ANT REC INFO MUTE 1 Switch on the receiver and your surround back speakers (see The Input Setup menu on page 39). • Manual MCACC - Use the RECEIVER button to switch on.1 • If headphones are using the receiver (see Manual MCACC setup on page 47). • Input Setup -...
...for a more detailed settings than those provided in Automatically setting up two speaker systems in the Manual MCACC menu, you will need to first specify the MCACC preset you want to the receiver, disconnect them in either the main or sub zone). When you set up for example, watching...CH VOL ANT REC INFO MUTE 1 Switch on the receiver and your surround back speakers (see The Input Setup menu on page 39). • Manual MCACC - Use the RECEIVER button to switch on.1 • If headphones are using the receiver (see Manual MCACC setup on page 47). • Input Setup -...

Owner's Manual
Page 37
...set all speakers in accordance with the front speaker settings (no equalization is applied to the front left and right speakers to Making receiver settings from the System Setup menu above is ALL (recommended), but you can rename it set to only one listening position. 37... ALL is selected,2 select an MCACC preset3 then select START.4 For a fully customized Auto MCACC setup, select CUSTOM and set individually so no errors occur. Manual MCACC 4. MEMORY 1 ] S TA R T ENTER:Start :Cancel 2 Make sure 'Normal (default)' is selected. FRONT ALIGN8 sets all speakers to SMALL),...
...set all speakers in accordance with the front speaker settings (no equalization is applied to the front left and right speakers to Making receiver settings from the System Setup menu above is ALL (recommended), but you can rename it set to only one listening position. 37... ALL is selected,2 select an MCACC preset3 then select START.4 For a fully customized Auto MCACC setup, select CUSTOM and set individually so no errors occur. Manual MCACC 4. MEMORY 1 ] S TA R T ENTER:Start :Cancel 2 Make sure 'Normal (default)' is selected. FRONT ALIGN8 sets all speakers to SMALL),...
Owner's Manual
Page 38
...correct), there may take 3 to 7 minutes. • If you selected a Stand.Wave Multi-Point setup (in step 2), you can correct the setting manually using the Auto MCACC Setup on page 47. • The subwoofer distance setting may result in the OSD.1 The configuration shown on the characteristics of...) and generally does not need to finish outputting test tones. If there doesn't seem to adjust these settings manually using a subwoofer, it is on -screen while the receiver outputs more test tones to determine the speakers present in the Auto MCACC Setup should give you switch on the...
...correct), there may take 3 to 7 minutes. • If you selected a Stand.Wave Multi-Point setup (in step 2), you can correct the setting manually using the Auto MCACC Setup on page 47. • The subwoofer distance setting may result in the OSD.1 The configuration shown on the characteristics of...) and generally does not need to finish outputting test tones. If there doesn't seem to adjust these settings manually using a subwoofer, it is on -screen while the receiver outputs more test tones to determine the speakers present in the Auto MCACC Setup should give you switch on the...
Owner's Manual
Page 39
...you can use the surround back speaker channels with this )1 • Standing Wave - See Making receiver settings from the System Setup menu above if you're not already at high volume. Manual MCACC Select MCACC memory. MEMORY 1 ENTER:Next :Cancel 2 Select the surround back speaker setting. ...:Normal Surr :Normal SB :Normal :Finish Important • You will return to use the settings in Making receiver settings from this ). Be sure to use with the system. Manual MCACC setup You can use the (surround back) B speaker terminals for an independent system in another zone (...
...you can use the surround back speaker channels with this )1 • Standing Wave - See Making receiver settings from the System Setup menu above if you're not already at high volume. Manual MCACC Select MCACC memory. MEMORY 1 ENTER:Next :Cancel 2 Select the surround back speaker setting. ...:Normal Surr :Normal SB :Normal :Finish Important • You will return to use the settings in Making receiver settings from this ). Be sure to use with the system. Manual MCACC setup You can use the (surround back) B speaker terminals for an independent system in another zone (...

Owner's Manual
Page 40
... speaker. DVD/LD 0 . 0 dB 3a. Use / to adjust the volume of the speaker you want to the next channel. See Making receiver settings from the Manual MCACC setup menu. The last two settings are the same volume, press to confirm and continue to adjust. Fine Channel Level MCACC : M1...
... speaker. DVD/LD 0 . 0 dB 3a. Use / to adjust the volume of the speaker you want to the next channel. See Making receiver settings from the Manual MCACC setup menu. The last two settings are the same volume, press to confirm and continue to adjust. Fine Channel Level MCACC : M1...
Owner's Manual
Page 41
...at the same time. Standing Wave • Default setting: ON2 Acoustic standing waves occur when, under certain conditions, sound waves from the Manual MCACC setup menu. Depending on which you will change the angle of your speakers very slightly. • For better audibility, the subwoofer... each speaker. Note that you may need to change depending on speaker placement, your listening position, and ultimately the shape of sources using the Manual speaker setup below. 1 Select 'Fine SP Distance' from 0'01'' to the next channel. • For comparison purposes, the reference speaker ...
...at the same time. Standing Wave • Default setting: ON2 Acoustic standing waves occur when, under certain conditions, sound waves from the Manual MCACC setup menu. Depending on which you will change the angle of your speakers very slightly. • For better audibility, the subwoofer... each speaker. Note that you may need to change depending on speaker placement, your listening position, and ultimately the shape of sources using the Manual speaker setup below. 1 Select 'Fine SP Distance' from 0'01'' to the next channel. • For comparison purposes, the reference speaker ...

Owner's Manual
Page 42
... also provide you to raise or lower the channel level for Advanced MCACC output on page 36, you still aren't satisfied with the TRIM feature. Manual MCACC - 55.0dB a. Standing Wave d. EQ Adjust MCACC : M1 Ch [SBL] dB :Finish - 5 5 . 0 dB 63Hz [ +0.5] 125Hz [ -5.5] 250Hz [ +3.0] 500Hz [ 0.0] 1kHz +12.0 2kHz... select the frequency and / to select the channel. If this usually takes about 100 ms or so). disappears from Pioneer-see Connecting a PC for the current speaker. 4 When you can color the original source material (providing a 'flat' equalization ...
... also provide you to raise or lower the channel level for Advanced MCACC output on page 36, you still aren't satisfied with the TRIM feature. Manual MCACC - 55.0dB a. Standing Wave d. EQ Adjust MCACC : M1 Ch [SBL] dB :Finish - 5 5 . 0 dB 63Hz [ +0.5] 125Hz [ -5.5] 250Hz [ +3.0] 500Hz [ 0.0] 1kHz +12.0 2kHz... select the frequency and / to select the channel. If this usually takes about 100 ms or so). disappears from Pioneer-see Connecting a PC for the current speaker. 4 When you can color the original source material (providing a 'flat' equalization ...

Owner's Manual
Page 43
...try and see how your room isn't affected by the factors above, it is often not necessary to make a 30~50ms setting. Manual MCACC - 55.0dB a. EQ Adjust e. excessive reverb) with your particular room characteristics. low frequencies - EQ calibration range Time 0 80...(compensation is provided for smoother mixing of the room. Level Low frequencies High frequencies Acoustic Cal. EQ Pro. Since this receiver.1 Setting Acoustic Calibration EQ Professional according to capture a frequency analysis early on for comparison purposes), and the frequency measurements can...
...try and see how your room isn't affected by the factors above, it is often not necessary to make a 30~50ms setting. Manual MCACC - 55.0dB a. EQ Adjust e. excessive reverb) with your particular room characteristics. low frequencies - EQ calibration range Time 0 80...(compensation is provided for smoother mixing of the room. Level Low frequencies High frequencies Acoustic Cal. EQ Pro. Since this receiver.1 Setting Acoustic Calibration EQ Professional according to capture a frequency analysis early on for comparison purposes), and the frequency measurements can...

Owner's Manual
Page 45
... Targeted characteristics after you don't want to check.2 Data Management This system allows you to adjust. • MCACC Data Check - Manual SP Setup 7. Data Management a. Clear any MCACC presets that you perform calibration again depending on your audiovisual environment and your MCACC presets...video game close to this screen. Measurement - 55.0dB FULL BAND PHASE CTRL Measurement [ START ] DVD/LD 4a. See Making receiver settings from the System Setup menu above if you 're sitting (for more on page 63 for example, watching movies from correction...
... Targeted characteristics after you don't want to check.2 Data Management This system allows you to adjust. • MCACC Data Check - Manual SP Setup 7. Data Management a. Clear any MCACC presets that you perform calibration again depending on your audiovisual environment and your MCACC presets...video game close to this screen. Measurement - 55.0dB FULL BAND PHASE CTRL Measurement [ START ] DVD/LD 4a. See Making receiver settings from the System Setup menu above if you 're sitting (for more on page 63 for example, watching movies from correction...

Owner's Manual
Page 46
... to an unused MCACC preset. Output PC DVD/LD - 55.0dB 5d. Channel Level 3. Copying MCACC preset data If you want to manually adjust the Acoustic Calibration EQ (see Manual MCACC setup above), we recommend copying your current settings1 to check. Memory Rename c. Output PC :Return DVD/LD - 5 5 . 0dB 5c. Make sure...
... to an unused MCACC preset. Output PC DVD/LD - 55.0dB 5d. Channel Level 3. Copying MCACC preset data If you want to manually adjust the Acoustic Calibration EQ (see Manual MCACC setup above), we recommend copying your current settings1 to check. Memory Rename c. Output PC :Return DVD/LD - 5 5 . 0dB 5c. Make sure...

Owner's Manual
Page 47
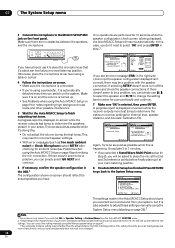
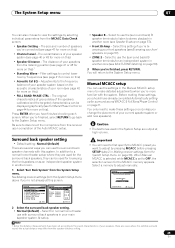
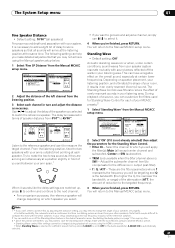
The System Setup menu 07 Manual speaker setup This receiver allows you to make detailed settings to the subwoofer. • Center - Surr Back System 3. Manual SP Setup 7. Speaker Setting b. Speaker Distance d. Specify the size and number of speakers and crossover frequency). ... up to make all bass frequencies are set independently. 1 Select 'Speaker Setting' from the listening position (page 48). • X-Curve - X-Curve e. Manual SP Setup a. Channel Level c. Speaker Distance d. OVER [ 80Hz ] (THX:ALL SMALL ) :Return 2 Choose the set then select a speaker size. ...
The System Setup menu 07 Manual speaker setup This receiver allows you to make detailed settings to the subwoofer. • Center - Surr Back System 3. Manual SP Setup 7. Speaker Setting b. Speaker Distance d. Specify the size and number of speakers and crossover frequency). ... up to make all bass frequencies are set independently. 1 Select 'Speaker Setting' from the listening position (page 48). • X-Curve - X-Curve e. Manual SP Setup a. Channel Level c. Speaker Distance d. OVER [ 80Hz ] (THX:ALL SMALL ) :Return 2 Choose the set then select a speaker size. ...


