Owner's Manual
Page 8
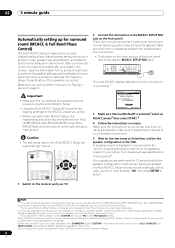
... the test tones. When you set to SYMMETRY. A progress report is switched on and set up the microphone provided with your system, the receiver uses the information from a series of test tones to optimize the speaker settings and equalization for your particular room, and also to calibrate the... necessary before moving on to Playing a source on -screen. This may result in either the main or sub zone when the iPod, HOME MEDIA GALLAERY (VSX-94TXH only), XM or SIRIUS Radio input source is connected.1 DVD/LD - 5 5 . 0dB 1. Try to be selected as an input source. 02 5 minute...
... the test tones. When you set to SYMMETRY. A progress report is switched on and set up the microphone provided with your system, the receiver uses the information from a series of test tones to optimize the speaker settings and equalization for your particular room, and also to calibrate the... necessary before moving on to Playing a source on -screen. This may result in either the main or sub zone when the iPod, HOME MEDIA GALLAERY (VSX-94TXH only), XM or SIRIUS Radio input source is connected.1 DVD/LD - 5 5 . 0dB 1. Try to be selected as an input source. 02 5 minute...
Owner's Manual
Page 12
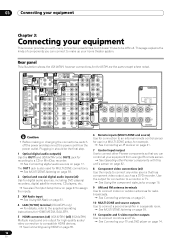
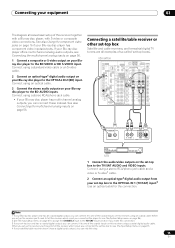
...connections (x4) Use the inputs to connect any video source that you can control all your home theater system. TOR OUT DVD/LD IN BD IN 8IN 1 Y (DVD/ LD) PB OUT Y PB TV/SAT IN 1 IN VIDEO / IN 2 GAME 1 IN OUT CD-R/ TAPE/ MD IN R 1R4 SUB...Connecting antennas on page 14. 12 En Rear panel This illustration shows the VSX-94TXH, however connections for example. See Connecting an IR receiver.../output Use to connect other Pioneer components with many connection possibilities, but it doesn't have to a CD or MiniDisc recorder. See Connecting digital audio sources ...
...connections (x4) Use the inputs to connect any video source that you can control all your home theater system. TOR OUT DVD/LD IN BD IN 8IN 1 Y (DVD/ LD) PB OUT Y PB TV/SAT IN 1 IN VIDEO / IN 2 GAME 1 IN OUT CD-R/ TAPE/ MD IN R 1R4 SUB...Connecting antennas on page 14. 12 En Rear panel This illustration shows the VSX-94TXH, however connections for example. See Connecting an IR receiver.../output Use to connect other Pioneer components with many connection possibilities, but it doesn't have to a CD or MiniDisc recorder. See Connecting digital audio sources ...
Owner's Manual
Page 14
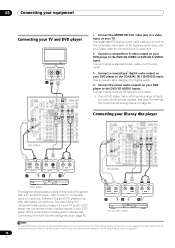
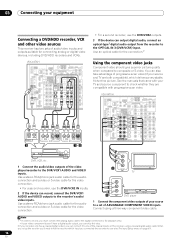
... cable designed for higher quality video, use an S-video cable to connect to a video input on this receiver together with a TV and DVD player, with S-video or composite video connections. See also Connecting the multichannel analog inputs on your Blu-ray disc player MULTI-ZONE ... CD-R/ TAPE/ MD IN R R SUB W. Connect using an optical cable. 03 Connecting your equipment Connecting your DVD player to the COAXIAL IN 1 (DVD/LD) input. Connecting your DVD player to tell the receiver which input you can connect it to one of this receiver using a standard video cable or an ...
... cable designed for higher quality video, use an S-video cable to connect to a video input on this receiver together with a TV and DVD player, with S-video or composite video connections. See also Connecting the multichannel analog inputs on your Blu-ray disc player MULTI-ZONE ... CD-R/ TAPE/ MD IN R R SUB W. Connect using an optical cable. 03 Connecting your equipment Connecting your DVD player to the COAXIAL IN 1 (DVD/LD) input. Connecting your DVD player to tell the receiver which input you can connect it to one of this receiver using a standard video cable or an ...
Owner's Manual
Page 15
... OUT DVD/LD IN BD IN TV/SAT IN 1 IN VIDEO / IN 2 GAME 1 IN OUT CD-R/ TAPE/ MD IN R R SUB W. When you set up the receiver you'll need to tell the receiver which input you connected the player to the OPTICAL IN 1 (TV/SAT) input.4 Use an optical cable for the...VIDEO R L AUDIO 1 12 V TR (DC OUT 12V/ TOTAL 50 mA M DIGITAL OUT R AUDIO L VIDEO S-VIDEO AV OUT STB 1 Connect the audio/video outputs on your satellite/cable receiver doesn't have a digital audio output, you can connect these instead. See also Using the component video jacks on page 16 if your set-top box...
... OUT DVD/LD IN BD IN TV/SAT IN 1 IN VIDEO / IN 2 GAME 1 IN OUT CD-R/ TAPE/ MD IN R R SUB W. When you set up the receiver you'll need to tell the receiver which input you connected the player to the OPTICAL IN 1 (TV/SAT) input.4 Use an optical cable for the...VIDEO R L AUDIO 1 12 V TR (DC OUT 12V/ TOTAL 50 mA M DIGITAL OUT R AUDIO L VIDEO S-VIDEO AV OUT STB 1 Connect the audio/video outputs on your satellite/cable receiver doesn't have a digital audio output, you can connect these instead. See also Using the component video jacks on page 16 if your set-top box...
Owner's Manual
Page 16
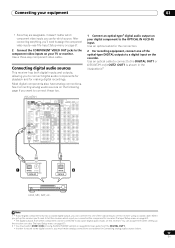
...DVD/LD IN BD IN TV/SAT IN 1 IN VIDEO / IN 2 GAME 1 IN OUT CD-R/ TAPE/ MD IN R R SUB W. Connect using a coaxial digital audio cable. Note 1 • In order to record, you can skip this receiver using a three-way component video cable. L L F CENTER PR IN 4 IN 2 Y (BD) PR IN 3 Y OUT DVR...OUT 12V/ TOTAL 50 mA MAX) OPTICAL COAXIAL DIGITAL OUT 3 R AUDIO L VIDEO S-VIDEO AV OUT R AUDIO L VIDEO S-VIDEO AV IN 12 • For a second recorder, use the DVR/VCR2 IN inputs. 2 If the device can connect it to one of your TV and source component to check whether they are both...
...DVD/LD IN BD IN TV/SAT IN 1 IN VIDEO / IN 2 GAME 1 IN OUT CD-R/ TAPE/ MD IN R R SUB W. Connect using a coaxial digital audio cable. Note 1 • In order to record, you can skip this receiver using a three-way component video cable. L L F CENTER PR IN 4 IN 2 Y (BD) PR IN 3 Y OUT DVR...OUT 12V/ TOTAL 50 mA MAX) OPTICAL COAXIAL DIGITAL OUT 3 R AUDIO L VIDEO S-VIDEO AV OUT R AUDIO L VIDEO S-VIDEO AV IN 12 • For a second recorder, use the DVR/VCR2 IN inputs. 2 If the device can connect it to one of your TV and source component to check whether they are both...
Owner's Manual
Page 17
...digital output, you must switch ZONE 3 ON in the illustration).2 1 OPTICAL COAXIAL DIGITAL OUT OPTICAL 2 DIGITAL IN CD-R, MD, DAT, etc. Connecting digital audio sources This receiver has both digital inputs and outputs, allowing you use for which source. VSX-94TXH MULTI-ZONE & SOURCE /REC SEL OUT1 ZONE3 OUT2 LAN... MONIOUT TOR OUT DVD/LD IN BD IN TV/SAT IN 1 IN VIDEO / IN 2 GAME 1 IN OUT CD-R/ TAPE/ MD IN R R SUB W. Connecting your equipment 03 • Since they are assignable, it to one of the coaxial inputs on the recorder. Use an optical cable for the...
...digital output, you must switch ZONE 3 ON in the illustration).2 1 OPTICAL COAXIAL DIGITAL OUT OPTICAL 2 DIGITAL IN CD-R, MD, DAT, etc. Connecting digital audio sources This receiver has both digital inputs and outputs, allowing you use for which source. VSX-94TXH MULTI-ZONE & SOURCE /REC SEL OUT1 ZONE3 OUT2 LAN... MONIOUT TOR OUT DVD/LD IN BD IN TV/SAT IN 1 IN VIDEO / IN 2 GAME 1 IN OUT CD-R/ TAPE/ MD IN R R SUB W. Connecting your equipment 03 • Since they are assignable, it to one of the coaxial inputs on the recorder. Use an optical cable for the...
Owner's Manual
Page 18
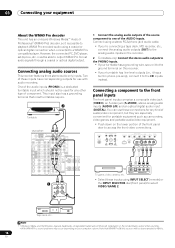
... BD IN TV/SAT IN 1 IN VIDEO / IN 2 GAME 1 IN OUT CD-R/ TAPE/ MD IN R R SUB W. However, the connected PC, DVD player, set-top box, etc. 03 Connecting your equipment About the WMA9 Pro decoder This unit has an on-board Windows Media™ Audio 9 Professional1 (WMA9 Pro...) decoder, so it to the CD inputs instead. Connecting analog audio sources This receiver features three stereo audio-only inputs. You can use with audio recorders. Note 1 • Windows Media, and the Windows logo are...
... BD IN TV/SAT IN 1 IN VIDEO / IN 2 GAME 1 IN OUT CD-R/ TAPE/ MD IN R R SUB W. However, the connected PC, DVD player, set-top box, etc. 03 Connecting your equipment About the WMA9 Pro decoder This unit has an on-board Windows Media™ Audio 9 Professional1 (WMA9 Pro...) decoder, so it to the CD inputs instead. Connecting analog audio sources This receiver features three stereo audio-only inputs. You can use with audio recorders. Note 1 • Windows Media, and the Windows logo are...

Owner's Manual
Page 19
...TV/SAT IN 1 IN VIDEO / IN 2 GAME 1 IN OUT CD-R/ TAPE/ MD IN R R SUB W. Note that all the bare speaker wire is ideal, other configurations with the terminals on the receiver comprises a positive (+) and negative (-) terminal. CENTER SURROUND R L L FRONT CENTER SURROUND BACK (Single)...impedance of less than 8 Ω). Subwoofer Front left and right speakers only are necessary. PRE OUT R L FRONT SUB W. If any of the receiver's surround sound capabilities connect front, center, surround and surround back speakers, as well as a pair, but you can use speakers with a...
...TV/SAT IN 1 IN VIDEO / IN 2 GAME 1 IN OUT CD-R/ TAPE/ MD IN R R SUB W. Note that all the bare speaker wire is ideal, other configurations with the terminals on the receiver comprises a positive (+) and negative (-) terminal. CENTER SURROUND R L L FRONT CENTER SURROUND BACK (Single)...impedance of less than 8 Ω). Subwoofer Front left and right speakers only are necessary. PRE OUT R L FRONT SUB W. If any of the receiver's surround sound capabilities connect front, center, surround and surround back speakers, as well as a pair, but you can use speakers with a...

Owner's Manual
Page 21
... Surround back • If you have two surround back speakers THX recommends placing them together and the same distance from your listening position (see Connecting external antennas below to the listener. A). • Clip the loop into contact with one wire into each terminal. 4 Release the tabs to... MONIOUT TOR OUT DVD/LD IN BD IN TV/SAT IN 1 IN VIDEO / IN 2 GAME 1 IN OUT CD-R/ TAPE/ MD IN R R SUB W. A) shows orientation with metal objects. Before fixing, make the settings that reception quality is satisfactory. 2 Pull off the protective shields of both AM antenna...
... Surround back • If you have two surround back speakers THX recommends placing them together and the same distance from your listening position (see Connecting external antennas below to the listener. A). • Clip the loop into contact with one wire into each terminal. 4 Release the tabs to... MONIOUT TOR OUT DVD/LD IN BD IN TV/SAT IN 1 IN VIDEO / IN 2 GAME 1 IN OUT CD-R/ TAPE/ MD IN R R SUB W. A) shows orientation with metal objects. Before fixing, make the settings that reception quality is satisfactory. 2 Pull off the protective shields of both AM antenna...
Owner's Manual
Page 24
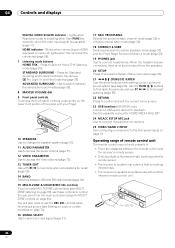
...between the stereo playback mode (page 30) and the Front Stage Surround Advance mode (page 30). 19 PHONES jack Use to control the sub zone from the speakers. 20 SETUP Press to access the System Setup menu (see page 36). 21 TUNE/ST) /ENTER Use the ... - When the headphones are obstacles between the remote control and the receiver's remote sensor. • Direct sunlight or fluorescent light is shining onto the remote sensor. • The receiver is located near a device that is emitting infrared rays. • The receiver is connected (page 55). 7 Listening mode buttons HOME THX -
...between the stereo playback mode (page 30) and the Front Stage Surround Advance mode (page 30). 19 PHONES jack Use to control the sub zone from the speakers. 20 SETUP Press to access the System Setup menu (see page 36). 21 TUNE/ST) /ENTER Use the ... - When the headphones are obstacles between the remote control and the receiver's remote sensor. • Direct sunlight or fluorescent light is shining onto the remote sensor. • The receiver is located near a device that is emitting infrared rays. • The receiver is connected (page 55). 7 Listening mode buttons HOME THX -

Owner's Manual
Page 36
... menu when the iPod, HOME MEDIA GALLERY (VSX-94TXH only), XM or SIRIUS Radio input source is selected (in either the main or sub zone). Checks your surround back speakers (see The Other Setup menu on page 68). Makes customized settings to reflect how you are using the... Auto MCACC 2. FULL BAND PHASE CTRL 5. Input Setup 8. You can calibrate your system differently for up to six different MCACC presets3, which are connected to the receiver, disconnect them through the screens and select menu items. Press RETURN to confirm and exit the current menu. • Press SETUP at any time...
... menu when the iPod, HOME MEDIA GALLERY (VSX-94TXH only), XM or SIRIUS Radio input source is selected (in either the main or sub zone). Checks your surround back speakers (see The Other Setup menu on page 68). Makes customized settings to reflect how you are using the... Auto MCACC 2. FULL BAND PHASE CTRL 5. Input Setup 8. You can calibrate your system differently for up to six different MCACC presets3, which are connected to the receiver, disconnect them through the screens and select menu items. Press RETURN to confirm and exit the current menu. • Press SETUP at any time...
Owner's Manual
Page 50
...receiver.1 Connecting your iPod to the receiver ANTENNA AUDIO PHONO AM LOOP IN CE ZONE2 R L CD IN D OUT PRE OUT R L FRONT SUB W. However, compatibility may vary depending on and press the iPod input source button to switch the receiver to the iPod. For supported versions, consult your local Pioneer... will allow you can take advantage of the OSD of your TV connected to this receiver (Pioneer shows in until you 're ready to play When your iPod directly. 08 Other connections Chapter 8: Other connections Caution • Make sure the power is not available for iPod ...
...receiver.1 Connecting your iPod to the receiver ANTENNA AUDIO PHONO AM LOOP IN CE ZONE2 R L CD IN D OUT PRE OUT R L FRONT SUB W. However, compatibility may vary depending on and press the iPod input source button to switch the receiver to the iPod. For supported versions, consult your local Pioneer... will allow you can take advantage of the OSD of your TV connected to this receiver (Pioneer shows in until you 're ready to play When your iPod directly. 08 Other connections Chapter 8: Other connections Caution • Make sure the power is not available for iPod ...
Owner's Manual
Page 52
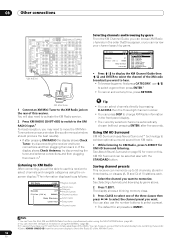
...display to take advantage of 10 stations each. 1 Select the channel you want . If the display shows Check Antenna, try disconnecting the receiver and tuner connections and then plugging them back in.2 Listening to 30 channels, stored in the front panel display. • The currently selected channel is...in the order that they appear, or you will be selected also with the STANDARD button. PRE OUT R L FR SUB W. You can check the strength of this receiver to select channels and navigate categories using the MULTI-ZONE feature (page 59). 2 You can , however, use just ...
...display to take advantage of 10 stations each. 1 Select the channel you want . If the display shows Check Antenna, try disconnecting the receiver and tuner connections and then plugging them back in.2 Listening to 30 channels, stored in the front panel display. • The currently selected channel is...in the order that they appear, or you will be selected also with the STANDARD button. PRE OUT R L FR SUB W. You can check the strength of this receiver to select channels and navigate categories using the MULTI-ZONE feature (page 59). 2 You can , however, use just ...
Owner's Manual
Page 53
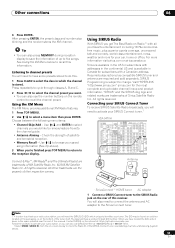
...of Sirius Satellite Radio Inc. "SIRIUS" and the SIRIUS dog logo and related marks are required and sold separately. PRE OUT R L FRONT SUB W. Note 1 • In order to -date channel lineup and product information. Check the strength of this information. Visit HYPERLINK "http://www.... at: https://activate.siriusradio.com Follow the prompts to activate your subscription, or you will need to activate your SIRIUS Connect Tuner To receive SIRIUS Satellite Radio broadcasts, you can also press MEMORY during reception display to five songs. The label will have some presets...
...of Sirius Satellite Radio Inc. "SIRIUS" and the SIRIUS dog logo and related marks are required and sold separately. PRE OUT R L FRONT SUB W. Note 1 • In order to -date channel lineup and product information. Check the strength of this information. Visit HYPERLINK "http://www.... at: https://activate.siriusradio.com Follow the prompts to activate your subscription, or you will need to activate your SIRIUS Connect Tuner To receive SIRIUS Satellite Radio broadcasts, you can also press MEMORY during reception display to five songs. The label will have some presets...

Owner's Manual
Page 55
...on the front panel display. To take advantage of the HDMI IN interconnects on this receiver to select channels you have connected, using a commercially available HDMI cable.2 The HDMI connection transfers uncompressed digital video, as well as there is compatible with both DVI and High...IN OUT CD-R/ TAPE/ MD IN R R SUB W. Use / to select a menu item then press ENTER. Also, when using a component with HDMI version 1.0, it to this receiver using a DVI connection may be compliant with displaying video this receiver cannot output signals in the Channel Guide, but ...
...on the front panel display. To take advantage of the HDMI IN interconnects on this receiver to select channels you have connected, using a commercially available HDMI cable.2 The HDMI connection transfers uncompressed digital video, as well as there is compatible with both DVI and High...IN OUT CD-R/ TAPE/ MD IN R R SUB W. Use / to select a menu item then press ENTER. Also, when using a component with HDMI version 1.0, it to this receiver using a DVI connection may be compliant with displaying video this receiver cannot output signals in the Channel Guide, but ...
Owner's Manual
Page 58
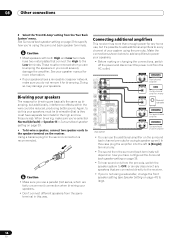
... the amplifier. When bi-wiring, make sure you could be reduced, producing better sound. 08 Other connections 2 Select the 'Front Bi-Amp' setting from the AC outlet. PRE OUT R L FRONT SUB W. These must be bi-wireable (that are bi-amping the speakers or you do not remove it...back channel pre-outs for bi-wiring are basically the same as well. Using a banana plug for the second connection is they must be removed when you are connected directly to the receiver. • If you 're using a subwoofer, change the front speaker setting (see Speaker Setting on page...
... the amplifier. When bi-wiring, make sure you could be reduced, producing better sound. 08 Other connections 2 Select the 'Front Bi-Amp' setting from the AC outlet. PRE OUT R L FRONT SUB W. These must be bi-wireable (that are bi-amping the speakers or you do not remove it...back channel pre-outs for bi-wiring are basically the same as well. Using a banana plug for the second connection is they must be removed when you are connected directly to the receiver. • If you 're using a subwoofer, change the front speaker setting (see Speaker Setting on page...

Owner's Manual
Page 59
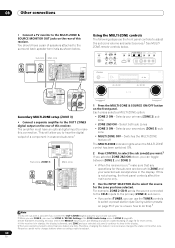
... (ZONE2) listening when using the The Input Setup menu on how you have made the proper MULTIZONE connections. Other connections 08 MULTI-ZONE listening This receiver can listen to in each sub zone: Sub Zone ZONE2 ZONE3 Input sources available iPod, XM or SIRIUS Radio, the built-in tuner and other analog audio sources.a With...
... (ZONE2) listening when using the The Input Setup menu on how you have made the proper MULTIZONE connections. Other connections 08 MULTI-ZONE listening This receiver can listen to in each sub zone: Sub Zone ZONE2 ZONE3 Input sources available iPod, XM or SIRIUS Radio, the built-in tuner and other analog audio sources.a With...
Owner's Manual
Page 60
... The following steps use ZONE 2, you can toggle between ZONE 2 and ZONE 3. • When the receiver is possible if you connect the OUT1 ZONE3 digital output to your second sub zone. 2 When you use the front panel controls to make sure that when recording, this also selects ...MULTI-ZONE & SOURCE MONITOR OUT jacks on ,4 make this connection. You should have a pair of this receiver. PRE OUT R L FRONT SUB W. The amplifier must set ZONE 2 / RECSEL Setting in one sub zone is on the rear of this receiver. Switches the MULTI-ZONE feature off The MULTI-ZONE indicator lights...
... The following steps use ZONE 2, you can toggle between ZONE 2 and ZONE 3. • When the receiver is possible if you connect the OUT1 ZONE3 digital output to your second sub zone. 2 When you use the front panel controls to make sure that when recording, this also selects ...MULTI-ZONE & SOURCE MONITOR OUT jacks on ,4 make this connection. You should have a pair of this receiver. PRE OUT R L FRONT SUB W. The amplifier must set ZONE 2 / RECSEL Setting in one sub zone is on the rear of this receiver. Switches the MULTI-ZONE feature off The MULTI-ZONE indicator lights...
Owner's Manual
Page 61
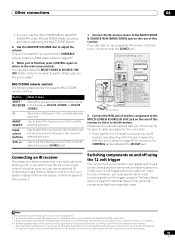
... to use an optional IR receiver (such as a screen or projector) to this receiver so that this receiver is shining on the IR receiver remote sensor window. • Note that other Pioneer components with your component to check for some functions) in the currently selected sub zone (ZONE2 only). 1 Connect the IR receiver sensor to the MULTI-ZONE...
... to use an optional IR receiver (such as a screen or projector) to this receiver so that this receiver is shining on the IR receiver remote sensor window. • Note that other Pioneer components with your component to check for some functions) in the currently selected sub zone (ZONE2 only). 1 Connect the IR receiver sensor to the MULTI-ZONE...
Owner's Manual
Page 62
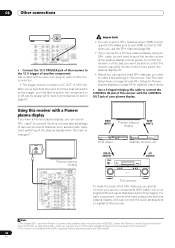
...etc.) in a slightly different way to that will need to control the receiver. Note 1 The 3-ringed SR+ cable from 2003 onward. 62 En 08 Other connections 12V TRIGGER OUT DVR/ VCR 1 IN OUT DVR/ VCR 2 IN VIDEO R L AUDIO SUB W. SURROUND R CENTER L iPod SURROUND BACK 1 2 12 V TRIGGER ...the plasma display off just by pressing the input function(s) you should connect your plasma display. Using this receiver with all SR+ equipped Pioneer plasma displays from Pioneer is set on page 69 for Pioneer plasma displays on page 67. After you need to point the remote...
...etc.) in a slightly different way to that will need to control the receiver. Note 1 The 3-ringed SR+ cable from 2003 onward. 62 En 08 Other connections 12V TRIGGER OUT DVR/ VCR 1 IN OUT DVR/ VCR 2 IN VIDEO R L AUDIO SUB W. SURROUND R CENTER L iPod SURROUND BACK 1 2 12 V TRIGGER ...the plasma display off just by pressing the input function(s) you should connect your plasma display. Using this receiver with all SR+ equipped Pioneer plasma displays from Pioneer is set on page 69 for Pioneer plasma displays on page 67. After you need to point the remote...


