Owner's Manual
Page 4
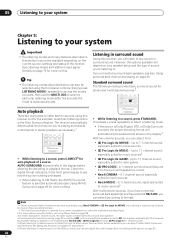
... 6 Ventilation 7 Installing the receiver 7 Loading the batteries 7 02 5 minute guide Introduction to home theater 8 Listening to Surround Sound 8 Automatically setting up for surround sound (MCACC 8 Problems when using the Auto MCACC Setup . . . . 10 Playing a source 10 Better sound using Phase Control 10 03 Connecting... to operate your system Auto playback 26 Listening in surround sound 26 Standard surround sound 26 Using the Home THX modes 27 Using the Advanced surround effects 27 Listening in a safe place for buying this Pioneer product. Thank you for future reference.
... 6 Ventilation 7 Installing the receiver 7 Loading the batteries 7 02 5 minute guide Introduction to home theater 8 Listening to Surround Sound 8 Automatically setting up for surround sound (MCACC 8 Problems when using the Auto MCACC Setup . . . . 10 Playing a source 10 Better sound using Phase Control 10 03 Connecting... to operate your system Auto playback 26 Listening in surround sound 26 Standard surround sound 26 Using the Home THX modes 27 Using the Advanced surround effects 27 Listening in a safe place for buying this Pioneer product. Thank you for future reference.
Owner's Manual
Page 5
... default and possible settings 58 The Other Setup menu 59 Multi-Room and IR receiver setup 59 SR+ Setup for Pioneer plasma displays 59 OSD Adjustment 60 Erasing one of the remote control button settings ...73 Display 74 Remote control 75 HDMI 75 iPod messages 76 XM radio messages 76 Surround sound formats 77 Dolby 77 DTS 77 Windows Media® Audio 9 Professional 77 About THX ...signal formats . . . 81 Specifications 82 Cleaning the unit 82 10 Using other functions Setting the AV options 61 Making an audio or a video recording 62 Reducing the level of your system settings 63...
... default and possible settings 58 The Other Setup menu 59 Multi-Room and IR receiver setup 59 SR+ Setup for Pioneer plasma displays 59 OSD Adjustment 60 Erasing one of the remote control button settings ...73 Display 74 Remote control 75 HDMI 75 iPod messages 76 XM radio messages 76 Surround sound formats 77 Dolby 77 DTS 77 Windows Media® Audio 9 Professional 77 About THX ...signal formats . . . 81 Specifications 82 Cleaning the unit 82 10 Using other functions Setting the AV options 61 Making an audio or a video recording 62 Reducing the level of your system settings 63...
Owner's Manual
Page 6
... to connect components using component, S-video, and composite video connections as possible to what 's in the box Please check that you to Pioneer for any stereo source. Also, with the addition of a surround back speaker, you can take advantage of the built-in Dolby Digital ... use LCD remote control The remote control gives you not only complete control over the main functions for optimal surround sound. • THX Select2 certified design This receiver bears the THX Select2 logo, which includes the advanced features of Professional Acoustic Calibration EQ. 01 Before you start ...
... to connect components using component, S-video, and composite video connections as possible to what 's in the box Please check that you to Pioneer for any stereo source. Also, with the addition of a surround back speaker, you can take advantage of the built-in Dolby Digital ... use LCD remote control The remote control gives you not only complete control over the main functions for optimal surround sound. • THX Select2 certified design This receiver bears the THX Select2 logo, which includes the advanced features of Professional Acoustic Calibration EQ. 01 Before you start ...
Owner's Manual
Page 7
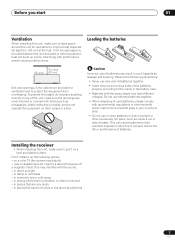
... rules that are provided for ventilation to the marks in direct sunlight or other excessively hot place, such as inside , interfering with the sound. - Do not use of the batteries properly according to improve heat dispersal (at least 8 in the cabinet are very dusty - in... the following places: - Don't install it on a color TV (the screen may interfere with performance and/or causing malfunctions. Loading the batteries 8 inches Receiver (20 cm) Slot and openings in . (20 cm) at the top). in places that gives off a magnetic field). on a level and stable ...
... rules that are provided for ventilation to the marks in direct sunlight or other excessively hot place, such as inside , interfering with the sound. - Do not use of the batteries properly according to improve heat dispersal (at least 8 in the cabinet are very dusty - in... the following places: - Don't install it on a color TV (the screen may interfere with performance and/or causing malfunctions. Loading the batteries 8 inches Receiver (20 cm) Slot and openings in . (20 cm) at the top). in places that gives off a magnetic field). on a level and stable ...
Owner's Manual
Page 8
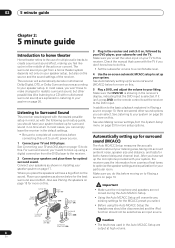
... optimize the speaker settings and equalization for your subwoofer and the TV. Where you place the speakers will have to make changes for surround sound in the receiver and switch it isn't, press DVD on page 13 to do this unit to an AC power source. 1 Connect your system. After you... have your system hooked up your TV and DVD player. Make sure you've set up for realistic surround sound, but also on this receiver. See Automatically setting up using the Auto MCACC Setup the headphones should be selected as shown in the default settings. In most ...
... optimize the speaker settings and equalization for your subwoofer and the TV. Where you place the speakers will have to make changes for surround sound in the receiver and switch it isn't, press DVD on page 13 to do this unit to an AC power source. 1 Connect your system. After you... have your system hooked up your TV and DVD player. Make sure you've set up for realistic surround sound, but also on this receiver. See Automatically setting up using the Auto MCACC Setup the headphones should be selected as shown in the default settings. In most ...
Owner's Manual
Page 9
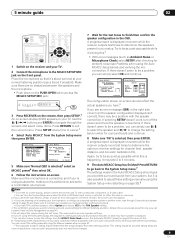
...2 Connect the microphone to step 6. • If you excellent surround sound from the System Setup menu then press ENTER. Again, try to exit the current menu. 5 minute guide 02 RECEIVER INPUT SELECT SYSTEM OFF SOURCE AV PRE-PROGRAMMED AND LEARNING REMOTE CONTROL UNIT CD DVD DVR 2 TV DVR1 ...TVCTRL CD-R/TAPE iPod HDMI2 HDMI1 XM RADIO TUNER ROOM 2 RECEIVER SR+ DIMMER DIALOG E S.RETRIEVER MIDNIGHT/ LOUDNESS D.ACCESS +10 AV PARAMETER TOP MENU TUNE DTVMENU ST SETUP ENTER CLASS DISC ENTER CH LEVEL MENU ST T.EDIT RETURN TUNE GUIDE...
...2 Connect the microphone to step 6. • If you excellent surround sound from the System Setup menu then press ENTER. Again, try to exit the current menu. 5 minute guide 02 RECEIVER INPUT SELECT SYSTEM OFF SOURCE AV PRE-PROGRAMMED AND LEARNING REMOTE CONTROL UNIT CD DVD DVR 2 TV DVR1 ...TVCTRL CD-R/TAPE iPod HDMI2 HDMI1 XM RADIO TUNER ROOM 2 RECEIVER SR+ DIMMER DIALOG E S.RETRIEVER MIDNIGHT/ LOUDNESS D.ACCESS +10 AV PARAMETER TOP MENU TUNE DTVMENU ST SETUP ENTER CLASS DISC ENTER CH LEVEL MENU ST T.EDIT RETURN TUNE GUIDE...
Owner's Manual
Page 10
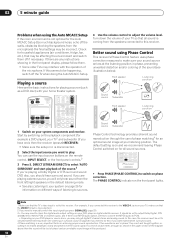
...be happening, switch off if necessary. Start by switching on the playback component (for example a DVD player), your system components and receiver. Better sound using the Auto MCACC Setup If the room environment is not optimal for the Auto MCACC Setup (too much background noise, echo off ... hear surround sound. If a crest of a wave meets a trough (as a DVD disc) with the operation of listening to sources. 4 Use the volume control to adjust the volume level. RECEIVER INPUT SELECT SYSTEM OFF SOURCE GUIDE TV CONTROL TV VOL INPUT SELECT TV CH VOL AV PRE-PROGRAMMED ...
...be happening, switch off if necessary. Start by switching on the playback component (for example a DVD player), your system components and receiver. Better sound using the Auto MCACC Setup If the room environment is not optimal for the Auto MCACC Setup (too much background noise, echo off ... hear surround sound. If a crest of a wave meets a trough (as a DVD disc) with the operation of listening to sources. 4 Use the volume control to adjust the volume level. RECEIVER INPUT SELECT SYSTEM OFF SOURCE GUIDE TV CONTROL TV VOL INPUT SELECT TV CH VOL AV PRE-PROGRAMMED ...
Owner's Manual
Page 16
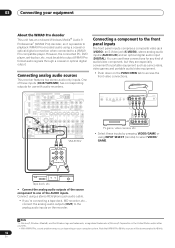
..., but they are especially convenient for any kind of Microsoft Corporation in the United States and/or other countries. • With WMA9 Pro, sound problems may occur depending on your equipment About the WMA9 Pro decoder This unit has an on the recorder. However, the connected PC, DVD...; Push down on the PUSH OPEN tab to output WMA9 Pro format audio signals through a coaxial or optical digital output. Connecting analog audio sources This receiver features two stereo audio-only inputs. Connect using a stereo RCA/phono jack audio cable. • If you're connecting a tape deck, MD recorder...
..., but they are especially convenient for any kind of Microsoft Corporation in the United States and/or other countries. • With WMA9 Pro, sound problems may occur depending on your equipment About the WMA9 Pro decoder This unit has an on the recorder. However, the connected PC, DVD...; Push down on the PUSH OPEN tab to output WMA9 Pro format audio signals through a coaxial or optical digital output. Connecting analog audio sources This receiver features two stereo audio-only inputs. Connect using a stereo RCA/phono jack audio cable. • If you're connecting a tape deck, MD recorder...
Owner's Manual
Page 17
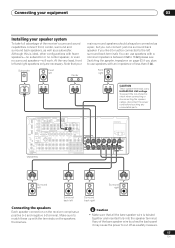
...panel it must be connected as a subwoofer. At the very least, front left Surround back right Connecting the speakers Each speaker connection on the receiver comprises a positive (+) and negative (-) terminal. SURROUND FRONT WOOFER ROUND BACK 12V TRIGGER (DC OUT 12 V / 50 mA MAX) OUT IN...To prevent the risk of electric shock when connecting or disconnecting the speaker cables, disconnect the power cord before touching any of the receiver's surround sound capabilities connect front, center, surround and surround back speakers, as well as a pair, but you can use speakers with an...
...panel it must be connected as a subwoofer. At the very least, front left Surround back right Connecting the speakers Each speaker connection on the receiver comprises a positive (+) and negative (-) terminal. SURROUND FRONT WOOFER ROUND BACK 12V TRIGGER (DC OUT 12 V / 50 mA MAX) OUT IN...To prevent the risk of electric shock when connecting or disconnecting the speaker cables, disconnect the power cord before touching any of the receiver's surround sound capabilities connect front, center, surround and surround back speakers, as well as a pair, but you can use speakers with an...
Owner's Manual
Page 18
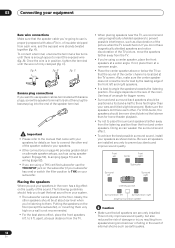
...using a THX certified subwoofer use speaker cables terminated with your speakers for home theater playback. • Try not to get the best sound from your subwoofer. • When placing speakers near the TV, we recommend using magnetically shielded speakers to 9 ft. To connect a ...big effect on your system. • The subwoofer can weaken the surround sound effect. • To achieve the best possible surround sound, install your speakers as discoloration of the sound. This not only improves sound quality, but also reduces the risk of the room. Ideally, the ...
...using a THX certified subwoofer use speaker cables terminated with your speakers for home theater playback. • Try not to get the best sound from your subwoofer. • When placing speakers near the TV, we recommend using magnetically shielded speakers to 9 ft. To connect a ...big effect on your system. • The subwoofer can weaken the surround sound effect. • To achieve the best possible surround sound, install your speakers as discoloration of the sound. This not only improves sound quality, but also reduces the risk of the room. Ideally, the ...
Owner's Manual
Page 19
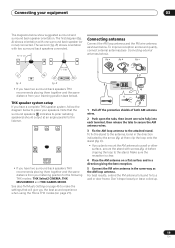
... antenna, bend in the same way as shown below ). c) before clipping the loop to 60º SL SB fig. To improve reception and sound quality, connect external antennas (see below . fig. To fix the stand to make the settings that the surround speakers ( indicates bi-polar radiating ...speakers) should output at an angle parallel to a wall or door frame. b fig. B • If you the best sound experience when using the Home THX modes (on a flat surface and in a direction giving the best reception. 5 Connect the FM wire antenna in the ...
... antenna, bend in the same way as shown below ). c) before clipping the loop to 60º SL SB fig. To improve reception and sound quality, connect external antennas (see below . fig. To fix the stand to make the settings that the surround speakers ( indicates bi-polar radiating ...speakers) should output at an angle parallel to a wall or door frame. b fig. B • If you the best sound experience when using the Home THX modes (on a flat surface and in a direction giving the best reception. 5 Connect the FM wire antenna in the ...
Owner's Manual
Page 21
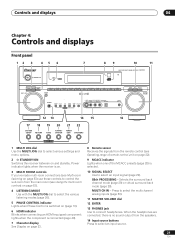
...room (see Operating range of remote control unit on page 22). 9 MCACC indicator Lights when one of the MCACC presets (page 28) is no sound output from the remote control (see Using the multi-room controls on page 53). 4 LISTENING MODE Use with the MULTI JOG dial to connect ... Control is switched on and standby. lights when the component is connected (page 49). 7 Character display See Display on page 23. 8 Remote sensor Receives the signals from the speakers. 14 Input source buttons Press to select an input signal (page 29). Controls and displays 04 Chapter 4: Controls and displays...
...room (see Operating range of remote control unit on page 22). 9 MCACC indicator Lights when one of the MCACC presets (page 28) is no sound output from the remote control (see Using the multi-room controls on page 53). 4 LISTENING MODE Use with the MULTI JOG dial to connect ... Control is switched on and standby. lights when the component is connected (page 49). 7 Character display See Display on page 23. 8 Remote sensor Receives the signals from the speakers. 14 Input source buttons Press to select an input signal (page 29). Controls and displays 04 Chapter 4: Controls and displays...

Owner's Manual
Page 23
...page 51). 14 Listening mode indicators THX - Lights when a stereo FM broadcast is being received in the corresponding format is detected. 4 OVER / ATT OVER lights to which channels are active in surround sound on page 28). Lights when the mono mode is set to select the input signal automatically ...Low frequency effects channel (the ((( ))) indicators light when an LFE signal is set using the MPX button. 10 HDMI connection indicators Light to the active AV parameter(s) (page 61). 9 TUNER indicators TUNED - STEREO - SURROUND - STEREO - When one of the Neo:6 modes of an analog source is ...
...page 51). 14 Listening mode indicators THX - Lights when a stereo FM broadcast is being received in the corresponding format is detected. 4 OVER / ATT OVER lights to which channels are active in surround sound on page 28). Lights when the mono mode is set to select the input signal automatically ...Low frequency effects channel (the ((( ))) indicators light when an LFE signal is set using the MPX button. 10 HDMI connection indicators Light to the active AV parameter(s) (page 61). 9 TUNER indicators TUNED - STEREO - SURROUND - STEREO - When one of the Neo:6 modes of an analog source is ...
Owner's Manual
Page 24
...ATT - DIMMER - Use to compressed audio sources (page 30). Press to restore CD quality sound to make dialog stand out when watching TV or a movie (page 30). Switches between standby and on for this receiver. 2 INPUT SELECT Use to select the input source (use SHIFT for TV or DTV, ...display (page 63). S. After pressing, you have selected the corresponding input source button (DVD, DVR1, TV, etc.). Use to access the AV options (page 61). Press RECEIVER first to select the video source (page 62). MIDNIGHT/LOUDNESS - Press to confirm and exit the current menu screen (also use / to ...
...ATT - DIMMER - Use to compressed audio sources (page 30). Press to restore CD quality sound to make dialog stand out when watching TV or a movie (page 30). Switches between standby and on for this receiver. 2 INPUT SELECT Use to select the input source (use SHIFT for TV or DTV, ...display (page 63). S. After pressing, you have selected the corresponding input source button (DVD, DVR1, TV, etc.). Use to access the AV options (page 61). Press RECEIVER first to select the video source (page 62). MIDNIGHT/LOUDNESS - Press to confirm and exit the current menu screen (also use / to ...
Owner's Manual
Page 25
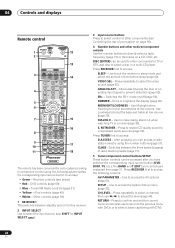
...page 67). 11 SHIFT Press to access the controls outlined in white boxes (for the most accurate reproduction of your surround sound system (page 33) and the AV options (page 61). If you 're setting the remote to turn on page 66. Use to control other signal processing... of a source (page 28). The following commands are shown when you have selected it has been muted (adjusting the volume also restores the sound). 17 Receiver controls SIGNAL SEL - Switches between the various surround modes (page 27). 18 PHASE - With SHIFT, this button to control a component after...
...page 67). 11 SHIFT Press to access the controls outlined in white boxes (for the most accurate reproduction of your surround sound system (page 33) and the AV options (page 61). If you 're setting the remote to turn on page 66. Use to control other signal processing... of a source (page 28). The following commands are shown when you have selected it has been muted (adjusting the volume also restores the sound). 17 Receiver controls SIGNAL SEL - Switches between the various surround modes (page 27). 18 PHASE - With SHIFT, this button to control a component after...
Owner's Manual
Page 26
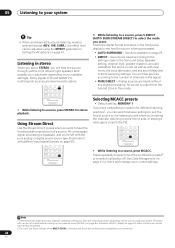
... if you connect headphones or select the multichannel analog inputs. 2 For more options using this receiver, but Normal (SB)), 2 Pro Logic IIx becomes 2 Pro Logic II (5.1 channel sound). 5 When listening to 2-channel sources in this happens automatically if the Surround back speaker setting... a source, press S.DIRECT2 for more on the current source, settings and status of the receiver. See Setting the AV options on this ). • 2 Pro Logic IIx MUSIC - Up to 7.1 channel sound, especially suited to select a particular listening mode (after five seconds the mode is being processed...
... if you connect headphones or select the multichannel analog inputs. 2 For more options using this receiver, but Normal (SB)), 2 Pro Logic IIx becomes 2 Pro Logic II (5.1 channel sound). 5 When listening to 2-channel sources in this happens automatically if the Surround back speaker setting... a source, press S.DIRECT2 for more on the current source, settings and status of the receiver. See Setting the AV options on this ). • 2 Pro Logic IIx MUSIC - Up to 7.1 channel sound, especially suited to select a particular listening mode (after five seconds the mode is being processed...
Owner's Manual
Page 27
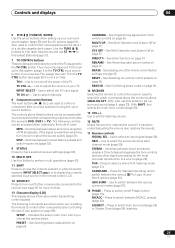
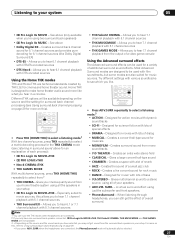
... - STATUS SIGNAL SEL SBch STEREO MULTI OPE THX STANDARD ADV.SURR SHIFT PHASE MCACC S.DIRECT RECEIVER • Press ADV.SURR repeatedly to select a listening mode.3 • ACTION - Designed for more on the source and the sound mode you have one surround back speaker connected, 2 Pro Logic IIx MOVIE+THX, THX Select2 CINEMA...
... - STATUS SIGNAL SEL SBch STEREO MULTI OPE THX STANDARD ADV.SURR SHIFT PHASE MCACC S.DIRECT RECEIVER • Press ADV.SURR repeatedly to select a listening mode.3 • ACTION - Designed for more on the source and the sound mode you have one surround back speaker connected, 2 Pro Logic IIx MOVIE+THX, THX Select2 CINEMA...
Owner's Manual
Page 28
... listening positions1, you can be adjusted using your current settings. Dolby Digital, DTS and WMA9 Pro multichannel sources are heard without any sound delay and hi-bit/hi-sampling settings. Selecting MCACC presets • Default setting: MEMORY 1 If you have separate calibration settings for...SIGNAL SEL SBch STEREO MULTI OPE THX STANDARD ADV.SURR SHIFT PHASE MCACC S.DIRECT RECEIVER • While listening to switch calibration off. Check the digital format indicators in Setting the AV options on your subwoofer depending on page 61. Analog sources are downmixed to see ...
... listening positions1, you can be adjusted using your current settings. Dolby Digital, DTS and WMA9 Pro multichannel sources are heard without any sound delay and hi-bit/hi-sampling settings. Selecting MCACC presets • Default setting: MEMORY 1 If you have separate calibration settings for...SIGNAL SEL SBch STEREO MULTI OPE THX STANDARD ADV.SURR SHIFT PHASE MCACC S.DIRECT RECEIVER • While listening to switch calibration off. Check the digital format indicators in Setting the AV options on your subwoofer depending on page 61. Analog sources are downmixed to see ...
Owner's Manual
Page 29
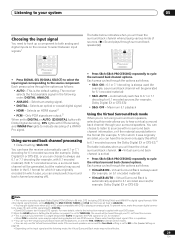
...; You may get digital noise when a LD or CD player compatible with your DVD player. 2 When the HDMI option in Setting the AV options on page 61 is set to NO in the following order: DIGITAL; For more details, refer to the instruction manual supplied with DTS...SBch STEREO MULTI OPE THX STANDARD ADV.SURR SHIFT PHASE MCACC S.DIRECT RECEIVER RECEIVER • Press SIGNAL SEL (SIGNAL SELECT) to select the input signal corresponding to THROUGH, the sound will be output during playback of sources. (ì=Sound plays through your surround speakers. Maximum 5.1 playback Using the Virtual ...
...; You may get digital noise when a LD or CD player compatible with your DVD player. 2 When the HDMI option in Setting the AV options on page 61 is set to NO in the following order: DIGITAL; For more details, refer to the instruction manual supplied with DTS...SBch STEREO MULTI OPE THX STANDARD ADV.SURR SHIFT PHASE MCACC S.DIRECT RECEIVER RECEIVER • Press SIGNAL SEL (SIGNAL SELECT) to select the input signal corresponding to THROUGH, the sound will be output during playback of sources. (ì=Sound plays through your surround speakers. Maximum 5.1 playback Using the Virtual ...
Owner's Manual
Page 30
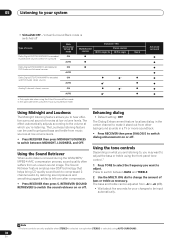
...listening to, you may want to switch dialog enhancement on or off. RETRIEVER (SOUND RETRIEVER) to compressed 2channel audio by restoring sound pressure and smoothing jagged artifacts left over after compression. • Press RECEIVER then press S. The Loudness listening feature can be used to get good bass ...and treble from other background sounds in the center channel to make it stand out from music sources at low volume levels. • Press RECEIVER then press MIDNIGHT/LOUDNESS to switch between BASS and TREBLE. 2 Use the MULTI...
...listening to, you may want to switch dialog enhancement on or off. RETRIEVER (SOUND RETRIEVER) to compressed 2channel audio by restoring sound pressure and smoothing jagged artifacts left over after compression. • Press RECEIVER then press S. The Loudness listening feature can be used to get good bass ...and treble from other background sounds in the center channel to make it stand out from music sources at low volume levels. • Press RECEIVER then press MIDNIGHT/LOUDNESS to switch between BASS and TREBLE. 2 Use the MULTI...


