Owner's Manual
Page 4
...27 Playing other sources 27 Selecting the multi-channel analog inputs ... 28 6 Setting up your receiver Choosing your receiver setup 29 Speaker setting 30 Subwoofer setting 30 Crossover frequency setting 30 LFE attenuator setting 31 Front speaker distance setting 31 Center speaker distance setting 31 Surround speaker distance setting .......... 31 Dynamic range control setting 32 Dual mono setting 32 Coaxial digital input setting 32 Optical digital input setting 32 Setting the relative volume level of each channel 33 7 Using the tuner Listening to the radio 34 Improving FM stereo...
...27 Playing other sources 27 Selecting the multi-channel analog inputs ... 28 6 Setting up your receiver Choosing your receiver setup 29 Speaker setting 30 Subwoofer setting 30 Crossover frequency setting 30 LFE attenuator setting 31 Front speaker distance setting 31 Center speaker distance setting 31 Surround speaker distance setting .......... 31 Dynamic range control setting 32 Dual mono setting 32 Coaxial digital input setting 32 Optical digital input setting 32 Setting the relative volume level of each channel 33 7 Using the tuner Listening to the radio 34 Improving FM stereo...
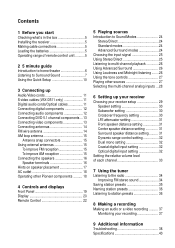
Owner's Manual
Page 5
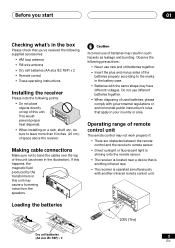
... SETUP MULTI JOG AUDIO/VIDEO MULTI-CHANNEL MULTI JOG RECEIVER N∫m-Û.,, ENTER SINEPLUETCTOR DOWN MASTER VOLUME UP R • When installing on top of the batteries properly according to bend the cables over the top of used batteries, please comply with another infrared remote control unit. + + - 1 4 5 2 3 6 STANDBY STANDBY/ON PHONES 30 STATION TUNER EDIT MULTI JOG CLASS TUNING BAND MPX STANDARD SAUDRVARONCUNEDD SDTIERREECOT/ INPUT ATTLISFTELNDINIMGMMEORDE SSEIGLNEACLT MONITOR MIDNIGHT LOUDNESS TONE QUICK SETUP MULTI JOG AUDIO/VIDEO MULTI-CHANNEL...
... SETUP MULTI JOG AUDIO/VIDEO MULTI-CHANNEL MULTI JOG RECEIVER N∫m-Û.,, ENTER SINEPLUETCTOR DOWN MASTER VOLUME UP R • When installing on top of the batteries properly according to bend the cables over the top of used batteries, please comply with another infrared remote control unit. + + - 1 4 5 2 3 6 STANDBY STANDBY/ON PHONES 30 STATION TUNER EDIT MULTI JOG CLASS TUNING BAND MPX STANDARD SAUDRVARONCUNEDD SDTIERREECOT/ INPUT ATTLISFTELNDINIMGMMEORDE SSEIGLNEACLT MONITOR MIDNIGHT LOUDNESS TONE QUICK SETUP MULTI JOG AUDIO/VIDEO MULTI-CHANNEL...
Owner's Manual
Page 7
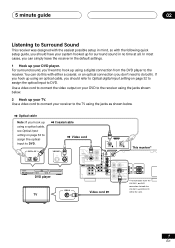
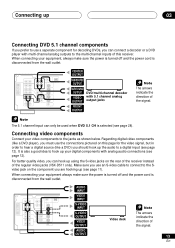
...) ¥ This receiver* VIDEO OUT STANDBY/ON 41 ¡¢ 0 7 8 Î 3 DVD PLAYER DVD player VIDEO IN TV IN Video cord MONITOR OUT SUB WOOFER PREOUT *The illustration shows the VSX-D511, but DVD connections for surround sound in the default settings. 1 Hook up for both ). For surround sound, you'll want to hook up using a optical cable, see Optical input setting on page 32 to assign the optical input to DVD. Use a video cord to connect the video output on your DVD player. Optical cable Note: If you hook up using the jacks shown below . If...
...) ¥ This receiver* VIDEO OUT STANDBY/ON 41 ¡¢ 0 7 8 Î 3 DVD PLAYER DVD player VIDEO IN TV IN Video cord MONITOR OUT SUB WOOFER PREOUT *The illustration shows the VSX-D511, but DVD connections for surround sound in the default settings. 1 Hook up for both ). For surround sound, you'll want to hook up using a optical cable, see Optical input setting on page 32 to assign the optical input to DVD. Use a video cord to connect the video output on your DVD player. Optical cable Note: If you hook up using the jacks shown below . If...
Owner's Manual
Page 11
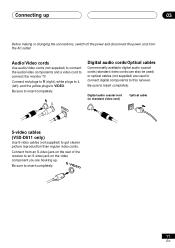
...video cords. R L VIDEO Digital audio cords/Optical cables Commercially available digital audio coaxial cords (standard video cords can also be used) or optical cables (not supplied) are hooking up 03 Before making or changing the connections, switch off the power and disconnect the power cord from an S-video jack on the rear of the receiver to an S-video jack on the video component you are used to connect digital components to this receiver. Connect from the AC outlet. Digital audio coaxial cord (or standard video cord) Optical cable S-video cables (VSX-D511 only) Use S-video...
...video cords. R L VIDEO Digital audio cords/Optical cables Commercially available digital audio coaxial cords (standard video cords can also be used) or optical cables (not supplied) are hooking up 03 Before making or changing the connections, switch off the power and disconnect the power cord from an S-video jack on the rear of the receiver to an S-video jack on the video component you are used to connect digital components to this receiver. Connect from the AC outlet. Digital audio coaxial cord (or standard video cord) Optical cable S-video cables (VSX-D511 only) Use S-video...
Owner's Manual
Page 12
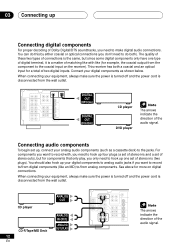
... make sure the power is turned off and the power cord is a matter of matching like with like an MD) to/from the wall outlet. When connecting your analog audio components (such as shown below. DIGITAL OUT (OPTICAL) DIGITAL OUT (COAXIAL) CD player DVD player The arrows indicate the direction of the audio signal. This receiver has both ). Connecting audio components To begin set of stereo ins (two plugs). When connecting your digital components to analog audio jacks if you want...
... make sure the power is turned off and the power cord is a matter of matching like with like an MD) to/from the wall outlet. When connecting your analog audio components (such as shown below. DIGITAL OUT (OPTICAL) DIGITAL OUT (COAXIAL) CD player DVD player The arrows indicate the direction of the audio signal. This receiver has both ). Connecting audio components To begin set of stereo ins (two plugs). When connecting your digital components to analog audio jacks if you want...
Owner's Manual
Page 13
CENTER OUTPUT SUBWOOFER OUTPUT SURROUND OUTPUT VIDEO OUTPUT DVD/multi-channel decoder with 5.1 channel analog output jacks FRONT OUTPUT The arrows indicate the direction of the signal. 13 En It is disconnected from the wall outlet. AUDIO INPUT VIDEO INPUT S-VIDEO INPUT S-VIDEO OUTPUT VIDEO OUTPUT AUDIO OUTPUT Video deck The arrows indicate the direction of the signal. When connecting your equipment, always make sure the power is turned off and the power cord is also a good idea to hook up your digital components with multi-channel analog outputs to the multi-channel inputs ...
CENTER OUTPUT SUBWOOFER OUTPUT SURROUND OUTPUT VIDEO OUTPUT DVD/multi-channel decoder with 5.1 channel analog output jacks FRONT OUTPUT The arrows indicate the direction of the signal. 13 En It is disconnected from the wall outlet. AUDIO INPUT VIDEO INPUT S-VIDEO INPUT S-VIDEO OUTPUT VIDEO OUTPUT AUDIO OUTPUT Video deck The arrows indicate the direction of the signal. When connecting your equipment, always make sure the power is turned off and the power cord is also a good idea to hook up your digital components with multi-channel analog outputs to the multi-channel inputs ...
Owner's Manual
Page 17
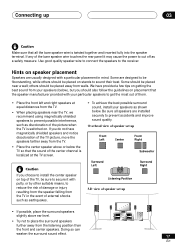
... surround speakers further away from the TV. • Place the center speaker above or below . Use good quality speaker wire to connect the speakers to sound their best. We have provided a few tips on . Be sure all the bare speaker wire is switched on getting the best sound from your speakers (below), but you do not have magnetically shielded speakers and notice discoloration of the bare speaker wire touches the rear panel...
... surround speakers further away from the TV. • Place the center speaker above or below . Use good quality speaker wire to connect the speakers to sound their best. We have provided a few tips on . Be sure all the bare speaker wire is switched on getting the best sound from your speakers (below), but you do not have magnetically shielded speakers and notice discoloration of the bare speaker wire touches the rear panel...
Owner's Manual
Page 18
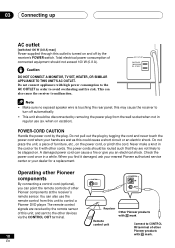
... AC outlet [switched 100 W (0.8 A) max] Power supplied through this outlet is touching the rear panel, this may cause the receiver to CONTROL IN terminal of other Pioneer products with Î mark Remote control unit Connect to turn off by the receiver's POWER switch. AC OUTLET SWITCHED 100 W MAX 0.8 A MAX • Make sure no exposed speaker wire is turned on the power cord, or pinch the cord. DO NOT CONNECT A MONITOR, TV SET, HEATER, OR...
... AC outlet [switched 100 W (0.8 A) max] Power supplied through this outlet is touching the rear panel, this may cause the receiver to CONTROL IN terminal of other Pioneer products with Î mark Remote control unit Connect to turn off by the receiver's POWER switch. AC OUTLET SWITCHED 100 W MAX 0.8 A MAX • Make sure no exposed speaker wire is turned on the power cord, or pinch the cord. DO NOT CONNECT A MONITOR, TV SET, HEATER, OR...
Owner's Manual
Page 19
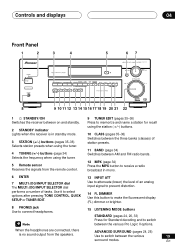
... Panel 1 2 STANDBY STANDBY/ON PHONES 3 4 5 67 AUDIO/VIDEO MULTI-CHANNEL RECEIVER N∫m-Û.,, STATION TUNING ADVANCED STANDARD SURROUND STEREO/ DIRECT SIGNAL SELECT MONITOR MIDNIGHT LOUDNESS TONE QUICK SETUP TUNER EDIT CLASS BAND MPX MULTI JOG LISTENING MODE INPUT ATT FL DIMMER MULTI JOG MULTI JOG ENTER INPUT SELECTOR MASTER VOLUME DOWN UP R 8 9 10 11 12 13 14 15 16 17 18 19 20 21 22 1 STANDBY/ON Switches the receiver between on and standby. 2 STANDBY indicator Lights when the receiver is no sound output from the remote control. 9 TUNER...
... Panel 1 2 STANDBY STANDBY/ON PHONES 3 4 5 67 AUDIO/VIDEO MULTI-CHANNEL RECEIVER N∫m-Û.,, STATION TUNING ADVANCED STANDARD SURROUND STEREO/ DIRECT SIGNAL SELECT MONITOR MIDNIGHT LOUDNESS TONE QUICK SETUP TUNER EDIT CLASS BAND MPX MULTI JOG LISTENING MODE INPUT ATT FL DIMMER MULTI JOG MULTI JOG ENTER INPUT SELECTOR MASTER VOLUME DOWN UP R 8 9 10 11 12 13 14 15 16 17 18 19 20 21 22 1 STANDBY/ON Switches the receiver between on and standby. 2 STANDBY indicator Lights when the receiver is no sound output from the remote control. 9 TUNER...
Owner's Manual
Page 20
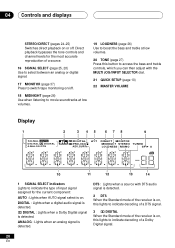
... signal. 3 2 DIGITAL When the Standard mode of a Dolby Digital signal. 20 En ANALOG : Lights when an analog signal is detected. DTS : Lights when a source with the MULTI JOG/INPUT SELECTOR dial. 21 QUICK SETUP (page 10) 22 MASTER VOLUME Display 1 SIGNAL AUTO DIGITAL DIGITAL ANALOG DTS 2 3 45 678 9 DIGITAL ATT DIRECT MONITOR PROLOGIC MIDNIGHT STEREO TUNED ADV.SURR. Direct playback bypasses the tone controls and channel levels for the current component: AUTO : Lights when AUTO signal select is on or off . 18 MIDNIGHT (page 26) Use when listening to movie soundtracks at low...
... signal. 3 2 DIGITAL When the Standard mode of a Dolby Digital signal. 20 En ANALOG : Lights when an analog signal is detected. DTS : Lights when a source with the MULTI JOG/INPUT SELECTOR dial. 21 QUICK SETUP (page 10) 22 MASTER VOLUME Display 1 SIGNAL AUTO DIGITAL DIGITAL ANALOG DTS 2 3 45 678 9 DIGITAL ATT DIRECT MONITOR PROLOGIC MIDNIGHT STEREO TUNED ADV.SURR. Direct playback bypasses the tone controls and channel levels for the current component: AUTO : Lights when AUTO signal select is on or off . 18 MIDNIGHT (page 26) Use when listening to movie soundtracks at low...
Owner's Manual
Page 23
... test tones when setting up the surround sound of a DVD. 12 } ] ' ' and ENTER/SETUP buttons Use these buttons to control a Pioneer DVD player connected to select preset radio stations (pages 35-36). Starts playback. Stops playback. TEST TONE (page 33) Use to previous tracks/chapters. Button DVD AUDIO SUBTITLE 1 3 ¡ 7 8 4 ¢ What it does Turns DVD power on the remote control. MPX (page 34) Use to switch between the station preset name and the frequency. 11 TOP MENU Displays the disc 'top' menu of the receiver. Skips to set up the surround sound...
... test tones when setting up the surround sound of a DVD. 12 } ] ' ' and ENTER/SETUP buttons Use these buttons to control a Pioneer DVD player connected to select preset radio stations (pages 35-36). Starts playback. Stops playback. TEST TONE (page 33) Use to previous tracks/chapters. Button DVD AUDIO SUBTITLE 1 3 ¡ 7 8 4 ¢ What it does Turns DVD power on the remote control. MPX (page 34) Use to switch between the station preset name and the frequency. 11 TOP MENU Displays the disc 'top' menu of the receiver. Skips to set up the surround sound...
Owner's Manual
Page 25
... to give multi-channel sound to a digital input. For more details, refer to the instruction manual supplied with DTS is assigned to a stereo source, using all the speakers in your DVD player. • You can only select DIGITAL if the source you selected is playing an analog signal. You can also use with Dolby Pro Logic for more on your subwoofer depending on the digital input settings. AUDIO/VIDEO MULTI-CHANNEL RECEIVER N∫m-Û.,, STEREO/ DIRECT SIGNAL SELECT MONITOR MIDNIGHT LOUDNESS TONE QUICK SETUP MULTI JOG MULTI JOG ENTER INPUT SELECTOR MASTER VOLUME DOWN...
... to give multi-channel sound to a digital input. For more details, refer to the instruction manual supplied with DTS is assigned to a stereo source, using all the speakers in your DVD player. • You can only select DIGITAL if the source you selected is playing an analog signal. You can also use with Dolby Pro Logic for more on your subwoofer depending on the digital input settings. AUDIO/VIDEO MULTI-CHANNEL RECEIVER N∫m-Û.,, STEREO/ DIRECT SIGNAL SELECT MONITOR MIDNIGHT LOUDNESS TONE QUICK SETUP MULTI JOG MULTI JOG ENTER INPUT SELECTOR MASTER VOLUME DOWN...
Owner's Manual
Page 27
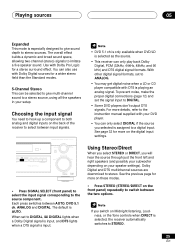
... to adjust. INPUT SELECTOR RECEIVER DVD/LD TV/SAT CD CD-R/ VCR/ DVR AUDIO/VIDEO MULTI-CHANNEL RECEIVER N∫m-Û.,, MIDNIGHT LOUDNESS TONE QUICK SETUP MULTI JOG MULTI JOG ENTER INPUT SELECTOR MASTER VOLUME DOWN UP R 1 Press TONE to select the frequency you want to adjust the bass or treble using the tone controls automatically switches the receiver to playback. Wait about five seconds for your changes to be used with the Stereo sound mode. • When the receiver is switched to Direct, using the front panel tone control...
... to adjust. INPUT SELECTOR RECEIVER DVD/LD TV/SAT CD CD-R/ VCR/ DVR AUDIO/VIDEO MULTI-CHANNEL RECEIVER N∫m-Û.,, MIDNIGHT LOUDNESS TONE QUICK SETUP MULTI JOG MULTI JOG ENTER INPUT SELECTOR MASTER VOLUME DOWN UP R 1 Press TONE to select the frequency you want to adjust the bass or treble using the tone controls automatically switches the receiver to playback. Wait about five seconds for your changes to be used with the Stereo sound mode. • When the receiver is switched to Direct, using the front panel tone control...
Owner's Manual
Page 29
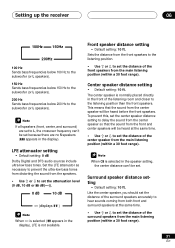
... the best possible surround sound. LFE attenuator setting (page 31) Specify the peak level for details on each option as you cycle through the display. Front speaker distance setting (page 31) Specify the distance from your listening position to your front speakers. You can leave the Speaker setting and the Subwoofer setting in turn the power on. Optical digital input setting (page 32) Specify the component to be assigned to the coaxial digital input. 2 Press RECEIVER. 3 Use...
... the best possible surround sound. LFE attenuator setting (page 31) Specify the peak level for details on each option as you cycle through the display. Front speaker distance setting (page 31) Specify the distance from your listening position to your front speakers. You can leave the Speaker setting and the Subwoofer setting in turn the power on. Optical digital input setting (page 32) Specify the component to be assigned to the coaxial digital input. 2 Press RECEIVER. 3 Use...
Owner's Manual
Page 30
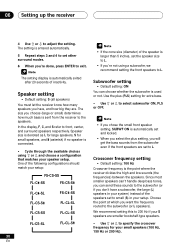
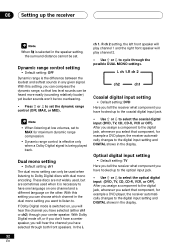
... the receiver divides the high and low sounds (the frequencies) between the speakers. Choose the point at which you 're not using ' or ' and choose a configuration that matches your system) instead of the speaker is automatically set to L. Speaker size is denoted as L for large speakers, S for your setup. Since most smaller speakers can't handle deep bass tones, you can choose whether the subwoofer is connected...
... the receiver divides the high and low sounds (the frequencies) between the speakers. Choose the point at which you 're not using ' or ' and choose a configuration that matches your system) instead of the speaker is automatically set to L. Speaker size is denoted as L for large speakers, S for your setup. Since most smaller speakers can't handle deep bass tones, you can choose whether the subwoofer is connected...
Owner's Manual
Page 31
... bass frequencies below 100 Hz to the subwoofer (or L speakers). 150 Hz Sends bass frequencies below 150 Hz to the subwoofer (or L speakers). 200 Hz Sends bass frequencies below 200 Hz to set the attenuation level (0 dB, 10 dB or dB(∞)). 0 dB 10 dB ∞ (displays ) When ∞ is not available. LFE attenuator setting • Default setting: 0 dB Dolby Digital and DTS audio sources include ultra-low bass tones. Sets the distance from the speakers. • Use...
... bass frequencies below 100 Hz to the subwoofer (or L speakers). 150 Hz Sends bass frequencies below 150 Hz to the subwoofer (or L speakers). 200 Hz Sends bass frequencies below 200 Hz to set the attenuation level (0 dB, 10 dB or dB(∞)). 0 dB 10 dB ∞ (displays ) When ∞ is not available. LFE attenuator setting • Default setting: 0 dB Dolby Digital and DTS audio sources include ultra-low bass tones. Sets the distance from the speakers. • Use...
Owner's Manual
Page 32
... you assign a component to the digital jack, whenever you can compress the dynamic range, so that low level sounds can only be set to cycle through the possible DUAL MONO settings. With Dolby Digital mode off, or if you don't have a center speaker, you will play channel 1 and the right front speaker will hear the channel you have hooked up the receiver When S is selected in the speaker setting, the surround distance cannot be used when...
... you assign a component to the digital jack, whenever you can compress the dynamic range, so that low level sounds can only be set to cycle through the possible DUAL MONO settings. With Dolby Digital mode off, or if you don't have a center speaker, you will play channel 1 and the right front speaker will hear the channel you have hooked up the receiver When S is selected in the speaker setting, the surround distance cannot be used when...
Owner's Manual
Page 34
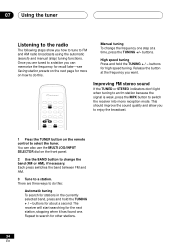
There are tuned to a station you can also use the MULTI JOG/INPUT SELECTOR dial on the remote control to select the tuner. buttons for high speed tuning. High speed tuning Press and hold the TUNING + / - TUNING BAND MPX 1 Press the TUNER button on the front panel. 2 Use the BAND button to change the frequency one . buttons for about a second. buttons. You can memorize the frequency for recall later-see Saving station presets on the next page...
There are tuned to a station you can also use the MULTI JOG/INPUT SELECTOR dial on the remote control to select the tuner. buttons for high speed tuning. High speed tuning Press and hold the TUNING + / - TUNING BAND MPX 1 Press the TUNER button on the front panel. 2 Use the BAND button to change the frequency one . buttons for about a second. buttons. You can memorize the frequency for recall later-see Saving station presets on the next page...
Owner's Manual
Page 35
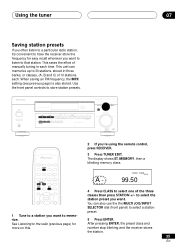
... to select the station preset you 're using the remote control, press RECEIVER. 3 Press TUNER EDIT. You can memorize up to that station. After pressing ENTER, the preset class and number stop blinking and the receiver stores the station. 35 En STANDBY STANDBY/ON PHONES AUDIO/VIDEO MULTI-CHANNEL RECEIVER N∫m-Û.,, STATION TUNING ADVANCED STEREO/ STANDARD SURROUND DIRECT SIGNAL SELECT MONITOR MIDNIGHT LOUDNESS TONE QUICK SETUP TUNER EDIT CLASS BAND MPX MULTI JOG LISTENING MODE INPUT ATT FL DIMMER MULTI JOG MULTI JOG ENTER INPUT SELECTOR MASTER VOLUME DOWN...
... to select the station preset you 're using the remote control, press RECEIVER. 3 Press TUNER EDIT. You can memorize up to that station. After pressing ENTER, the preset class and number stop blinking and the receiver stores the station. 35 En STANDBY STANDBY/ON PHONES AUDIO/VIDEO MULTI-CHANNEL RECEIVER N∫m-Û.,, STATION TUNING ADVANCED STEREO/ STANDARD SURROUND DIRECT SIGNAL SELECT MONITOR MIDNIGHT LOUDNESS TONE QUICK SETUP TUNER EDIT CLASS BAND MPX MULTI JOG LISTENING MODE INPUT ATT FL DIMMER MULTI JOG MULTI JOG ENTER INPUT SELECTOR MASTER VOLUME DOWN...
Owner's Manual
Page 37
... as a CD player or TV) through the analog jacks. Insert a blank tape, MD, video etc. Tune to the radio station, load the CD, video, DVD etc. 3 Prepare the recorder (connected to do this ). The receiver's volume, balance, tone (bass, treble, loudness), and surround effects have a record monitor function). • Press the MONITOR button to switch between the recorded signal and the original source signal. into the recording device and set the audio recording level automatically-check the component's instruction manual if you...
... as a CD player or TV) through the analog jacks. Insert a blank tape, MD, video etc. Tune to the radio station, load the CD, video, DVD etc. 3 Prepare the recorder (connected to do this ). The receiver's volume, balance, tone (bass, treble, loudness), and surround effects have a record monitor function). • Press the MONITOR button to switch between the recorded signal and the original source signal. into the recording device and set the audio recording level automatically-check the component's instruction manual if you...


