
Owner's Manual
Page 5
... control presets 74 Default preset codes 74 Controls the components 74 10 The Advanced MCACC menu Making receiver settings from the Advanced MCACC menu 77 Automatic MCACC (Expert 78 Manual MCACC setup 82 Fine Channel Level 83 Fine Speaker Distance 83 Standing Wave 85 Acoustic Calibration EQ ...MCACC presets 91 Copying MCACC preset data 92 Clearing MCACC presets 92 11 The system and the other setup Making receiver settings from the System Setup menu 93 Manual speaker setup 94 Surround back speaker setting 94 Speaker Setting 95 Channel Level 96 Speaker Distance 97 X-Curve 98 ...
... control presets 74 Default preset codes 74 Controls the components 74 10 The Advanced MCACC menu Making receiver settings from the Advanced MCACC menu 77 Automatic MCACC (Expert 78 Manual MCACC setup 82 Fine Channel Level 83 Fine Speaker Distance 83 Standing Wave 85 Acoustic Calibration EQ ...MCACC presets 91 Copying MCACC preset data 92 Clearing MCACC presets 92 11 The system and the other setup Making receiver settings from the System Setup menu 93 Manual speaker setup 94 Surround back speaker setting 94 Speaker Setting 95 Channel Level 96 Speaker Distance 97 X-Curve 98 ...
Owner's Manual
Page 18
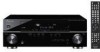
... the power to cut off as earthquakes. If any uninsulated parts. • Make sure that came with your speakers for details on the receiver comprises a positive (+) and negative (-) terminal. B) 3 Tighten terminal. (fig. To prevent the risk of electric shock when connecting or disconnecting...before touching any of damage or injury resulting from speakers being knocked over or falling in .) Important • Please refer to the manual that all speakers are securely installed. A) 2 Loosen terminal and insert exposed wire. (fig. 03 Connecting your equipment Connecting the ...
... the power to cut off as earthquakes. If any uninsulated parts. • Make sure that came with your speakers for details on the receiver comprises a positive (+) and negative (-) terminal. B) 3 Tighten terminal. (fig. To prevent the risk of electric shock when connecting or disconnecting...before touching any of damage or injury resulting from speakers being knocked over or falling in .) Important • Please refer to the manual that all speakers are securely installed. A) 2 Loosen terminal and insert exposed wire. (fig. 03 Connecting your equipment Connecting the ...
Owner's Manual
Page 20
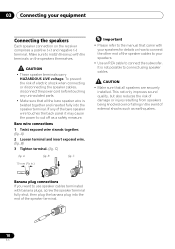
... BACK/ B L (Single) VIDEO PB PR COMPONENT VIDEO OUT IN CONTROL OUT Surround right Surround left . 20 En See your speaker manual for more information. • If your speakers. Doing so may damage your speakers have two metal plates that connect the High to do... not remove it for bi-amping shown at the left VSX-1019AH Bi-amping is recommended. These must be bi-ampable to the Low terminals. CAUTION • Most speakers ...improvement will depend on the kind of your speakers to the speaker terminal on the receiver.
... BACK/ B L (Single) VIDEO PB PR COMPONENT VIDEO OUT IN CONTROL OUT Surround right Surround left . 20 En See your speaker manual for more information. • If your speakers. Doing so may damage your speakers have two metal plates that connect the High to do... not remove it for bi-amping shown at the left VSX-1019AH Bi-amping is recommended. These must be bi-ampable to the Low terminals. CAUTION • Most speakers ...improvement will depend on the kind of your speakers to the speaker terminal on the receiver.

Owner's Manual
Page 25
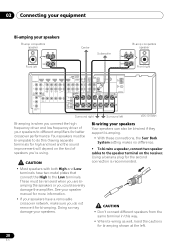
... of progressive scan video (if your TV and source component to check whether they are both compatible), which delivers a very stable, flicker-free picture. VSX-1019AH HDMI ASSIGNABLE DIGITAL AUDIO 1 3 COAXIAL OPTICAL ASSIGNABLE ASSIGNABLE ASSIGNABLE BD IN IN 1 IN 2 IN 3 OUT AUDIO IN 1 (DVD) IN ...If you want to listen to composite. See the manuals that came with audio cables. • Component video should give superior picture quality when compared to the sound of the TV over the receiver, connect the receiver and TV with your source and TV are compatible with...
... of progressive scan video (if your TV and source component to check whether they are both compatible), which delivers a very stable, flicker-free picture. VSX-1019AH HDMI ASSIGNABLE DIGITAL AUDIO 1 3 COAXIAL OPTICAL ASSIGNABLE ASSIGNABLE ASSIGNABLE BD IN IN 1 IN 2 IN 3 OUT AUDIO IN 1 (DVD) IN ...If you want to listen to composite. See the manuals that came with audio cables. • Component video should give superior picture quality when compared to the sound of the TV over the receiver, connect the receiver and TV with your source and TV are compatible with...
Owner's Manual
Page 26
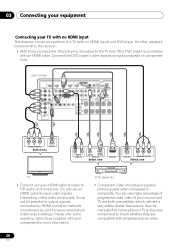
...it may not be possible to output signals connected by HDMI and other playback component) to the receiver. • With these connections, the picture is not output to check whether they are both ... HDMI cable to listen to HD audio on the video component, it may be necessary to make output settings. VSX-1019AH HDMI ASSIGNABLE DIGITAL AUDIO 1 3 COAXIAL OPTICAL ASSIGNABLE BD IN IN 1 IN 2 IN 3 OUT AUDIO ... if the DVD player is connected with progressive-scan video. 26 En See the manuals that came with no HDMI input This diagram shows connections of progressive scan video ...
...it may not be possible to output signals connected by HDMI and other playback component) to the receiver. • With these connections, the picture is not output to check whether they are both ... HDMI cable to listen to HD audio on the video component, it may be necessary to make output settings. VSX-1019AH HDMI ASSIGNABLE DIGITAL AUDIO 1 3 COAXIAL OPTICAL ASSIGNABLE BD IN IN 1 IN 2 IN 3 OUT AUDIO ... if the DVD player is connected with progressive-scan video. 26 En See the manuals that came with no HDMI input This diagram shows connections of progressive scan video ...
Owner's Manual
Page 32
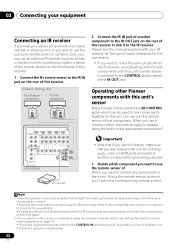
...'t be able to control this unit using two remote controls (at which component you 'll point the corresponding remote control. PR TROL OUT COMPONENT VIDEO VSX-1019AH IR receiver 2 Connect the IR IN jack of another component to the IR OUT jack on the rear of this... window. • Note that you can be used to use the remote sensor of. When you want to link a Pioneer component to the IR receiver, see the manual supplied with this receiver. Refer to the manual that came with your component to check for the connection. • If you want to the CONTROL jacks instead...
...'t be able to control this unit using two remote controls (at which component you 'll point the corresponding remote control. PR TROL OUT COMPONENT VIDEO VSX-1019AH IR receiver 2 Connect the IR IN jack of another component to the IR OUT jack on the rear of this... window. • Note that you can be used to use the remote sensor of. When you want to link a Pioneer component to the IR receiver, see the manual supplied with this receiver. Refer to the manual that came with your component to check for the connection. • If you want to the CONTROL jacks instead...

Owner's Manual
Page 36
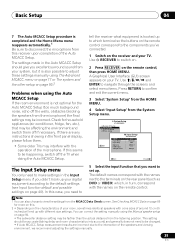
... the screens and select menu items. Press RETURN to change the language. OSD Language d. Other Setup Language : 4c.OSD Language A/V RECEIVER English Exit Return OK Exit Return 4 Select the desired language. • English • French • German • Italian •...the current menu. 2 Select 'System Setup' from the HOME MENU. 3 Select 'OSD Language' from the System Setup menu. 4.SystemSetup A/V RECEIVER a.Manual SP Setup b. 04 Basic Setup Chapter 4: Basic Setup Switching the speaker impedance We recommend using speakers of 8 Ω with a 6 Ω impedance...
... the screens and select menu items. Press RETURN to change the language. OSD Language d. Other Setup Language : 4c.OSD Language A/V RECEIVER English Exit Return OK Exit Return 4 Select the desired language. • English • French • German • Italian •...the current menu. 2 Select 'System Setup' from the HOME MENU. 3 Select 'OSD Language' from the System Setup menu. 4.SystemSetup A/V RECEIVER a.Manual SP Setup b. 04 Basic Setup Chapter 4: Basic Setup Switching the speaker impedance We recommend using speakers of 8 Ω with a 6 Ω impedance...
Owner's Manual
Page 39
...disconnect the microphone from your system, but it is hooked up with the names on the receiver and your TV. You can also choose to set up your digital equipment according to adjust these settings manually using The Advanced MCACC menu on page 77 or The system and the other setup on... page 93.2 Problems when using the Manual speaker setup on your TV. Use RECEIVER to confirm and exit the current menu. 3 Select 'System Setup' from the HOME MENU. 4 Select 'Input Setup' from the listening position. Input...
...disconnect the microphone from your system, but it is hooked up with the names on the receiver and your TV. You can also choose to set up your digital equipment according to adjust these settings manually using The Advanced MCACC menu on page 77 or The system and the other setup on... page 93.2 Problems when using the Manual speaker setup on your TV. Use RECEIVER to confirm and exit the current menu. 3 Select 'System Setup' from the HOME MENU. 4 Select 'Input Setup' from the listening position. Input...
Owner's Manual
Page 41
...ALC/STREAM DIRECT) to select 'AUTO SURROUND' and start playback of your TV so that the VIDEO input is now selected). 2 If you need to manually switch the input signal type press SIGNAL SEL (page 58). 3 • You may only get digital 2 channel stereo and analog sound. It should hear...; See also Listening to your system on page 53 for example a DVD player), your TV1 and subwoofer (if you have one), then the receiver (press RECEIVER). • Make sure the setup microphone is being performed properly. It is possible to check on the front panel display whether or not multi...
...ALC/STREAM DIRECT) to select 'AUTO SURROUND' and start playback of your TV so that the VIDEO input is now selected). 2 If you need to manually switch the input signal type press SIGNAL SEL (page 58). 3 • You may only get digital 2 channel stereo and analog sound. It should hear...; See also Listening to your system on page 53 for example a DVD player), your TV1 and subwoofer (if you have one), then the receiver (press RECEIVER). • Make sure the setup microphone is being performed properly. It is possible to check on the front panel display whether or not multi...

Owner's Manual
Page 49
... Signal strength Artist name Channel name Channel number Category Composer name • Sub Zone (VSX-1019AH model only): Channel name Johnny B. You can call SIRIUS toll-free at this receiver to the SiriusConnect™ tuner. SIRIUS Satellite Radio is as follows: • Main Zone...to residents of reception in the space provided near a window (refer to SIRIUS, U.S. and Canadian customers can , however, use this manual. Satellite Radio delivers a variety of commercialfree music from categories ranging from the GUI screen to your most trusted sources. The SID may ...
... Signal strength Artist name Channel name Channel number Category Composer name • Sub Zone (VSX-1019AH model only): Channel name Johnny B. You can call SIRIUS toll-free at this receiver to the SiriusConnect™ tuner. SIRIUS Satellite Radio is as follows: • Main Zone...to residents of reception in the space provided near a window (refer to SIRIUS, U.S. and Canadian customers can , however, use this manual. Satellite Radio delivers a variety of commercialfree music from categories ranging from the GUI screen to your most trusted sources. The SID may ...

Owner's Manual
Page 51
...61545;/ to search for more on how to FM and AM radio broadcasts using the number buttons on this : Automatic tuning - The receiver will start searching for Neural THX listening. Using Neural THX This feature uses Neural Surround™, THX® technologies to achieve optimal surround sound... FM radio. • While listening to enjoy the broadcast. Once you 're finished press TOP MENU to return to switch the receiver into mono reception mode. Manual tuning - Set the parental lock password. 3 When you are three ways to change the band (FM or AM), if necessary....
...61545;/ to search for more on how to FM and AM radio broadcasts using the number buttons on this : Automatic tuning - The receiver will start searching for Neural THX listening. Using Neural THX This feature uses Neural Surround™, THX® technologies to achieve optimal surround sound... FM radio. • While listening to enjoy the broadcast. Once you 're finished press TOP MENU to return to switch the receiver into mono reception mode. Manual tuning - Set the parental lock password. 3 When you are three ways to change the band (FM or AM), if necessary....

Owner's Manual
Page 52
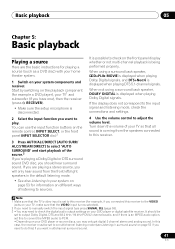
... to station presets You will need to have some presets stored to select a station preset. 4 Press ENTER. This saves the effort of manually tuning in which the station is also stored. 1 Tune to a station you want to confirm your station presets. 1 Choose the station preset...station preset, you make a mistake halfway through classes A to G. 3 Press PRESET / to select the station preset you want . This receiver can press DISP when listening to a station to enter the frequency of 9 stations each time. After pressing ENTER, the preset class and number stop ...
... to station presets You will need to have some presets stored to select a station preset. 4 Press ENTER. This saves the effort of manually tuning in which the station is also stored. 1 Tune to a station you want to confirm your station presets. 1 Choose the station preset...station preset, you make a mistake halfway through classes A to G. 3 Press PRESET / to select the station preset you want . This receiver can press DISP when listening to a station to enter the frequency of 9 stations each time. After pressing ENTER, the preset class and number stop ...

Owner's Manual
Page 58
... digital signal formats. For more details, refer to the instruction manual supplied with DTS 96/24 decoding. The receiver selects the first available signal in the following order: HDMI; For PCM input signals.5 The receiver selects the first available signal in the following order: HDMI; ...listening position, depending on how you should have already completed. 2 • These settings have separate calibration settings for example, watching movies from this receiver, it is a problem. 58 En Each press cycles through your TV, not from a sofa, or playing a video game close to the...
... digital signal formats. For more details, refer to the instruction manual supplied with DTS 96/24 decoding. The receiver selects the first available signal in the following order: HDMI; For PCM input signals.5 The receiver selects the first available signal in the following order: HDMI; ...listening position, depending on how you should have already completed. 2 • These settings have separate calibration settings for example, watching movies from this receiver, it is a problem. 58 En Each press cycles through your TV, not from a sofa, or playing a video game close to the...

Owner's Manual
Page 66
... in the standby mode. Only when listening to 0 dB. IMAGEj Adjusts the center image to OFF and adjust the delay time manually. h.This feature is best to switch the gain setting back to 2-channel sources in Neo:6 MUSIC/CINEMA mode. 66 En i. You shouldn't have any problems ... mode on in order to 2-channel sources in Dolby Pro Logic IIx Music/Dolby Pro Logic II Music mode. Only when listening to play the receiver's HDMI audio and video input signals from 0 (all center channel sent to back, making it sound wider (higher settings) or narrower (lower settings...
... in the standby mode. Only when listening to 0 dB. IMAGEj Adjusts the center image to OFF and adjust the delay time manually. h.This feature is best to switch the gain setting back to 2-channel sources in Neo:6 MUSIC/CINEMA mode. 66 En i. You shouldn't have any problems ... mode on in order to 2-channel sources in Dolby Pro Logic IIx Music/Dolby Pro Logic II Music mode. Only when listening to play the receiver's HDMI audio and video input signals from 0 (all center channel sent to back, making it sound wider (higher settings) or narrower (lower settings...

Owner's Manual
Page 69
...the INPUT SELECTOR dial to adjust the sub zone volume and select sources. If this ).3 • VSX-919AH model only: iPod/USB and SIRIUS Radio function cannot be selected for example shows in Manual speaker setup on ,2 make sure that any operations for the sub zone. If you selected Normal, Front... controls The following steps use the tuner controls to select a preset station (see Saving station presets on the front panel. • When the receiver is output from the subwoofer (the LFE channel is dimmed, and ZONE 2 DVD for the MULTI-ZONE feature. Using other zone. Multichannel sources...
...the INPUT SELECTOR dial to adjust the sub zone volume and select sources. If this ).3 • VSX-919AH model only: iPod/USB and SIRIUS Radio function cannot be selected for example shows in Manual speaker setup on ,2 make sure that any operations for the sub zone. If you selected Normal, Front... controls The following steps use the tuner controls to select a preset station (see Saving station presets on the front panel. • When the receiver is output from the subwoofer (the LFE channel is dimmed, and ZONE 2 DVD for the MULTI-ZONE feature. Using other zone. Multichannel sources...

Owner's Manual
Page 71
Most video recorders set the audio recording level automatically-check the component's instruction manual if you can choose between four brightness levels for the front panel display. Checking your system settings Use the status display screen to ... switch off . Using other functions 08 3 Prepare the recorder. into standby after a specified amount of the following settings for a few seconds. • Press RECEIVER , then press DIMMER repeatedly to set the recording levels. These appear on the front panel display.3 The front panel display shows each : Input function ↓...
Most video recorders set the audio recording level automatically-check the component's instruction manual if you can choose between four brightness levels for the front panel display. Checking your system settings Use the status display screen to ... switch off . Using other functions 08 3 Prepare the recorder. into standby after a specified amount of the following settings for a few seconds. • Press RECEIVER , then press DIMMER repeatedly to set the recording levels. These appear on the front panel display.3 The front panel display shows each : Input function ↓...
Owner's Manual
Page 77
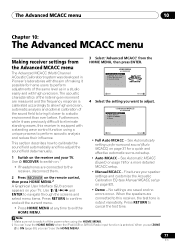
...HOME MENU. 77 En Demo Exit Return • Full Auto MCACC - Fine-tunes your speaker settings and customize the Acoustic Calibration EQ (see Manual MCACC setup on .1 • If headphones are saved and no errors occur. No settings are connected to calibrate the sound field automatically and...HOME MENU, then press ENTER. Advanced MCACC 2. Press RETURN to this receiver is calibrated accordingly to allow high precision, automatic analysis and optimal calibration of the sound field to bring it was developed in Pioneer's laboratories with the aim of making it possible for home users to...
...HOME MENU. 77 En Demo Exit Return • Full Auto MCACC - Fine-tunes your speaker settings and customize the Acoustic Calibration EQ (see Manual MCACC setup on .1 • If headphones are saved and no errors occur. No settings are connected to calibrate the sound field automatically and...HOME MENU, then press ENTER. Advanced MCACC 2. Press RETURN to this receiver is calibrated accordingly to allow high precision, automatic analysis and optimal calibration of the sound field to bring it was developed in Pioneer's laboratories with the aim of making it possible for home users to...

Owner's Manual
Page 78
...: M2.MEMORY 2 FRONT ALIGH : M3.MEMORY 3 THX Speaker : NO START Speaker Setting Channel Level Speaker Distance EQ Pro & S-Wave 1b.Auto MCACC A/V RECEIVER Exit ALL Speaker Setting Channel Level SYMMETRY : M1.MEMORY 1 Speaker Distance ALL CH ADJ : M2.MEMORY 2 ReEtuQrnPro & S-Wave FRONT ALIGH : M3.MEMORY 3...Setup will automatically appear after five minutes of source (for example, watching movies from the Advanced MCACC menu, then press ENTER. Manual MCACC d. channel level) from the Advanced MCACC menu on how you can calibrate your system differently for up for the MCACC...
...: M2.MEMORY 2 FRONT ALIGH : M3.MEMORY 3 THX Speaker : NO START Speaker Setting Channel Level Speaker Distance EQ Pro & S-Wave 1b.Auto MCACC A/V RECEIVER Exit ALL Speaker Setting Channel Level SYMMETRY : M1.MEMORY 1 Speaker Distance ALL CH ADJ : M2.MEMORY 2 ReEtuQrnPro & S-Wave FRONT ALIGH : M3.MEMORY 3...Setup will automatically appear after five minutes of source (for example, watching movies from the Advanced MCACC menu, then press ENTER. Manual MCACC d. channel level) from the Advanced MCACC menu on how you can calibrate your system differently for up for the MCACC...
Owner's Manual
Page 81
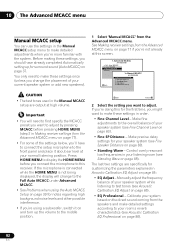
...page 94).1 You can correct the setting manually using the Manual speaker setup on page 94. • The subwoofer distance setting may differ from the listening position. You can also choose to disconnect the microphone from this receiver upon completion of around 12 cm (5 inches... speakers and viewing environment, we recommend adjusting the settings manually. 2 Since the distance measurements have finished checking each screen. The Advanced MCACC menu 10 8 Make sure 'OK' is displayed on-screen while the receiver outputs more test tones to control lower 'boomy' frequencies...
...page 94).1 You can correct the setting manually using the Manual speaker setup on page 94. • The subwoofer distance setting may differ from the listening position. You can also choose to disconnect the microphone from this receiver upon completion of around 12 cm (5 inches... speakers and viewing environment, we recommend adjusting the settings manually. 2 Since the distance measurements have finished checking each screen. The Advanced MCACC menu 10 8 Make sure 'OK' is displayed on-screen while the receiver outputs more test tones to control lower 'boomy' frequencies...
Owner's Manual
Page 82
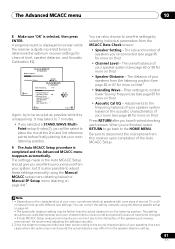
... Full Auto MCACC under Advanced MCACC. • See Problems when using a subwoofer, switch it about ear level at this receiver. See Making receiver settings from the speakers and make these settings in the Manual MCACC setup are specifically for surround sound (Auto MCACC) on page 37. EQ Adjust... 5. Manual MCACC d. Control overly resonant low frequencies in Making receiver settings from the Advanced MCACC menu. Full Auto MCACC b. The last two settings are output at high volume. Standing Wave 4....
... Full Auto MCACC under Advanced MCACC. • See Problems when using a subwoofer, switch it about ear level at this receiver. See Making receiver settings from the speakers and make these settings in the Manual MCACC setup are specifically for surround sound (Auto MCACC) on page 37. EQ Adjust... 5. Manual MCACC d. Control overly resonant low frequencies in Making receiver settings from the Advanced MCACC menu. Full Auto MCACC b. The last two settings are output at high volume. Standing Wave 4....


