
Owner's Manual
Page 1
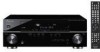
...CHANNEL RECEIVER VSX-1019AH-K VSX-919AH-K Register your product at http://www.pioneerelectronics.com (US) http://www.pioneerelectronics.ca (Canada) · Protect your new investment The details of your purchase will be on file for reference in the event of an insurance claim such as loss or theft. · Receive... free tips, updates and service bulletins on your new product · Improve product development Your input helps us continue to design products that meet your needs. · Receive a free Pioneer newsletter Registered customers can opt in to...
...CHANNEL RECEIVER VSX-1019AH-K VSX-919AH-K Register your product at http://www.pioneerelectronics.com (US) http://www.pioneerelectronics.ca (Canada) · Protect your new investment The details of your purchase will be on file for reference in the event of an insurance claim such as loss or theft. · Receive... free tips, updates and service bulletins on your new product · Improve product development Your input helps us continue to design products that meet your needs. · Receive a free Pioneer newsletter Registered customers can opt in to...
Owner's Manual
Page 2
...a Class B digital device, pursuant to dripping, splashing, rain or moisture. Product Name: AUDIO/VIDEO MULTI-CHANNEL RECEIVER Model Number: VSX-1019AH-K, VSX-919AH-K Responsible Party Name: PIONEER ELECTRONICS SERVICE INC. LONG BEACH, CA 90801-1760, USA Phone: 1-800-421-1404 D3-4-2-1-3_B_En WARNING Before...is properly disposed of the area where this material may be removed and appropriate one fitted. Reorient or relocate the receiving antenna. - D8-10-2_A1_En CAUTION: This product satisfies FCC regulations when shielded cables and connectors are designed to ...
...a Class B digital device, pursuant to dripping, splashing, rain or moisture. Product Name: AUDIO/VIDEO MULTI-CHANNEL RECEIVER Model Number: VSX-1019AH-K, VSX-919AH-K Responsible Party Name: PIONEER ELECTRONICS SERVICE INC. LONG BEACH, CA 90801-1760, USA Phone: 1-800-421-1404 D3-4-2-1-3_B_En WARNING Before...is properly disposed of the area where this material may be removed and appropriate one fitted. Reorient or relocate the receiving antenna. - D8-10-2_A1_En CAUTION: This product satisfies FCC regulations when shielded cables and connectors are designed to ...
Owner's Manual
Page 4
...29 Connecting AM/FM antennas 30 Connecting external antennas 30 MULTI-ZONE setup 31 Making MULTI-ZONE connections 31 Connecting an IR receiver 32 Operating other Pioneer components with no HDMI output 25 Connecting your model properly. Contents 01 Before you start Checking what's in a safe ... sound 53 Using the Advanced surround effects 54 Listening in stereo 55 Using Front Stage Surround Advance 55 Using Stream Direct 56 Using surround back channel processing . . . . 56 Using the Virtual Surround Back mode. . . . . 57 Setting the Up Mix function 57 Selecting MCACC presets 58...
...29 Connecting AM/FM antennas 30 Connecting external antennas 30 MULTI-ZONE setup 31 Making MULTI-ZONE connections 31 Connecting an IR receiver 32 Operating other Pioneer components with no HDMI output 25 Connecting your model properly. Contents 01 Before you start Checking what's in a safe ... sound 53 Using the Advanced surround effects 54 Listening in stereo 55 Using Front Stage Surround Advance 55 Using Stream Direct 56 Using surround back channel processing . . . . 56 Using the Virtual Surround Back mode. . . . . 57 Setting the Up Mix function 57 Selecting MCACC presets 58...

Owner's Manual
Page 5
... 74 Default preset codes 74 Controls the components 74 10 The Advanced MCACC menu Making receiver settings from the Advanced MCACC menu 77 Automatic MCACC (Expert 78 Manual MCACC setup 82 Fine Channel Level 83 Fine Speaker Distance 83 Standing Wave 85 Acoustic Calibration EQ Adjust 85 Acoustic ...preset data 92 Clearing MCACC presets 92 11 The system and the other setup Making receiver settings from the System Setup menu 93 Manual speaker setup 94 Surround back speaker setting 94 Speaker Setting 95 Channel Level 96 Speaker Distance 97 X-Curve 98 The Other Setup menu 98 Multi...
... 74 Default preset codes 74 Controls the components 74 10 The Advanced MCACC menu Making receiver settings from the Advanced MCACC menu 77 Automatic MCACC (Expert 78 Manual MCACC setup 82 Fine Channel Level 83 Fine Speaker Distance 83 Standing Wave 85 Acoustic Calibration EQ Adjust 85 Acoustic ...preset data 92 Clearing MCACC presets 92 11 The system and the other setup Making receiver settings from the System Setup menu 93 Manual speaker setup 94 Surround back speaker setting 94 Speaker Setting 95 Channel Level 96 Speaker Distance 97 X-Curve 98 The Other Setup menu 98 Multi...
Owner's Manual
Page 6
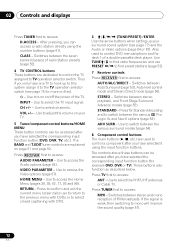
... Control (page 59) • Switches on/off the Acoustic Calibration EQ, Sound retriever or Dialog Enhancement (page 64) • Change the channel level while listening (Tip on the receiver The unit is 6 Ω to 8 Ω) 6 Power On 7 Changing the OSD display language (OSD Language)... the speaker impedance (page 36) (Only if the impedance of the connected speakers is a full-fledged AV receiver equipped with an abundance of the remote control • Operating multiple receivers (page 73) • Setting the remote to make the connections and settings. The colors of the ...
... Control (page 59) • Switches on/off the Acoustic Calibration EQ, Sound retriever or Dialog Enhancement (page 64) • Change the channel level while listening (Tip on the receiver The unit is 6 Ω to 8 Ω) 6 Power On 7 Changing the OSD display language (OSD Language)... the speaker impedance (page 36) (Only if the impedance of the connected speakers is a full-fledged AV receiver equipped with an abundance of the remote control • Operating multiple receivers (page 73) • Setting the remote to make the connections and settings. The colors of the ...
Owner's Manual
Page 8
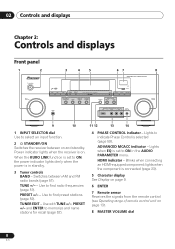
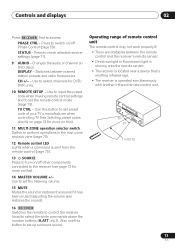
...BAND - Lights to indicate Phase Control is connected (page 23). 5 Character display See Display on page 9. 6 ENTER 7 Remote sensor Receives the signals from the remote control (see Operating range of remote control unit on page 13). 8 MASTER VOLUME dial 8 En Use to ...Controls and displays Chapter 2: Controls and displays Front panel 1 2 STANDBY/ON INPUT SELECTOR 3 4 5 67 8 AUDIO/VIDEO MULTI-CHANNEL RECEIVER BAND TUNE TUNE PHASE CONTROL ADVANCED MCACC AUTO SURR/ALC/ STREAM DIRECT STEREO ADVANCED SURROUND STANDARD SURROUND PHONES HDMI ENTER PRESET PRESET TUNER EDIT...
...BAND - Lights to indicate Phase Control is connected (page 23). 5 Character display See Display on page 9. 6 ENTER 7 Remote sensor Receives the signals from the remote control (see Operating range of remote control unit on page 13). 8 MASTER VOLUME dial 8 En Use to ...Controls and displays Chapter 2: Controls and displays Front panel 1 2 STANDBY/ON INPUT SELECTOR 3 4 5 67 8 AUDIO/VIDEO MULTI-CHANNEL RECEIVER BAND TUNE TUNE PHASE CONTROL ADVANCED MCACC AUTO SURR/ALC/ STREAM DIRECT STEREO ADVANCED SURROUND STANDARD SURROUND PHONES HDMI ENTER PRESET PRESET TUNER EDIT...

Owner's Manual
Page 9
...component to the front panel inputs on page 69). 13 iPod/iPhone/USB, VIDEO INPUT terminals Use to indicate the channels being output from the receiver. L/R - Either one channel other than the ones above XC - Switches between stereo playback, and Front Stage Surround Advance modes (page 55). Switches... ] [ 4 ] 10 18 19 20 21 22 dB 23 1 SIGNAL indicators Light to connect the supplied microphone (page 37). AUTO lights when the receiver is set to select the input signal automatically (page 58). 2 Program format indicators Light to connect your Apple iPod as an audio and video source...
...component to the front panel inputs on page 69). 13 iPod/iPhone/USB, VIDEO INPUT terminals Use to indicate the channels being output from the receiver. L/R - Either one channel other than the ones above XC - Switches between stereo playback, and Front Stage Surround Advance modes (page 55). Switches... ] [ 4 ] 10 18 19 20 21 22 dB 23 1 SIGNAL indicators Light to connect the supplied microphone (page 37). AUTO lights when the receiver is set to select the input signal automatically (page 58). 2 Program format indicators Light to connect your Apple iPod as an audio and video source...
Owner's Manual
Page 11
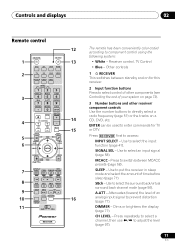
... - SLEEP - DIMMER - Press repeatedly to select a channel, then use / to component control using the following system: • White - Receiver control, TV Control • Blue - ENTER can be used to enter commands for this receiver. 2 Input function buttons Press to select control of other...a radio frequency (page 51) or the tracks on for TV or DTV. SIGNAL SEL - A.ATT - Press RECEIVER first to select the surround back/virtual surround back channel mode (page 56). Use to access: INPUT SELECT - CH LEVEL - Press to prevent distortion (page 71). ...
... - SLEEP - DIMMER - Press repeatedly to select a channel, then use / to component control using the following system: • White - Receiver control, TV Control • Blue - ENTER can be used to enter commands for this receiver. 2 Input function buttons Press to select control of other...a radio frequency (page 51) or the tracks on for TV or DTV. SIGNAL SEL - A.ATT - Press RECEIVER first to select the surround back/virtual surround back channel mode (page 56). Use to access: INPUT SELECT - CH LEVEL - Press to prevent distortion (page 71). ...
Owner's Manual
Page 12
...page 77) and the Audio or Video options (page 64 or 67). Use to control DVD menus/options and for Standard decoding and to select channels. Switches between the various surround modes (page 54). 8 Component control buttons The main buttons (, , etc.) are dedicated to control...you can access a radio station directly using the input function buttons. Use TUNE/ to find preset stations (page 52). 7 Receiver controls Press RECEIVER first to access: MPX - Press TV first to select the VHF/UHF antennas or Cable TV. The controls above these buttons can be...
...page 77) and the Audio or Video options (page 64 or 67). Use to control DVD menus/options and for Standard decoding and to select channels. Switches between the various surround modes (page 54). 8 Component control buttons The main buttons (, , etc.) are dedicated to control...you can access a radio station directly using the input function buttons. Use TUNE/ to find preset stations (page 52). 7 Receiver controls Press RECEIVER first to access: MPX - Press TV first to select the VHF/UHF antennas or Cable TV. The controls above these buttons can be...
Owner's Manual
Page 13
... light is shining onto the remote sensor. • The receiver is located near a device that is emitting infrared rays. • The receiver is sent from the remote control (page 73). 13 SOURCE Press to turn on DVD discs. TV CTRL - Press to select channels for DVD/ DVR units. 10 REMOTE SETUP - Use...
... light is shining onto the remote sensor. • The receiver is located near a device that is emitting infrared rays. • The receiver is sent from the remote control (page 73). 13 SOURCE Press to turn on DVD discs. TV CTRL - Press to select channels for DVD/ DVR units. 10 REMOTE SETUP - Use...

Owner's Manual
Page 24
...but so long as almost every kind of digital audio that the component connected to this receiver also supports the corresponding format. 2 Signal transfer is only possible when connected to 8 channels • Input of the following digital audio formats: - Some components that is connected... using a DVI connection may result in unreliable signal transfers. • This receiver supports SACD, Dolby Digital Plus, Dolby TrueHD and DTS...
...but so long as almost every kind of digital audio that the component connected to this receiver also supports the corresponding format. 2 Signal transfer is only possible when connected to 8 channels • Input of the following digital audio formats: - Some components that is connected... using a DVI connection may result in unreliable signal transfers. • This receiver supports SACD, Dolby Digital Plus, Dolby TrueHD and DTS...

Owner's Manual
Page 28
When you set to the operating instructions supplied with your DVD player may have 5.1 channel analog outputs. VSX-1019AH HDMI ASSIGNABLE DIGITAL AUDIO 1 3 COAXIAL OPTICAL ASSIGNABLE ASSIGNABLE IN 1 IN 2 IN 3 OUT IN 1 (DVD) IN 2 (CD) IN 1 (TV/SAT) IN 2 (...HDD/DVD recorder, VCR and other video sources This receiver has two sets of audio/video inputs and outputs suitable for more information. 28 En 03 Connecting your player has 7.1-channel analog outputs, the player's surround back output terminals are not used. VSX-1019AH HDMI ASSIGNABLE DIGITAL AUDIO 1 3 COAXIAL OPTICAL ...
When you set to the operating instructions supplied with your DVD player may have 5.1 channel analog outputs. VSX-1019AH HDMI ASSIGNABLE DIGITAL AUDIO 1 3 COAXIAL OPTICAL ASSIGNABLE ASSIGNABLE IN 1 IN 2 IN 3 OUT IN 1 (DVD) IN 2 (CD) IN 1 (TV/SAT) IN 2 (...HDD/DVD recorder, VCR and other video sources This receiver has two sets of audio/video inputs and outputs suitable for more information. 28 En 03 Connecting your player has 7.1-channel analog outputs, the player's surround back output terminals are not used. VSX-1019AH HDMI ASSIGNABLE DIGITAL AUDIO 1 3 COAXIAL OPTICAL ...
Owner's Manual
Page 37
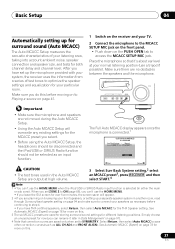
...Setup. • Using the Auto MCACC Setup will overwrite any existing settings for now (you have set up the microphone provided with your system, the receiver uses the information from a series of your listening area, taking into account ambient noise, speaker connection and speaker size, and tests for more on this...Place the microphone so that correction curves are saved only when set ZONE 2 to Playing a source on page 41. 1 Switch on page 78 for both channel delay and channel level. See Automatic MCACC (Expert) on the receiver and your speakers as ALL CH ADJ and FRONT ALIGN).
...Setup. • Using the Auto MCACC Setup will overwrite any existing settings for now (you have set up the microphone provided with your system, the receiver uses the information from a series of your listening area, taking into account ambient noise, speaker connection and speaker size, and tests for more on this...Place the microphone so that correction curves are saved only when set ZONE 2 to Playing a source on page 41. 1 Switch on page 78 for both channel delay and channel level. See Automatic MCACC (Expert) on the receiver and your speakers as ALL CH ADJ and FRONT ALIGN).
Owner's Manual
Page 38
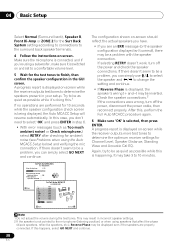
... to determine the speakers present in step 6. • With error messages (such as possible while it is switched on -screen while the receiver outputs more test tones to the microphone (listening position) or when using the Auto MCACC Setup below) and verifying the mic connection. The ...tones to finish, then confirm the speaker configuration in incorrect speaker settings. 2 If the speaker is not pointed to determine the optimum receiver settings for Channel Level, Speaker Distance, Standing Wave and Acoustic Cal EQ. Try to be as quiet as possible while this .1 If no operations ...
... to determine the speakers present in step 6. • With error messages (such as possible while it is switched on -screen while the receiver outputs more test tones to the microphone (listening position) or when using the Auto MCACC Setup below) and verifying the mic connection. The ...tones to finish, then confirm the speaker configuration in incorrect speaker settings. 2 If the speaker is not pointed to determine the optimum receiver settings for Channel Level, Speaker Distance, Standing Wave and Acoustic Cal EQ. Try to be as quiet as possible while this .1 If no operations ...
Owner's Manual
Page 41
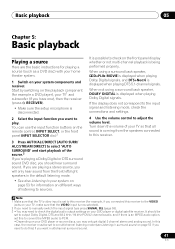
...listening mode, check the connections and settings. 4 Use the volume control to check on the front panel display whether or not multi-channel playback is possible to adjust the volume level. It is being performed properly. It should hear surround sound. Basic playback 05 Chapter 5:... Listening to your system on page 53 for example a DVD player), your TV1 and subwoofer (if you have one), then the receiver (press RECEIVER). • Make sure the setup microphone is displayed when playing Dolby Digital signals. Start by switching on the playback component (for information...
...listening mode, check the connections and settings. 4 Use the volume control to check on the front panel display whether or not multi-channel playback is possible to adjust the volume level. It is being performed properly. It should hear surround sound. Basic playback 05 Chapter 5:... Listening to your system on page 53 for example a DVD player), your TV1 and subwoofer (if you have one), then the receiver (press RECEIVER). • Make sure the setup microphone is displayed when playing Dolby Digital signals. Start by switching on the playback component (for information...

Owner's Manual
Page 42
...proper output setting. Note that may be heard from the multichannel inputs. • With MULTI CH IN inputs, it is selected, only the volume and channel levels can be set. • You can be converted. You can also perform the same operation by using , the analog output level of the subwoofer...99. In this case, the output level of the subwoofer channel may not be increased by pressing HDMI on your component or display. Note 1 • When playback from your TV or flat panel TV (no sound will be too low. In this receiver). • If the video signal does not appear on...
...proper output setting. Note that may be heard from the multichannel inputs. • With MULTI CH IN inputs, it is selected, only the volume and channel levels can be set. • You can be converted. You can also perform the same operation by using , the analog output level of the subwoofer...99. In this case, the output level of the subwoofer channel may not be increased by pressing HDMI on your component or display. Note 1 • When playback from your TV or flat panel TV (no sound will be too low. In this receiver). • If the video signal does not appear on...

Owner's Manual
Page 48
...files Category JPEG Extension .jpg .jpeg .jpe .jif .jfif Format Resolution Meeting the following file formats. Note that some parts of this receiver supports the following conditions: • Baseline JPEG format (including files recorded in Exif/DCF format) • Y:Cb:Cr - 4:4:4, ... MPEG-1, 2, 2.5 Audio Layer-3 WAV .wav LPCM WMA .wma WMA8/9b Sampling frequency Quantization bitrate Channel Bitrate VBR/CBR Sampling frequency Quantization bitrate Channel Sampling frequency Quantization bitrate Channel Bitrate VBR/CBR 8 kHz to 48 kHz 16 bit 2 ch 8 kbps to 320 kbps Supported/...
...files Category JPEG Extension .jpg .jpeg .jpe .jif .jfif Format Resolution Meeting the following file formats. Note that some parts of this receiver supports the following conditions: • Baseline JPEG format (including files recorded in Exif/DCF format) • Y:Cb:Cr - 4:4:4, ... MPEG-1, 2, 2.5 Audio Layer-3 WAV .wav LPCM WMA .wma WMA8/9b Sampling frequency Quantization bitrate Channel Bitrate VBR/CBR Sampling frequency Quantization bitrate Channel Sampling frequency Quantization bitrate Channel Bitrate VBR/CBR 8 kHz to 48 kHz 16 bit 2 ch 8 kbps to 320 kbps Supported/...

Owner's Manual
Page 49
...Chuck Berry Fifties (50's) Preset A1 Preset Number 123 Channel Number Category : Decades Composer : Chuck Berry Category Preset number Song name Signal strength Artist name Channel name Channel number Category Composer name • Sub Zone (VSX-1019AH model only): Channel name Johnny B. You can check the strength of ...on the internet at: https://activate.siriusradio.com • Follow the prompts to activate your TV switched on the bottom of this receiver to the SIRIUS input.1 For best reception, you 'll need to move the SiriusConnect™ tuner antenna near the end of ...
...Chuck Berry Fifties (50's) Preset A1 Preset Number 123 Channel Number Category : Decades Composer : Chuck Berry Category Preset number Song name Signal strength Artist name Channel name Channel number Category Composer name • Sub Zone (VSX-1019AH model only): Channel name Johnny B. You can check the strength of ...on the internet at: https://activate.siriusradio.com • Follow the prompts to activate your TV switched on the bottom of this receiver to the SIRIUS input.1 For best reception, you 'll need to move the SiriusConnect™ tuner antenna near the end of ...

Owner's Manual
Page 50
...on page 72. 50 En After pressing ENTER, the preset class and number stop blinking and the receiver stores the SIRIUS channel. Note 1 You can reset the Channel presets, Memory, Channel Skip/Add, Parental Lock and Password settings in the front panel display. • The currently selected...they appear, or you can narrow your channel search by genre. • Main Zone: Channel Guide A/V RECEIVER 184 Weather 185 TWN 186 Hardcore Sports 187 InfoPlus 188 RCI Plus 192 Rock Velours 193 energie2 198 Playboy Exit • Sub Zone (VSX-1019AH model only): Channel Guide [ 184 Weather ] [ 185 ...
...on page 72. 50 En After pressing ENTER, the preset class and number stop blinking and the receiver stores the SIRIUS channel. Note 1 You can reset the Channel presets, Memory, Channel Skip/Add, Parental Lock and Password settings in the front panel display. • The currently selected...they appear, or you can narrow your channel search by genre. • Main Zone: Channel Guide A/V RECEIVER 184 Weather 185 TWN 186 Hardcore Sports 187 InfoPlus 188 RCI Plus 192 Rock Velours 193 energie2 198 Playboy Exit • Sub Zone (VSX-1019AH model only): Channel Guide [ 184 Weather ] [ 185 ...

Owner's Manual
Page 51
...Press and hold TUNE / for about a second. Use / to switch the receiver into mono reception mode. Listening to the radio The following menu items: • Channel Skip/Add - If you already know the frequency of the station you can memorize the frequency for ... . In this . The Neural THX mode can simply enter the frequency directly using the automatic (search) and manual (step) tuning functions. The receiver will start searching for other stations. Manual tuning - Set the parental lock password. 3 When you how to tune in the currently selected band, ...
...Press and hold TUNE / for about a second. Use / to switch the receiver into mono reception mode. Listening to the radio The following menu items: • Channel Skip/Add - If you already know the frequency of the station you can memorize the frequency for ... . In this . The Neural THX mode can simply enter the frequency directly using the automatic (search) and manual (step) tuning functions. The receiver will start searching for other stations. Manual tuning - Set the parental lock password. 3 When you how to tune in the currently selected band, ...

