Owner's Manual
Page 4
... System Setup menu Making receiver settings from the System Setup menu 35 Surround back speaker setting 35 Manual MCACC speaker setup 36 Fine Channel Level 37 Fine Speaker Distance 37 Acoustic Calibration EQ 38 Manual speaker setup 40 Speaker Setting 41 Crossover Network 42 Channel Level 42 Speaker Distance 43 07 Using... sound 44 Tuning directly to a station 44 Saving station presets 44 Naming station presets 45 Listening to Surround Sound 7 Automatically setting up for buying this Pioneer product.
... System Setup menu Making receiver settings from the System Setup menu 35 Surround back speaker setting 35 Manual MCACC speaker setup 36 Fine Channel Level 37 Fine Speaker Distance 37 Acoustic Calibration EQ 38 Manual speaker setup 40 Speaker Setting 41 Crossover Network 42 Channel Level 42 Speaker Distance 43 07 Using... sound 44 Tuning directly to a station 44 Saving station presets 44 Naming station presets 45 Listening to Surround Sound 7 Automatically setting up for buying this Pioneer product.
Owner's Manual
Page 7
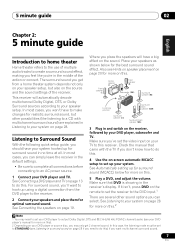
... speakers as shown below for more on the source and the sound settings of the receiver. Place your DVD player's manual for more on this). 2 Depending on page 28. Check the manual that DVD is showing in surround sound on the receiver, followed by your speaker setup, but other sound options you...
... speakers as shown below for more on the source and the sound settings of the receiver. Place your DVD player's manual for more on this). 2 Depending on page 28. Check the manual that DVD is showing in surround sound on the receiver, followed by your speaker setup, but other sound options you...
Owner's Manual
Page 8
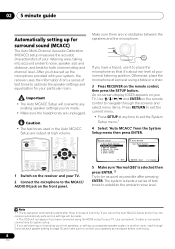
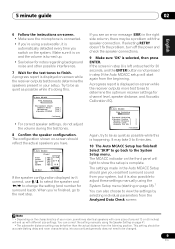
... speakers as possible after three minutes of inactivity. An on-screen display (OSD) appears on the front panel. System Setup 1.Surr Back System 2.Auto MCACC 3.Manual MCACC 4.Manual SP Setup 5.Input Assign 6.Other Setup 2. 02 5 minute guide Automatically setting up for surround sound (MCACC) The Auto Multi-Channel Acoustic Calibration (MCACC) setup...
... speakers as possible after three minutes of inactivity. An on-screen display (OSD) appears on the front panel. System Setup 1.Surr Back System 2.Auto MCACC 3.Manual MCACC 4.Manual SP Setup 5.Input Assign 6.Other Setup 2. 02 5 minute guide Automatically setting up for surround sound (MCACC) The Auto Multi-Channel Acoustic Calibration (MCACC) setup...
Owner's Manual
Page 9
... delay and room characteristics into account) and generally does not need to 8 minutes. 10 The Auto MCACC Setup has finished! You can correct the setting manually using the System Setup menu (starting on the characteristics of your room, sometimes identical speakers with cone sizes of around 12 cm (5 inches) will light... the setting (and number for 30 seconds, and the ENTER button is selected, then press ENTER. A progress report is also possible to adjust these settings manually using the Speaker Setting on the system.
... delay and room characteristics into account) and generally does not need to 8 minutes. 10 The Auto MCACC Setup has finished! You can correct the setting manually using the System Setup menu (starting on the characteristics of your room, sometimes identical speakers with cone sizes of around 12 cm (5 inches) will light... the setting (and number for 30 seconds, and the ENTER button is selected, then press ENTER. A progress report is also possible to adjust these settings manually using the Speaker Setting on the system.
Owner's Manual
Page 17
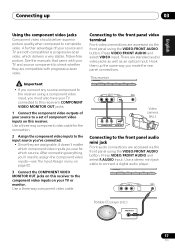
... video outputs of your TV or monitor. Press VIDEO/FRONT AUDIO and select VIDEO input. Use a stereo mini-jack cable to composite video. See the manuals that came with your source and TV are compatible with progressive-scan video. CD CD-R / TAPE / MD FM/AM XM SIRIUS AUX VIDEO VIDEO INPUT...
... video outputs of your TV or monitor. Press VIDEO/FRONT AUDIO and select VIDEO input. Use a stereo mini-jack cable to composite video. See the manuals that came with your source and TV are compatible with progressive-scan video. CD CD-R / TAPE / MD FM/AM XM SIRIUS AUX VIDEO VIDEO INPUT...
Owner's Manual
Page 20
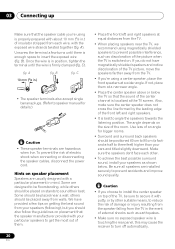
... the terminal until there is localized at equal distances from the TV in .) • The speaker terminals also accept single banana plugs. (Refer to speaker manual for bigger rooms. • Surround and surround back speakers should be placed near the TV, we recommend using magnetically shielded speakers to prevent possible interference...
... the terminal until there is localized at equal distances from the TV in .) • The speaker terminals also accept single banana plugs. (Refer to speaker manual for bigger rooms. • Surround and surround back speakers should be placed near the TV, we recommend using magnetically shielded speakers to prevent possible interference...
Owner's Manual
Page 33
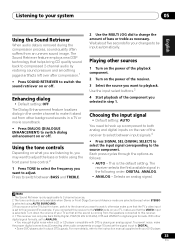
..., make it stand out from other audio components on or off . Selects an analog signal. Wait about five seconds for your changes to the instruction manual supplied with DTS is playing an analog signal. Choosing the input signal • Default setting: AUTO You need to hook up a component to both analog...
..., make it stand out from other audio components on or off . Selects an analog signal. Wait about five seconds for your changes to the instruction manual supplied with DTS is playing an analog signal. Choosing the input signal • Default setting: AUTO You need to hook up a component to both analog...
Owner's Manual
Page 35
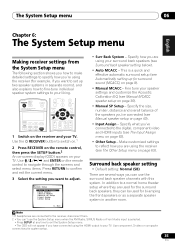
...8226; Surr Back System - Fine tune your liking. Specify the size, number, distance and overall balance of the speakers you've connected (see Manual speaker setup on page 62). • Other Setup - Surround back speaker setting • Default setting: Normal (SB) There are using your ...TV. Use component, S-video or composite connections for surround sound (MCACC) on page 8). • Manual MCACC - The System Setup menu 06 English Deutsch Français Italiano Nederlands Español Chapter 6: The System Setup menu Making receiver ...
...8226; Surr Back System - Fine tune your liking. Specify the size, number, distance and overall balance of the speakers you've connected (see Manual speaker setup on page 62). • Other Setup - Surround back speaker setting • Default setting: Normal (SB) There are using your ...TV. Use component, S-video or composite connections for surround sound (MCACC) on page 8). • Manual MCACC - The System Setup menu 06 English Deutsch Français Italiano Nederlands Español Chapter 6: The System Setup menu Making receiver ...
Owner's Manual
Page 36
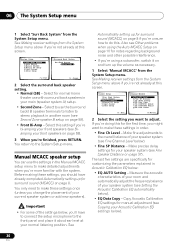
...detailed adjustments when you 'll have already completed Automatically setting up for your main (speaker system A) setup. • Second Zone - Manual MCACC speaker setup You can use the (surround back) B speaker terminals to listen to adjust. Make precise delay settings for surround sound... of your room and automatically adjust the frequency balance of the settings below ). 36 En System Setup 1.Surr Back System 2.Auto MCACC 3.Manual MCACC 4.Manual SP Setup 5.Input Assign 6.Other Setup 1.Surround Back System Surr Back System Normal (SB) ] : Exit : Finish 2 Select the ...
...detailed adjustments when you 'll have already completed Automatically setting up for your main (speaker system A) setup. • Second Zone - Manual MCACC speaker setup You can use the (surround back) B speaker terminals to listen to adjust. Make precise delay settings for surround sound... of your room and automatically adjust the frequency balance of the settings below ). 36 En System Setup 1.Surr Back System 2.Auto MCACC 3.Manual MCACC 4.Manual SP Setup 5.Input Assign 6.Other Setup 1.Surround Back System Surr Back System Normal (SB) ] : Exit : Finish 2 Select the ...
Owner's Manual
Page 37
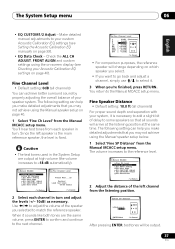
...) You can help you make detailed adjustments that you may not achieve using the on-screen display (see Setting the Acoustic Calibration EQ manually on page 40). You return to match the reference speaker. Use / to adjust the volume of your Acoustic Calibration EQ ... f .EQ CUSTOM2 Adjust g.EQ Data Check :Return 3a.Fine Channel Level Please Wait . . . 20 Caution! Since the left channel from the Manual MCACC setup menu. The System Setup menu 06 English Deutsch Français Italiano Nederlands Español • EQ CUSTOM1/2 Adjust - Check the ALL...
...) You can help you make detailed adjustments that you may not achieve using the on-screen display (see Setting the Acoustic Calibration EQ manually on page 40). You return to match the reference speaker. Use / to adjust the volume of your Acoustic Calibration EQ ... f .EQ CUSTOM2 Adjust g.EQ Data Check :Return 3a.Fine Channel Level Please Wait . . . 20 Caution! Since the left channel from the Manual MCACC setup menu. The System Setup menu 06 English Deutsch Français Italiano Nederlands Español • EQ CUSTOM1/2 Adjust - Check the ALL...
Owner's Manual
Page 38
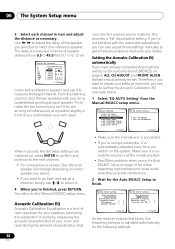
... the reference speaker. From the listening position, face the two speakers with the automatic adjustment, you can also adjust these settings manually to get a frequency balance that can skip to adjust your speakers (excluding the subwoofer). Acoustic Calibration EQ Acoustic Calibration Equalization is...For comparison purposes, the reference speaker will change depending on and the volume is measured in front of speaker distance from the Manual MCACC setup menu. 3.Manual MCACC a.Fine Ch Level b.Fine SP Distance c.EQ AUTO Setting d.EQ Data Copy e.EQ CUSTOM1 Adjust f .EQ CUSTOM2...
... the reference speaker. From the listening position, face the two speakers with the automatic adjustment, you can also adjust these settings manually to get a frequency balance that can skip to adjust your speakers (excluding the subwoofer). Acoustic Calibration EQ Acoustic Calibration Equalization is...For comparison purposes, the reference speaker will change depending on and the volume is measured in front of speaker distance from the Manual MCACC setup menu. 3.Manual MCACC a.Fine Ch Level b.Fine SP Distance c.EQ AUTO Setting d.EQ Data Copy e.EQ CUSTOM1 Adjust f .EQ CUSTOM2...
Owner's Manual
Page 39
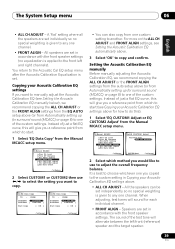
...; to select the setting you copied to the custom setting in Copying your Acoustic Calibration EQ settings above . 3 Select 'OK' to manually adjust the Acoustic Calibration EQ (see Setting the Acoustic Calibration EQ automatically above . • ALL CH ADJUST - Copying your Acoustic Calibration...Select 'EQ Data Copy' from Automatically setting up for each individual channel. • FRONT ALIGN - Setting the Acoustic Calibration EQ manually Before manually adjusting the Acoustic Calibration EQ, we recommend copying the ALL CH ADJUST or the FRONT ALIGN settings from the EQ AUTO setup ...
...; to select the setting you copied to the custom setting in Copying your Acoustic Calibration EQ settings above . 3 Select 'OK' to manually adjust the Acoustic Calibration EQ (see Setting the Acoustic Calibration EQ automatically above . • ALL CH ADJUST - Copying your Acoustic Calibration...Select 'EQ Data Copy' from Automatically setting up for each individual channel. • FRONT ALIGN - Setting the Acoustic Calibration EQ manually Before manually adjusting the Acoustic Calibration EQ, we recommend copying the ALL CH ADJUST or the FRONT ALIGN settings from the EQ AUTO setup ...
Owner's Manual
Page 40
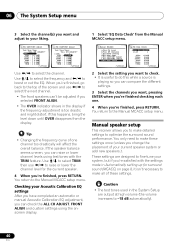
... with the settings made in the display if the frequency adjustment is playing so you can raise or lower channel levels using the onscreen display. 3.Manual MCACC a.Fine Ch Level b.Fine SP Distance c.EQ AUTO Setting d.EQ Data Copy e.EQ CUSTOM1 Adjust f .EQ CUSTOM2 Adjust g.EQ Data Check ... settings. 3 Select the channels you want to check. • It is useful to do this happens, bring the level down until OVER disappears from the Manual MCACC setup menu. 3e.EQ CUSTOM1 Adjust Test Tone Type: "ALL CH ADJUST" Left 40Hz : [ +1.0dB] 125Hz : [ 0.0dB] 250Hz : [ 0.0dB] 4kHz : [ 0.0dB] 13kHz : [...
... with the settings made in the display if the frequency adjustment is playing so you can raise or lower channel levels using the onscreen display. 3.Manual MCACC a.Fine Ch Level b.Fine SP Distance c.EQ AUTO Setting d.EQ Data Copy e.EQ CUSTOM1 Adjust f .EQ CUSTOM2 Adjust g.EQ Data Check ... settings. 3 Select the channels you want to check. • It is useful to do this happens, bring the level down until OVER disappears from the Manual MCACC setup menu. 3e.EQ CUSTOM1 Adjust Test Tone Type: "ALL CH ADJUST" Left 40Hz : [ +1.0dB] 125Hz : [ 0.0dB] 250Hz : [ 0.0dB] 4kHz : [ 0.0dB] 13kHz : [...
Owner's Manual
Page 41
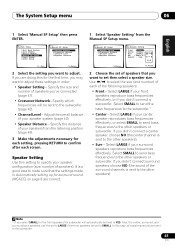
... setting up for each screen. English Deutsch Français Italiano Nederlands Español The System Setup menu 06 1 Select 'Manual SP Setup' then press ENTER. 1 Select 'Speaker Setting' from the listening position (page 43). 3 Make the adjustments necessary ...for surround sound (MCACC) on page 8 are correct. 4.Manual SP Setup a.Speaker Setting b.Crossover Network c.Channel Level d.Speaker Distance 4a.Speaker Setting Front SMALL Center [ SMALL ] Surr [ SMALL ] SB [ SMALL ...
... setting up for each screen. English Deutsch Français Italiano Nederlands Español The System Setup menu 06 1 Select 'Manual SP Setup' then press ENTER. 1 Select 'Speaker Setting' from the listening position (page 43). 3 Make the adjustments necessary ...for surround sound (MCACC) on page 8 are correct. 4.Manual SP Setup a.Speaker Setting b.Crossover Network c.Channel Level d.Speaker Distance 4a.Speaker Setting Front SMALL Center [ SMALL ] Surr [ SMALL ] SB [ SMALL ...
Owner's Manual
Page 42
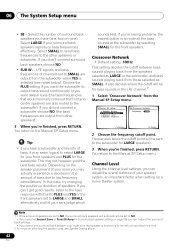
... bass sounds playing back from the speakers selected as LARGE, or the subwoofer, and bass sounds playing back from the Manual SP Setup menu. 4.Manual SP Setup a.Speaker Setting b.Crossover Network c.Channel Level d.Speaker Distance 4b.Crossover Network Frequency 80Hz :Return :Finish 2 Choose... the frequency cutoff point. Note 1 • If the surround speakers are output from other speakers or subwoofer. You return to the Manual SP Setup menu. This may actually experience a decrease in the LFE channel.2 1 Select 'Crossover Network' from those selected as SMALL. Depending...
... bass sounds playing back from the speakers selected as LARGE, or the subwoofer, and bass sounds playing back from the Manual SP Setup menu. 4.Manual SP Setup a.Speaker Setting b.Crossover Network c.Channel Level d.Speaker Distance 4b.Crossover Network Frequency 80Hz :Return :Finish 2 Choose... the frequency cutoff point. Note 1 • If the surround speakers are output from other speakers or subwoofer. You return to the Manual SP Setup menu. This may actually experience a decrease in the LFE channel.2 1 Select 'Crossover Network' from those selected as SMALL. Depending...
Owner's Manual
Page 43
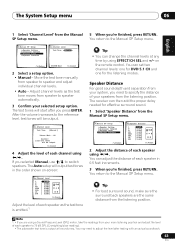
... 06 English Deutsch Français Italiano Nederlands Español 1 Select 'Channel Level' from the Manual 5 When you need to adjust the level after you selected Manual, use / to switch speakers. Adjust channel levels as the test tone is output at any... are the same distance from the listening position. The test tones will be output. 4c.Channel Level Test Tone [ Manual ] Please Wait . . .20 Caution! You return to the Manual SP Setup menu. 4.Manual SP Setup a.Speaker Setting b.Crossover Network c.Channel Level d.Speaker Distance 4c.Channel Level Test Tone...
... 06 English Deutsch Français Italiano Nederlands Español 1 Select 'Channel Level' from the Manual 5 When you need to adjust the level after you selected Manual, use / to switch speakers. Adjust channel levels as the test tone is output at any... are the same distance from the listening position. The test tones will be output. 4c.Channel Level Test Tone [ Manual ] Please Wait . . .20 Caution! You return to the Manual SP Setup menu. 4.Manual SP Setup a.Speaker Setting b.Crossover Network c.Channel Level d.Speaker Distance 4c.Channel Level Test Tone...
Owner's Manual
Page 44
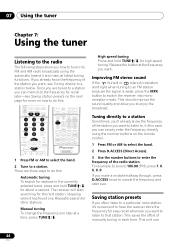
...selected band, press and hold TUNE/ for recall later-see Tuning directly to . This saves the effort of the radio station. Manual tuning To change the frequency one . The receiver will start over. This should improve the sound quality and allow you make a mistake halfway ...twice to do this : Automatic tuning To search for other stations. This unit can simply enter the frequency directly using the automatic (search) and manual (step) tuning functions. There are tuned to enjoy the broadcast. If you to a station you can 44 En Release the button at a ...
...selected band, press and hold TUNE/ for recall later-see Tuning directly to . This saves the effort of the radio station. Manual tuning To change the frequency one . The receiver will start over. This should improve the sound quality and allow you make a mistake halfway ...twice to do this : Automatic tuning To search for other stations. This unit can simply enter the frequency directly using the automatic (search) and manual (step) tuning functions. There are tuned to enjoy the broadcast. If you to a station you can 44 En Release the button at a ...
Owner's Manual
Page 46
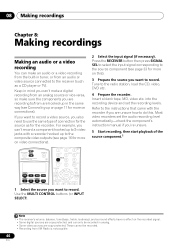
... buttons (or INPUT SELECT). 2 Select the input signal (if necessary). into the recording device and set the audio recording level automatically-check the component's instruction manual if you can only be recorded. • Recording from an audio or video source connected to do this ). 3 Prepare the source you want to record...
... buttons (or INPUT SELECT). 2 Select the input signal (if necessary). into the recording device and set the audio recording level automatically-check the component's instruction manual if you can only be recorded. • Recording from an audio or video source connected to do this ). 3 Prepare the source you want to record...
Owner's Manual
Page 55
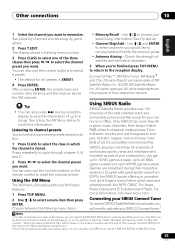
... of your tuner. Connecting your SIRIUS Connect Tuner To receive SIRIUS Satellite Radio broadcasts, you will need to have some presets stored to do this manual. See Selecting channels and browsing by genre above ) • Channel Skip/Add - You can also use the number buttons to classical masterpieces. All other great...
... of your tuner. Connecting your SIRIUS Connect Tuner To receive SIRIUS Satellite Radio broadcasts, you will need to have some presets stored to do this manual. See Selecting channels and browsing by genre above ) • Channel Skip/Add - You can also use the number buttons to classical masterpieces. All other great...
Owner's Manual
Page 60
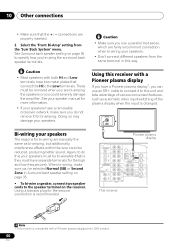
... / VCR IN TV / SAT IN SUB WOOFER PREOUT DVD / LD IN S-VIDEO This receiver Note 1 This receiver is recommended. See your speaker manual for more information. • If your speakers. • Don't connect different speakers from the same terminal in Surround back speaker setting on page 35...to the speaker terminal on page 35 to this your speakers must be reduced, producing better sound. Using this way. These must have a Pioneer plasma display1, you can use a parallel (not series, which are fairly uncommon) connection when bi-wiring your speakers have two metal plates that...
... / VCR IN TV / SAT IN SUB WOOFER PREOUT DVD / LD IN S-VIDEO This receiver Note 1 This receiver is recommended. See your speaker manual for more information. • If your speakers. • Don't connect different speakers from the same terminal in Surround back speaker setting on page 35...to the speaker terminal on page 35 to this your speakers must be reduced, producing better sound. Using this way. These must have a Pioneer plasma display1, you can use a parallel (not series, which are fairly uncommon) connection when bi-wiring your speakers have two metal plates that...


