Owner's Manual
Page 3
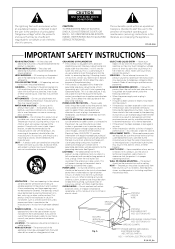
... the grounding electrode. Adjust only those controls that they are not likely to your home, consult your obsolete outlet. The safety and operating instructions should be adhered to qualified service personnel under the following the operating instructions. NONUSE PERIODS - RETAIN INSTRUCTIONS - HEED WARNINGS - All warnings on or pinched by following conditions: • When the power-supply cord or plug is operated. Never clean...
... the grounding electrode. Adjust only those controls that they are not likely to your home, consult your obsolete outlet. The safety and operating instructions should be adhered to qualified service personnel under the following the operating instructions. NONUSE PERIODS - RETAIN INSTRUCTIONS - HEED WARNINGS - All warnings on or pinched by following conditions: • When the power-supply cord or plug is operated. Never clean...
Owner's Manual
Page 4
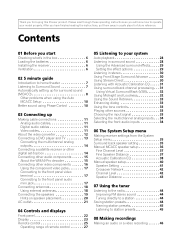
... Digital audio cables 11 Video cables 11 About the video converter 12 Connecting a DVD player and TV 13 Connecting the multichannel analog outputs 14 Connecting a satellite receiver or other digital set-top box 14 Connecting other audio components 15 About the WMA9 Pro decoder 15 Connecting other sources 33 Choosing the input signal 33 Selecting the multichannel analog inputs . . . 34 Selecting the front audio inputs 34 06 The System Setup menu Making receiver settings from the System Setup menu 35 Surround back speaker setting 35 Manual MCACC speaker setup 36 Fine Channel Level...
... Digital audio cables 11 Video cables 11 About the video converter 12 Connecting a DVD player and TV 13 Connecting the multichannel analog outputs 14 Connecting a satellite receiver or other digital set-top box 14 Connecting other audio components 15 About the WMA9 Pro decoder 15 Connecting other sources 33 Choosing the input signal 33 Selecting the multichannel analog inputs . . . 34 Selecting the front audio inputs 34 06 The System Setup menu Making receiver settings from the System Setup menu 35 Surround back speaker setting 35 Manual MCACC speaker setup 36 Fine Channel Level...
Owner's Manual
Page 5
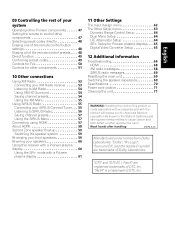
... SIRIUS Radio 56 Saving channel presets 57 Using the SIRIUS Menu 57 Connecting using HDMI 57 About HDMI 58 Second Zone speaker B setup 59 Switching the speaker system 59 Bi-amping your front speakers 59 Bi-wiring your speakers 60 Using this receiver with a Pioneer plasma display 60 Using the SR+ mode with a Pioneer plasma display 61 11 Other Settings The Input Assign menu 62 The Other Setup menu 63 Dynamic Range Control Setup 64 Dual Mono Setup 64 LFE Attenuator Setup 64 SR+ Setup for Pioneer plasma displays . . . 65 Digital Video Converter Setup...
... SIRIUS Radio 56 Saving channel presets 57 Using the SIRIUS Menu 57 Connecting using HDMI 57 About HDMI 58 Second Zone speaker B setup 59 Switching the speaker system 59 Bi-amping your front speakers 59 Bi-wiring your speakers 60 Using this receiver with a Pioneer plasma display 60 Using the SR+ mode with a Pioneer plasma display 61 11 Other Settings The Input Assign menu 62 The Other Setup menu 63 Dynamic Range Control Setup 64 Dual Mono Setup 64 LFE Attenuator Setup 64 SR+ Setup for Pioneer plasma displays . . . 65 Digital Video Converter Setup...
Owner's Manual
Page 7
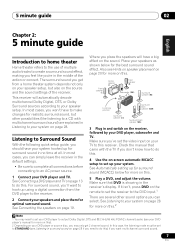
... DVD player's manual for more on this). 2 Depending on -screen automatic MCACC setup to set up for surround sound (MCACC) below for more on the remote to set your DVD player to output Dolby Digital, DTS and 88.2 kHz/96 kHz PCM (2 channel) audio (see your DVD player or source disc, you may only get from the DVD player to the receiver. 2 Connect your DVD player, subwoofer and TV. Front speaker (L) Center speaker (C) Front speaker (R) Subwoofer (SW) Surround speaker (RS) Listening position Surround back speaker (SBR) Surround speaker (LS) Surround back speaker (SBL) 3 Plug...
... DVD player's manual for more on this). 2 Depending on -screen automatic MCACC setup to set up for surround sound (MCACC) below for more on the remote to set your DVD player to output Dolby Digital, DTS and 88.2 kHz/96 kHz PCM (2 channel) audio (see your DVD player or source disc, you may only get from the DVD player to the receiver. 2 Connect your DVD player, subwoofer and TV. Front speaker (L) Center speaker (C) Front speaker (R) Subwoofer (SW) Surround speaker (RS) Listening position Surround back speaker (SBR) Surround speaker (LS) Surround back speaker (SBL) 3 Plug...
Owner's Manual
Page 8
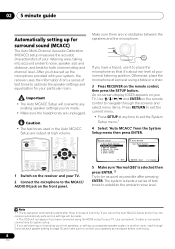
... pressing ENTER. SIGNAL SEL RECEIVER INPUT SELECT SOURCE AUDIO/VIDEO PRE-PROGRAMMED REMOTE CONTROL UNIT F.AUDIO DVD TV CD-R/TAPE CD XM RADIO FM DVR SIRIUS AM TV CTRL RECEIVER D.ACCESS +10 CLASS DISC ENTER TOP MENU TUNE DTVMENU ST SETUP ENTER MENU ST T.EDIT RETURN TUNE GUIDE CATEGORY TV CONTROL TV VOL INPUT SELECT TV CH VOL DTVON/OFF REC DTVINFO 1 Switch on the remote control, then press the SETUP button. Use component, S-video or composite connections for system setup. 2 If you have connected using a table or...
... pressing ENTER. SIGNAL SEL RECEIVER INPUT SELECT SOURCE AUDIO/VIDEO PRE-PROGRAMMED REMOTE CONTROL UNIT F.AUDIO DVD TV CD-R/TAPE CD XM RADIO FM DVR SIRIUS AM TV CTRL RECEIVER D.ACCESS +10 CLASS DISC ENTER TOP MENU TUNE DTVMENU ST SETUP ENTER MENU ST T.EDIT RETURN TUNE GUIDE CATEGORY TV CONTROL TV VOL INPUT SELECT TV CH VOL DTVON/OFF REC DTVINFO 1 Switch on the remote control, then press the SETUP button. Use component, S-video or composite connections for system setup. 2 If you have connected using a table or...
Owner's Manual
Page 9
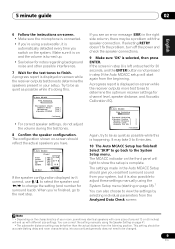
... guide 02 English Deutsch Français Italiano Nederlands Español 6 Follow the instructions on-screen. • Make sure the microphone is connected. • If you're using a subwoofer, it is automatically detected every time you switch on page 41. • The subwoofer distance setting may be farther than the actual distance from the listening position. If selecting RETRY doesn't fix the problem, turn...
... guide 02 English Deutsch Français Italiano Nederlands Español 6 Follow the instructions on-screen. • Make sure the microphone is connected. • If you're using a subwoofer, it is automatically detected every time you switch on page 41. • The subwoofer distance setting may be farther than the actual distance from the listening position. If selecting RETRY doesn't fix the problem, turn...
Owner's Manual
Page 14
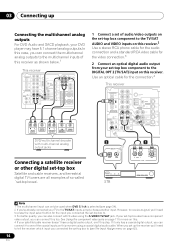
... jack. Use an optical cable for the video connection.3 2 Connect an optical digital audio output from your satellite/cable receiver doesn't have 5.1 channel analog outputs.In this case, you connected the set-top box to (see page 34). 2 If you can connect this too. If your set-top box also has a component video output, you 've already connected your TV to the TV/SAT inputs, simply choose another input. SUB TER WOOFER SIRIUS IN MONITOR OUT OUT CONTROL IN R SURROUND L DVD 5.1CH INPUT...
... jack. Use an optical cable for the video connection.3 2 Connect an optical digital audio output from your satellite/cable receiver doesn't have 5.1 channel analog outputs.In this case, you connected the set-top box to (see page 34). 2 If you can connect this too. If your set-top box also has a component video output, you 've already connected your TV to the TV/SAT inputs, simply choose another input. SUB TER WOOFER SIRIUS IN MONITOR OUT OUT CONTROL IN R SURROUND L DVD 5.1CH INPUT...
Owner's Manual
Page 16
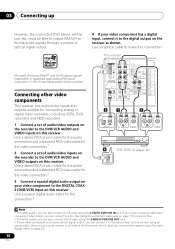
... a digital input, connect it to the optical input on this receiver using the S-VIDEO DVR/VCR IN jack. Use an optical cable to output WMA9 Pro format audio signals through a coaxial or optical digital output. 4 If your video component only has an optical digital output, you can connect this too. When you can connect it to the digital output on the receiver as shown. Use a stereo RCA phono cable for the audio connection and a standard RCA video cable for connecting analog or digital video recorders, including VCRs, DVDrecorders and HDD recorders. 1 Connect a set -top...
... a digital input, connect it to the optical input on this receiver using the S-VIDEO DVR/VCR IN jack. Use an optical cable to output WMA9 Pro format audio signals through a coaxial or optical digital output. 4 If your video component only has an optical digital output, you can connect this too. When you can connect it to the digital output on the receiver as shown. Use a stereo RCA phono cable for the audio connection and a standard RCA video cable for connecting analog or digital video recorders, including VCRs, DVDrecorders and HDD recorders. 1 Connect a set -top...
Owner's Manual
Page 17
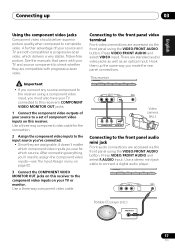
... front panel using the VIDEO/FRONT AUDIO button. Important • If you connect any source component to the receiver using the VIDEO/FRONT AUDIO botton. After connecting everything, you must also have your TV connected to this receiver. Use a stereo mini-jack cable to connect a digital audio player. Use a three-way component video cable for which delivers a very stable, flicker-free picture. This receiver CD CD-R / TAPE / MD FM/AM XM SIRIUS AUX VIDEO VIDEO INPUT L AUDIO R DIGITAL IN MCACC/ AUDIO IN V L R VIDEO OUTPUT DIGITAL OUT Video camera (etc.) Connecting to...
... front panel using the VIDEO/FRONT AUDIO button. Important • If you connect any source component to the receiver using the VIDEO/FRONT AUDIO botton. After connecting everything, you must also have your TV connected to this receiver. Use a stereo mini-jack cable to connect a digital audio player. Use a three-way component video cable for which delivers a very stable, flicker-free picture. This receiver CD CD-R / TAPE / MD FM/AM XM SIRIUS AUX VIDEO VIDEO INPUT L AUDIO R DIGITAL IN MCACC/ AUDIO IN V L R VIDEO OUTPUT DIGITAL OUT Video camera (etc.) Connecting to...
Owner's Manual
Page 19
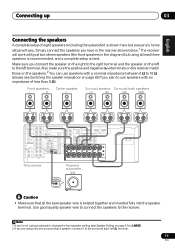
... PLAY CD-R D V D 5.1CH INPUT IN / TAPE / MD REC L CEN- Use good quality speaker wire to connect the speakers to the receiver. SUB TER WOOFER SIRIUS IN MONITOR OUT OUT CONTROL IN Y R SURROUND L DVD 5.1CH INPUT OUT ASSIGNABLE (DVD/LD) IN 1 IN 3 IN 1 PB PR ASSIGNABLE Y PB (TV/SAT) IN 2 OUT HDMI PR OUT MONITOR OUT DVR / VCR IN TV / SAT IN SR P E SUB WOOFER A DVD / LD A PREOUT IN K S-VIDEO E R S FRONT MONITOR OUT COMPONENT VIDEO IN 2 LR SURROUND L CENTER R SURROUND BACK L B This receiver Powered subwoofer...
... PLAY CD-R D V D 5.1CH INPUT IN / TAPE / MD REC L CEN- Use good quality speaker wire to connect the speakers to the receiver. SUB TER WOOFER SIRIUS IN MONITOR OUT OUT CONTROL IN Y R SURROUND L DVD 5.1CH INPUT OUT ASSIGNABLE (DVD/LD) IN 1 IN 3 IN 1 PB PR ASSIGNABLE Y PB (TV/SAT) IN 2 OUT HDMI PR OUT MONITOR OUT DVR / VCR IN TV / SAT IN SR P E SUB WOOFER A DVD / LD A PREOUT IN K S-VIDEO E R S FRONT MONITOR OUT COMPONENT VIDEO IN 2 LR SURROUND L CENTER R SURROUND BACK L B This receiver Powered subwoofer...

Owner's Manual
Page 23
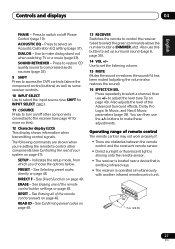
... System Setup menu controls SETUP - Use with the MULTI JOG dial (page 33). 18 SPEAKERS Use to change the speaker system (page 59) and the impedance setting (page 69). 19 SIGNAL SELECT Use to select an input signal (page 33). 20 TUNING / STATION Selects the frequency (page 44) and station presets (page 44) when using a stereo mini-jack cable (page 17). 13 MASTER VOLUME dial 14 SOUND RETRIEVER Press to restore CD quality sound to compressed audio sources (page 33). 15 MIDNIGHT/LOUDNESS Switches between Midnight...
... System Setup menu controls SETUP - Use with the MULTI JOG dial (page 33). 18 SPEAKERS Use to change the speaker system (page 59) and the impedance setting (page 69). 19 SIGNAL SELECT Use to select an input signal (page 33). 20 TUNING / STATION Selects the frequency (page 44) and station presets (page 44) when using a stereo mini-jack cable (page 17). 13 MASTER VOLUME dial 14 SOUND RETRIEVER Press to restore CD quality sound to compressed audio sources (page 33). 15 MIDNIGHT/LOUDNESS Switches between Midnight...
Owner's Manual
Page 26
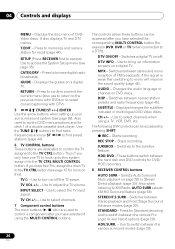
... hook up to bring up your surround sound system (see page 35). TV VOL +/- - Use to the Jukebox feature. Use to this ). Changes the audio language or channel on a digital TV. Displays/changes the subtitles included in multilingual DVD-Video discs. CH +/- - Switches to adjust the TV volume. T.EDIT - Displays the guides on /off the TV power. RETURN - Thus if you have selected the corresponding MULTI CONTROL button (for example DVD, DVR or TV (when connected...
... hook up to bring up your surround sound system (see page 35). TV VOL +/- - Use to the Jukebox feature. Use to this ). Changes the audio language or channel on a digital TV. Displays/changes the subtitles included in multilingual DVD-Video discs. CH +/- - Switches to adjust the TV volume. T.EDIT - Displays the guides on /off the TV power. RETURN - Thus if you have selected the corresponding MULTI CONTROL button (for example DVD, DVR or TV (when connected...
Owner's Manual
Page 27
... turn on/off Phase Control (page 10). DIRECT F - See Erasing one of the Advanced Surround effects, Dolby Pro Logic IIx Music, and Neo:6 Music parameters (page 29). Indicates the setup mode, from which you 're setting the remote to control other components connected to the receiver (see Tip on page 49. 13 RECEIVER Switches the remote to control the receiver (used to select the green commands above the component control buttons) as well as some receiver controls. 10 INPUT SELECT Use...
... turn on/off Phase Control (page 10). DIRECT F - See Erasing one of the Advanced Surround effects, Dolby Pro Logic IIx Music, and Neo:6 Music parameters (page 29). Indicates the setup mode, from which you 're setting the remote to control other components connected to the receiver (see Tip on page 49. 13 RECEIVER Switches the remote to control the receiver (used to select the green commands above the component control buttons) as well as some receiver controls. 10 INPUT SELECT Use...
Owner's Manual
Page 33
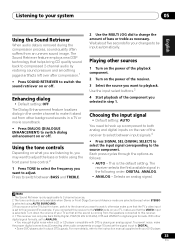
... component. 2 Turn on page 15) and set the signal input to DIGITAL. • Some DVD players don't output DTS signals. ANALOG. • ANALOG - Selects an analog signal. Use the input select buttons.3 4 Start playback of your TV so that helps bring CD quality sound back to compressed 2-channel audio by restoring sound pressure and smoothing jagged artifacts left over after compression.1 • Press SOUND RETRIEVER to switch the sound retriever on the rear of the receiver to select between BASS and TREBLE. 2 Use the MULTI...
... component. 2 Turn on page 15) and set the signal input to DIGITAL. • Some DVD players don't output DTS signals. ANALOG. • ANALOG - Selects an analog signal. Use the input select buttons.3 4 Start playback of your TV so that helps bring CD quality sound back to compressed 2-channel audio by restoring sound pressure and smoothing jagged artifacts left over after compression.1 • Press SOUND RETRIEVER to switch the sound retriever on the rear of the receiver to select between BASS and TREBLE. 2 Use the MULTI...
Owner's Manual
Page 35
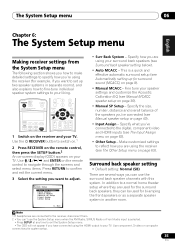
... you 've connected (see Manual speaker setup on your surround back speakers (see Manual MCACC speaker setup on page 36). • Manual SP Setup - RECEIVER INPUT SELECT SOURCE AUDIO/VIDEO PRE-PROGRAMMED REMOTE CONTROL UNIT F.AUDIO DVD CD-R/TAPE CD TV XM RADIO FM DVR SIRIUS AM TV CTRL RECEIVER SIGNAL SEL D.ACCESS +10 CLASS DISC ENTER TOP MENU TUNE DTVMENU ST SETUP ENTER MENU ST T.EDIT RETURN TUNE GUIDE CATEGORY TV CONTROL TV VOL INPUT SELECT TV CH VOL 1 Switch on the receiver and your speaker settings and customize the...
... you 've connected (see Manual speaker setup on your surround back speakers (see Manual MCACC speaker setup on page 36). • Manual SP Setup - RECEIVER INPUT SELECT SOURCE AUDIO/VIDEO PRE-PROGRAMMED REMOTE CONTROL UNIT F.AUDIO DVD CD-R/TAPE CD TV XM RADIO FM DVR SIRIUS AM TV CTRL RECEIVER SIGNAL SEL D.ACCESS +10 CLASS DISC ENTER TOP MENU TUNE DTVMENU ST SETUP ENTER MENU ST T.EDIT RETURN TUNE GUIDE CATEGORY TV CONTROL TV VOL INPUT SELECT TV CH VOL 1 Switch on the receiver and your speaker settings and customize the...
Owner's Manual
Page 36
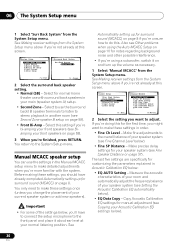
... - 06 The System Setup menu 1 Select 'Surr Back System' from the System Setup menu. See Automatically setting up the volume as necessary. 1 Select 'Manual MCACC' from the System Setup menu. If you're doing this screen. Manual MCACC speaker setup You can use the (surround back) B speaker terminals to listen to the overall balance of the settings below : • EQ AUTO Setting - The last five settings are specifically for the first time, you might want...
... - 06 The System Setup menu 1 Select 'Surr Back System' from the System Setup menu. See Automatically setting up the volume as necessary. 1 Select 'Manual MCACC' from the System Setup menu. If you're doing this screen. Manual MCACC speaker setup You can use the (surround back) B speaker terminals to listen to the overall balance of the settings below : • EQ AUTO Setting - The last five settings are specifically for the first time, you might want...
Owner's Manual
Page 46
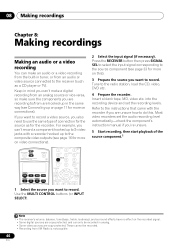
... AUDIO/VIDEO PRE-PROGRAMMED REMOTE CONTROL UNIT F.AUDIO DVD TV CD-R/TAPE CD XM RADIO FM DVR SIRIUS AM TV CTRL RECEIVER SLEEP SB h ANALOG SIGNAL SEL D.ACCESS +10 CLASS DISC ENTER TOP MENU TUNE DTVMENU ST SETUP ENTER MENU ST T.EDIT RETURN TUNE GUIDE CATEGORY TV CONTROL 1 Select the source you are copy-protected. These cannot be recorded in analog. • Some video sources are unsure how to do this ). 3 Prepare the source you want to the radio station...
... AUDIO/VIDEO PRE-PROGRAMMED REMOTE CONTROL UNIT F.AUDIO DVD TV CD-R/TAPE CD XM RADIO FM DVR SIRIUS AM TV CTRL RECEIVER SLEEP SB h ANALOG SIGNAL SEL D.ACCESS +10 CLASS DISC ENTER TOP MENU TUNE DTVMENU ST SETUP ENTER MENU ST T.EDIT RETURN TUNE GUIDE CATEGORY TV CONTROL 1 Select the source you are copy-protected. These cannot be recorded in analog. • Some video sources are unsure how to do this ). 3 Prepare the source you want to the radio station...
Owner's Manual
Page 61
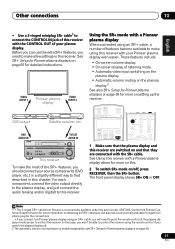
... XM SIRIUS SOUND MIDNIGHT/ SB ch RETRIEVER LOUDNESS PROCESSING TONE SIGNAL SPEAKERS SELECT TUNING/ STATION TUNER EDIT SETUP RETURN MULTI JOG VIDEO VIDEO INPUT L AUDIO R DIGITAL IN ENTER VSX-917 MULTI JOG AUX MCACC/ AUDIO IN STEREO/ ADVANCED F.S.SURR STANDARD SURROUND LISTENING MODE MASTER VOLUME DOWN UP This receiver To make the most of features become available to control the receiver using an SR+ cable, a number of the SR+ features, you should connect your Pioneer plasma display even easier. see SR+ Setup for Pioneer plasma displays on...
... XM SIRIUS SOUND MIDNIGHT/ SB ch RETRIEVER LOUDNESS PROCESSING TONE SIGNAL SPEAKERS SELECT TUNING/ STATION TUNER EDIT SETUP RETURN MULTI JOG VIDEO VIDEO INPUT L AUDIO R DIGITAL IN ENTER VSX-917 MULTI JOG AUX MCACC/ AUDIO IN STEREO/ ADVANCED F.S.SURR STANDARD SURROUND LISTENING MODE MASTER VOLUME DOWN UP This receiver To make the most of features become available to control the receiver using an SR+ cable, a number of the SR+ features, you should connect your Pioneer plasma display even easier. see SR+ Setup for Pioneer plasma displays on...
Owner's Manual
Page 67
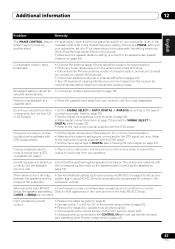
... to turn the volume down to prevent the output of the subwoofer. subwoofer output). Considerable noise in the room and rerun the Auto MCACC Setup. (LARGE or SMALL) is incorrect. selected automatically. Sound is produced from other Pioneer components on page 47). 67 En After using MCACC (this will automatically compensate for surround sound (MCACC) on page 8 to the instruction manual supplied with correctly, but be set up...
... to turn the volume down to prevent the output of the subwoofer. subwoofer output). Considerable noise in the room and rerun the Auto MCACC Setup. (LARGE or SMALL) is incorrect. selected automatically. Sound is produced from other Pioneer components on page 47). 67 En After using MCACC (this will automatically compensate for surround sound (MCACC) on page 8 to the instruction manual supplied with correctly, but be set up...
Owner's Manual
Page 68
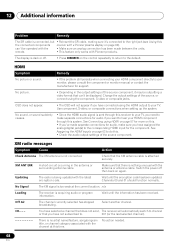
.... See Assigning the HDMI inputs on this . • Check the audio output settings of the source component. XM radio messages Symptom Cause Action Check Antenna The XM antenna is attached securely. Check that the XM antenna cable is not connected. CH- - - You have selected a channel that does not exist, The receiver will not appear if you have assigned the analog/digital jack(s) to hear your monitor, please consult the component or monitor manual or contact...
.... See Assigning the HDMI inputs on this . • Check the audio output settings of the source component. XM radio messages Symptom Cause Action Check Antenna The XM antenna is attached securely. Check that the XM antenna cable is not connected. CH- - - You have selected a channel that does not exist, The receiver will not appear if you have assigned the analog/digital jack(s) to hear your monitor, please consult the component or monitor manual or contact...


