
Operating Instructions
Page 5
After you have finished reading the instructions, put them away in the receiver 24 04 Controls and displays Front panel 25 Operating range of remote control unit 26 Display 27 Remote control 28 06 Using the tuner Listening to the radio 36 Improving FM stereo sound 36 ... Before you start Features 7 Checking what's in the box 8 Installing the receiver 8 Loading the batteries 8 02 5 minute guide Introduction to home theater 9 Listening to Surround Sound 9 Automatically setting up for buying this Pioneer product. Thank you for surround sound (Auto MCACC 10 Problems when using the...
After you have finished reading the instructions, put them away in the receiver 24 04 Controls and displays Front panel 25 Operating range of remote control unit 26 Display 27 Remote control 28 06 Using the tuner Listening to the radio 36 Improving FM stereo sound 36 ... Before you start Features 7 Checking what's in the box 8 Installing the receiver 8 Loading the batteries 8 02 5 minute guide Introduction to home theater 9 Listening to Surround Sound 9 Automatically setting up for buying this Pioneer product. Thank you for surround sound (Auto MCACC 10 Problems when using the...

Operating Instructions
Page 6
... MULTI-ZONE connections 61 Using the MULTI-ZONE controls 62 Connecting an IR receiver 63 Switching components on and off using the 12 volt trigger 64 Using this receiver with a Pioneer flat panel TV 64 Using the SR+ mode with a Pioneer flat panel TV . . . . 65 Connecting a PC for Advanced MCACC... speaker impedance 76 Checking your system settings 76 Resetting the system 77 Default system settings 77 12 Controlling the rest of your system Setting the remote to control other components . . . . . 78 Selecting preset codes directly 78 Preset code list 78 Controls for TVs 79 Controls for ...
... MULTI-ZONE connections 61 Using the MULTI-ZONE controls 62 Connecting an IR receiver 63 Switching components on and off using the 12 volt trigger 64 Using this receiver with a Pioneer flat panel TV 64 Using the SR+ mode with a Pioneer flat panel TV . . . . 65 Connecting a PC for Advanced MCACC... speaker impedance 76 Checking your system settings 76 Resetting the system 77 Default system settings 77 12 Controlling the rest of your system Setting the remote to control other components . . . . . 78 Selecting preset codes directly 78 Preset code list 78 Controls for TVs 79 Controls for ...

Operating Instructions
Page 8
...connected to a device that have different voltages. Observe the following supplied accessories: • Setup microphone (cable: 5 m (16.4 ft.)) • Remote control unit • AA/IEC R6P dry cell batteries x2 • AM loop antenna • FM wire antenna • Warranty card • These... plus and minus sides of used batteries, please comply with the sound. - Installing the receiver • When installing this receiver, make sure to leak, overheat, explode or catch fire. This receiver's enhanced compatibility makes XM HD Surround playback as well as a kitchen) 8 En This ...
...connected to a device that have different voltages. Observe the following supplied accessories: • Setup microphone (cable: 5 m (16.4 ft.)) • Remote control unit • AA/IEC R6P dry cell batteries x2 • AM loop antenna • FM wire antenna • Warranty card • These... plus and minus sides of used batteries, please comply with the sound. - Installing the receiver • When installing this receiver, make sure to leak, overheat, explode or catch fire. This receiver's enhanced compatibility makes XM HD Surround playback as well as a kitchen) 8 En This ...

Operating Instructions
Page 9
... hooked up your speakers as shown below for optimal surround sound. If it isn't, press DVD on the remote control to set up for more on the source and the sound settings of the receiver. See Listening to do this. • Set the subwoofer volume to a comfortable level. 4 Use the on your... and DVD player on page 17 to your speaker system on page 22 for surround sound in no time at all connections before connecting this receiver to your liking. Place your speakers as shown in Installing your system on page 30 for realistic surround sound, but also on this. 5 Play a DVD...
... hooked up your speakers as shown below for optimal surround sound. If it isn't, press DVD on the remote control to set up for more on the source and the sound settings of the receiver. See Listening to do this. • Set the subwoofer volume to a comfortable level. 4 Use the on your... and DVD player on page 17 to your speaker system on page 22 for surround sound in no time at all connections before connecting this receiver to your liking. Place your speakers as shown in Installing your system on page 30 for realistic surround sound, but also on this. 5 Play a DVD...

Operating Instructions
Page 11
... (such as a DVD disc) with the speaker connection. If you are any instructions showing in surround sound on your home theater system. 4 5 6 RECEIVER SOURCE SR+ SBch A.ATT 7 8 9 CATEGORY RETURN DVD BD TV HDMI DVR 1 DVR 2 CD CD-R FM/AM XM SIRIUS iPod USB D.ACCESS ... 2 ] SW [ YES ] OK 10 :Cancel The configuration shown on the remote control, INPUT SELECT, or the front panel controls.5 3 Press AUTO/DIRECT (AUTO SURR/STREAM DIRECT) to the interaction of the microphone. If this receiver upon completion of the source.6 If you're playing a Dolby Digital or DTS...
... (such as a DVD disc) with the speaker connection. If you are any instructions showing in surround sound on your home theater system. 4 5 6 RECEIVER SOURCE SR+ SBch A.ATT 7 8 9 CATEGORY RETURN DVD BD TV HDMI DVR 1 DVR 2 CD CD-R FM/AM XM SIRIUS iPod USB D.ACCESS ... 2 ] SW [ YES ] OK 10 :Cancel The configuration shown on the remote control, INPUT SELECT, or the front panel controls.5 3 Press AUTO/DIRECT (AUTO SURR/STREAM DIRECT) to the interaction of the microphone. If this receiver upon completion of the source.6 If you're playing a Dolby Digital or DTS...

Operating Instructions
Page 13
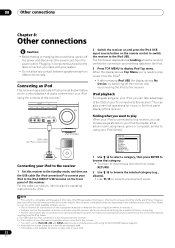
... (TV SAT) RS-232C 6CON- Connecting your equipment 03 Chapter 3: Connecting your equipment This receiver provides you with this receiver's sensor on page 81. 7 Remote input/output (MULTI-ZONE) Use for connection to an external remote control sensor for use in a MULTI-ZONE setup, for example. See Connecting an ...81 12 V TRIGGER 2 (OUTPUT 12 V TOTAL 50 mA MAX) 9S- Plugging in your system on and off according to connect other Pioneer components so that you can control all your home theater system. Use the IN jacks for digital audio sources, including DVD players/recorders, ...
... (TV SAT) RS-232C 6CON- Connecting your equipment 03 Chapter 3: Connecting your equipment This receiver provides you with this receiver's sensor on page 81. 7 Remote input/output (MULTI-ZONE) Use for connection to an external remote control sensor for use in a MULTI-ZONE setup, for example. See Connecting an ...81 12 V TRIGGER 2 (OUTPUT 12 V TOTAL 50 mA MAX) 9S- Plugging in your system on and off according to connect other Pioneer components so that you can control all your home theater system. Use the IN jacks for digital audio sources, including DVD players/recorders, ...

Operating Instructions
Page 16
... with displaying video this is used to protect digital content transmitted and received by pressing HDMI on the remote control repeatedly. • Set the HDMI parameter in unreliable signal transfers. • This receiver supports SACD, Dolby Digital Plus, Dolby TrueHD and DTS-HD Master ... IN L DVR OUT R MULTI CH IN SPEA A FRONT CENTER SURROUND SURROUND BACK L R SUBWOOFER VSX-9130TXH HDMI/DVI-equipped component HDMI OUT 1 Use an HDMI cable to this receiver's digital out jacks. HDMI features include uncompressed digital video, one of these formats, however, make sure...
... with displaying video this is used to protect digital content transmitted and received by pressing HDMI on the remote control repeatedly. • Set the HDMI parameter in unreliable signal transfers. • This receiver supports SACD, Dolby Digital Plus, Dolby TrueHD and DTS-HD Master ... IN L DVR OUT R MULTI CH IN SPEA A FRONT CENTER SURROUND SURROUND BACK L R SUBWOOFER VSX-9130TXH HDMI/DVI-equipped component HDMI OUT 1 Use an HDMI cable to this receiver's digital out jacks. HDMI features include uncompressed digital video, one of these formats, however, make sure...

Operating Instructions
Page 20
... is possible to select VIDEO. Use an optical cable to connect to the OPTICAL OUT.2 About the WMA9 Pro decoder This receiver has an on this receiver using INPUT SELECT (remote) to playback WMA9 Pro-encoded audio using a stereo RCA/phono jack audio cable. • If you set -top box... an optical digital output, you must be downsampled to the analog audio inputs on the recorder. SELECTABLE SEE INSTRUCTION MANUAL SELECTABLE VOIR LE MODE D'EMPLOI VSX-9130TXH OUT PLAY IN REC R L AUDIO IN/OUT Tape deck, etc. When you 're connecting a tape deck, MD recorder, etc., connect the ...
... is possible to select VIDEO. Use an optical cable to connect to the OPTICAL OUT.2 About the WMA9 Pro decoder This receiver has an on this receiver using INPUT SELECT (remote) to playback WMA9 Pro-encoded audio using a stereo RCA/phono jack audio cable. • If you set -top box... an optical digital output, you must be downsampled to the analog audio inputs on the recorder. SELECTABLE SEE INSTRUCTION MANUAL SELECTABLE VOIR LE MODE D'EMPLOI VSX-9130TXH OUT PLAY IN REC R L AUDIO IN/OUT Tape deck, etc. When you 're connecting a tape deck, MD recorder, etc., connect the ...

Operating Instructions
Page 25
...select an input source. 8 VIDEO INPUT See Connecting a component to select an input source. 2 STANDBY/ON Switches the receiver between on (page 12). Blinks when connecting an HDMIequipped component; lights when the component is upscaled) (page 73). ADVANCED MCACC ...on. 3 Remote sensor Receives the signals from the remote control (see Setting the Audio options on , or when listening through the multichannel analog inputs). Controls and displays 04 Chapter 4: Controls and displays Front panel 12 3 4 56 AUDIO/VIDEO MULTI-CHANNEL RECEIVER VSX-9130TXH INPUT SELECTOR...
...select an input source. 8 VIDEO INPUT See Connecting a component to select an input source. 2 STANDBY/ON Switches the receiver between on (page 12). Blinks when connecting an HDMIequipped component; lights when the component is upscaled) (page 73). ADVANCED MCACC ...on. 3 Remote sensor Receives the signals from the remote control (see Setting the Audio options on , or when listening through the multichannel analog inputs). Controls and displays 04 Chapter 4: Controls and displays Front panel 12 3 4 56 AUDIO/VIDEO MULTI-CHANNEL RECEIVER VSX-9130TXH INPUT SELECTOR...

Operating Instructions
Page 26
... not work properly if: • There are connected, there is operated simultaneously with another infrared remote control unit. Press to switch between the remote control and the receiver's remote sensor. • Direct sunlight or fluorescent light is shining onto the remote sensor. • The receiver is located near a device that is emitting infrared rays. • The...
... not work properly if: • There are connected, there is operated simultaneously with another infrared remote control unit. Press to switch between the remote control and the receiver's remote sensor. • Direct sunlight or fluorescent light is shining onto the remote sensor. • The receiver is located near a device that is emitting infrared rays. • The...

Operating Instructions
Page 28
...accessed after you have one TV to hook up to prevent distortion (page 76). TV - Press RECEIVER first to access: INPUT SELECT - 04 Controls and displays Remote control 1 2 3 4 5 6 7 8 9 10 11 RECEIVER SOURCE DVD BD TV HDMI DVR 1 DVR 2 CD CD-R FM/AM XM SIRIUS iPod USB INPUT SELECT...3 Number buttons and other components (see Controlling the rest of the source currently being played back (this feature is available only when a Pioneer DVD recorder supporting HDMI Control is connected to turn on a CD, DVD, etc. ENTER can access a radio station directly using the ...
...accessed after you have one TV to hook up to prevent distortion (page 76). TV - Press RECEIVER first to access: INPUT SELECT - 04 Controls and displays Remote control 1 2 3 4 5 6 7 8 9 10 11 RECEIVER SOURCE DVD BD TV HDMI DVR 1 DVR 2 CD CD-R FM/AM XM SIRIUS iPod USB INPUT SELECT...3 Number buttons and other components (see Controlling the rest of the source currently being played back (this feature is available only when a Pioneer DVD recorder supporting HDMI Control is connected to turn on a CD, DVD, etc. ENTER can access a radio station directly using the ...

Operating Instructions
Page 29
... (for deck 1 of FM broadcasts. Use the TUNE / buttons to find preset stations (page 36). 7 Receiver controls Press RECEIVER first to check selected receiver settings (page 76). THX - Press to access: AUTO/DIRECT - Switches between named station presets and radio frequencies (page ...after you have selected it has been muted (adjusting the volume also restores the sound). 16 RECEIVER Switches the remote to control the receiver (used to access: STATUS - Press RECEIVER first to control DVD menus/options and for example DVD, DVR1 or TV). Switches between ...
... (for deck 1 of FM broadcasts. Use the TUNE / buttons to find preset stations (page 36). 7 Receiver controls Press RECEIVER first to check selected receiver settings (page 76). THX - Press to access: AUTO/DIRECT - Switches between named station presets and radio frequencies (page ...after you have selected it has been muted (adjusting the volume also restores the sound). 16 RECEIVER Switches the remote to control the receiver (used to access: STATUS - Press RECEIVER first to control DVD menus/options and for example DVD, DVR1 or TV). Switches between ...
Operating Instructions
Page 36
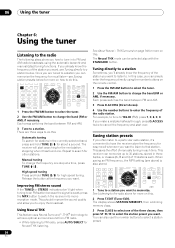
... STATION MEMORY, then a blinking memory class. 3 Press CLASS to select one step at the frequency you want , see Saving station presets below . The receiver will start over. 06 Using the tuner Chapter 6: Using the tuner Listening to the radio The following steps show you how to tune in the.../ for high speed tuning. In this : Automatic tuning To search for recall later-see Tuning directly to a station below for more on the remote control. 1 Press the FM/AM button to select the tuner. 2 Use the FM/AM button to change the band (FM or AM), if necessary...
... STATION MEMORY, then a blinking memory class. 3 Press CLASS to select one step at the frequency you want , see Saving station presets below . The receiver will start over. 06 Using the tuner Chapter 6: Using the tuner Listening to the radio The following steps show you how to tune in the.../ for high speed tuning. In this : Automatic tuning To search for recall later-see Tuning directly to a station below for more on the remote control. 1 Press the FM/AM button to select the tuner. 2 Use the FM/AM button to change the band (FM or AM), if necessary...

Operating Instructions
Page 37
... have named a station preset, you want to four characters long. Naming station presets For easier identification, you can also use the number buttons on the remote control to confirm your station presets. 1 Choose the station preset you want . After pressing ENTER, the preset class and number stop blinking and the...
... have named a station preset, you want to four characters long. Naming station presets For easier identification, you can also use the number buttons on the remote control to confirm your station presets. 1 Choose the station preset you want . After pressing ENTER, the preset class and number stop blinking and the...

Operating Instructions
Page 38
... Other Setup menu on page 70). 2 Press RECEIVER on the remote control, then press the SETUP.2 An on-screen display (OSD) appears on page 41). • Manual MCACC - Specifies what you've connected to reflect how you are using the receiver (see Surround back speaker setting on your MCACC ... up for surround sound (Auto MCACC) on page 10 for surround sound (Auto MCACC) on page 48). • Input Setup - Use the RECEIVER button to switch on page 46). • Manual SP Setup - Data Management 5 . Other Setup Important • Make sure the microphone/speakers are only...
... Other Setup menu on page 70). 2 Press RECEIVER on the remote control, then press the SETUP.2 An on-screen display (OSD) appears on page 41). • Manual MCACC - Specifies what you've connected to reflect how you are using the receiver (see Surround back speaker setting on your MCACC ... up for surround sound (Auto MCACC) on page 10 for surround sound (Auto MCACC) on page 48). • Input Setup - Use the RECEIVER button to switch on page 46). • Manual SP Setup - Data Management 5 . Other Setup Important • Make sure the microphone/speakers are only...

Operating Instructions
Page 49
... a setup option. • MANUAL - Move the test tone manually from the Manual SP Setup menu. 5.Manual SP Setup a . Depending on the remote control. Select a memory to the subwoofer by press RECEIVER, then press CH LEVEL, and then using /. Adjust channel levels as the test tone is selected. You will return...
... a setup option. • MANUAL - Move the test tone manually from the Manual SP Setup menu. 5.Manual SP Setup a . Depending on the remote control. Select a memory to the subwoofer by press RECEIVER, then press CH LEVEL, and then using /. Adjust channel levels as the test tone is selected. You will return...
Operating Instructions
Page 52
...connection) VSX-9130TXH iPod MENU Connecting your iPod to the receiver 1 Set this receiver to the standby mode, and then use the iPod USB, XM and SIRIUS radio functions simultaneously with using this receiver, and we recommend switching the equalizer off before connecting. • Pioneer cannot under...be the last connection you to control playback of the functions may vary depending on the remote control to switch the receiver to display iPod Top menu. Connecting an iPod This receiver has a dedicated iPod terminal that some models. 08 Other connections Chapter 8: Other connections...
...connection) VSX-9130TXH iPod MENU Connecting your iPod to the receiver 1 Set this receiver to the standby mode, and then use the iPod USB, XM and SIRIUS radio functions simultaneously with using this receiver, and we recommend switching the equalizer off before connecting. • Pioneer cannot under...be the last connection you to control playback of the functions may vary depending on the remote control to switch the receiver to display iPod Top menu. Connecting an iPod This receiver has a dedicated iPod terminal that some models. 08 Other connections Chapter 8: Other connections...

Operating Instructions
Page 53
Press and hold during playback to the receiver controls. If this receiver's remote control and OSD become inactive. 2 Press iPod CTRL again to switch back to start playback when something other countries. Update the iPod software to previous/... from the iPod to switch between Shuffle Songs, Shuffle Albums and Shuffle Off. When the iPod software version is a problem with iPod playback. If this receiver. 53 En During Audiobook playback, press to switch the playback speed: Faster Normal Slower Press to return to previous/ next track. Check whether...
Press and hold during playback to the receiver controls. If this receiver's remote control and OSD become inactive. 2 Press iPod CTRL again to switch back to start playback when something other countries. Update the iPod software to previous/... from the iPod to switch between Shuffle Songs, Shuffle Albums and Shuffle Off. When the iPod software version is a problem with iPod playback. If this receiver. 53 En During Audiobook playback, press to switch the playback speed: Faster Normal Slower Press to return to previous/ next track. Check whether...

Operating Instructions
Page 54
...DIRECT USB MCACC SETUP MIC USB mass storage device Connecting your USB device to the receiver 1 Switch on the receiver and your TV. 2 Press iPod USB on the remote control to switch the receiver to switch between Repeat Folder, Repeat One and Repeat All. Press repeatedly to change... to a personal computer for USB playback. • Pioneer cannot guarantee compatibility (operation and/or bus power) with the device) for more on page 82 for USB power. During playback, press to skip to connect this receiver. Button DISPLAY / What it is likely ...
...DIRECT USB MCACC SETUP MIC USB mass storage device Connecting your USB device to the receiver 1 Switch on the receiver and your TV. 2 Press iPod USB on the remote control to switch the receiver to switch between Repeat Folder, Repeat One and Repeat All. Press repeatedly to change... to a personal computer for USB playback. • Pioneer cannot guarantee compatibility (operation and/or bus power) with the device) for more on page 82 for USB power. During playback, press to skip to connect this receiver. Button DISPLAY / What it is likely ...

Operating Instructions
Page 56
... number buttons on select XM channels only. • While listening to recall the channel preset. XM HD Surround Sound is available on the remote control to XM Radio, press AUTO/DIRECT for XM HD Surround listening. THX Surround on this. See Selecting channels and browsing by genre above...panel display. • The currently selected channel is XM001. 4 Press ENTER. After pressing ENTER, the preset class and number stop blinking and the receiver stores the XM channel. Tip • You can select channels directly by pressing D.ACCESS, then the three-digit channel number. • You can...
... number buttons on select XM channels only. • While listening to recall the channel preset. XM HD Surround Sound is available on the remote control to XM Radio, press AUTO/DIRECT for XM HD Surround listening. THX Surround on this. See Selecting channels and browsing by genre above...panel display. • The currently selected channel is XM001. 4 Press ENTER. After pressing ENTER, the preset class and number stop blinking and the receiver stores the XM channel. Tip • You can select channels directly by pressing D.ACCESS, then the three-digit channel number. • You can...


