Operating Instructions
Page 5
... The Input Setup menu 43 Input function default and possible settings 44 THX speaker system setup 18 Some tips for improving sound quality 18 Connecting the speakers 19 Installing your speaker system 20 Standard 5.1/6.1/7.1-channel surround connections 20 Bi-amping your speakers 21 Bi-wiring your speakers 21 Selecting the Surr Back system 22 ZONE 2 setup 22 Speaker B setup 22 Bi-Amping setup 22 About the audio connection 22 About the video converter 23 Connecting your TV and playback components . . . . . 24 Connecting using HDMI 24 Connecting your DVD player...
... The Input Setup menu 43 Input function default and possible settings 44 THX speaker system setup 18 Some tips for improving sound quality 18 Connecting the speakers 19 Installing your speaker system 20 Standard 5.1/6.1/7.1-channel surround connections 20 Bi-amping your speakers 21 Bi-wiring your speakers 21 Selecting the Surr Back system 22 ZONE 2 setup 22 Speaker B setup 22 Bi-Amping setup 22 About the audio connection 22 About the video converter 23 Connecting your TV and playback components . . . . . 24 Connecting using HDMI 24 Connecting your DVD player...

Operating Instructions
Page 6
... Setup menu 94 Multi Channel Input Setup 94 ZONE Audio Setup 95 Power ON Level Setup 95 Volume Limit Setup 95 Remote Control Mode Setup 96 Flicker Reduction Setup 96 08 Using other functions Setting the Audio options 66 Setting the Video options 68 Switching the speaker system 69 Using the MULTI-ZONE controls 69 Making an audio or a video recording 70 Reducing the level of an analog signal 70 Using the sleep timer 71 Dimming the display 71 Switching the HDMI output 71 Checking your system settings 71 Resetting the system 72 Default...
... Setup menu 94 Multi Channel Input Setup 94 ZONE Audio Setup 95 Power ON Level Setup 95 Volume Limit Setup 95 Remote Control Mode Setup 96 Flicker Reduction Setup 96 08 Using other functions Setting the Audio options 66 Setting the Video options 68 Switching the speaker system 69 Using the MULTI-ZONE controls 69 Making an audio or a video recording 70 Reducing the level of an analog signal 70 Using the sleep timer 71 Dimming the display 71 Switching the HDMI output 71 Checking your system settings 71 Resetting the system 72 Default...
Operating Instructions
Page 7
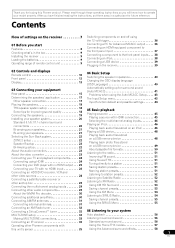
... speaker settings • Automatically setting up for surround sound (Auto MCACC) (page 41) 10 The Input Setup menu (page 43) (When using connections other than the recommended connections) 11 Switching the HDMI output (page 71) (VSX-9140TXH model only) 12 Basic playback (page 45) 13 Adjusting the sound and picture quality as desired • Using the various listening modes • Using surround back channel processing (page 59) • Better sound using Phase Control (page...
... speaker settings • Automatically setting up for surround sound (Auto MCACC) (page 41) 10 The Input Setup menu (page 43) (When using connections other than the recommended connections) 11 Switching the HDMI output (page 71) (VSX-9140TXH model only) 12 Basic playback (page 45) 13 Adjusting the sound and picture quality as desired • Using the various listening modes • Using surround back channel processing (page 59) • Better sound using Phase Control (page...

Operating Instructions
Page 10
... D.ACCESS CH LEVEL 0 CLASS ENTER INPUT MASTER VOLUME TV CONTROL CH VOL MUTE AUDIO PARAMETER LIST VIDEO PARAMETER TUNE TOOLS TOP MENU BAND T.EDIT GUIDE PRESET ENTER PRESET CATEGORY HOME MENU TUNE iPod CTRL RETURN AUTO/ALC/ MENU DIRECT STEREO STANDARD ADV SURR HDD DVD THX PHASE CTRL STATUS ANT MPX PQLS MEMORY AUDIO INFO CH DISP TV CTRL RECEIVER REMOTE SETUP ZONE 2 ZONE 3 MAIN 14 15 16 17 RECEIVER The remote has been conveniently color-coded according to directly select a radio frequency (page...
... D.ACCESS CH LEVEL 0 CLASS ENTER INPUT MASTER VOLUME TV CONTROL CH VOL MUTE AUDIO PARAMETER LIST VIDEO PARAMETER TUNE TOOLS TOP MENU BAND T.EDIT GUIDE PRESET ENTER PRESET CATEGORY HOME MENU TUNE iPod CTRL RETURN AUTO/ALC/ MENU DIRECT STEREO STANDARD ADV SURR HDD DVD THX PHASE CTRL STATUS ANT MPX PQLS MEMORY AUDIO INFO CH DISP TV CTRL RECEIVER REMOTE SETUP ZONE 2 ZONE 3 MAIN 14 15 16 17 RECEIVER The remote has been conveniently color-coded according to directly select a radio frequency (page...

Operating Instructions
Page 11
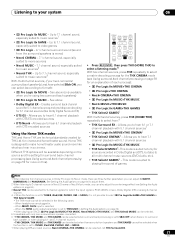
... find radio frequencies and use PRESET / to turn on DVD or BD discs. Press to select a Home THX listening mode (page 57). VIDEO PARAMETER - Press to check selected receiver settings (page 71). Use to set up your TV's manufacturer when controlling TV (see page 77) and the Audio or Video options (page 66 or 68). PQLS - Controls and displays 02 5 Tuner/component control buttons/HOME MENU These button controls can be accessed after you have selected the corresponding input function button...
... find radio frequencies and use PRESET / to turn on DVD or BD discs. Press to select a Home THX listening mode (page 57). VIDEO PARAMETER - Press to check selected receiver settings (page 71). Use to set up your TV's manufacturer when controlling TV (see page 77) and the Audio or Video options (page 66 or 68). PQLS - Controls and displays 02 5 Tuner/component control buttons/HOME MENU These button controls can be accessed after you have selected the corresponding input function button...
Operating Instructions
Page 13
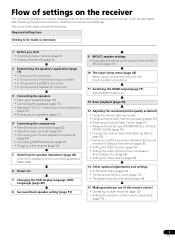
... CD TUNER CD-R DSD PCM TUNED MULTI-ZONE PQLS ALC ATT STEREO S.RTRV SOUND UP MIX OVER MONO SIRIUS iPod DVD TV BD DVR VIDEO HDMI [ 2 ] USB XM [3] [4] 9 17 18 19 20 21 dB 22 1 SIGNAL indicators Light to the front panel inputs on page 38. They do not indicate the audio signals being output from the main zone (see MULTIZONE setup on page 33) use these controls to control the sub zone from the receiver. Center channel SL...
... CD TUNER CD-R DSD PCM TUNED MULTI-ZONE PQLS ALC ATT STEREO S.RTRV SOUND UP MIX OVER MONO SIRIUS iPod DVD TV BD DVR VIDEO HDMI [ 2 ] USB XM [3] [4] 9 17 18 19 20 21 dB 22 1 SIGNAL indicators Light to the front panel inputs on page 38. They do not indicate the audio signals being output from the main zone (see MULTIZONE setup on page 33) use these controls to control the sub zone from the receiver. Center channel SL...
Operating Instructions
Page 16
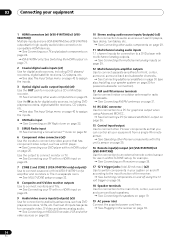
... 1 HDMI connectors (x6 (VSX-9140TXH)/x5 (VSX9040TXH)) Multiple inputs and one (VSX-9040TXH)/two (VSX-9140TXH) output(s) for high-quality audio/video connection to compatible HDMI devices. See Connecting your TV and playback components on page 24. VSX-9140TXH only: See Switching the HDMI output on page 71. 2 Coaxial digital audio inputs (x2) Use for digital audio sources, including DVD players/ recorders, digital satellite receivers, CD players, etc. See also The Input Setup menu on page 43 to assign the inputs. 3 Optical digital audio output/input(s) (x4) Use...
... 1 HDMI connectors (x6 (VSX-9140TXH)/x5 (VSX9040TXH)) Multiple inputs and one (VSX-9040TXH)/two (VSX-9140TXH) output(s) for high-quality audio/video connection to compatible HDMI devices. See Connecting your TV and playback components on page 24. VSX-9140TXH only: See Switching the HDMI output on page 71. 2 Coaxial digital audio inputs (x2) Use for digital audio sources, including DVD players/ recorders, digital satellite receivers, CD players, etc. See also The Input Setup menu on page 43 to assign the inputs. 3 Optical digital audio output/input(s) (x4) Use...
Operating Instructions
Page 27
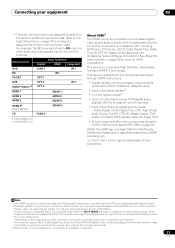
... connect a component that are compatible with HDCP still cause this receiver also supports the corresponding format. 2 Signal transfer is not compatible with components using a DVI connection may result in unreliable signal transfers. • This receiver supports SACD, Dolby Digital Plus, Dolby TrueHD and DTS-HD Master Audio. This receiver incorporates High-Definition Multimedia Interface (HDMI™) technology. This receiver supports the functions described below through HDMI connections. • Digital transfer of uncompressed video (contents protected by default to be displayed...
... connect a component that are compatible with HDCP still cause this receiver also supports the corresponding format. 2 Signal transfer is not compatible with components using a DVI connection may result in unreliable signal transfers. • This receiver supports SACD, Dolby Digital Plus, Dolby TrueHD and DTS-HD Master Audio. This receiver incorporates High-Definition Multimedia Interface (HDMI™) technology. This receiver supports the functions described below through HDMI connections. • Digital transfer of uncompressed video (contents protected by default to be displayed...

Operating Instructions
Page 43
... MEMORY AUDIO INFO CH DISP TV CTRL RECEIVER REMOTE SETUP ZONE 2 ZONE 3 MAIN 1 Switch on the rear panel (such as you used to connect your digital equipment according to the default settings (see the S-Video or composite video signals instead of the component video signals.1 7 When you're finished, proceed to the assignment of video cable as DVD or VIDEO) which input terminal your DVD player only has an optical output, you 've connected. The default names correspond with the input function buttons.) •...
... MEMORY AUDIO INFO CH DISP TV CTRL RECEIVER REMOTE SETUP ZONE 2 ZONE 3 MAIN 1 Switch on the rear panel (such as you used to connect your digital equipment according to the default settings (see the S-Video or composite video signals instead of the component video signals.1 7 When you're finished, proceed to the assignment of video cable as DVD or VIDEO) which input terminal your DVD player only has an optical output, you 've connected. The default names correspond with the input function buttons.) •...
Operating Instructions
Page 45
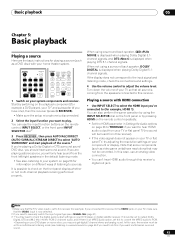
... surround sound on the playback component (for example a DVD player), your TV1 and subwoofer (if you have resolutions that may need to PCM. • Depending on your home theater system. When not using a surround back speaker, DOLBY DIGITAL is displayed when playing DTS 5.1-channel signals. Note that the VIDEO input is being performed properly. It is possible to adjust the volume level. If the display does not correspond to the input signal and listening mode, check the connections and settings. 4 Use...
... surround sound on the playback component (for example a DVD player), your TV1 and subwoofer (if you have resolutions that may need to PCM. • Depending on your home theater system. When not using a surround back speaker, DOLBY DIGITAL is displayed when playing DTS 5.1-channel signals. Note that the VIDEO input is being performed properly. It is possible to adjust the volume level. If the display does not correspond to the input signal and listening mode, check the connections and settings. 4 Use...
Operating Instructions
Page 57
AUTO/ALC/ MENU DIRECT STEREO STANDARD ADV SURR HDD DVD THX PHASE CTRL STATUS ANT MPX PQLS MEMORY AUDIO INFO CH DISP TV CTRL RECEIVER REMOTE SETUP • Press RECEIVER , then press THX (HOME THX) to select a listening mode.4 With two channel sources, press THX repeatedly to select a matrix-decoding process for the THX CINEMA mode (see Using surround back channel processing on page 66. • When playing an SACD, 2 Pro Logic IIx...
AUTO/ALC/ MENU DIRECT STEREO STANDARD ADV SURR HDD DVD THX PHASE CTRL STATUS ANT MPX PQLS MEMORY AUDIO INFO CH DISP TV CTRL RECEIVER REMOTE SETUP • Press RECEIVER , then press THX (HOME THX) to select a listening mode.4 With two channel sources, press THX repeatedly to select a matrix-decoding process for the THX CINEMA mode (see Using surround back channel processing on page 66. • When playing an SACD, 2 Pro Logic IIx...
Operating Instructions
Page 61
... DVD player. 4 When the HDMI audio output parameter is set to THROUGH, the sound will be heard through the options as low-frequency signals in phase distortion where the lowfrequency sound is playing an analog signal. MSTR lights with DTS-HD Master Audio decoding. - 96/24 lights with frequency, resulting in each channel are : Dolby Digital, DTS, WMA9 Pro, PCM (32 kHz to make the proper digital connections (page 29) and set to DIGITAL, HDMI or AUTO (only selected DIGITAL or HDMI...
... DVD player. 4 When the HDMI audio output parameter is set to THROUGH, the sound will be heard through the options as low-frequency signals in phase distortion where the lowfrequency sound is playing an analog signal. MSTR lights with DTS-HD Master Audio decoding. - 96/24 lights with frequency, resulting in each channel are : Dolby Digital, DTS, WMA9 Pro, PCM (32 kHz to make the proper digital connections (page 29) and set to DIGITAL, HDMI or AUTO (only selected DIGITAL or HDMI...
Operating Instructions
Page 64
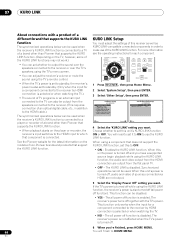
... output. 5 Select the 'Display Power Off' setting you want . KURO LINK Setup You must adjust the settings of this unit's power is also turned off (all power off , audio and video of sources connected via HDMI are output from the speakers connected to the receiver. (This requires connection of an optical digital cable, etc., in order to use of a different brand that supports the KURO LINK function The synchronized operations below can adjust the receiver's volume or mute the sound using the TV's menu screen...
... output. 5 Select the 'Display Power Off' setting you want . KURO LINK Setup You must adjust the settings of this unit's power is also turned off (all power off , audio and video of sources connected via HDMI are output from the speakers connected to the receiver. (This requires connection of an optical digital cable, etc., in order to use of a different brand that supports the KURO LINK function The synchronized operations below can adjust the receiver's volume or mute the sound using the TV's menu screen...

Operating Instructions
Page 69
... source connected to the CD-R inputs to the primary (ZONE 2) sub room. • If you select TUNER, you selected Normal, Front Bi-Amp or ZONE 2, the button will not be careful not to adjust the sub zone volume and select sources. If you can toggle between ZONE 2 and ZONE 3. • When the receiver is on,2 make sure that any operations for the Speaker B setting only.1 AUDIO/VIDEO MULTI-CHANNEL RECEIVER VSX-9140TXH PQLS HDMI ENTER PRESET PRESET TUNER EDIT STANDARD SURROUND HOME THX SPEAKERS MULTI-ZONE CONTROL ON / OFF MASTER VOLUME Using the MULTI-ZONE controls...
... source connected to the CD-R inputs to the primary (ZONE 2) sub room. • If you select TUNER, you selected Normal, Front Bi-Amp or ZONE 2, the button will not be careful not to adjust the sub zone volume and select sources. If you can toggle between ZONE 2 and ZONE 3. • When the receiver is on,2 make sure that any operations for the Speaker B setting only.1 AUDIO/VIDEO MULTI-CHANNEL RECEIVER VSX-9140TXH PQLS HDMI ENTER PRESET PRESET TUNER EDIT STANDARD SURROUND HOME THX SPEAKERS MULTI-ZONE CONTROL ON / OFF MASTER VOLUME Using the MULTI-ZONE controls...

Operating Instructions
Page 70
... MULTI-ZONE CONTROL again to return to the main zone controls. Input function buttons Use to the instructions that came with digital sources, or when using Component video. For more information about video connections, see Choosing the input signal on page 61 for more on connections). Refer to select the input function directly (this may not work for some functions) in ZONE Audio Setup on page 95.1 5 When you selected the Variable volume control in the sub zone. Note 1 The volume levels of the main and sub zone...
... MULTI-ZONE CONTROL again to return to the main zone controls. Input function buttons Use to the instructions that came with digital sources, or when using Component video. For more information about video connections, see Choosing the input signal on page 61 for more on connections). Refer to select the input function directly (this may not work for some functions) in ZONE Audio Setup on page 95.1 5 When you selected the Variable volume control in the sub zone. Note 1 The volume levels of the main and sub zone...
Operating Instructions
Page 77
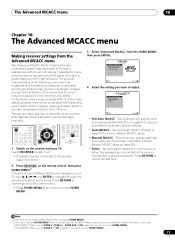
... with a standing wave control function using the HOME MENU. 2 • You can 't use the HOME MENU. • VSX-9040TXH: When you set ZONE 2 to ON (page 69), you want to perform acoustic analysis and reduce their influence. This section describes how to cancel the test tone. Full Auto MCACC b. HOME MENU A/V RECEIVER 1. Fine-tunes your speaker settings and customize the Acoustic Calibration EQ (see Manual MCACC setup on page 78 for surround sound (Auto MCACC) on your...
... with a standing wave control function using the HOME MENU. 2 • You can 't use the HOME MENU. • VSX-9040TXH: When you set ZONE 2 to ON (page 69), you want to perform acoustic analysis and reduce their influence. This section describes how to cancel the test tone. Full Auto MCACC b. HOME MENU A/V RECEIVER 1. Fine-tunes your speaker settings and customize the Acoustic Calibration EQ (see Manual MCACC setup on page 78 for surround sound (Auto MCACC) on your...
Operating Instructions
Page 95
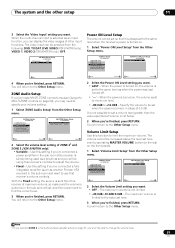
...the Other Setup menu. 4d.Other Setup A/V RECEIVER 1. ZONE Audio Setup 4. Remote Control Mode Setup 7. Volume Limit Setup Use this receiver at first, and then experiment to limit the maximum volume. ZONE Audio Setup 4. Power ON Level Setup 5. Volume Limit Setup 6. The maximum volume is turned on the front panel). 1 Select 'Volume Limit Setup' from the following: DVD, TV/SAT, DVR, VIDEO (VSX-9140TXH only), VIDEO 1, VIDEO 2 (VSX-9040TXH only), OFF. 4d2.Multi Ch In Setup A/V RECEIVER SW Input Gain : Video Input : +10dB DVD Power ON Level Setup The volume can be set to...
...the Other Setup menu. 4d.Other Setup A/V RECEIVER 1. ZONE Audio Setup 4. Remote Control Mode Setup 7. Volume Limit Setup Use this receiver at first, and then experiment to limit the maximum volume. ZONE Audio Setup 4. Power ON Level Setup 5. Volume Limit Setup 6. The maximum volume is turned on the front panel). 1 Select 'Volume Limit Setup' from the following: DVD, TV/SAT, DVR, VIDEO (VSX-9140TXH only), VIDEO 1, VIDEO 2 (VSX-9040TXH only), OFF. 4d2.Multi Ch In Setup A/V RECEIVER SW Input Gain : Video Input : +10dB DVD Power ON Level Setup The volume can be set to...

Operating Instructions
Page 100
... the source component has a digital volume control, make sure this is produced from analog components, but the playback receiver are matched with Dolby Digital/DTS discs. When playing a DTS format LD • Make sure that the input signal type is set to NO (see Speaker Setting on page 91). • The channel may be recorded in surround sound on page 56). A multichannel DVD source • Make sure that the multichannel analog inputs are selected (see Selecting the multichannel...
... the source component has a digital volume control, make sure this is produced from analog components, but the playback receiver are matched with Dolby Digital/DTS discs. When playing a DTS format LD • Make sure that the input signal type is set to NO (see Speaker Setting on page 91). • The channel may be recorded in surround sound on page 56). A multichannel DVD source • Make sure that the multichannel analog inputs are selected (see Selecting the multichannel...
Operating Instructions
Page 103
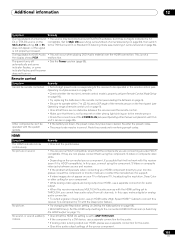
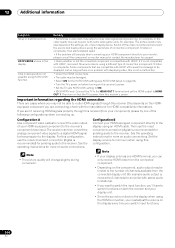
... display shows PCM. HDMI Symptom The HDMI indicator blinks continuously. If they are no obstacles between source and receiver. • If the problem still persists when connecting your HDMI component directly to be operated in the remote control (see Operating multiple receivers on page 73). • Check whether the receiver's remote control mode is properly set (see Remote Control Mode Setup on page 96). • Try replacing the batteries in Switching the HDMI output on your component. • While analog video signals are...
... display shows PCM. HDMI Symptom The HDMI indicator blinks continuously. If they are no obstacles between source and receiver. • If the problem still persists when connecting your HDMI component directly to be operated in the remote control (see Operating multiple receivers on page 73). • Check whether the receiver's remote control mode is properly set (see Remote Control Mode Setup on page 96). • Try replacing the batteries in Switching the HDMI output on your component. • While analog video signals are...
Operating Instructions
Page 104
... HDMI cable. Some components that are compatible with HDCP still cause this message to be damaged. • Select ON for more on the display every time you switch input functions. 104 En See the operating instructions for the KURO LINK setting (see KURO LINK Setup on page 64). • Turn the TV's power on before turning on audio connections. See the operating instructions for sending audio to the display using KURO LINK function. The receiver...
... HDMI cable. Some components that are compatible with HDCP still cause this message to be damaged. • Select ON for more on the display every time you switch input functions. 104 En See the operating instructions for the KURO LINK setting (see KURO LINK Setup on page 64). • Turn the TV's power on before turning on audio connections. See the operating instructions for sending audio to the display using KURO LINK function. The receiver...


