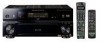
Owner's Manual
Page 5
... . . 71 Connecting your XM Radio receiver 48 Erasing one of the remote control button settings . . 72 Listening to XM Radio 49 Resetting the remote control presets 72 Using XM ...LINK 52 Using System off using the 12 volt trigger 60 Using this receiver with a Pioneer plasma display. . . 60 Using the SR+ mode with a Pioneer plasma display 61 Connecting a PC for Advanced MCACC output . . .... 88 OSD Adjustment 65 Specifications 89 Cleaning the unit 89 10 Using other functions Setting the AV options 66 Our philosophy 90 Features 90 Making an audio or a video recording 67 Playing...
... . . 71 Connecting your XM Radio receiver 48 Erasing one of the remote control button settings . . 72 Listening to XM Radio 49 Resetting the remote control presets 72 Using XM ...LINK 52 Using System off using the 12 volt trigger 60 Using this receiver with a Pioneer plasma display. . . 60 Using the SR+ mode with a Pioneer plasma display 61 Connecting a PC for Advanced MCACC output . . .... 88 OSD Adjustment 65 Specifications 89 Cleaning the unit 89 10 Using other functions Setting the AV options 66 Our philosophy 90 Features 90 Making an audio or a video recording 67 Playing...
Owner's Manual
Page 25
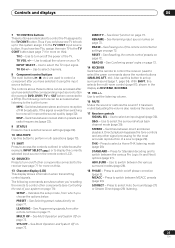
...shown when you have selected it using the input source buttons. RENAME - See Erasing one TV to hook up surround sound (page 7, page 34). RESET - STANDARD - PRESET - MULTI OP - Press to the built-in the remote control LCD. 12 SOURCE Press to turn on page 73. 18 ...+/- - Use to switch between named station presets and radio frequencies (page 33). 9 STATUS Press to this ). Press to set up to check selected receiver settings (page 69). 10 MULTIOPE Use this ). TV - ADV.SURR - Thus if you choose the options below. Indicates the setup mode, from other ...
...shown when you have selected it using the input source buttons. RENAME - See Erasing one TV to hook up surround sound (page 7, page 34). RESET - STANDARD - PRESET - MULTI OP - Press to the built-in the remote control LCD. 12 SOURCE Press to turn on page 73. 18 ...+/- - Use to switch between named station presets and radio frequencies (page 33). 9 STATUS Press to this ). Press to set up to check selected receiver settings (page 69). 10 MULTIOPE Use this ). TV - ADV.SURR - Thus if you choose the options below. Indicates the setup mode, from other ...

Owner's Manual
Page 69
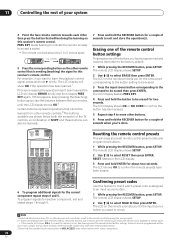
...Press SETUP to check the system settings. SURR SHIFT PHASE MCACC S.DIRECT 1 Press STATUS to confirm. Resetting the system Use this . 1 Switch the receiver into standby. 2 While holding down the front panel AV PARAMETER button, press and hold STANDBY/ON for about three seconds. Multi Room Room 2 Volume Type ... If the Pure Direct mode is unplugged. OK appears in the display to indicate that the receiver has been reset to the factory default settings. • Note that all the receiver's settings to the factory default. Inputs See Input function default and possible settings on , some ...
...Press SETUP to check the system settings. SURR SHIFT PHASE MCACC S.DIRECT 1 Press STATUS to confirm. Resetting the system Use this . 1 Switch the receiver into standby. 2 While holding down the front panel AV PARAMETER button, press and hold STANDBY/ON for about three seconds. Multi Room Room 2 Volume Type ... If the Pure Direct mode is unplugged. OK appears in the display to indicate that the receiver has been reset to the factory default settings. • Note that all the receiver's settings to the factory default. Inputs See Input function default and possible settings on , some ...
Owner's Manual
Page 72
...display shows SETUP. 2 Use / to an input source button. 1 While pressing the RECEIVER button, press SETUP. See Erasing one of the buttons you want to check. RECEIVER INPUT SELECT SYSTEM OFF SOURCE Resetting the remote control presets This will be doing the learning on the remote prompts you ...briefly. CD DVD DVR2 DVR1 TV SAT CD-R i Pod VIDEO 2 VIDEO 1 TV CONT XM RADIO TUNER ROOM2/3 RECEIVER SLEEP SR+ VIDEO SEL DIMMER ANALOG ATT S.RETRIEVER D.ACCESS +10 AV PARAMETER TOP MENU ì TUNE DTVMENU ST SETUP ENTER CLASS DISC ENTER CH LEVEL MENU ST T.EDIT ì RETURN...
...display shows SETUP. 2 Use / to an input source button. 1 While pressing the RECEIVER button, press SETUP. See Erasing one of the buttons you want to check. RECEIVER INPUT SELECT SYSTEM OFF SOURCE Resetting the remote control presets This will be doing the learning on the remote prompts you ...briefly. CD DVD DVR2 DVR1 TV SAT CD-R i Pod VIDEO 2 VIDEO 1 TV CONT XM RADIO TUNER ROOM2/3 RECEIVER SLEEP SR+ VIDEO SEL DIMMER ANALOG ATT S.RETRIEVER D.ACCESS +10 AV PARAMETER TOP MENU ì TUNE DTVMENU ST SETUP ENTER CLASS DISC ENTER CH LEVEL MENU ST T.EDIT ì RETURN...

Owner's Manual
Page 73
To reset the button to eight characters (the possible characters are listed below). The ... * + - [space] Direct function • Default setting: ON You can operate the remote control without affecting the receiver.1 1 While pressing the RECEIVER button, press SETUP. For example, you can use one component using the remote control while at the same time.2 Programming...DVR2 DVR1 TV SAT CD-R i Pod VIDEO 2 VIDEO 1 TV CONT XM RADIO TUNER ROOM2/3 RECEIVER SLEEP VIDEO ANALOG D.ACCESS +10 AV PARAMETER TOP MENU ì TUNE DTVMENU ST SETUP ENTER CLASS DISC ENTER CH LEVEL MENU ST T....
To reset the button to eight characters (the possible characters are listed below). The ... * + - [space] Direct function • Default setting: ON You can operate the remote control without affecting the receiver.1 1 While pressing the RECEIVER button, press SETUP. For example, you can use one component using the remote control while at the same time.2 Programming...DVR2 DVR1 TV SAT CD-R i Pod VIDEO 2 VIDEO 1 TV CONT XM RADIO TUNER ROOM2/3 RECEIVER SLEEP VIDEO ANALOG D.ACCESS +10 AV PARAMETER TOP MENU ì TUNE DTVMENU ST SETUP ENTER CLASS DISC ENTER CH LEVEL MENU ST T....
Owner's Manual
Page 82
...on page 52 for more on page 63). The sound may need to your HDMI component directly to reset the i.LINK database memory in the receiver (use the front panel): With the receiver in the display, press ENTER, then SETUP again to a more data. button. When you see ...your computers output level is displayed instead of the proper component name. appear in standby, press STANDBY/ON while holding down RETURN. The receiver is not a malfunction. No picture or sound. When an i.LINK-equipped component name cannot be interrupted momentarily when this message is ...
...on page 52 for more on page 63). The sound may need to your HDMI component directly to reset the i.LINK database memory in the receiver (use the front panel): With the receiver in the display, press ENTER, then SETUP again to a more data. button. When you see ...your computers output level is displayed instead of the proper component name. appear in standby, press STANDBY/ON while holding down RETURN. The receiver is not a malfunction. No picture or sound. When an i.LINK-equipped component name cannot be interrupted momentarily when this message is ...
Owner's Manual
Page 83
... on page 66). • Check that the HDMI AV setting is set to AMP/THROUGH. • If the component is a DVI device, use a separate connection for support. iPod to work, try resetting your monitor, please consult the component or monitor manual or contact the ... or that you have selected a channel that the XM antenna cable is acquiring audio or program information. Wait until the information has been received. Noisy or distorted picture. Remedy • If your display device. Change the output settings of the source component. • Sometimes ...
... on page 66). • Check that the HDMI AV setting is set to AMP/THROUGH. • If the component is a DVI device, use a separate connection for support. iPod to work, try resetting your monitor, please consult the component or monitor manual or contact the ... or that you have selected a channel that the XM antenna cable is acquiring audio or program information. Wait until the information has been received. Noisy or distorted picture. Remedy • If your display device. Change the output settings of the source component. • Sometimes ...


