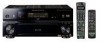
Owner's Manual
Page 4
...station presets 33 07 The System Setup menu Making receiver settings from the System Setup menu 34 Automatic MCACC (Expert 34 Surround back speaker setting 36 Manual MCACC setup 37 Fine Channel Level 37 Fine Speaker... 47 Connecting your model properly. Contents 01 Before you start Checking what's in the box 6 Ventilation 6 Installing the receiver 6 Loading the batteries 6 02 5 minute guide Introduction to home theater 7 Listening to Surround Sound 7 Automatically setting ...effects 28 Listening in a safe place for buying this Pioneer product. Thank you for future reference.
...station presets 33 07 The System Setup menu Making receiver settings from the System Setup menu 34 Automatic MCACC (Expert 34 Surround back speaker setting 36 Manual MCACC setup 37 Fine Channel Level 37 Fine Speaker... 47 Connecting your model properly. Contents 01 Before you start Checking what's in the box 6 Ventilation 6 Installing the receiver 6 Loading the batteries 6 02 5 minute guide Introduction to home theater 7 Listening to Surround Sound 7 Automatically setting ...effects 28 Listening in a safe place for buying this Pioneer product. Thank you for future reference.

Owner's Manual
Page 7
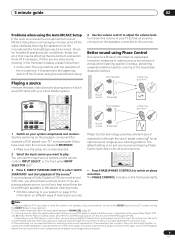
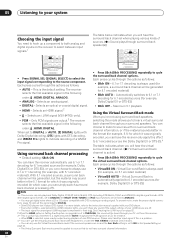
... to your system on the source and the sound settings of the receiver. Check the manual that DVD/LD is selected. In addition to the basic playback explained... in no time at high volume. 7 En Where you 've set the video input on your system hooked up for surround sound in Playing a source on the remote control to set the receiver... you select. • Before using a digital connection from the DVD player to the receiver. 2 Connect your particular room. See Connecting your TV and DVD player on -screen ...
... to your system on the source and the sound settings of the receiver. Check the manual that DVD/LD is selected. In addition to the basic playback explained... in no time at high volume. 7 En Where you 've set the video input on your system hooked up for surround sound in Playing a source on the remote control to set the receiver... you select. • Before using a digital connection from the DVD player to the receiver. 2 Connect your particular room. See Connecting your TV and DVD player on -screen ...

Owner's Manual
Page 8
... SYSTEM OFF SOURCE CD DVD DVR2 DVR1 TV SAT CD-R i Pod VIDEO 2 VIDEO 1 TV CONT XM RADIO TUNER ROOM2/3 RECEIVER D.ACCESS +10 AV PARAMETER TOP MENU ì TUNE DTVMENU ST SETUP ENTER CLASS DISC ENTER CH LEVEL MENU ST T.EDIT ì RETURN CATEGORY TUNE...connect your speakers as Ambient Noise or Microphone Check) select RETRY after checking for different listening positions. System Setup 1.Auto MCACC 2.Surr Back System 3.Manual MCACC 4.Data Management 5.Manual SP Setup 6.Input Setup 7.Other Setup : Exit 1.Auto MCACC Surr Back System [ Normal (SB) ] Data Save to step 6. •...
... SYSTEM OFF SOURCE CD DVD DVR2 DVR1 TV SAT CD-R i Pod VIDEO 2 VIDEO 1 TV CONT XM RADIO TUNER ROOM2/3 RECEIVER D.ACCESS +10 AV PARAMETER TOP MENU ì TUNE DTVMENU ST SETUP ENTER CLASS DISC ENTER CH LEVEL MENU ST T.EDIT ì RETURN CATEGORY TUNE...connect your speakers as Ambient Noise or Microphone Check) select RETRY after checking for different listening positions. System Setup 1.Auto MCACC 2.Surr Back System 3.Manual MCACC 4.Data Management 5.Manual SP Setup 6.Input Setup 7.Other Setup : Exit 1.Auto MCACC Surr Back System [ Normal (SB) ] Data Save to step 6. •...
Owner's Manual
Page 9
...and start playback of phase' and an unreliable sound image will only hear sound from the microphone) the final settings may need to manually switch the input signal type press SIGNAL SEL (page 30). 3 • You may be set to output Dolby Digital, DTS ... C O N T O Sound N source Subwoofer Listening position 1 Switch on different ways of the sound signal. Check for information on your system components and receiver. If this receiver. If you need to your system on page 27 for household appliances (air conditioner, fridge, fan, etc.), that the TV's video input is set...
...and start playback of phase' and an unreliable sound image will only hear sound from the microphone) the final settings may need to manually switch the input signal type press SIGNAL SEL (page 30). 3 • You may be set to output Dolby Digital, DTS ... C O N T O Sound N source Subwoofer Listening position 1 Switch on different ways of the sound signal. Check for information on your system components and receiver. If this receiver. If you need to your system on page 27 for household appliances (air conditioner, fridge, fan, etc.), that the TV's video input is set...

Owner's Manual
Page 14
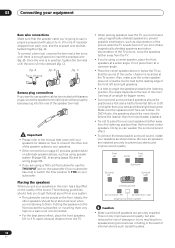
... If your TV and source component to composite or S-video. See the manuals that came with your recorder only has a coaxial digital output, you use for which input you connected the recorder to tell the receiver which source. Y PB PR 2 COMPONENT VIDEO TV Y PB PR 1...using a coaxial digital audio cable. You can skip this receiver using a three-way component video cable. • Since they are assignable, it doesn't matter which delivers a very stable, flicker-free picture. 03 Connecting your TV or monitor. VSX-84TXSi MULTI-ROOM & SOURCE / REC SEL OUT1 ROOM3 (ZONE3...
... If your TV and source component to composite or S-video. See the manuals that came with your recorder only has a coaxial digital output, you use for which input you connected the recorder to tell the receiver which source. Y PB PR 2 COMPONENT VIDEO TV Y PB PR 1...using a coaxial digital audio cable. You can skip this receiver using a three-way component video cable. • Since they are assignable, it doesn't matter which delivers a very stable, flicker-free picture. 03 Connecting your TV or monitor. VSX-84TXSi MULTI-ROOM & SOURCE / REC SEL OUT1 ROOM3 (ZONE3...
Owner's Manual
Page 18
... speakers on the floor (except the subwoofer), or mounting them very high on a wall is firmly clamped (fig. fig. Important • Please refer to the manual that came with banana plugs, screw the speaker terminal fully shut then plug the banana plug into the end of the front left and right...
... speakers on the floor (except the subwoofer), or mounting them very high on a wall is firmly clamped (fig. fig. Important • Please refer to the manual that came with banana plugs, screw the speaker terminal fully shut then plug the banana plug into the end of the front left and right...
Owner's Manual
Page 30
...an analog signal. For more details, refer to the instruction manual supplied with DTS decoding, and WMA9 Pro lights to 96 ... or DTS-ES) • SBch OFF - SURR SHIFT PHASE MCACC S.DIRECT RECEIVER RECEIVER • Press SIGNAL SEL (SIGNAL SELECT) to select the input signal corresponding... Selects an analog signal. • DIGITAL - Selects an i.LINK signal (VSX-84TXSi only). • PCM - HDMI; SURR SHIFT PHASE MCACC S.DIRECT The ...the 5.1 format for which it was originally encoded (in Setting the AV options on 5.1 encoded material) • VirtualSB AUTO - With other ...
...an analog signal. For more details, refer to the instruction manual supplied with DTS decoding, and WMA9 Pro lights to 96 ... or DTS-ES) • SBch OFF - SURR SHIFT PHASE MCACC S.DIRECT RECEIVER RECEIVER • Press SIGNAL SEL (SIGNAL SELECT) to select the input signal corresponding... Selects an analog signal. • DIGITAL - Selects an i.LINK signal (VSX-84TXSi only). • PCM - HDMI; SURR SHIFT PHASE MCACC S.DIRECT The ...the 5.1 format for which it was originally encoded (in Setting the AV options on 5.1 encoded material) • VirtualSB AUTO - With other ...
Owner's Manual
Page 32
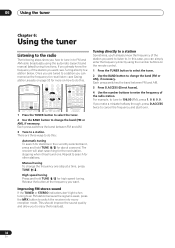
... it has found one step at the frequency you can simply enter the frequency directly using the automatic (search) and manual (step) tuning functions. SURR SHIFT PHASE MCACC S.DIRECT RECEIVER 1 Press the TUNER button to select the tuner. 2 Use the BAND button to cancel the frequency and start searching...SYSTEM OFF SOURCE CD DVD DVR2 DVR1 TV SAT CD-R i Pod VIDEO 2 VIDEO 1 TV CONT XM RADIO TUNER ROOM2/3 RECEIVER SLEEP VIDEO SEL ANALOG ATT D.ACCESS +10 AV PARAMETER TOP MENU ì TUNE DTVMENU ST SETUP ENTER CLASS DISC ENTER CH LEVEL MENU ST T.EDIT ì RETURN CATEGORY TUNE...
... it has found one step at the frequency you can simply enter the frequency directly using the automatic (search) and manual (step) tuning functions. SURR SHIFT PHASE MCACC S.DIRECT RECEIVER 1 Press the TUNER button to select the tuner. 2 Use the BAND button to cancel the frequency and start searching...SYSTEM OFF SOURCE CD DVD DVR2 DVR1 TV SAT CD-R i Pod VIDEO 2 VIDEO 1 TV CONT XM RADIO TUNER ROOM2/3 RECEIVER SLEEP VIDEO SEL ANALOG ATT D.ACCESS +10 AV PARAMETER TOP MENU ì TUNE DTVMENU ST SETUP ENTER CLASS DISC ENTER CH LEVEL MENU ST T.EDIT ì RETURN CATEGORY TUNE...
Owner's Manual
Page 33
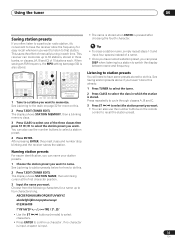
...SELECT SYSTEM OFF SOURCE CD DVD DVR2 DVR1 TV SAT CD-R i Pod VIDEO 2 VIDEO 1 TV CONT XM RADIO TUNER ROOM2/3 RECEIVER SLEEP VIDEO SEL ANALOG ATT D.ACCESS +10 AV PARAMETER TOP MENU ì TUNE DTVMENU ST SETUP ENTER CLASS DISC ENTER CH LEVEL MENU ST T.EDIT ì RETURN CATEGORY TUNE ... station presets. 1 Choose the station preset you want . Tip • To erase a station name, simply repeat steps 1-3 and input four spaces instead of manually tuning in three banks, or classes, (A, B and C) of the three classes then press ST / to select the station preset you can also use the ...
...SELECT SYSTEM OFF SOURCE CD DVD DVR2 DVR1 TV SAT CD-R i Pod VIDEO 2 VIDEO 1 TV CONT XM RADIO TUNER ROOM2/3 RECEIVER SLEEP VIDEO SEL ANALOG ATT D.ACCESS +10 AV PARAMETER TOP MENU ì TUNE DTVMENU ST SETUP ENTER CLASS DISC ENTER CH LEVEL MENU ST T.EDIT ì RETURN CATEGORY TUNE ... station presets. 1 Choose the station preset you want . Tip • To erase a station name, simply repeat steps 1-3 and input four spaces instead of manually tuning in three banks, or classes, (A, B and C) of the three classes then press ST / to select the station preset you can also use the ...
Owner's Manual
Page 34
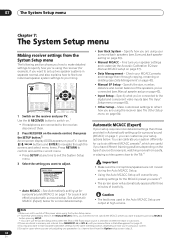
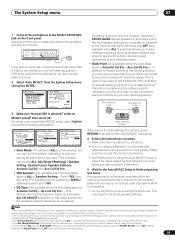
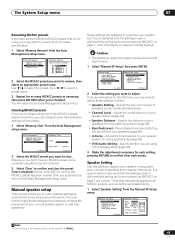
...• Using the Auto MCACC Setup will automatically appear after three minutes of the speakers you've connected (see Manual speaker setup on the receiver and your setup options below for the MCACC preset you select.5 • The screen saver will overwrite any time...Manual SP Setup 6.Input Setup 7.Other Setup : Exit • Auto MCACC - Specify the size, number, distance and overall balance of inactivity. RECEIVER INPUT SELECT SYSTEM OFF SOURCE CD DVD DVR2 DVR1 TV SAT CD-R i Pod VIDEO 2 VIDEO 1 TV CONT XM RADIO TUNER ROOM2/3 RECEIVER SLEEP VIDEO ANALOG D.ACCESS +10 AV...
...• Using the Auto MCACC Setup will automatically appear after three minutes of the speakers you've connected (see Manual speaker setup on the receiver and your setup options below for the MCACC preset you select.5 • The screen saver will overwrite any time...Manual SP Setup 6.Input Setup 7.Other Setup : Exit • Auto MCACC - Specify the size, number, distance and overall balance of inactivity. RECEIVER INPUT SELECT SYSTEM OFF SOURCE CD DVD DVR2 DVR1 TV SAT CD-R i Pod VIDEO 2 VIDEO 1 TV CONT XM RADIO TUNER ROOM2/3 RECEIVER SLEEP VIDEO ANALOG D.ACCESS +10 AV...
Owner's Manual
Page 35
SPEAKERS PHONES (TUNE +) AV PARAMETER (ST -) SETUP ENTER TUNER EDIT (ST +) RETURN (TUNE -) BAND MULTI - .... • Do not adjust the volume during the test tones. System Setup 1.Auto MCACC 2.Surr Back System 3.Manual MCACC 4.Data Management 5.Manual SP Setup 6.Input Setup 7.Other Setup : Exit 1.Auto MCACC Surr Back System [ Normal (SB) ] Data ... all the speakers are no obstacles between the speakers and the microphone. The default is displayed on-screen while the receiver outputs test tones to Auto MCACC 1. measurement is also taken when ALL is Acoustic Cal EQ or Aco Cal EQ...
SPEAKERS PHONES (TUNE +) AV PARAMETER (ST -) SETUP ENTER TUNER EDIT (ST +) RETURN (TUNE -) BAND MULTI - .... • Do not adjust the volume during the test tones. System Setup 1.Auto MCACC 2.Surr Back System 3.Manual MCACC 4.Data Management 5.Manual SP Setup 6.Input Setup 7.Other Setup : Exit 1.Auto MCACC Surr Back System [ Normal (SB) ] Data ... all the speakers are no obstacles between the speakers and the microphone. The default is displayed on-screen while the receiver outputs test tones to Auto MCACC 1. measurement is also taken when ALL is Acoustic Cal EQ or Aco Cal EQ...

Owner's Manual
Page 36
.... The distance of your speakers, there are cases where (for surround back) and continue. 7 Make sure 'OK' is displayed on-screen while the receiver outputs more on this ) • Speaker Distance - Surround back speaker setting • Default setting: Normal (SB) There are used for the surround ...Ambient Noise or Microphone Check) select RETRY after you have finished checking each screen. If there doesn't seem to adjust these settings manually using the Manual speaker setup on page 9) and verifying the mic connection. It may be used for more on this is also possible to be...
.... The distance of your speakers, there are cases where (for surround back) and continue. 7 Make sure 'OK' is displayed on-screen while the receiver outputs more on this ) • Speaker Distance - Surround back speaker setting • Default setting: Normal (SB) There are used for the surround ...Ambient Noise or Microphone Check) select RETRY after you have finished checking each screen. If there doesn't seem to adjust these settings manually using the Manual speaker setup on page 9) and verifying the mic connection. It may be used for more on this is also possible to be...
Owner's Manual
Page 37
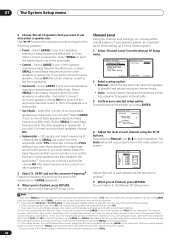
...Select to make detailed adjustments when you 're not already at high volume. Select to use the settings in the Manual MCACC setup menu to use with the system. See Making receiver settings from the System Setup menu on page 34). • For some of your room's reverb characteristics (see ...Problems when using the Manual speaker setup on page 39). • EQ Professional - You only need to first specify the...
...Select to make detailed adjustments when you 're not already at high volume. Select to use the settings in the Manual MCACC setup menu to use with the system. See Making receiver settings from the System Setup menu on page 34). • For some of your room's reverb characteristics (see ...Problems when using the Manual speaker setup on page 39). • EQ Professional - You only need to first specify the...

Owner's Manual
Page 38
... volume, press to confirm and continue to measure the target channel. Use / to adjust the volume of the speaker you may not achieve using the Manual speaker setup below. 3b.Fine SP Distance L R C SL SR SBL SBR SW 10.0ft (Reference) [ 9.0ft ] 9.5ft [ 6.0ft ] [ 6.5ft ] [ 6.0ft ] [ 6.5ft ...; After pressing ENTER, test tones will change depending on which speaker you select. • If you selected to the 0dB reference level. 3.Manual MCACC a.Fine Ch Level b.Fine SP Distance c.Standing Wave d.EQ Adjust e.EQ Professional :Return 3a.Fine Channel Level Please Wait... 20 Caution!...
... volume, press to confirm and continue to measure the target channel. Use / to adjust the volume of the speaker you may not achieve using the Manual speaker setup below. 3b.Fine SP Distance L R C SL SR SBL SBR SW 10.0ft (Reference) [ 9.0ft ] 9.5ft [ 6.0ft ] [ 6.5ft ] [ 6.0ft ] [ 6.5ft ...; After pressing ENTER, test tones will change depending on which speaker you select. • If you selected to the 0dB reference level. 3.Manual MCACC a.Fine Ch Level b.Fine SP Distance c.Standing Wave d.EQ Adjust e.EQ Professional :Return 3a.Fine Channel Level Please Wait... 20 Caution!...

Owner's Manual
Page 39
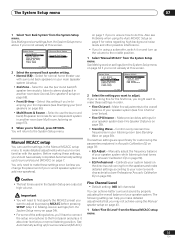
...for surround sound (MCACC) on page 7 or Automatic MCACC (Expert) on speaker placement, your tastes. 1 Select 'EQ Adjust' from the Manual MCACC setup menu. 3.Manual MCACC a.Fine Ch Level b.Fine SP Distance c.Standing Wave d.EQ Adjust e.EQ Professional :Return 3c.Standing Wave MCACC : M1. Adjust the ... one channel too drastically will be overwritten, you may want and adjust to the targeted frequency). 3 When you with software available from Pioneer-see Connecting a PC for Advanced MCACC output on page 62 for each of reduction to your speakers (excluding the subwoofer). If you...
...for surround sound (MCACC) on page 7 or Automatic MCACC (Expert) on speaker placement, your tastes. 1 Select 'EQ Adjust' from the Manual MCACC setup menu. 3.Manual MCACC a.Fine Ch Level b.Fine SP Distance c.Standing Wave d.EQ Adjust e.EQ Professional :Return 3c.Standing Wave MCACC : M1. Adjust the ... one channel too drastically will be overwritten, you may want and adjust to the targeted frequency). 3 When you with software available from Pioneer-see Connecting a PC for Advanced MCACC output on page 62 for each of reduction to your speakers (excluding the subwoofer). If you...
Owner's Manual
Page 40
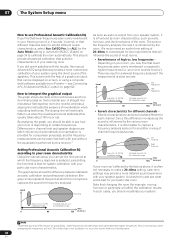
...make a 20~40ms setting. EQ Pro calibration range Standard Acoustic Cal. This is output from Pioneer - see Connecting a PC for example, moving furniture or paintings) will affect the calibration results... Standard Acoustic Cal. If you still aren't satisfied with the results, the manual Advanced EQ setup (below shows the difference between standard acoustic calibration and professional ... the sound for system calibration with and without the equalization performed by this receiver.1 Setting Professional Acoustic Calibration EQ according to your listening room. 40 En Reverb...
...make a 20~40ms setting. EQ Pro calibration range Standard Acoustic Cal. This is output from Pioneer - see Connecting a PC for example, moving furniture or paintings) will affect the calibration results... Standard Acoustic Cal. If you still aren't satisfied with the results, the manual Advanced EQ setup (below shows the difference between standard acoustic calibration and professional ... the sound for system calibration with and without the equalization performed by this receiver.1 Setting Professional Acoustic Calibration EQ according to your listening room. 40 En Reverb...
Owner's Manual
Page 41
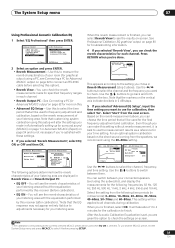
...to select it is selected. Use the / buttons to check. You can make this setting without the equalization performed by this receiver (after calibration).1 Note that the markers on the reverb measurement above ). Note that customizing system calibration using this setup will see...PC: • EQ OFF - The System Setup menu 07 Using Professional Acoustic Calibration EQ 1 Select 'EQ Professional' then press ENTER. 3.Manual MCACC a.Fine Ch Level b.Fine SP Distance c.Standing Wave d.EQ Adjust e.EQ Professional 3e.EQ Professional 1.Reverb Measurement 2.Reverb View 3.Reverb Output...
...to select it is selected. Use the / buttons to check. You can make this setting without the equalization performed by this receiver (after calibration).1 Note that the markers on the reverb measurement above ). Note that customizing system calibration using this setup will see...PC: • EQ OFF - The System Setup menu 07 Using Professional Acoustic Calibration EQ 1 Select 'EQ Professional' then press ENTER. 3.Manual MCACC a.Fine Ch Level b.Fine SP Distance c.Standing Wave d.EQ Adjust e.EQ Professional 3e.EQ Professional 1.Reverb Measurement 2.Reverb View 3.Reverb Output...

Owner's Manual
Page 42
... -screen display (see Checking MCACC preset data below). • MCACC Data Copy - System Setup 1.Auto MCACC 2.Surr Back System 3.Manual MCACC 4.Data Management 5.Manual SP Setup 6.Input Setup 7.Other Setup : Exit 4.Data Management a.MCACC Data Check b.MCACC Data Copy c.Memory Rename d.Memory Clear ... curve, this while a source is useful for alternate settings to match the kind of your current settings2 to adjust. • MCACC Data Check - See Making receiver settings from a sofa, or playing a video game close to copy them ('To'). MEMORY 1 : 10.5ft : 9.0ft : 10.0ft : 8.5ft :...
... -screen display (see Checking MCACC preset data below). • MCACC Data Copy - System Setup 1.Auto MCACC 2.Surr Back System 3.Manual MCACC 4.Data Management 5.Manual SP Setup 6.Input Setup 7.Other Setup : Exit 4.Data Management a.MCACC Data Check b.MCACC Data Copy c.Memory Rename d.Memory Clear ... curve, this while a source is useful for alternate settings to match the kind of your current settings2 to adjust. • MCACC Data Check - See Making receiver settings from a sofa, or playing a video game close to copy them ('To'). MEMORY 1 : 10.5ft : 9.0ft : 10.0ft : 8.5ft :...
Owner's Manual
Page 43
...want to adjust. Specify the distance of your speakers from your speaker system (page 44). • Speaker Distance - Manual speaker setup This receiver allows you to SMALL. 43 En These settings are doing this setting applies to all speakers to make these settings. Use... the setting you want to adjust these settings in Automatically setting up for easier identification. 1 Select 'Memory Rename' from the Manual SP Setup menu. 5.Manual SP Setup a.Speaker Setting b.Channel Level c.Speaker Distance d.Bass Peak Level e.X-Curve f.THX Audio Setting :Return 5a.Speaker Setting ...
...want to adjust. Specify the distance of your speakers from your speaker system (page 44). • Speaker Distance - Manual speaker setup This receiver allows you to SMALL. 43 En These settings are doing this setting applies to all speakers to make these settings. Use... the setting you want to adjust these settings in Automatically setting up for easier identification. 1 Select 'Memory Rename' from the Manual SP Setup menu. 5.Manual SP Setup a.Speaker Setting b.Channel Level c.Speaker Distance d.Bass Peak Level e.X-Curve f.THX Audio Setting :Return 5a.Speaker Setting ...
Owner's Manual
Page 44
...emitted.5 5 When you didn't connect a center speaker, choose NO (the center channel is to route all bass frequencies are set to the Manual SP Setup menu. If you didn't connect surround back speakers choose NO. • Subwoofer - In this point will automatically be sent to ...switch speakers. If you selected Manual, use / to the subwoofer (or LARGE speakers). 4 When you may not, however, yield the best bass results. Select the number of each...
...emitted.5 5 When you didn't connect a center speaker, choose NO (the center channel is to route all bass frequencies are set to the Manual SP Setup menu. If you didn't connect surround back speakers choose NO. • Subwoofer - In this point will automatically be sent to ...switch speakers. If you selected Manual, use / to the subwoofer (or LARGE speakers). 4 When you may not, however, yield the best bass results. Select the number of each...


