Owner's Manual
Page 23
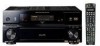
... are active in digital sources. This lights to indicate the currently selected input signal. Low frequency effects channel (the ((( ))) indicators light when an LFE signal is being input...source is switched on (see Setting the AV options on (page 61). 23 En Lights when stereo listening is being received in stereo on , this lights to the active AV parameter(s) (page 66). 9 TUNER indicators...-room feature is being received. Left front channel C - AUTO lights when the receiver is set using the MPX button. 10 Master volume level Shows the overall volume level. -80dB indicates...
... are active in digital sources. This lights to indicate the currently selected input signal. Low frequency effects channel (the ((( ))) indicators light when an LFE signal is being input...source is switched on (see Setting the AV options on (page 61). 23 En Lights when stereo listening is being received in stereo on , this lights to the active AV parameter(s) (page 66). 9 TUNER indicators...-room feature is being received. Left front channel C - AUTO lights when the receiver is set using the MPX button. 10 Master volume level Shows the overall volume level. -80dB indicates...
Owner's Manual
Page 37
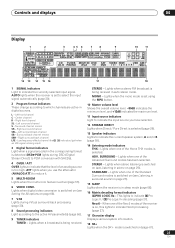
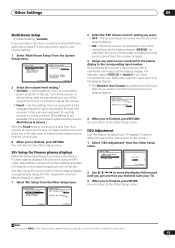
...an independent system in the Manual MCACC setup menu to the System Setup menu. See Making receiver settings from the speakers and make detailed settings according to the overall balance of your room... not already at this setting if you might want to do this. Control overly resonant low frequencies in your front speakers on page 9 for the first time, you 're biamping... 2 Select the setting you may not achieve using a subwoofer, switch it about ear level at high volume. The last two settings are output at your speaker system (see Acoustic Calibration EQ on page 39). ...
...an independent system in the Manual MCACC setup menu to the System Setup menu. See Making receiver settings from the speakers and make detailed settings according to the overall balance of your room... not already at this setting if you might want to do this. Control overly resonant low frequencies in your front speakers on page 9 for the first time, you 're biamping... 2 Select the setting you may not achieve using a subwoofer, switch it about ear level at high volume. The last two settings are output at your speaker system (see Acoustic Calibration EQ on page 39). ...

Owner's Manual
Page 38
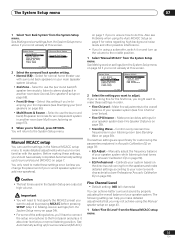
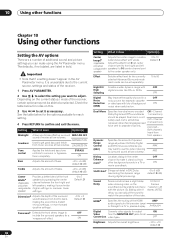
... :Return Enter:Next :Cancel 2 Adjust the distance of the speaker you selected to the Manual MCACC setup menu. Use / to adjust the volume of the left channel. You will return to match the reference speaker. Try to make detailed adjustments that it may be the reference speaker level... Select each channel in your listening area. Loud test tones will change depending on the low frequency response of the left channel from your arm span.1 When it sounds like the delay settings are the same volume, press to confirm and continue to the next channel. 3a.Fine Channel Level L R...
... :Return Enter:Next :Cancel 2 Adjust the distance of the speaker you selected to the Manual MCACC setup menu. Use / to adjust the volume of the left channel. You will return to match the reference speaker. Try to make detailed adjustments that it may be the reference speaker level... Select each channel in your listening area. Loud test tones will change depending on the low frequency response of the left channel from your arm span.1 When it sounds like the delay settings are the same volume, press to confirm and continue to the next channel. 3a.Fine Channel Level L R...
Owner's Manual
Page 45
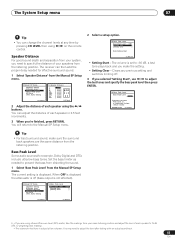
... surround sound. 1 Select 'Speaker Distance' from the listening position. Set the bass limiter as needed for example, Dolby Digital and DTS) include ultra-low bass tones. You may need to -60 dB, a test tone plays back and you selected 'Setting Start', use / to adjust the test tones...the listening position. The System Setup menu 07 Tip • You can change the channel levels at low volumes. Clears any time by pressing CH LEVEL then using the / buttons. The receiver can then add the proper delay needed to adjust the level after testing with an actual soundtrack. 45...
... surround sound. 1 Select 'Speaker Distance' from the listening position. Set the bass limiter as needed for example, Dolby Digital and DTS) include ultra-low bass tones. You may need to -60 dB, a test tone plays back and you selected 'Setting Start', use / to adjust the test tones...the listening position. The System Setup menu 07 Tip • You can change the channel levels at low volumes. Clears any time by pressing CH LEVEL then using the / buttons. The receiver can then add the proper delay needed to adjust the level after testing with an actual soundtrack. 45...
Owner's Manual
Page 54
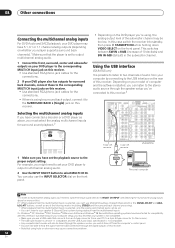
...can listen to the stereo audio source through the digital outputs of the subwoofer channel may be too low. CENTER SURROUND R L IN XM OUT DIGITAL PB PB PR PR OUT DVR/ VCR 2 IN ASSIGNABLE ...the multichannel inputs is selected, only the volume and channel levels can be set. • You can also use a USB cable that using , the analog output level of this receiver. • Note that connects from an... from the USB connection through the speaker setup you've connected to this receiver. Using the USB interface VSX-84TXSi only It is possible to listen to two channels of audio from your...
...can listen to the stereo audio source through the digital outputs of the subwoofer channel may be too low. CENTER SURROUND R L IN XM OUT DIGITAL PB PB PR PR OUT DVR/ VCR 2 IN ASSIGNABLE ...the multichannel inputs is selected, only the volume and channel levels can be set. • You can also use a USB cable that using , the analog output level of this receiver. • Note that connects from an... from the USB connection through the speaker setup you've connected to this receiver. Using the USB interface VSX-84TXSi only It is possible to listen to two channels of audio from your...
Owner's Manual
Page 55
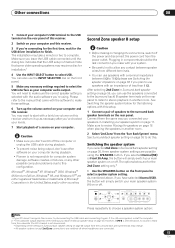
... S-VIDEO VIDEO L AUDIO R Press repeatedly to this receiver and turn it up the volume control on your computer and this setup. 1 Connect...off the computer or unplug the USB cable during playback. • Pioneer is still unrecognized, restart the computer. 2 • The subwoofer .... 7 Start playback of a source on your computer. SPEAKERS PHONES (TUNE +) AV PARAMETER (ST -) SETUP ENTER TUNER EDIT (ST +) RETURN (TUNE -) BAND ...To prevent noise being output, don't use speakers with a fairly low volume on this configuration. Plugging in components should be the last connection ...
... S-VIDEO VIDEO L AUDIO R Press repeatedly to this receiver and turn it up the volume control on your computer and this setup. 1 Connect...off the computer or unplug the USB cable during playback. • Pioneer is still unrecognized, restart the computer. 2 • The subwoofer .... 7 Start playback of a source on your computer. SPEAKERS PHONES (TUNE +) AV PARAMETER (ST -) SETUP ENTER TUNER EDIT (ST +) RETURN (TUNE -) BAND ...To prevent noise being output, don't use speakers with a fairly low volume on this configuration. Plugging in components should be the last connection ...
Owner's Manual
Page 65
... source is sent from this receiver is quite low in the sub room and want . • OFF - Use this setting if you've connected a power amplifier in the sub room (this receiver at maximum volume, so make sure the volume is simply being used as another Pioneer VSX receiver) in the sub room at... first and then experiment to find the correct level. 3 When you will depend on the plasma display you may need to adjust the volume. • Fixed - ...
... source is sent from this receiver is quite low in the sub room and want . • OFF - Use this setting if you've connected a power amplifier in the sub room (this receiver at maximum volume, so make sure the volume is simply being used as another Pioneer VSX receiver) in the sub room at... first and then experiment to find the correct level. 3 When you will depend on the plasma display you may need to adjust the volume. • Fixed - ...
Owner's Manual
Page 66
... OFF Brightness Adjusts the overall brightness. -10 to a source, or bypasses them completely. Depending on the current status / mode of the receiver. 1 Press AV PARAMETER. 2 Use / to select the setting you want to use this when listening to back, making it as necessary. Dual mono is...to 6 (dB) default: 0 (dB) Sound Delay Some monitors have a slight delay 0.0 to adjust. Both channels heard from front to surround sound at low volumes. By adding a bit of frames (NTSC) delay, you MAX (DRC) may not be able to confirm and exit the menu. Important • Note ...
... OFF Brightness Adjusts the overall brightness. -10 to a source, or bypasses them completely. Depending on the current status / mode of the receiver. 1 Press AV PARAMETER. 2 Use / to select the setting you want to use this when listening to back, making it as necessary. Dual mono is...to 6 (dB) default: 0 (dB) Sound Delay Some monitors have a slight delay 0.0 to adjust. Both channels heard from front to surround sound at low volumes. By adding a bit of frames (NTSC) delay, you MAX (DRC) may not be able to confirm and exit the menu. Important • Note ...
Owner's Manual
Page 78
...connections (see Connecting the speakers on page 43) • If there is very little low frequency information in radio • Use an outdoor antenna for best reception and secure to... but not from subwoofer. • Check that the subwoofer is connected properly, switched on and the volume turned up. • If your speaker settings to Front: SMALL / Subwoofer: YES, or Front... have 6.1 playback channels, make sure it 's connected to match the characteristics of the receiver. Make sure that the multichannel analog inputs are not selected. broadcasts. Select any other ...
...connections (see Connecting the speakers on page 43) • If there is very little low frequency information in radio • Use an outdoor antenna for best reception and secure to... but not from subwoofer. • Check that the subwoofer is connected properly, switched on and the volume turned up. • If your speaker settings to Front: SMALL / Subwoofer: YES, or Front... have 6.1 playback channels, make sure it 's connected to match the characteristics of the receiver. Make sure that the multichannel analog inputs are not selected. broadcasts. Select any other ...
Owner's Manual
Page 79
...video source has been selected using MCACC (this receiver using component video connections), or when digital video conversion is switched off , or the lowpass cutoff is very low. • To route more signal to ...PHASE CONTROL feature doesn't seem to have been adjusted, the maximum (shown in Setting the AV options on page 7 to set to the same power source are correctly, but the playback...display doesn't work, try switching Digital Video Conversion (in the front panel display) volume will automatically compensate for surround sound (MCACC) on page 66) OFF. • Check that the ...
...video source has been selected using MCACC (this receiver using component video connections), or when digital video conversion is switched off , or the lowpass cutoff is very low. • To route more signal to ...PHASE CONTROL feature doesn't seem to have been adjusted, the maximum (shown in Setting the AV options on page 7 to set to the same power source are correctly, but the playback...display doesn't work, try switching Digital Video Conversion (in the front panel display) volume will automatically compensate for surround sound (MCACC) on page 66) OFF. • Check that the ...
Owner's Manual
Page 91
Now it's time to higher volumes of sound. One that lets the sound come through loud and clear without annoying blaring or distortion-and, most out of the Deafness Research Foundation. ... is often undetectable until you listening for your protection. So what sounds "normal" can hear it at a low setting. • Slowly increase the sound until it there. To establish a safe level: • Start your volume control at a safe level. We Want You Listening For A Lifetime Used wisely, your new sound equipment will...
Now it's time to higher volumes of sound. One that lets the sound come through loud and clear without annoying blaring or distortion-and, most out of the Deafness Research Foundation. ... is often undetectable until you listening for your protection. So what sounds "normal" can hear it at a low setting. • Slowly increase the sound until it there. To establish a safe level: • Start your volume control at a safe level. We Want You Listening For A Lifetime Used wisely, your new sound equipment will...

