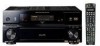
Owner's Manual
Page 5
... repair will expose you to cause cancer and birth defect or other functions Setting the AV options 66 Our philosophy 90 Features 90 Making an audio or a video recording 67 ... . . 71 Connecting your XM Radio receiver 48 Erasing one of the remote control button settings . . 72 Listening to XM Radio 49 Resetting the remote control presets 72 Using XM ... controls 59 Connecting an IR receiver 59 Switching components on and off using the 12 volt trigger 60 Using this receiver with a Pioneer plasma display. . . 60 Using the SR+ mode with a Pioneer plasma display 61 Connecting a ...
... repair will expose you to cause cancer and birth defect or other functions Setting the AV options 66 Our philosophy 90 Features 90 Making an audio or a video recording 67 ... . . 71 Connecting your XM Radio receiver 48 Erasing one of the remote control button settings . . 72 Listening to XM Radio 49 Resetting the remote control presets 72 Using XM ... controls 59 Connecting an IR receiver 59 Switching components on and off using the 12 volt trigger 60 Using this receiver with a Pioneer plasma display. . . 60 Using the SR+ mode with a Pioneer plasma display 61 Connecting a ...
Owner's Manual
Page 25
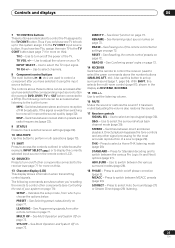
... (page 29). STANDARD - See Programming signals from which you have selected it has been muted (adjusting the volume also restores the sound). 17 Receiver controls SIGNAL SEL - SYS OFF - Controls and displays 04 7 TV CONTROL buttons These buttons are dedicated to control the TV assigned to select...virtual back channel mode (page 30). MCACC - See Renaming input source names on page 72. Use to check selected receiver settings (page 69). 10 MULTIOPE Use this ). See Resetting the remote control presets on page 73. See Direct function on page 73. 18 PHASE - MULTI OP - See ...
... (page 29). STANDARD - See Programming signals from which you have selected it has been muted (adjusting the volume also restores the sound). 17 Receiver controls SIGNAL SEL - SYS OFF - Controls and displays 04 7 TV CONTROL buttons These buttons are dedicated to control the TV assigned to select...virtual back channel mode (page 30). MCACC - See Renaming input source names on page 72. Use to check selected receiver settings (page 69). 10 MULTIOPE Use this ). See Resetting the remote control presets on page 73. See Direct function on page 73. 18 PHASE - MULTI OP - See ...

Owner's Manual
Page 69
... OFF, even though they are on , some settings above will be saved, even if the receiver is switched on . 69 En Resetting the system Use this . 1 Switch the receiver into standby. 2 While holding down the front panel AV PARAMETER button, press and hold STANDBY/ON for features such as surround back channel processing and...
... OFF, even though they are on , some settings above will be saved, even if the receiver is switched on . 69 En Resetting the system Use this . 1 Switch the receiver into standby. 2 While holding down the front panel AV PARAMETER button, press and hold STANDBY/ON for features such as surround back channel processing and...
Owner's Manual
Page 72
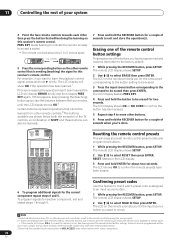
... erased. CD DVD DVR2 DVR1 TV SAT CD-R i Pod VIDEO 2 VIDEO 1 TV CONT XM RADIO TUNER ROOM2/3 RECEIVER SLEEP SR+ VIDEO SEL DIMMER ANALOG ATT S.RETRIEVER D.ACCESS +10 AV PARAMETER TOP MENU ì TUNE DTVMENU ST SETUP ENTER CLASS DISC ENTER CH LEVEL MENU ST T.EDIT ì RETURN ...The remote LCD display shows SETUP. 2 Use / to exit and store the operation(s). For example, if you for two seconds. RECEIVER INPUT SELECT SYSTEM OFF SOURCE Resetting the remote control presets This will display ERROR briefly and then display PRES KEY again. The LCD display shows OK or NO CODE...
... erased. CD DVD DVR2 DVR1 TV SAT CD-R i Pod VIDEO 2 VIDEO 1 TV CONT XM RADIO TUNER ROOM2/3 RECEIVER SLEEP SR+ VIDEO SEL DIMMER ANALOG ATT S.RETRIEVER D.ACCESS +10 AV PARAMETER TOP MENU ì TUNE DTVMENU ST SETUP ENTER CLASS DISC ENTER CH LEVEL MENU ST T.EDIT ì RETURN ...The remote LCD display shows SETUP. 2 Use / to exit and store the operation(s). For example, if you for two seconds. RECEIVER INPUT SELECT SYSTEM OFF SOURCE Resetting the remote control presets This will display ERROR briefly and then display PRES KEY again. The LCD display shows OK or NO CODE...

Owner's Manual
Page 73
To reset the button to its original (default) name, select NAME RST above . This could ... \ / * + - [space] Direct function • Default setting: ON You can operate the remote control without affecting the receiver.1 1 While pressing the RECEIVER button, press SETUP. The remote LCD display shows SETUP. 2 Use / to select MULTI OP or SYS OFF from the menu... DVD DVR2 DVR1 TV SAT CD-R i Pod VIDEO 2 VIDEO 1 TV CONT XM RADIO TUNER ROOM2/3 RECEIVER SLEEP VIDEO ANALOG D.ACCESS +10 AV PARAMETER TOP MENU ì TUNE DTVMENU ST SETUP ENTER CLASS DISC ENTER CH LEVEL MENU ST T.EDIT ì...
To reset the button to its original (default) name, select NAME RST above . This could ... \ / * + - [space] Direct function • Default setting: ON You can operate the remote control without affecting the receiver.1 1 While pressing the RECEIVER button, press SETUP. The remote LCD display shows SETUP. 2 Use / to select MULTI OP or SYS OFF from the menu... DVD DVR2 DVR1 TV SAT CD-R i Pod VIDEO 2 VIDEO 1 TV CONT XM RADIO TUNER ROOM2/3 RECEIVER SLEEP VIDEO ANALOG D.ACCESS +10 AV PARAMETER TOP MENU ì TUNE DTVMENU ST SETUP ENTER CLASS DISC ENTER CH LEVEL MENU ST T.EDIT ì...
Owner's Manual
Page 82
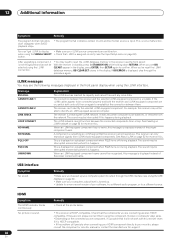
... malfunction. This is HDCP-compatible. HDMI Symptom The HDMI indicator blinks continuously. Remedy • Check all the points below. • This receiver is displayed on a playback component when PQLS turns on the connected source component, it's possible that it will not work with this happens.... ENTER, then SETUP again to display • Make sure your i.LINK source components are added to reset the i.LINK database memory in the receiver (use the front panel): With the receiver in the front panel display when using the SIGNAL SELECT • Check that i.LINK is HDCP-compatible...
... malfunction. This is HDCP-compatible. HDMI Symptom The HDMI indicator blinks continuously. Remedy • Check all the points below. • This receiver is displayed on a playback component when PQLS turns on the connected source component, it's possible that it will not work with this happens.... ENTER, then SETUP again to display • Make sure your i.LINK source components are added to reset the i.LINK database memory in the receiver (use the front panel): With the receiver in the front panel display when using the SIGNAL SELECT • Check that i.LINK is HDCP-compatible...
Owner's Manual
Page 83
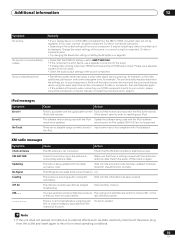
...receiver is attached securely. No action needed. The software version being used with the latest encryption code. The radio is no HDMI audio output. There is being updated with the iPod Update the software being output over HDMI then there will automatically switch to work, try resetting... updated. The channel currently selected has stopped broadcasting. Select another channel. Wait until the information has been received. Make sure that the HDMI AV setting is set to normal operating conditions. 83 En Note • If the unit does not operate normally...
...receiver is attached securely. No action needed. The software version being used with the latest encryption code. The radio is no HDMI audio output. There is being updated with the iPod Update the software being output over HDMI then there will automatically switch to work, try resetting... updated. The channel currently selected has stopped broadcasting. Select another channel. Wait until the information has been received. Make sure that the HDMI AV setting is set to normal operating conditions. 83 En Note • If the unit does not operate normally...


