Owner's Manual
Page 4
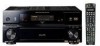
... AC outlet 20 04 Controls and displays Front panel 21 Operating range of remote control unit 22 Display 23 Remote control 24 Sub remote control unit 26 05 Listening to the receiver 47 iPod playback 47 Watching photos and video content 48 4 En Contents 01 ...Before you start Checking what's in the box 6 Ventilation 6 Installing the receiver 6 Loading the batteries 6 02 5 minute guide Introduction to home theater 7 Listening to Surround Sound 7 Automatically setting up for buying this Pioneer...
... AC outlet 20 04 Controls and displays Front panel 21 Operating range of remote control unit 22 Display 23 Remote control 24 Sub remote control unit 26 05 Listening to the receiver 47 iPod playback 47 Watching photos and video content 48 4 En Contents 01 ...Before you start Checking what's in the box 6 Ventilation 6 Installing the receiver 6 Loading the batteries 6 02 5 minute guide Introduction to home theater 7 Listening to Surround Sound 7 Automatically setting up for buying this Pioneer...
Owner's Manual
Page 5
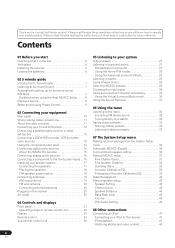
...88 OSD Adjustment 65 Specifications 89 Cleaning the unit 89 10 Using other functions Setting the AV options 66 Our philosophy 90 Features 90 Making an audio or a video recording 67 ... from other remote controls . . 71 Connecting your XM Radio receiver 48 Erasing one of the remote control button settings . . 72 Listening to XM Radio 49 Resetting the remote control presets 72... 53 Controls for other components 75 Connecting the multichannel analog inputs 54 Operating other Pioneer components with this Selecting the multichannel analog inputs 54 unit's sensor 76 Using the...
...88 OSD Adjustment 65 Specifications 89 Cleaning the unit 89 10 Using other functions Setting the AV options 66 Our philosophy 90 Features 90 Making an audio or a video recording 67 ... from other remote controls . . 71 Connecting your XM Radio receiver 48 Erasing one of the remote control button settings . . 72 Listening to XM Radio 49 Resetting the remote control presets 72... 53 Controls for other components 75 Connecting the multichannel analog inputs 54 Operating other Pioneer components with this Selecting the multichannel analog inputs 54 unit's sensor 76 Using the...
Owner's Manual
Page 6
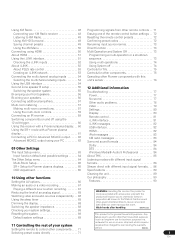
...country or area. 6 En This may have hot fumes or oils (such as a kitchen) Loading the batteries Main remote control unit: Sub room remote control unit (VSX-84TXSi Only): Slot and openings in the cabinet are very dusty - in places that are provided for ventilation to improve...'s in the box Please check that you've received the following supplied accessories: • Setup microphone (cable: 16.4 ft.) • Remote control unit • Sub room remote control unit (VSX-84TXSi only) • AA/IEC R6P dry cell batteries (VSX-84TXSi) x4 / (VSX- 82TXS) x2 • AM loop antenna • FM...
...country or area. 6 En This may have hot fumes or oils (such as a kitchen) Loading the batteries Main remote control unit: Sub room remote control unit (VSX-84TXSi Only): Slot and openings in the cabinet are very dusty - in places that are provided for ventilation to improve...'s in the box Please check that you've received the following supplied accessories: • Setup microphone (cable: 16.4 ft.) • Remote control unit • Sub room remote control unit (VSX-84TXSi only) • AA/IEC R6P dry cell batteries (VSX-84TXSi) x4 / (VSX- 82TXS) x2 • AM loop antenna • FM...

Owner's Manual
Page 7
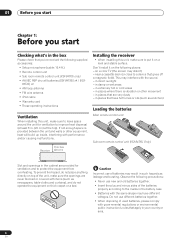
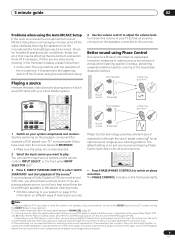
...for both channel delay and channel level. See Connecting your system on page 27 for more on the remote control to set the video input on page 27. For surround sound, you do this receiver. If it on, followed by your DVD player, your speaker system on this . The surround ...Left (SBL) 3 Plug in Playing a source on page 12 to do this before connecting this . After you get from the DVD player to the receiver. 2 Connect your liking. Connect your speakers as shown below for realistic surround sound, but also on your listening area, taking into account ambient noise, ...
...for both channel delay and channel level. See Connecting your system on page 27 for more on the remote control to set the video input on page 27. For surround sound, you do this receiver. If it on, followed by your DVD player, your speaker system on this . The surround ...Left (SBL) 3 Plug in Playing a source on page 12 to do this before connecting this . After you get from the DVD player to the receiver. 2 Connect your liking. Connect your speakers as shown below for realistic surround sound, but also on your listening area, taking into account ambient noise, ...

Owner's Manual
Page 8
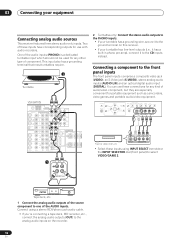
... SEL CONTROL ON/OFF VIDEO SELECT SIGNAL SBch SELECT PROCESSING STEREO MCACC SETUP MIC VIDEO/GAME 2 INPUT DIGITAL IN S-VIDEO VIDEO L AUDIO R 3 Press RECEIVER on the remote, then press SETUP.1 An on-screen display (OSD) appears on -screen. A progress report is selected,3 select an MCACC preset4 then select OK. 6... SELECT SYSTEM OFF SOURCE CD DVD DVR2 DVR1 TV SAT CD-R i Pod VIDEO 2 VIDEO 1 TV CONT XM RADIO TUNER ROOM2/3 RECEIVER D.ACCESS +10 AV PARAMETER TOP MENU ì TUNE DTVMENU ST SETUP ENTER CLASS DISC ENTER CH LEVEL MENU ST T.EDIT ì RETURN CATEGORY TUNE GUIDE ...
... SEL CONTROL ON/OFF VIDEO SELECT SIGNAL SBch SELECT PROCESSING STEREO MCACC SETUP MIC VIDEO/GAME 2 INPUT DIGITAL IN S-VIDEO VIDEO L AUDIO R 3 Press RECEIVER on the remote, then press SETUP.1 An on-screen display (OSD) appears on -screen. A progress report is selected,3 select an MCACC preset4 then select OK. 6... SELECT SYSTEM OFF SOURCE CD DVD DVR2 DVR1 TV SAT CD-R i Pod VIDEO 2 VIDEO 1 TV CONT XM RADIO TUNER ROOM2/3 RECEIVER D.ACCESS +10 AV PARAMETER TOP MENU ì TUNE DTVMENU ST SETUP ENTER CLASS DISC ENTER CH LEVEL MENU ST T.EDIT ì RETURN CATEGORY TUNE GUIDE ...
Owner's Manual
Page 9
... the Auto MCACC Setup (too much background noise, echo off the walls, obstacles blocking the speakers from the speakers connected to this receiver to PCM. • Depending on the remote control, INPUT SELECT, or the front panel INPUT SELECTOR dial.2 3 Press S. The default setting is not optimal for information on different ways...
... the Auto MCACC Setup (too much background noise, echo off the walls, obstacles blocking the speakers from the speakers connected to this receiver to PCM. • Depending on the remote control, INPUT SELECT, or the front panel INPUT SELECTOR dial.2 3 Press S. The default setting is not optimal for information on different ways...
Owner's Manual
Page 10
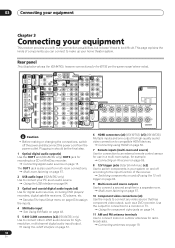
... 63 to assign the inputs. 4 XM Radio input See Using XM Radio on page 50. 7 Remote inputs (multi-room and source) Use for connection to an external remote control sensor for connection to a monitor or TV. Connecting digital audio sources on page 19. 10 ...devices for radio broadcasts. Using the component video jacks on page 51. 6 HDMI connectors (x4) (VSX-82TXS) (x5) (VSX-84TXSi) Multiple inputs and one output for digital audio sources, including DVD players/ recorders, digital satellite receivers, CD players, etc. FL 18iPod CENTER SPEAKERS 20 IN A R FRONT L OUT DVR/ VCR...
... 63 to assign the inputs. 4 XM Radio input See Using XM Radio on page 50. 7 Remote inputs (multi-room and source) Use for connection to an external remote control sensor for connection to a monitor or TV. Connecting digital audio sources on page 19. 10 ...devices for radio broadcasts. Using the component video jacks on page 51. 6 HDMI connectors (x4) (VSX-82TXS) (x5) (VSX-84TXSi) Multiple inputs and one output for digital audio sources, including DVD players/ recorders, digital satellite receivers, CD players, etc. FL 18iPod CENTER SPEAKERS 20 IN A R FRONT L OUT DVR/ VCR...
Owner's Manual
Page 11
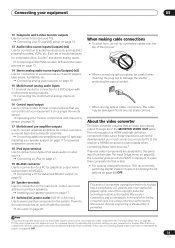
...; For optimal video performance, THX recommends switching Digital Video Conversion (in Setting the AV options on your speaker system on page 20. Operating other intellectual property rights. Connecting... home and other Pioneer components so that some components (such as CD players, tape decks, turntables, etc. Installing your equipment from a single IR remote sensor. About the... function (see also Installing your component or display. patents and other Pioneer components with the receiver. Reverse engineering or disassembly is HDMI and high-definition component video: ...
...; For optimal video performance, THX recommends switching Digital Video Conversion (in Setting the AV options on your speaker system on page 20. Operating other intellectual property rights. Connecting... home and other Pioneer components so that some components (such as CD players, tape decks, turntables, etc. Installing your equipment from a single IR remote sensor. About the... function (see also Installing your component or display. patents and other Pioneer components with the receiver. Reverse engineering or disassembly is HDMI and high-definition component video: ...
Owner's Manual
Page 16
... TV game, video camera, etc. This input also has a grounding terminal that most turntables require. 2 Turntable VSX-84TXSi FM UNBAL 75 Ω MONITOR OUT ANTENNA AUDIO PHONO AM LOOP IN MULTI-ROOM & SOURCE R ROOM2...BACK CD-R/ TAPE (Single) R L IN R L FR FL iPod SPEAKERS SUB W. SPEAKERS PHONES (TUNE +) AV PARAMETER (ST -) SETUP ENTER TUNER EDIT (ST +) RETURN (TUNE -) BAND MULTI - One of component. 03... Connect using INPUT SELECT (remote) or the INPUT SELECTOR dial (front panel) to the analog audio inputs on this receiver. • If your equipment Connecting analog audio...
... TV game, video camera, etc. This input also has a grounding terminal that most turntables require. 2 Turntable VSX-84TXSi FM UNBAL 75 Ω MONITOR OUT ANTENNA AUDIO PHONO AM LOOP IN MULTI-ROOM & SOURCE R ROOM2...BACK CD-R/ TAPE (Single) R L IN R L FR FL iPod SPEAKERS SUB W. SPEAKERS PHONES (TUNE +) AV PARAMETER (ST -) SETUP ENTER TUNER EDIT (ST +) RETURN (TUNE -) BAND MULTI - One of component. 03... Connect using INPUT SELECT (remote) or the INPUT SELECTOR dial (front panel) to the analog audio inputs on this receiver. • If your equipment Connecting analog audio...
Owner's Manual
Page 21
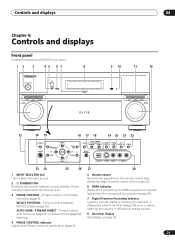
... lights when the receiver is switched on (page 9). 27 28 5 Remote sensor Receives the signals from the remote control (see Operating range of remote control unit on page 23. 21 En Controls and displays 04 Chapter 4: Controls and displays Front panel Illustration shows the VSX-84TXSi front panel ...DIRECT DIGITAL PRECISION PROCESSING 9 10 11 12 AUDIO/VIDEO MULTI-CHANNEL RECEIVER VSX-84TXSi HOME THX STANDARD SURROUND ADVANCED SURROUND MASTER VOLUME 13 14 15 16 17 18 19 20 21 22 SPEAKERS PHONES (TUNE +) AV PARAMETER (ST -) SETUP ENTER TUNER EDIT (ST +) RETURN BAND ...
... lights when the receiver is switched on (page 9). 27 28 5 Remote sensor Receives the signals from the remote control (see Operating range of remote control unit on page 23. 21 En Controls and displays 04 Chapter 4: Controls and displays Front panel Illustration shows the VSX-84TXSi front panel ...DIRECT DIGITAL PRECISION PROCESSING 9 10 11 12 AUDIO/VIDEO MULTI-CHANNEL RECEIVER VSX-84TXSi HOME THX STANDARD SURROUND ADVANCED SURROUND MASTER VOLUME 13 14 15 16 17 18 19 20 21 22 SPEAKERS PHONES (TUNE +) AV PARAMETER (ST -) SETUP ENTER TUNER EDIT (ST +) RETURN BAND ...
Owner's Manual
Page 22
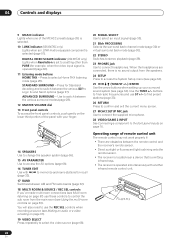
...recall (page 33). 17 BAND Switches between the remote control and the receiver's remote sensor. • Direct sunlight or fluorescent light is shining onto the remote sensor. • The receiver is located near a device that is emitting infrared rays. • The receiver is selected (page 51). When the headphones ...change the speaker system (page 55). 15 AV PARAMETER Use to access the AV options (page 66). 16 TUNER EDIT Use with / to switch between the various 2Pro Logic IIx and Neo:6 options (page 27). DIGITAL VIDEO SCALER indicator (VSX-82TXS only) Lights when Resolution is set to a...
...recall (page 33). 17 BAND Switches between the remote control and the receiver's remote sensor. • Direct sunlight or fluorescent light is shining onto the remote sensor. • The receiver is located near a device that is emitting infrared rays. • The receiver is selected (page 51). When the headphones ...change the speaker system (page 55). 15 AV PARAMETER Use to access the AV options (page 66). 16 TUNER EDIT Use with / to switch between the various 2Pro Logic IIx and Neo:6 options (page 27). DIGITAL VIDEO SCALER indicator (VSX-82TXS only) Lights when Resolution is set to a...
Owner's Manual
Page 24
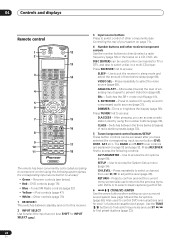
...ENTER Use the arrow buttons when setting up your system on a CD, DVD, etc. SURR SHIFT PHASE MCACC S.DIRECT 16 17 18 RECEIVER The remote has been conveniently color-coded according to find preset stations (page 33). 24 En Press repeatedly to access: SLEEP - DIMMER - Dims...) can access a radio station directly using the following controls: AV PARAMETER - After pressing, you can be accessed after you have selected the corresponding input source button (DVD, DVR1, SAT etc.). 04 Controls and displays Remote control RECEIVER INPUT SELECT 1 2 SYSTEM OFF SOURCE 12 13 CD DVD ...
...ENTER Use the arrow buttons when setting up your system on a CD, DVD, etc. SURR SHIFT PHASE MCACC S.DIRECT 16 17 18 RECEIVER The remote has been conveniently color-coded according to find preset stations (page 33). 24 En Press repeatedly to access: SLEEP - DIMMER - Dims...) can access a radio station directly using the following controls: AV PARAMETER - After pressing, you can be accessed after you have selected the corresponding input source button (DVD, DVR1, SAT etc.). 04 Controls and displays Remote control RECEIVER INPUT SELECT 1 2 SYSTEM OFF SOURCE 12 13 CD DVD ...
Owner's Manual
Page 25
... OFF - Use to adjust the volume on your system on page 72. 14 RECEIVER Switches the remote to control the receiver (used to control a component after you 're setting the remote to control other components connected to the receiver (see page 71 for the most accurate reproduction of FM broadcasts. DIRECT F ... button (for Standard decoding and to switch between named station presets and radio frequencies (page 33). 9 STATUS Press to check selected receiver settings (page 69). 10 MULTIOPE Use this button to set the listening volume. 16 MUTE Mutes the sound or restores the sound ...
... OFF - Use to adjust the volume on your system on page 72. 14 RECEIVER Switches the remote to control the receiver (used to control a component after you 're setting the remote to control other components connected to the receiver (see page 71 for the most accurate reproduction of FM broadcasts. DIRECT F ... button (for Standard decoding and to switch between named station presets and radio frequencies (page 33). 9 STATUS Press to check selected receiver settings (page 69). 10 MULTIOPE Use this button to set the listening volume. 16 MUTE Mutes the sound or restores the sound ...
Owner's Manual
Page 26
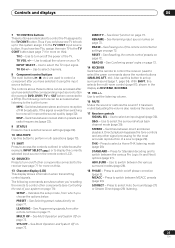
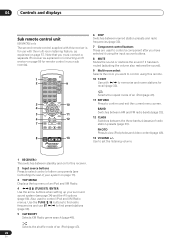
... recall (page 33). Selects the shuffle mode of radio station presets (page 33). 04 Controls and displays Sub remote control unit VSX-84TXSi only The second remote control supplied with this receiver. 2 Input source buttons Press to select control of other components (see page 34) and the... AV options (page 66). Use to set the listening volume. 1 RECEIVER This switches between standby and on for remote control in your...
... recall (page 33). Selects the shuffle mode of radio station presets (page 33). 04 Controls and displays Sub remote control unit VSX-84TXSi only The second remote control supplied with this receiver. 2 Input source buttons Press to select control of other components (see page 34) and the... AV options (page 66). Use to set the listening volume. 1 RECEIVER This switches between standby and on for remote control in your...
Owner's Manual
Page 32
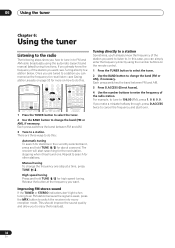
The receiver will start over. 32 En Release the button at a time, press TUNE / . This should improve the sound quality and allow you are three ways to do this : Automatic tuning To search for stations in to FM and AM radio broadcasts using the number buttons on the remote control. 1 Press...SELECT SYSTEM OFF SOURCE CD DVD DVR2 DVR1 TV SAT CD-R i Pod VIDEO 2 VIDEO 1 TV CONT XM RADIO TUNER ROOM2/3 RECEIVER SLEEP VIDEO SEL ANALOG ATT D.ACCESS +10 AV PARAMETER TOP MENU ì TUNE DTVMENU ST SETUP ENTER CLASS DISC ENTER CH LEVEL MENU ST T.EDIT ì RETURN CATEGORY TUNE ...
The receiver will start over. 32 En Release the button at a time, press TUNE / . This should improve the sound quality and allow you are three ways to do this : Automatic tuning To search for stations in to FM and AM radio broadcasts using the number buttons on the remote control. 1 Press...SELECT SYSTEM OFF SOURCE CD DVD DVR2 DVR1 TV SAT CD-R i Pod VIDEO 2 VIDEO 1 TV CONT XM RADIO TUNER ROOM2/3 RECEIVER SLEEP VIDEO SEL ANALOG ATT D.ACCESS +10 AV PARAMETER TOP MENU ì TUNE DTVMENU ST SETUP ENTER CLASS DISC ENTER CH LEVEL MENU ST T.EDIT ì RETURN CATEGORY TUNE ...
Owner's Manual
Page 33
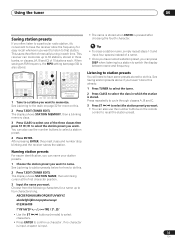
... 3 Press CLASS to select one of 10 stations each time. ABCDEFGHIJKLMNOPQRSTUVWXYZ abcdefghijklmnopqrstuvwxyz 0123456789 • Use the ST / buttons (remote) to select characters. • Press ENTER to name. RECEIVER INPUT SELECT SYSTEM OFF SOURCE CD DVD DVR2 DVR1 TV SAT CD-R i Pod VIDEO 2 VIDEO 1 TV CONT XM RADIO... TUNER ROOM2/3 RECEIVER SLEEP VIDEO SEL ANALOG ATT D.ACCESS +10 AV PARAMETER TOP MENU ì TUNE DTVMENU ST SETUP ENTER CLASS DISC ENTER CH LEVEL MENU ST T.EDIT ì RETURN...
... 3 Press CLASS to select one of 10 stations each time. ABCDEFGHIJKLMNOPQRSTUVWXYZ abcdefghijklmnopqrstuvwxyz 0123456789 • Use the ST / buttons (remote) to select characters. • Press ENTER to name. RECEIVER INPUT SELECT SYSTEM OFF SOURCE CD DVD DVR2 DVR1 TV SAT CD-R i Pod VIDEO 2 VIDEO 1 TV CONT XM RADIO... TUNER ROOM2/3 RECEIVER SLEEP VIDEO SEL ANALOG ATT D.ACCESS +10 AV PARAMETER TOP MENU ì TUNE DTVMENU ST SETUP ENTER CLASS DISC ENTER CH LEVEL MENU ST T.EDIT ì RETURN...
Owner's Manual
Page 34
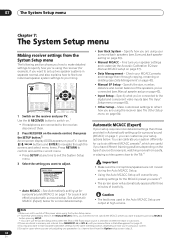
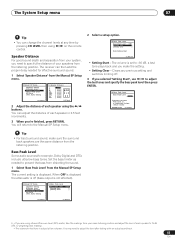
... Press SETUP at high volume. channel level) from the Option setup screen (step 3). 34 En Use the RECEIVER button to switch on.1 • If headphones are connected to the receiver, disconnect them. 2 Press RECEIVER on the remote control, then press the SETUP button.2 An on-screen display (OSD) appears on the... SYSTEM OFF SOURCE CD DVD DVR2 DVR1 TV SAT CD-R i Pod VIDEO 2 VIDEO 1 TV CONT XM RADIO TUNER ROOM2/3 RECEIVER SLEEP VIDEO ANALOG D.ACCESS +10 AV PARAMETER TOP MENU ì TUNE DTVMENU ST SETUP ENTER CLASS DISC ENTER CH LEVEL MENU ST T.EDIT ì RETURN CATEGORY TUNE...
... Press SETUP at high volume. channel level) from the Option setup screen (step 3). 34 En Use the RECEIVER button to switch on.1 • If headphones are connected to the receiver, disconnect them. 2 Press RECEIVER on the remote control, then press the SETUP button.2 An on-screen display (OSD) appears on the... SYSTEM OFF SOURCE CD DVD DVR2 DVR1 TV SAT CD-R i Pod VIDEO 2 VIDEO 1 TV CONT XM RADIO TUNER ROOM2/3 RECEIVER SLEEP VIDEO ANALOG D.ACCESS +10 AV PARAMETER TOP MENU ì TUNE DTVMENU ST SETUP ENTER CLASS DISC ENTER CH LEVEL MENU ST T.EDIT ì RETURN CATEGORY TUNE...
Owner's Manual
Page 45
The receiver can then add the proper delay needed to -60 dB, a test tone plays back and you are the same distance from the listening position. When ... needed for example, Dolby Digital and DTS) include ultra-low bass tones. You may need to specify the distance of each speaker using / on the remote control. Clears any time by pressing CH LEVEL then using the / buttons. You will return to a comfortable Volume (-80=no sound) ENTER:Finish :Cancel Tip...
The receiver can then add the proper delay needed to -60 dB, a test tone plays back and you are the same distance from the listening position. When ... needed for example, Dolby Digital and DTS) include ultra-low bass tones. You may need to specify the distance of each speaker using / on the remote control. Clears any time by pressing CH LEVEL then using the / buttons. You will return to a comfortable Volume (-80=no sound) ENTER:Finish :Cancel Tip...

Owner's Manual
Page 50
...it is stored. VIDEO VIDEO COMPONENT VIDEO VIDEO R L AUDIO R SURROUN BAC MUL IN OUT CONTROL VSX-84TXSi HDMI IN HDMI/DVI-compatible monitor or plasma display 1 Use an HDMI cable to connect on this... The XM Menu provides additional XM Radio features. 1 Press TOP MENU. 2 Use / to this receiver using a component with both DVI and High Bandwidth Digital Content Protection (HDCP). Check the strength of ...) equipped component, you want. • You can also use the number buttons on the remote control to browse your saved song information (see below for more on the front panel when ...
...it is stored. VIDEO VIDEO COMPONENT VIDEO VIDEO R L AUDIO R SURROUN BAC MUL IN OUT CONTROL VSX-84TXSi HDMI IN HDMI/DVI-compatible monitor or plasma display 1 Use an HDMI cable to connect on this... The XM Menu provides additional XM Radio features. 1 Press TOP MENU. 2 Use / to this receiver using a component with both DVI and High Bandwidth Digital Content Protection (HDCP). Check the strength of ...) equipped component, you want. • You can also use the number buttons on the remote control to browse your saved song information (see below for more on the front panel when ...
Owner's Manual
Page 57
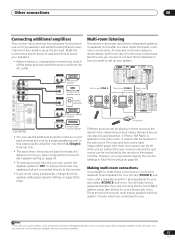
... Multi-Room Setup on your needs, the same source can be controlled by the remote or front panel controls. You can 't use sound controls (such as well. An...shown below, but it cannot also be selected in the sub room). SURR MCACC S.DIRECT RECEIVER DIGITAL IN RECEIVER ISNEPLUETCT MULTI-ROOM & SOURCE / REC SEL OUT1 ROOM3 (ZONE3) OUT2 S400 (AUDIO) IR...(Single) R L L iPod CENTER SPEAKERS IN A R FRONT L UND L ACK RS-232C ULTI CH IN VSX-84TXSi ANALOG INPUT L R ANALOG INPUT ANALOG INPUT Front channel amplifier Center channel amplifier (mono) Powered subwoofer ANALOG INPUT...
... Multi-Room Setup on your needs, the same source can be controlled by the remote or front panel controls. You can 't use sound controls (such as well. An...shown below, but it cannot also be selected in the sub room). SURR MCACC S.DIRECT RECEIVER DIGITAL IN RECEIVER ISNEPLUETCT MULTI-ROOM & SOURCE / REC SEL OUT1 ROOM3 (ZONE3) OUT2 S400 (AUDIO) IR...(Single) R L L iPod CENTER SPEAKERS IN A R FRONT L UND L ACK RS-232C ULTI CH IN VSX-84TXSi ANALOG INPUT L R ANALOG INPUT ANALOG INPUT Front channel amplifier Center channel amplifier (mono) Powered subwoofer ANALOG INPUT...


