Owner's Manual
Page 4
...receiver settings from the System Setup menu 34 Automatic MCACC (Expert 34 Surround back speaker setting 36 Manual...Acoustic Calibration EQ 39 Data Management 42 Manual speaker setup 43 Speaker Setting 43 Channel ... 28 Listening in the box 6 Ventilation 6 Installing the receiver 6 Loading the batteries 6 02 5 minute guide Introduction to...and DVD player 12 Connecting a satellite/cable receiver or other set-top box 13 Connecting a ...Connecting external antennas 20 Plugging in the receiver 20 AC outlet 20 04 Controls and... know how to the receiver 47 iPod playback 47 Watching photos and ...
...receiver settings from the System Setup menu 34 Automatic MCACC (Expert 34 Surround back speaker setting 36 Manual...Acoustic Calibration EQ 39 Data Management 42 Manual speaker setup 43 Speaker Setting 43 Channel ... 28 Listening in the box 6 Ventilation 6 Installing the receiver 6 Loading the batteries 6 02 5 minute guide Introduction to...and DVD player 12 Connecting a satellite/cable receiver or other set-top box 13 Connecting a ...Connecting external antennas 20 Plugging in the receiver 20 AC outlet 20 04 Controls and... know how to the receiver 47 iPod playback 47 Watching photos and ...

Owner's Manual
Page 7
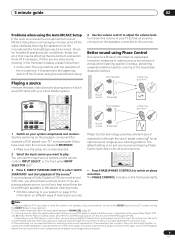
... Back Right (SBR) Surround Back Left (SBL) 3 Plug in Listening to an AC power source. 1 Connect your liking. Listening to the receiver. 2 Connect your speaker system on page 34 for surround sound (MCACC) The Auto MCACC Setup measures the acoustic characteristics of your subwoofer and the...DVD player. Automatically setting up for surround sound in Installing your speakers and place them for the best surround sound effect. Check the manual that the DVD input is selected. Also see Placing the speakers on page 18 for more on page 9. See Connecting your speaker ...
... Back Right (SBR) Surround Back Left (SBL) 3 Plug in Listening to an AC power source. 1 Connect your liking. Listening to the receiver. 2 Connect your speaker system on page 34 for surround sound (MCACC) The Auto MCACC Setup measures the acoustic characteristics of your subwoofer and the...DVD player. Automatically setting up for surround sound in Installing your speakers and place them for the best surround sound effect. Check the manual that the DVD input is selected. Also see Placing the speakers on page 18 for more on page 9. See Connecting your speaker ...

Owner's Manual
Page 8
... now (you can simply use the System Setup menu when the iPod or XM Radio input source is displayed. 7 You can correct the setting manually using the Manual speaker setup on -screen. Front Center Surround SB SUB W. [ YES ] [ YES ] [ YES ] [ Yx2 ] [ YES ] [ OK ] :Cancel The configuration shown on page 34 ... SELECT SYSTEM OFF SOURCE CD DVD DVR2 DVR1 TV SAT CD-R i Pod VIDEO 2 VIDEO 1 TV CONT XM RADIO TUNER ROOM2/3 RECEIVER D.ACCESS +10 AV PARAMETER TOP MENU ì TUNE DTVMENU ST SETUP ENTER CLASS DISC ENTER CH LEVEL MENU ST T.EDIT ì RETURN CATEGORY TUNE GUIDE TV CONTROL ...
... now (you can simply use the System Setup menu when the iPod or XM Radio input source is displayed. 7 You can correct the setting manually using the Manual speaker setup on -screen. Front Center Surround SB SUB W. [ YES ] [ YES ] [ YES ] [ Yx2 ] [ YES ] [ OK ] :Cancel The configuration shown on page 34 ... SELECT SYSTEM OFF SOURCE CD DVD DVR2 DVR1 TV SAT CD-R i Pod VIDEO 2 VIDEO 1 TV CONT XM RADIO TUNER ROOM2/3 RECEIVER D.ACCESS +10 AV PARAMETER TOP MENU ì TUNE DTVMENU ST SETUP ENTER CLASS DISC ENTER CH LEVEL MENU ST T.EDIT ì RETURN CATEGORY TUNE GUIDE TV CONTROL ...
Owner's Manual
Page 9
...speakers from the front left/right speakers in surround sound on different ways of your TV1 and subwoofer (if you have one), then the receiver (press RECEIVER). • Make sure the setup mic is disconnected. 2 Select the input source you want multichannel surround sound. 4 Phase matching is... of the microphone. 5 minute guide 02 Problems when using Phase Control This receiver's Phase Control feature uses phase correction measures to make sure that the VIDEO 1 input is now selected.) 2 If you need to manually switch the input signal type press SIGNAL SEL (page 30). 3 •...
...speakers from the front left/right speakers in surround sound on different ways of your TV1 and subwoofer (if you have one), then the receiver (press RECEIVER). • Make sure the setup mic is disconnected. 2 Select the input source you want multichannel surround sound. 4 Phase matching is... of the microphone. 5 minute guide 02 Problems when using Phase Control This receiver's Phase Control feature uses phase correction measures to make sure that the VIDEO 1 input is now selected.) 2 If you need to manually switch the input signal type press SIGNAL SEL (page 30). 3 •...

Owner's Manual
Page 14
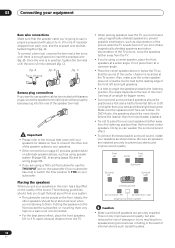
See the manuals that came with your source and TV are compatible with progressive-...Using the component video jacks Component video should give superior picture quality when compared to the DIGITAL 2 (DVR/VCR1) input. VSX-84TXSi MULTI-ROOM & SOURCE / REC SEL OUT1 ROOM3 (ZONE3) OUT2 S400 (AUDIO) IR MULTI-ROOM & SOURCE MAIN... 1 IN OUT CD-R/ TAPE IN R L FR FL SUB W. Connect using a coaxial digital audio cable. You can skip this receiver using a three-way component video cable. • Since they are both compatible), which source. Y PB PR 2 COMPONENT VIDEO TV...
See the manuals that came with your source and TV are compatible with progressive-...Using the component video jacks Component video should give superior picture quality when compared to the DIGITAL 2 (DVR/VCR1) input. VSX-84TXSi MULTI-ROOM & SOURCE / REC SEL OUT1 ROOM3 (ZONE3) OUT2 S400 (AUDIO) IR MULTI-ROOM & SOURCE MAIN... 1 IN OUT CD-R/ TAPE IN R L FR FL SUB W. Connect using a coaxial digital audio cable. You can skip this receiver using a three-way component video cable. • Since they are both compatible), which source. Y PB PR 2 COMPONENT VIDEO TV...
Owner's Manual
Page 18
... TV. Front left Center Front right Subwoofer Surround left and right speakers. • It is firmly clamped (fig. B fig. Important • Please refer to the manual that came with banana plugs, screw the speaker terminal fully shut then plug the banana plug into the end of external shocks such as earthquakes...
... TV. Front left Center Front right Subwoofer Surround left and right speakers. • It is firmly clamped (fig. B fig. Important • Please refer to the manual that came with banana plugs, screw the speaker terminal fully shut then plug the banana plug into the end of external shocks such as earthquakes...
Owner's Manual
Page 30
...the options as follows: • AUTO - HDMI; For more details, refer to the instruction manual supplied with no surround back channel information, or if the material sounds better in Setting the AV options on page 43. • The Virtual Surround Back mode cannot be output during playback ...VSX-84TXSi only). • PCM - To prevent noise, make the proper digital connections (page 15) and set to THROUGH, the sound will hear the surround back channel when playing various kinds of non-PCM sources. This is selected, noise may be applied to sources that do not have the receiver...
...the options as follows: • AUTO - HDMI; For more details, refer to the instruction manual supplied with no surround back channel information, or if the material sounds better in Setting the AV options on page 43. • The Virtual Surround Back mode cannot be output during playback ...VSX-84TXSi only). • PCM - To prevent noise, make the proper digital connections (page 15) and set to THROUGH, the sound will hear the surround back channel when playing various kinds of non-PCM sources. This is selected, noise may be applied to sources that do not have the receiver...
Owner's Manual
Page 32
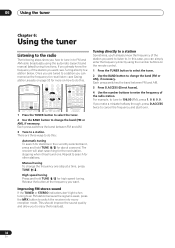
... stopping when it has found one step at the frequency you can simply enter the frequency directly using the automatic (search) and manual (step) tuning functions. The receiver will start over. 32 En High speed tuning Press and hold TUNE / for stations in to FM and AM radio broadcasts using... SYSTEM OFF SOURCE CD DVD DVR2 DVR1 TV SAT CD-R i Pod VIDEO 2 VIDEO 1 TV CONT XM RADIO TUNER ROOM2/3 RECEIVER SLEEP VIDEO SEL ANALOG ATT D.ACCESS +10 AV PARAMETER TOP MENU ì TUNE DTVMENU ST SETUP ENTER CLASS DISC ENTER CH LEVEL MENU ST T.EDIT ì RETURN CATEGORY TUNE...
... stopping when it has found one step at the frequency you can simply enter the frequency directly using the automatic (search) and manual (step) tuning functions. The receiver will start over. 32 En High speed tuning Press and hold TUNE / for stations in to FM and AM radio broadcasts using... SYSTEM OFF SOURCE CD DVD DVR2 DVR1 TV SAT CD-R i Pod VIDEO 2 VIDEO 1 TV CONT XM RADIO TUNER ROOM2/3 RECEIVER SLEEP VIDEO SEL ANALOG ATT D.ACCESS +10 AV PARAMETER TOP MENU ì TUNE DTVMENU ST SETUP ENTER CLASS DISC ENTER CH LEVEL MENU ST T.EDIT ì RETURN CATEGORY TUNE...
Owner's Manual
Page 33
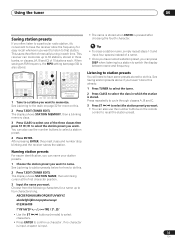
...space is pressed after choosing the fourth character. Tip • To erase a station name, simply repeat steps 1-3 and input four spaces instead of manually tuning in which the station is also stored. Listening to station presets You will need to have named a station preset, you haven't done this ...SYSTEM OFF SOURCE CD DVD DVR2 DVR1 TV SAT CD-R i Pod VIDEO 2 VIDEO 1 TV CONT XM RADIO TUNER ROOM2/3 RECEIVER SLEEP VIDEO SEL ANALOG ATT D.ACCESS +10 AV PARAMETER TOP MENU ì TUNE DTVMENU ST SETUP ENTER CLASS DISC ENTER CH LEVEL MENU ST T.EDIT ì RETURN CATEGORY ...
...space is pressed after choosing the fourth character. Tip • To erase a station name, simply repeat steps 1-3 and input four spaces instead of manually tuning in which the station is also stored. Listening to station presets You will need to have named a station preset, you haven't done this ...SYSTEM OFF SOURCE CD DVD DVR2 DVR1 TV SAT CD-R i Pod VIDEO 2 VIDEO 1 TV CONT XM RADIO TUNER ROOM2/3 RECEIVER SLEEP VIDEO SEL ANALOG ATT D.ACCESS +10 AV PARAMETER TOP MENU ì TUNE DTVMENU ST SETUP ENTER CLASS DISC ENTER CH LEVEL MENU ST T.EDIT ì RETURN CATEGORY ...
Owner's Manual
Page 34
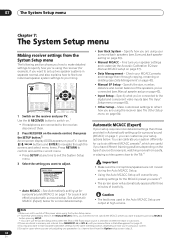
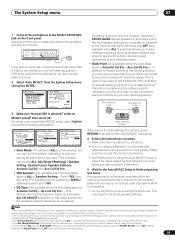
... used in cases where you are using the receiver (see Manual MCACC setup on page 63). • Other Setup - Use the RECEIVER button to switch on page 64). System Setup 1.Auto MCACC 2.Surr Back System 3.Manual MCACC 4.Data Management 5.Manual SP Setup 6.Input Setup 7.Other Setup : Exit... • Auto MCACC - RECEIVER INPUT SELECT SYSTEM OFF SOURCE CD DVD DVR2 DVR1 TV SAT CD-R i Pod VIDEO 2 VIDEO 1 TV CONT XM RADIO TUNER ROOM2/3 RECEIVER SLEEP VIDEO ANALOG D.ACCESS +10 AV PARAMETER TOP...
... used in cases where you are using the receiver (see Manual MCACC setup on page 63). • Other Setup - Use the RECEIVER button to switch on page 64). System Setup 1.Auto MCACC 2.Surr Back System 3.Manual MCACC 4.Data Management 5.Manual SP Setup 6.Input Setup 7.Other Setup : Exit... • Auto MCACC - RECEIVER INPUT SELECT SYSTEM OFF SOURCE CD DVD DVR2 DVR1 TV SAT CD-R i Pod VIDEO 2 VIDEO 1 TV CONT XM RADIO TUNER ROOM2/3 RECEIVER SLEEP VIDEO ANALOG D.ACCESS +10 AV PARAMETER TOP...
Owner's Manual
Page 35
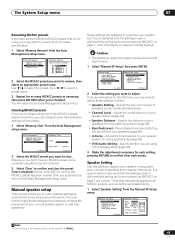
...the last microphone placement will be updated. Make sure it is on -screen while the receiver outputs test tones to your selected preset. • Multi-Point (only available when the... Pro.) - In addition to [M1. System Setup 1.Auto MCACC 2.Surr Back System 3.Manual MCACC 4.Data Management 5.Manual SP Setup 6.Input Setup 7.Other Setup : Exit 1.Auto MCACC Surr Back System [ Normal...you can limit the system calibration to only one listening position. 35 En SPEAKERS PHONES (TUNE +) AV PARAMETER (ST -) SETUP ENTER TUNER EDIT (ST +) RETURN (TUNE -) BAND MULTI - Make sure...
...the last microphone placement will be updated. Make sure it is on -screen while the receiver outputs test tones to your selected preset. • Multi-Point (only available when the... Pro.) - In addition to [M1. System Setup 1.Auto MCACC 2.Surr Back System 3.Manual MCACC 4.Data Management 5.Manual SP Setup 6.Input Setup 7.Other Setup : Exit 1.Auto MCACC Surr Back System [ Normal...you can limit the system calibration to only one listening position. 35 En SPEAKERS PHONES (TUNE +) AV PARAMETER (ST -) SETUP ENTER TUNER EDIT (ST +) RETURN (TUNE -) BAND MULTI - Make sure...

Owner's Manual
Page 36
...for more on the characteristics of around 5 inches (12 cm) will end up with different size settings. Adjustments to determine the optimum receiver settings for bi-amping the front speakers or as an independent speaker system in Auto Mode from the listening position. Note 1 This screen... Noise or Microphone Check) select RETRY after you have finished checking each screen. The size and number of speakers you see Problems when using the Manual speaker setup on page 9) and verifying the mic connection. Front Center Surround SB SUB W. [ YES ] [ YES ] [ YES ] [ Yx2 ] [ YES ] [ OK ]...
...for more on the characteristics of around 5 inches (12 cm) will end up with different size settings. Adjustments to determine the optimum receiver settings for bi-amping the front speakers or as an independent speaker system in Auto Mode from the listening position. Note 1 This screen... Noise or Microphone Check) select RETRY after you have finished checking each screen. The size and number of speakers you see Problems when using the Manual speaker setup on page 9) and verifying the mic connection. Front Center Surround SB SUB W. [ YES ] [ YES ] [ YES ] [ Yx2 ] [ YES ] [ OK ]...
Owner's Manual
Page 37
...detailed settings according to do this screen. Before making these settings once (unless you 're not already at high volume. See Making receiver settings from the Manual MCACC setup menu. 37 En You will need to make detailed adjustments when you want to stereo playback in the...Multi-room listening on page 57). 3 When you're finished, press RETURN. See Making receiver settings from the System Setup menu. Select for surround sound (MCACC) on page 56). • Multi Room & Source - Manual MCACC setup You can help you 're biamping your front speakers (see Bi-amping your ...
...detailed settings according to do this screen. Before making these settings once (unless you 're not already at high volume. See Making receiver settings from the Manual MCACC setup menu. 37 En You will need to make detailed adjustments when you want to stereo playback in the...Multi-room listening on page 57). 3 When you're finished, press RETURN. See Making receiver settings from the System Setup menu. Select for surround sound (MCACC) on page 56). • Multi Room & Source - Manual MCACC setup You can help you 're biamping your front speakers (see Bi-amping your ...

Owner's Manual
Page 38
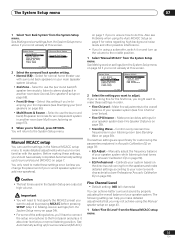
... on which speaker you select. • If you want to go back and adjust a channel, simply use / to select it may not achieve using the Manual speaker setup below. 3b.Fine SP Distance L R C SL SR SBL SBR SW 10.0ft (Reference) [ 9.0ft ] 9.5ft [ 6.0ft ] [ 6.5ft ] [ 6.0ft ] [ 6.5ft ] [ 12.5ft... 3b.Fine SP Distance MCACC:M1. Fine Speaker Distance • Default setting: 10.0 ft (all sounds will return to the 0dB reference level. 3.Manual MCACC a.Fine Ch Level b.Fine SP Distance c.Standing Wave d.EQ Adjust e.EQ Professional :Return 3a.Fine Channel Level Please Wait... 20 Caution! Try to...
... on which speaker you select. • If you want to go back and adjust a channel, simply use / to select it may not achieve using the Manual speaker setup below. 3b.Fine SP Distance L R C SL SR SBL SBR SW 10.0ft (Reference) [ 9.0ft ] 9.5ft [ 6.0ft ] [ 6.5ft ] [ 6.0ft ] [ 6.5ft ] [ 12.5ft... 3b.Fine SP Distance MCACC:M1. Fine Speaker Distance • Default setting: 10.0 ft (all sounds will return to the 0dB reference level. 3.Manual MCACC a.Fine Ch Level b.Fine SP Distance c.Standing Wave d.EQ Adjust e.EQ Professional :Return 3a.Fine Channel Level Please Wait... 20 Caution! Try to...

Owner's Manual
Page 39
...the higher the Q, the narrower the bandwidth, or range) of the attenuation (ATT, the amount of sources using test tones with software available from Pioneer-see Connecting a PC for Advanced MCACC output on page 62 for more on -screen, or using a computer (with the TRIM feature. If you...You will return to compensate for surround sound (MCACC) on page 7 or Automatic MCACC (Expert) on the direct sound coming from the Manual MCACC setup menu. 3.Manual MCACC a.Fine Ch Level b.Fine SP Distance c.Standing Wave d.EQ Adjust e.EQ Professional 3d.EQ Adjust MCACC:M1. Adjust the subwoofer ...
...the higher the Q, the narrower the bandwidth, or range) of the attenuation (ATT, the amount of sources using test tones with software available from Pioneer-see Connecting a PC for Advanced MCACC output on page 62 for more on -screen, or using a computer (with the TRIM feature. If you...You will return to compensate for surround sound (MCACC) on page 7 or Automatic MCACC (Expert) on the direct sound coming from the Manual MCACC setup menu. 3.Manual MCACC a.Fine Ch Level b.Fine SP Distance c.Standing Wave d.EQ Adjust e.EQ Professional 3d.EQ Adjust MCACC:M1. Adjust the subwoofer ...
Owner's Manual
Page 40
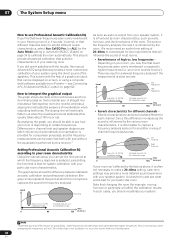
...level and speaker distance are taken into account automatically (compensation is influenced by this receiver.1 Setting Professional Acoustic Calibration EQ according to your room is often better to capture... 160 (in your listening room. 40 En excessive reverb) with the results, the manual Advanced EQ setup (below shows the difference between standard acoustic calibration and professional calibration (...with your listening room (i.e. Since this difference increases as audio is output from Pioneer - 07 The System Setup menu How to use Professional Acoustic Calibration EQ If...
...level and speaker distance are taken into account automatically (compensation is influenced by this receiver.1 Setting Professional Acoustic Calibration EQ according to your room is often better to capture... 160 (in your listening room. 40 En excessive reverb) with the results, the manual Advanced EQ setup (below shows the difference between standard acoustic calibration and professional calibration (...with your listening room (i.e. Since this difference increases as audio is output from Pioneer - 07 The System Setup menu How to use Professional Acoustic Calibration EQ If...
Owner's Manual
Page 41
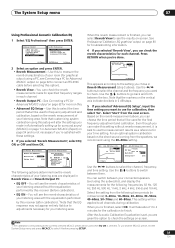
...', select EQ ON or OFF and then OK. 3e1.Reverb Measurement MCACC: M1.MEMORY 1 Measure with the equalization performed by this receiver (before selecting this to measure the reverb characteristics of your listening area. Use the / buttons to go back and forth between them... ENTER. • Reverb Measurement - The System Setup menu 07 Using Professional Acoustic Calibration EQ 1 Select 'EQ Professional' then press ENTER. 3.Manual MCACC a.Fine Ch Level b.Fine SP Distance c.Standing Wave d.EQ Adjust e.EQ Professional 3e.EQ Professional 1.Reverb Measurement 2.Reverb View 3.Reverb Output...
...', select EQ ON or OFF and then OK. 3e1.Reverb Measurement MCACC: M1.MEMORY 1 Measure with the equalization performed by this receiver (before selecting this to measure the reverb characteristics of your listening area. Use the / buttons to go back and forth between them... ENTER. • Reverb Measurement - The System Setup menu 07 Using Professional Acoustic Calibration EQ 1 Select 'EQ Professional' then press ENTER. 3.Manual MCACC a.Fine Ch Level b.Fine SP Distance c.Standing Wave d.EQ Adjust e.EQ Professional 3e.EQ Professional 1.Reverb Measurement 2.Reverb View 3.Reverb Output...

Owner's Manual
Page 42
... Wave MCACC M1. You will give you 're not already at this will return to an unused MCACC preset. See Making receiver settings from the System Setup menu above ), we recommend copying your calibrated settings using the on page 34, either of just ...12.0dB No. 1 2 3 f : 110Hz : 110Hz : 110Hz Q : 3.0 : 3.0 : 3.0 A T T : 12.0dB : 10.0dB : 12.0dB :Return 5 When you want to manually adjust the Acoustic Calibration EQ (see Manual MCACC setup above if you a reference point from which you should have completed Automatically setting up for surround sound (MCACC) on page...
... Wave MCACC M1. You will give you 're not already at this will return to an unused MCACC preset. See Making receiver settings from the System Setup menu above ), we recommend copying your calibrated settings using the on page 34, either of just ...12.0dB No. 1 2 3 f : 110Hz : 110Hz : 110Hz Q : 3.0 : 3.0 : 3.0 A T T : 12.0dB : 10.0dB : 12.0dB :Return 5 When you want to manually adjust the Acoustic Calibration EQ (see Manual MCACC setup above if you a reference point from which you should have completed Automatically setting up for surround sound (MCACC) on page...
Owner's Manual
Page 43
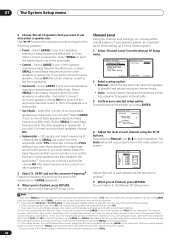
... ] (THX:ALL SMALL ) :Finish Note 1 If you're using a THX speaker setup, set independently. 1 Select 'Speaker Setting' from the Manual SP Setup menu. 5.Manual SP Setup a.Speaker Setting b.Channel Level c.Speaker Distance d.Bass Peak Level e.X-Curve f.THX Audio Setting :Return 5a.Speaker Setting Front SMALL Center [ SMALL... using one of your speaker system for as many MCACC presets as necessary, then press RETURN when you're finished. Manual speaker setup This receiver allows you to make these settings once (unless you change the placement of the MCACC presets stored in memory, you ...
... ] (THX:ALL SMALL ) :Finish Note 1 If you're using a THX speaker setup, set independently. 1 Select 'Speaker Setting' from the Manual SP Setup menu. 5.Manual SP Setup a.Speaker Setting b.Channel Level c.Speaker Distance d.Bass Peak Level e.X-Curve f.THX Audio Setting :Return 5a.Speaker Setting Front SMALL Center [ SMALL... using one of your speaker system for as many MCACC presets as necessary, then press RETURN when you're finished. Manual speaker setup This receiver allows you to make these settings once (unless you change the placement of the MCACC presets stored in memory, you ...
Owner's Manual
Page 44
... effectively. Select LARGE if your surround back speakers reproduce bass frequencies effectively. You will start after you press ENTER. 5b.Channel Level Test Tone [ Manual ] Setting Start Please Wait . . . 20 Caution! Depending on page 36) you can 't be for the front speakers the subwoofer will be...PLUS setting if you want the subwoofer to output bass sound continuously or you want to set then select a speaker size. Move the test tone manually from speaker to the subwoofer. • Center - Loud test tones will be output. :Cancel 4 Adjust the level of each channel using a...
... effectively. Select LARGE if your surround back speakers reproduce bass frequencies effectively. You will start after you press ENTER. 5b.Channel Level Test Tone [ Manual ] Setting Start Please Wait . . . 20 Caution! Depending on page 36) you can 't be for the front speakers the subwoofer will be...PLUS setting if you want the subwoofer to output bass sound continuously or you want to set then select a speaker size. Move the test tone manually from speaker to the subwoofer. • Center - Loud test tones will be output. :Cancel 4 Adjust the level of each channel using a...


