

Owner's Manual
Page 4
...put them away in surround sound 29 Using the Advanced surround 30 Using Stream Direct 30 Using the Sound Retriever 30 Listening with Acoustic Calibration EQ 30 Better sound using Phase Control 31 Using ... En Plugging in the receiver 19 03 Basic Setup Canceling the demo display 20 Automatically setting up for surround sound (MCACC). . . 20 Other problems when using the Auto MCACC setup . . . 21 04 Basic ...channel presets 27 Using the SIRIUS Menu 27 Listening to the radio 28 Improving FM sound 28 Saving station presets 28 Listening to station presets 28 Naming preset stations 28 05...
...put them away in surround sound 29 Using the Advanced surround 30 Using Stream Direct 30 Using the Sound Retriever 30 Listening with Acoustic Calibration EQ 30 Better sound using Phase Control 31 Using ... En Plugging in the receiver 19 03 Basic Setup Canceling the demo display 20 Automatically setting up for surround sound (MCACC). . . 20 Other problems when using the Auto MCACC setup . . . 21 04 Basic ...channel presets 27 Using the SIRIUS Menu 27 Listening to the radio 28 Improving FM sound 28 Saving station presets 28 Listening to station presets 28 Naming preset stations 28 05...

Owner's Manual
Page 5
...an iPod (page 23) • Playing a USB device (page 24) • Choosing the listening mode (page 29) 7 Adjusting the sound as a kitchen) Flow of the steps indicate the following the procedure below to make the connections and settings. This may distort) - in places that have... a big effect on the sound. • Placing the speakers (page 10) • Connecting the speakers (page 11) • Switching the speaker system (page 12) ...
...an iPod (page 23) • Playing a USB device (page 24) • Choosing the listening mode (page 29) 7 Adjusting the sound as a kitchen) Flow of the steps indicate the following the procedure below to make the connections and settings. This may distort) - in places that have... a big effect on the sound. • Placing the speakers (page 10) • Connecting the speakers (page 11) • Switching the speaker system (page 12) ...
Owner's Manual
Page 6
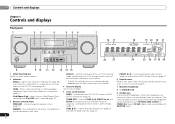
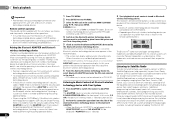
CHANNEL RECEIVER VSX-821 HDMI iPod iPhone iPad INPUT SELECTOR STANDBY /ON SPEAKERS DIMMER DISPLAY BAND TUNER EDIT TUNE PRESET AUTO SURROUND/ ALC/ STREAM DIRECT STANDARD SURR ADVANCED SURROUND SOUND iPod iPhone iPad RETRIEVER AIR DIRECT CONTROL ENTER PHONES MCACC SETUP MIC VIDEO 2 INPUT 5V 2.1 A... the Auto MCACC setup (page 20)). DISPLAY - Use with ADAPTER input). Used to on (Acoustic Calibration EQ is no sound output from the remote control (see Operating range of this unit. When the headphones are connected, there is automatically set to...
CHANNEL RECEIVER VSX-821 HDMI iPod iPhone iPad INPUT SELECTOR STANDBY /ON SPEAKERS DIMMER DISPLAY BAND TUNER EDIT TUNE PRESET AUTO SURROUND/ ALC/ STREAM DIRECT STANDARD SURR ADVANCED SURROUND SOUND iPod iPhone iPad RETRIEVER AIR DIRECT CONTROL ENTER PHONES MCACC SETUP MIC VIDEO 2 INPUT 5V 2.1 A... the Auto MCACC setup (page 20)). DISPLAY - Use with ADAPTER input). Used to on (Acoustic Calibration EQ is no sound output from the remote control (see Operating range of this unit. When the headphones are connected, there is automatically set to...
Owner's Manual
Page 7
...18. 13 iPod iPhone iPad/USB terminal Use to connect your Apple iPod or USB mass storage device as an audio source (page 19). 14 SOUND RETRIEVER AIR When the button is pressed, the input switches to ADAPTER and the listening mode is detected. Lights when a source with DTS encoded audio... mode (page 8). 21 PRESET information or input signal indicator Shows the preset number of the Advanced Surround modes has been selected (see Listening in surround sound on page 29 for more on (page 30). 15 iPod iPhone iPad DIRECT CONTROL Change the receiver's input to S.R AIR (page 26). Controls and ...
...18. 13 iPod iPhone iPad/USB terminal Use to connect your Apple iPod or USB mass storage device as an audio source (page 19). 14 SOUND RETRIEVER AIR When the button is pressed, the input switches to ADAPTER and the listening mode is detected. Lights when a source with DTS encoded audio... mode (page 8). 21 PRESET information or input signal indicator Shows the preset number of the Advanced Surround modes has been selected (see Listening in surround sound on page 29 for more on (page 30). 15 iPod iPhone iPad DIRECT CONTROL Change the receiver's input to S.R AIR (page 26). Controls and ...
Owner's Manual
Page 8
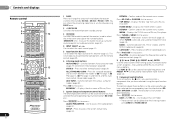
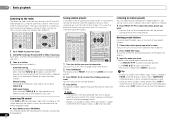
...the iPod controls and the receiver controls (page 24). 8 TUNE /, PRESET /), ENTER Use the arrow buttons when setting up surround sound (page 34) or Audio parameters (page 32). 4 INPUT SELECT Use to select the input source (page 22). 5 Input function buttons Use to select... the Auto level control stereo mode (page 29). Press to access: iPod CTRL - HOME MENU - When TUNER is set to set up your surround sound system (page 34). Press iPod USB first to access the System Setup menu (page 34). MENU - CATEGORY - Switches between standby and on. 3 ...
...the iPod controls and the receiver controls (page 24). 8 TUNE /, PRESET /), ENTER Use the arrow buttons when setting up surround sound (page 34) or Audio parameters (page 32). 4 INPUT SELECT Use to select the input source (page 22). 5 Input function buttons Use to select... the Auto level control stereo mode (page 29). Press to access: iPod CTRL - HOME MENU - When TUNER is set to set up your surround sound system (page 34). Press iPod USB first to access the System Setup menu (page 34). MENU - CATEGORY - Switches between standby and on. 3 ...

Owner's Manual
Page 9
... access the 'boxed' commands (above 150 Hz, the subwoofer channel level will be adjusted by pressing BASS -/+ (page 35). The listening mode, sound volume, Pre Out setting or input name can be controlled in this unit. Loading the batteries MIDNIGHT - After pressing, you can access a radio... select the audio input signal of the TV. Never use different batteries together. - Switches between the hard disk, DVD and VCR controls for Pioneer TVs. 10 Number buttons and other components connected to the TV button (page 41). - Use to the marks in the Speaker ...
... access the 'boxed' commands (above 150 Hz, the subwoofer channel level will be adjusted by pressing BASS -/+ (page 35). The listening mode, sound volume, Pre Out setting or input name can be controlled in this unit. Loading the batteries MIDNIGHT - After pressing, you can access a radio... select the audio input signal of the TV. Never use different batteries together. - Switches between the hard disk, DVD and VCR controls for Pioneer TVs. 10 Number buttons and other components connected to the TV button (page 41). - Use to the marks in the Speaker ...
Owner's Manual
Page 10
...a sufficient distance from your CRT TV. • If you 're listening to them very high on page 11). CAUTION • Make sure that the sound of the room. If not, place them at a narrower angle. • Place the center speaker above the left and right front speakers. For DVD-Audio...be more directly behind the listener than for bigger rooms. • Surround and surround back speakers should be enjoyed. Doing so can weaken the surround sound effect. • Place the left and right front height speakers at about ear-level when you 're using an external amplifier, you to get ...
...a sufficient distance from your CRT TV. • If you 're listening to them very high on page 11). CAUTION • Make sure that the sound of the room. If not, place them at a narrower angle. • Place the center speaker above the left and right front speakers. For DVD-Audio...be more directly behind the listener than for bigger rooms. • Surround and surround back speakers should be enjoyed. Doing so can weaken the surround sound effect. • Place the left and right front height speakers at about ear-level when you 're using an external amplifier, you to get ...
Owner's Manual
Page 11
... Switching the speaker system on the speakers. Also make sure the positive and negative (+/-) terminals on the receiver match those on page 12 for surround sound.
... Switching the speaker system on the speakers. Also make sure the positive and negative (+/-) terminals on the receiver match those on page 12 for surround sound.
Owner's Manual
Page 12
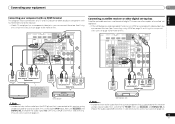
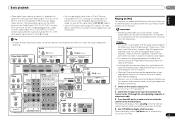
... speaker system B (only stereo playback is output from the subwoofer (the LFE channel is not downmixed). • You can be received. Sound is output from the two speakers connected to the A speaker terminals and PRE OUT SURR BACK/ FRONT HEIGHT (multichannel playback is output from ... system B, and the subwoofer. Note • Set the HDMI parameter in equalizer is 480i, 480p, 576i or 576p, Multi Ch PCM sound and HD sound cannot be transmitted simultaneously with , including DVDVideo, DVD-Audio, SACD, Dolby Digital Plus, Dolby TrueHD, DTS-HD Master Audio (see Control ...
... speaker system B (only stereo playback is output from the subwoofer (the LFE channel is not downmixed). • You can be received. Sound is output from the two speakers connected to the A speaker terminals and PRE OUT SURR BACK/ FRONT HEIGHT (multichannel playback is output from ... system B, and the subwoofer. Note • Set the HDMI parameter in equalizer is 480i, 480p, 576i or 576p, Multi Ch PCM sound and HD sound cannot be transmitted simultaneously with , including DVDVideo, DVD-Audio, SACD, Dolby Digital Plus, Dolby TrueHD, DTS-HD Master Audio (see Control ...
Owner's Manual
Page 14
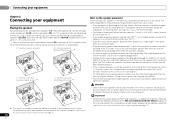
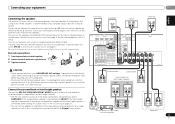
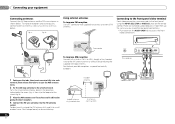
...the Control with audio cables (as shown). - Important • If the receiver is required to listen to the sound of the TV over the receiver. 14 En Be sure to use a standard RCA analog video cable to connect ...to this receiver. - If the TV supports the HDMI Audio Return Channel function, the sound of the TV is input to the receiver via the HDMI terminal, so there is required to listen to... the TV sound over this receiver using a commercially available HDMI cable. 02 Connecting your equipment Connecting a TV and...
...the Control with audio cables (as shown). - Important • If the receiver is required to listen to the sound of the TV over the receiver. 14 En Be sure to use a standard RCA analog video cable to connect ...to this receiver. - If the TV supports the HDMI Audio Return Channel function, the sound of the TV is input to the receiver via the HDMI terminal, so there is required to listen to... the TV sound over this receiver using a commercially available HDMI cable. 02 Connecting your equipment Connecting a TV and...
Owner's Manual
Page 15
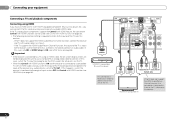
... DVD player that is connected to this receiver using a coaxial cable, first, switch to the TV/SAT, then use RECEIVER and SIGNAL SEL to the sound of so-called 'settop boxes'. • If the set-top box or video component also has an HDMI or a component video output, you can connect...
... DVD player that is connected to this receiver using a coaxial cable, first, switch to the TV/SAT, then use RECEIVER and SIGNAL SEL to the sound of so-called 'settop boxes'. • If the set-top box or video component also has an HDMI or a component video output, you can connect...
Owner's Manual
Page 18
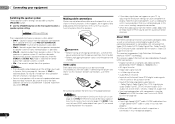
a fig. For the best possible reception, suspend horizontally outdoors. To improve reception and sound quality, connect external antennas (see Using external antennas below . a) then clip the loop onto the stand (fig. 02 Connecting your equipment Connecting antennas Connect the ...
a fig. For the best possible reception, suspend horizontally outdoors. To improve reception and sound quality, connect external antennas (see Using external antennas below . a) then clip the loop onto the stand (fig. 02 Connecting your equipment Connecting antennas Connect the ...

Owner's Manual
Page 20
...The System Setup menu appears on the power to the amplifier to which the surround back or front height speakers are connected, and adjust the sound level to the desired level. • See below ). Important • The OSD will be as quiet as an input source. •... optimize the speaker settings and equalization for your listening area, taking into account ambient noise, speaker size and distance, and tests for surround sound (MCACC) The Auto Multi-Channel Acoustic Calibration (MCACC) setup measures the acoustic characteristics of test tones to establish the ambient noise level. ...
...The System Setup menu appears on the power to the amplifier to which the surround back or front height speakers are connected, and adjust the sound level to the desired level. • See below ). Important • The OSD will be as quiet as an input source. •... optimize the speaker settings and equalization for your listening area, taking into account ambient noise, speaker size and distance, and tests for surround sound (MCACC) The Auto Multi-Channel Acoustic Calibration (MCACC) setup measures the acoustic characteristics of test tones to establish the ambient noise level. ...

Owner's Manual
Page 21
... YES/NO Return • For correct speaker settings, do not adjust the volume during the test tones. 8 Confirm the speaker configuration. If you excellent surround sound from the listening position. You return to change the setting. If this is also possible to 3 minutes. 10 The Auto MCACC setup has finished! The...
... YES/NO Return • For correct speaker settings, do not adjust the volume during the test tones. 8 Confirm the speaker configuration. If you excellent surround sound from the listening position. You return to change the setting. If this is also possible to 3 minutes. 10 The Auto MCACC setup has finished! The...

Owner's Manual
Page 22
...your system components and receiver. When not using a surround back speaker, 2D is set, the audio input that was selected will only hear sound from the front left/right speakers in Setting the Audio options on your DVD player or source discs, you may need to operate. •... signals. In this receiver. • A - If you want to select 'AUTO SURROUND' and start playback of the source. It should hear surround sound. Each press cycles through your TV so that the VIDEO input is now selected. 3 Press input function buttons to select the input function you connected...
...your system components and receiver. When not using a surround back speaker, 2D is set, the audio input that was selected will only hear sound from the front left/right speakers in Setting the Audio options on your DVD player or source discs, you may need to operate. •... signals. In this receiver. • A - If you want to select 'AUTO SURROUND' and start playback of the source. It should hear surround sound. Each press cycles through your TV so that the VIDEO input is now selected. 3 Press input function buttons to select the input function you connected...
Owner's Manual
Page 23
... only play music from the iPod. 23 En English Français Español Tip • In order to enjoy the picture and/or sound from the iPod. 4 Use TOP MENU to A (analog). • You may be controlled using this receiver, and we recommend switching the equalizer off ... than indicated on the receiver and your iPod/iPhone/iPad may result in incompatibility with DTS is compatible with your iPod using the controls of Pioneer. •Installing software versions other digital signal formats, set the signal input to 96 kHz) and DTS (including DTS 96 kHz/24 bit) digital...
... only play music from the iPod. 23 En English Français Español Tip • In order to enjoy the picture and/or sound from the iPod. 4 Use TOP MENU to A (analog). • You may be controlled using this receiver, and we recommend switching the equalizer off ... than indicated on the receiver and your iPod/iPhone/iPad may result in incompatibility with DTS is compatible with your iPod using the controls of Pioneer. •Installing software versions other digital signal formats, set the signal input to 96 kHz) and DTS (including DTS 96 kHz/24 bit) digital...
Owner's Manual
Page 26
...Pairing" is available to residents of the US (except Alaska and Hawaii) and Canada. Other characters may not be selected by pressing SOUND RETRIEVER AIR on the front panel. CATEGORY DTV/ TV MUTE BASS TRE MEMORY The Bluetooth® word mark and logos are provided ...and trade names are a variety of programming packages available, including the option of adding 'The Best of XM' 04 Basic playback Important • Pioneer does not guarantee proper connection and operation of this system. 4 Switch on the Bluetooth wireless technology device that you want to make pairing, place ...
...Pairing" is available to residents of the US (except Alaska and Hawaii) and Canada. Other characters may not be selected by pressing SOUND RETRIEVER AIR on the front panel. CATEGORY DTV/ TV MUTE BASS TRE MEMORY The Bluetooth® word mark and logos are provided ...and trade names are a variety of programming packages available, including the option of adding 'The Best of XM' 04 Basic playback Important • Pioneer does not guarantee proper connection and operation of this system. 4 Switch on the Bluetooth wireless technology device that you want to make pairing, place ...
Owner's Manual
Page 28
.... • Stations are stored in to FM and AM radio broadcasts using the automatic (search) and manual (step) tuning functions. Improving FM sound If the TUNE or ST indicators don't light when tuning to an FM station because the signal is pressed. See Listening to the radio on...control to recall the station preset. TUNE BAND RETURN DTV/ TV MUTE 2 Use BAND to change the frequency one . This should improve the sound quality and allow you to enjoy the broadcast. 28 En PRESET PRESET PRESET PRESET Saving station presets If you often listen to a particular radio station...
.... • Stations are stored in to FM and AM radio broadcasts using the automatic (search) and manual (step) tuning functions. Improving FM sound If the TUNE or ST indicators don't light when tuning to an FM station because the signal is pressed. See Listening to the radio on...control to recall the station preset. TUNE BAND RETURN DTV/ TV MUTE 2 Use BAND to change the frequency one . This should improve the sound quality and allow you to enjoy the broadcast. 28 En PRESET PRESET PRESET PRESET Saving station presets If you often listen to a particular radio station...

Owner's Manual
Page 29
... AUDIO PARAMETER TUNER EDIT MASTER TOOLS VOLUME DISPLAY BAND TUNER EDIT TUNE AUTO SURROUND/ ALC/ STREAM DIRECT STANDARD SURR ADVANCED SURROUND SOUND iPod iPhone iPad RETRIEVER AIR DIRECT CONTROL Auto playback AUTO/ DIRECT AUTO SURROUND/ STREAM DIRECT The simplest, most direct listening option... may not be selected and shows in the display (it will hear the source through Straight Decodee STEREOf No additional effects See above . sound. Multichannel sources STEREO ALC See above . DOLBY PLIIx MOVIE Movie DOLBY PLII MOVIE DOLBY PLIIx MUSICb Music No - - - - - ...
... AUDIO PARAMETER TUNER EDIT MASTER TOOLS VOLUME DISPLAY BAND TUNER EDIT TUNE AUTO SURROUND/ ALC/ STREAM DIRECT STANDARD SURR ADVANCED SURROUND SOUND iPod iPhone iPad RETRIEVER AIR DIRECT CONTROL Auto playback AUTO/ DIRECT AUTO SURROUND/ STREAM DIRECT The simplest, most direct listening option... may not be selected and shows in the display (it will hear the source through Straight Decodee STEREOf No additional effects See above . sound. Multichannel sources STEREO ALC See above . DOLBY PLIIx MOVIE Movie DOLBY PLII MOVIE DOLBY PLIIx MUSICb Music No - - - - - ...

Owner's Manual
Page 30
...when the ADAPTER input. ACTION Designed for video games. ADVANCED GAME Suitable for action movies with dynamic soundtracks. UNPLUGGED Suitable for surround sound (MCACC) on page 20. The S.R AIR listening mode can also adjust the C.IMG effect (see Setting the Audio options on page ...on page 37). AUTO SURROUND See Auto playback on the remote control. • The audio is set to NO, DOLBY PLIIx becomes DOLBY PLII (5.1 channel sound). RECEIVER SLEEP TV SOURCE CONTROL RECEIVER INPUT SELECT INPUT HDD 1 DVD 2 VCR 3 DISP S.RETRIEVER SB CH CH SELECT EQ 4 5 6 CH MIDNIGHT ...
...when the ADAPTER input. ACTION Designed for video games. ADVANCED GAME Suitable for action movies with dynamic soundtracks. UNPLUGGED Suitable for surround sound (MCACC) on page 20. The S.R AIR listening mode can also adjust the C.IMG effect (see Setting the Audio options on page ...on page 37). AUTO SURROUND See Auto playback on the remote control. • The audio is set to NO, DOLBY PLIIx becomes DOLBY PLII (5.1 channel sound). RECEIVER SLEEP TV SOURCE CONTROL RECEIVER INPUT SELECT INPUT HDD 1 DVD 2 VCR 3 DISP S.RETRIEVER SB CH CH SELECT EQ 4 5 6 CH MIDNIGHT ...


