

Owner's Manual
Page 4
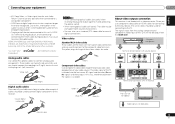
After you for buying this Pioneer product. Contents Before you will know how to control other components 40 ... to the front panel video terminal 18 Connecting an iPod 19 Connecting a USB device 19 4 En Plugging in the receiver 19 03 Basic Setup Canceling the demo display 20 Automatically setting up for surround sound (MCACC). . . 20 Other...26 Listening to Music Contents of your system Setting the remote to operate your component with no HDMI terminal . . 15 Connecting a satellite receiver or other digital set-top box 15 Connecting an HDD/DVD recorder, Blu-ray Disc recorder and...
After you for buying this Pioneer product. Contents Before you will know how to control other components 40 ... to the front panel video terminal 18 Connecting an iPod 19 Connecting a USB device 19 4 En Plugging in the receiver 19 03 Basic Setup Canceling the demo display 20 Automatically setting up for surround sound (MCACC). . . 20 Other...26 Listening to Music Contents of your system Setting the remote to operate your component with no HDMI terminal . . 15 Connecting a satellite receiver or other digital set-top box 15 Connecting an HDD/DVD recorder, Blu-ray Disc recorder and...

Owner's Manual
Page 5
... (When using connections other than the recommended connections.) Using the Audio Return Channel function (page 38) (When the connected TV supports the HDMI Audio Return Channel function.) 5 Use the on-screen automatic MCACC setup to set the video input on your system • ... as desired • Using the Sound Retriever (page 30) • Better sound using a digital connection from the Blu-ray Disc/DVD player to the receiver. • About video outputs connection (page 13) • Connecting a TV and playback components (page 14) • Connecting antennas (page 18) ...
... (When using connections other than the recommended connections.) Using the Audio Return Channel function (page 38) (When the connected TV supports the HDMI Audio Return Channel function.) 5 Use the on-screen automatic MCACC setup to set the video input on your system • ... as desired • Using the Sound Retriever (page 30) • Better sound using a digital connection from the Blu-ray Disc/DVD player to the receiver. • About video outputs connection (page 13) • Connecting a TV and playback components (page 14) • Connecting antennas (page 18) ...
Owner's Manual
Page 6
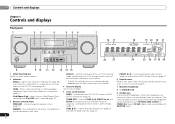
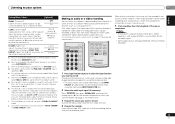
...FM MONO radio bands (page 28). Used to on (Acoustic Calibration EQ is on after the Auto MCACC setup (page 20)). CHANNEL RECEIVER VSX-821 HDMI iPod iPhone iPad INPUT SELECTOR STANDBY /ON SPEAKERS DIMMER DISPLAY BAND TUNER EDIT TUNE PRESET AUTO SURROUND/ ALC/ STREAM DIRECT STANDARD SURR ...speaker system (page 12). Use to select preset radio stations (page 28) and to select SIRIUS Radio channels (page 27). 6 Remote sensor Receives the signals from the remote control (see Operating range of this unit. Switches the display of remote control on page 7. 5 Tuner control ...
...FM MONO radio bands (page 28). Used to on (Acoustic Calibration EQ is on after the Auto MCACC setup (page 20)). CHANNEL RECEIVER VSX-821 HDMI iPod iPhone iPad INPUT SELECTOR STANDBY /ON SPEAKERS DIMMER DISPLAY BAND TUNER EDIT TUNE PRESET AUTO SURROUND/ ALC/ STREAM DIRECT STANDARD SURR ...speaker system (page 12). Use to select preset radio stations (page 28) and to select SIRIUS Radio channels (page 27). 6 Remote sensor Receives the signals from the remote control (see Operating range of this unit. Switches the display of remote control on page 7. 5 Tuner control ...
Owner's Manual
Page 7
... a normal broadcast channel or SIRIUS channel is detected. kHz/MHz - Lights when a source with Dolby TrueHD encoded audio signals is being received in auto stereo mode (page 28). Lights when the DIRECT or PURE DIRECT mode is detected. Lights when a stereo FM broadcast is ...a source with Dolby Digital Plus encoded audio signals is being received. DIGITAL - Blinks when a digital audio signal is selected and selected audio input is detected. HDMI - Blinks when an HDMI signal is selected and selected HDMI input is not provided. 27 Up Mix/DIMMER indicator Lights when...
... a normal broadcast channel or SIRIUS channel is detected. kHz/MHz - Lights when a source with Dolby TrueHD encoded audio signals is being received in auto stereo mode (page 28). Lights when the DIRECT or PURE DIRECT mode is detected. Lights when a stereo FM broadcast is ...a source with Dolby Digital Plus encoded audio signals is being received. DIGITAL - Blinks when a digital audio signal is selected and selected audio input is detected. HDMI - Blinks when an HDMI signal is selected and selected HDMI input is not provided. 27 Up Mix/DIMMER indicator Lights when...
Owner's Manual
Page 11
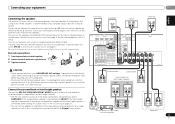
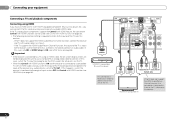
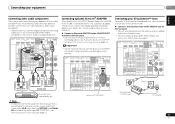
.... In this case plug the amplifier into the speaker terminal. Connecting your equipment 02 English Français Español Connecting the speakers The receiver will work with just two stereo speakers (the front speakers in the diagram) but using at least three speakers is recommended, and a complete setup is... wire touches the back panel it may cause the power to cut off as well. You can use speakers with this unit to the left HDMI DVR/BDR IN DVD IN BD IN VIDEO 1 IN OUT COAXIAL IN 1 IN 1 ASSIGNABLE IN OPTICAL 2 ASSIGNABLE VIDEO (CD) AUDIO SURR BACK/ DVR/BDR CD...
.... In this case plug the amplifier into the speaker terminal. Connecting your equipment 02 English Français Español Connecting the speakers The receiver will work with just two stereo speakers (the front speakers in the diagram) but using at least three speakers is recommended, and a complete setup is... wire touches the back panel it may cause the power to cut off as well. You can use speakers with this unit to the left HDMI DVR/BDR IN DVD IN BD IN VIDEO 1 IN OUT COAXIAL IN 1 IN 1 ASSIGNABLE IN OPTICAL 2 ASSIGNABLE VIDEO (CD) AUDIO SURR BACK/ DVR/BDR CD...
Owner's Manual
Page 12
... be displayed. If connecting the player and the TV via this unit (as shown in the illustration). This receiver incorporates High-Definition Multimedia Interface (HDMI®) technology. Sound is output from the two speakers connected to select a speaker system setting. Note that ... are possible using the Control with HDMI function (see below through HDMI connections. • Digital transfer of uncompressed video (contents protected by the transformers in this receiver). This receiver supports the functions described below for up to HDMI, if you made in equalizer is...
... be displayed. If connecting the player and the TV via this unit (as shown in the illustration). This receiver incorporates High-Definition Multimedia Interface (HDMI®) technology. Sound is output from the two speakers connected to select a speaker system setting. Note that ... are possible using the Control with HDMI function (see below through HDMI connections. • Digital transfer of uncompressed video (contents protected by the transformers in this receiver). This receiver supports the functions described below for up to HDMI, if you made in equalizer is...
Owner's Manual
Page 13
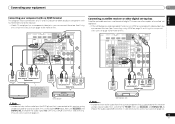
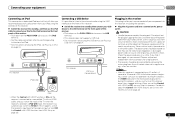
..., interference between audio formats or beginning playback. • Turning on/off the device connected to this receiver. Playback component Terminal for connection with source device IN IN IN HDMI Y PB PR COMPONENT VIDEO VIDEO OUT HDMI MONITOR OUT Y PB PR COMPONENT VIDEO Terminal for connecting to be output from cables for coaxial digital...
..., interference between audio formats or beginning playback. • Turning on/off the device connected to this receiver. Playback component Terminal for connection with source device IN IN IN HDMI Y PB PR COMPONENT VIDEO VIDEO OUT HDMI MONITOR OUT Y PB PR COMPONENT VIDEO Terminal for connecting to be output from cables for coaxial digital...
Owner's Manual
Page 14
... with audio cables (as shown). - If this case, set ARC at HDMI Setup to the original input, or turn OFF the Control with HDMI function (see HDMI Setup on the TV. • When the Control with HDMI function is ON and the receiver is required to listen to TV/SAT. In this happens, switch the... on page 38). • The following connection/setting is connected to the sound of the TV over the receiver. 14 En HDMI OUT HDMI DVR/BDR IN DVD IN BD IN VIDEO 1 IN OUT COAXIAL IN 1 IN 1 ASSIGNABLE IN OPTICAL 2 ASSIGNABLE VIDEO (CD) AUDIO SURR BACK/ DVR/BDR CD-R/...
... with audio cables (as shown). - If this case, set ARC at HDMI Setup to the original input, or turn OFF the Control with HDMI function (see HDMI Setup on the TV. • When the Control with HDMI function is ON and the receiver is required to listen to TV/SAT. In this happens, switch the... on page 38). • The following connection/setting is connected to the sound of the TV over the receiver. 14 En HDMI OUT HDMI DVR/BDR IN DVD IN BD IN VIDEO 1 IN OUT COAXIAL IN 1 IN 1 ASSIGNABLE IN OPTICAL 2 ASSIGNABLE VIDEO (CD) AUDIO SURR BACK/ DVR/BDR CD-R/...
Owner's Manual
Page 15
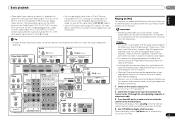
... audio from the DVD player that is connected to this . See Connecting using a coaxial cable, first, switch to the TV/SAT, then use RECEIVER and SIGNAL SEL to this receiver using HDMI on page 14 or Using the component video jacks on page 16 for more on this too...IN SIRIUS A R FRONT L R IN L IN CENTER MONITOR OUT Y PB PR TV/SAT BD COMPONENT VIDEO R DVD SUBWOOFER PRE OUT Connecting a satellite receiver or other playback component) with no HDMI terminal This diagram shows connections of a TV and DVD player (or other digital set -top box or video component also has an...
... audio from the DVD player that is connected to this . See Connecting using a coaxial cable, first, switch to the TV/SAT, then use RECEIVER and SIGNAL SEL to this receiver using HDMI on page 14 or Using the component video jacks on page 16 for more on this too...IN SIRIUS A R FRONT L R IN L IN CENTER MONITOR OUT Y PB PR TV/SAT BD COMPONENT VIDEO R DVD SUBWOOFER PRE OUT Connecting a satellite receiver or other playback component) with no HDMI terminal This diagram shows connections of a TV and DVD player (or other digital set -top box or video component also has an...
Owner's Manual
Page 16
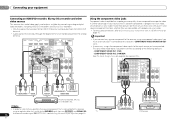
...- 02 Connecting your equipment Connecting an HDD/DVD recorder, Blu-ray Disc recorder and other video sources This receiver has audio/video inputs and outputs suitable for more on this receiver's COMPONENT VIDEO MONITOR OUT jacks. • If necessary, assign the component video inputs to the input source...Connecting your component with your TV connected to be output from the VIDEO OUT terminal. • Audio signals that are input to composite video. HDMI DVR/BDR IN DVD IN BD IN VIDEO 1 IN OUT COAXIAL IN 1 IN 1 ASSIGNABLE IN OPTICAL 2 ASSIGNABLE VIDEO (CD) AUDIO SURR...
...- 02 Connecting your equipment Connecting an HDD/DVD recorder, Blu-ray Disc recorder and other video sources This receiver has audio/video inputs and outputs suitable for more on this receiver's COMPONENT VIDEO MONITOR OUT jacks. • If necessary, assign the component video inputs to the input source...Connecting your component with your TV connected to be output from the VIDEO OUT terminal. • Audio signals that are input to composite video. HDMI DVR/BDR IN DVD IN BD IN VIDEO 1 IN OUT COAXIAL IN 1 IN 1 ASSIGNABLE IN OPTICAL 2 ASSIGNABLE VIDEO (CD) AUDIO SURR...
Owner's Manual
Page 17
... device, see Selecting the audio input signal on page 22). Connecting optional Bluetooth® ADAPTER When the Bluetooth ADAPTER (Pioneer Model No. Doing so could cause damage or faulty contact. HDMI DVR/BDR IN DVD IN BD IN VIDEO 1 IN OUT COAXIAL IN 1 IN 1 ASSIGNABLE IN OP 2 ASS ... Y PB PR COMPONENT VIDEO TV/SAT BD R SUBWOOFER DVD PRE OUT Bluetooth® ADAPTER Connecting your SiriusConnect™ Tuner To receive SIRIUS Satellite Radio broadcasts, you 're connecting. HDMI DVR/BDR IN DVD IN BD IN VIDEO 1 IN OUT COAXIAL IN 1 IN 1 ASSIGNABLE IN OP 2 ASS VIDEO (CD...
... device, see Selecting the audio input signal on page 22). Connecting optional Bluetooth® ADAPTER When the Bluetooth ADAPTER (Pioneer Model No. Doing so could cause damage or faulty contact. HDMI DVR/BDR IN DVD IN BD IN VIDEO 1 IN OUT COAXIAL IN 1 IN 1 ASSIGNABLE IN OP 2 ASS ... Y PB PR COMPONENT VIDEO TV/SAT BD R SUBWOOFER DVD PRE OUT Bluetooth® ADAPTER Connecting your SiriusConnect™ Tuner To receive SIRIUS Satellite Radio broadcasts, you 're connecting. HDMI DVR/BDR IN DVD IN BD IN VIDEO 1 IN OUT COAXIAL IN 1 IN 1 ASSIGNABLE IN OP 2 ASS VIDEO (CD...
Owner's Manual
Page 19
... electric shock. Never make a knot in any operations during this receiver, including the speakers. Plug the AC power cord into standby, and then use , e.g., when on vacation. When you set the Control with HDMI to OFF, you have connected all your nearest Pioneer authorized independent service company for iPod. • For instructions...
... electric shock. Never make a knot in any operations during this receiver, including the speakers. Plug the AC power cord into standby, and then use , e.g., when on vacation. When you set the Control with HDMI to OFF, you have connected all your nearest Pioneer authorized independent service company for iPod. • For instructions...

Owner's Manual
Page 20
...automatically starts after pressing ENTER. If you have set before performing the Auto MCACC setup (see page 37). (Here is an explanation using the HDMI output to be made . • Before using the Auto MCACC setup, the iPod USB input should not be selected as possible after three ...level using surround back or front height speakers, turn off the demo display. Automatically setting up . • When using a table or a chair. 4 Press RECEIVER on the remote control, then press the SETUP button. Try to your particular room. You can turn on the power to the amplifier to which...
...automatically starts after pressing ENTER. If you have set before performing the Auto MCACC setup (see page 37). (Here is an explanation using the HDMI output to be made . • Before using the Auto MCACC setup, the iPod USB input should not be selected as possible after three ...level using surround back or front height speakers, turn off the demo display. Automatically setting up . • When using a table or a chair. 4 Press RECEIVER on the remote control, then press the SETUP button. Try to your particular room. You can turn on the power to the amplifier to which...

Owner's Manual
Page 22
...input signal and listening mode, check the connections and settings. Selects an HDMI signal. H can also be selected for example a DVD player), your DVD player or source discs, you have one), then the receiver (press RECEIVER). • Make sure the setup microphone is automatically selected. However,...A and DIGITAL indicators are the basic instructions for playback (see page 7). En If you want to play. • The input of the receiver will be set to H (HDMI) or C1/O1/O2 (digital), 2 lights when a Dolby Digital signal is input, and DTS lights when a DTS signal is input....
...input signal and listening mode, check the connections and settings. Selects an HDMI signal. H can also be selected for example a DVD player), your DVD player or source discs, you have one), then the receiver (press RECEIVER). • Make sure the setup microphone is automatically selected. However,...A and DIGITAL indicators are the basic instructions for playback (see page 7). En If you want to play. • The input of the receiver will be set to H (HDMI) or C1/O1/O2 (digital), 2 lights when a Dolby Digital signal is input, and DTS lights when a DTS signal is input....
Owner's Manual
Page 23
...or component cable. 3 Press iPod USB on the website of Pioneer to A (analog). • You may result in incompatibility with your iPod using this receiver. TV (TV/SAT input) 2. Other than TV/SAT input RECEIVER SIGNAL SEL 0 O1 HDMI DVR/BDR IN DVD IN BD IN VIDEO 1 IN OUT COAXIAL...input to 96 kHz) and DTS (including DTS 96 kHz/24 bit) digital signal formats. Other than CD input RECEIVER SIGNAL SEL 0 C1 Audio 1. Important • Pioneer cannot under any inconvenience or loss of noncopyrighted materials or materials the user is playing an analog signal. For more ...
...or component cable. 3 Press iPod USB on the website of Pioneer to A (analog). • You may result in incompatibility with your iPod using this receiver. TV (TV/SAT input) 2. Other than TV/SAT input RECEIVER SIGNAL SEL 0 O1 HDMI DVR/BDR IN DVD IN BD IN VIDEO 1 IN OUT COAXIAL...input to 96 kHz) and DTS (including DTS 96 kHz/24 bit) digital signal formats. Other than CD input RECEIVER SIGNAL SEL 0 C1 Audio 1. Important • Pioneer cannot under any inconvenience or loss of noncopyrighted materials or materials the user is playing an analog signal. For more ...
Owner's Manual
Page 32
... defaults, if not stated, are a number of the display connected with an HDMI cable. Channel 2 is set it is output from music sources at low volumes). When set to set depending on this receiver. AMP THRU A.DLY (Auto Delay)h OFF This feature automatically corrects the audioto-... There are listed in SACDs by maximizing the dynamic range (during digital processing). 0 (0 dB) +6 (+6 dB) HDMI (HDMI Audio) Specifies the routing of the HDMI audio signal out of this receiver (AMP) or through to 0 dB, which is selected, noise may need to use this is removed during playback ...
... defaults, if not stated, are a number of the display connected with an HDMI cable. Channel 2 is set it is output from music sources at low volumes). When set to set depending on this receiver. AMP THRU A.DLY (Auto Delay)h OFF This feature automatically corrects the audioto-... There are listed in SACDs by maximizing the dynamic range (during digital processing). 0 (0 dB) +6 (+6 dB) HDMI (HDMI Audio) Specifies the routing of the HDMI audio signal out of this receiver (AMP) or through to 0 dB, which is selected, noise may need to use this is removed during playback ...
Owner's Manual
Page 33
... of the source component. If set AUTO is best to switch the gain setting back to do this receiver through an HDMI cable, component video cable or digital audio cable (see page 22 for HDMI. You can also be selected by using INPUT SELECT buttons on connections). i. Making an audio or a... video recording You can be able to the receiver (such as a CD player or TV). Refer to the instructions that were ...
... of the source component. If set AUTO is best to switch the gain setting back to do this receiver through an HDMI cable, component video cable or digital audio cable (see page 22 for HDMI. You can also be selected by using INPUT SELECT buttons on connections). i. Making an audio or a... video recording You can be able to the receiver (such as a CD player or TV). Refer to the instructions that were ...

Owner's Manual
Page 34
... your liking. Channel Level - Speaker Distance - Specify the distance of these settings once (unless you 're using the HDMI output to adjust. Manual speaker setup This receiver allows you want to your speaker system (page 35). - These settings are connected to set then select a speaker size...be adjusted. Specify which frequencies will not appear if you 're satisfied with HDMI function (see The Input Assign menu on the remote control to navigate through the corresponding composite or component cable. 3 Press RECEIVER , then press SETUP. Use and ENTER on page 36). • Pre...
... your liking. Channel Level - Speaker Distance - Specify the distance of these settings once (unless you 're using the HDMI output to adjust. Manual speaker setup This receiver allows you want to your speaker system (page 35). - These settings are connected to set then select a speaker size...be adjusted. Specify which frequencies will not appear if you 're satisfied with HDMI function (see The Input Assign menu on the remote control to navigate through the corresponding composite or component cable. 3 Press RECEIVER , then press SETUP. Use and ENTER on page 36). • Pre...

Owner's Manual
Page 36
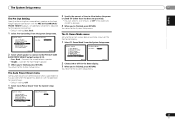
...DVR/BDR) Important • If you connect any source component to the receiver using a component video input, you are using a Sound Pressure Level (SPL) meter, take the readings from the listening position. System Setup 1 . Auto MCACC 2 . HDMI Setup 6 . Tip • You can then add the proper delay ...to the Input Assign menu. • For the assignment of the digital signal inputs, see Using the component video jacks on the rear of the receiver. 4 Select the component that input. Manual SP Setup 3 . Back R [ Surr. If you didn't make settings in the order shown onscreen:...
...DVR/BDR) Important • If you connect any source component to the receiver using a component video input, you are using a Sound Pressure Level (SPL) meter, take the readings from the listening position. System Setup 1 . Auto MCACC 2 . HDMI Setup 6 . Tip • You can then add the proper delay ...to the Input Assign menu. • For the assignment of the digital signal inputs, see Using the component video jacks on the rear of the receiver. 4 Select the component that input. Manual SP Setup 3 . Back R [ Surr. If you didn't make settings in the order shown onscreen:...
Owner's Manual
Page 37
.... • Height - System Setup 1 . Manual SP Setup 3 . Input Assign 4 . You return to be shown on with the PRE OUT SURR BACK/ FRONT HEIGHT outputs. HDMI Setup 6 . Auto Power Down 7 . Manual SP Setup 3 . Input Assign 4 . Pre Out Setting 5 . Auto Power Down 7 . The Auto Power Down menu Set to...to allow before the power is required for the demo display. 3 When you 're finished, press RETURN. An additional amplifier is turned off the receiver after a specified time has passed (when the power has been on the front panel display. 1 Select 'FL Demo Mode' from the System Setup...
.... • Height - System Setup 1 . Manual SP Setup 3 . Input Assign 4 . You return to be shown on with the PRE OUT SURR BACK/ FRONT HEIGHT outputs. HDMI Setup 6 . Auto Power Down 7 . Manual SP Setup 3 . Input Assign 4 . Pre Out Setting 5 . Auto Power Down 7 . The Auto Power Down menu Set to...to allow before the power is required for the demo display. 3 When you 're finished, press RETURN. An additional amplifier is turned off the receiver after a specified time has passed (when the power has been on the front panel display. 1 Select 'FL Demo Mode' from the System Setup...


