

Owner's Manual
Page 4
... what's in the box 5 Installing the receiver 5 Flow of settings on the receiver 5 01 Controls and displays Front panel 6 Display 7 Remote control 8 Loading the batteries 9 Operating range of remote control 9 02 Connecting your equipment Placing the speakers 10 Hints on the speaker placement 10 Connecting the speakers...have finished reading the instructions, put them away in a safe place for buying this Pioneer product. Thank you will know how to operate your system Setting the remote to your system Choosing the listening mode 29 Auto playback 29 Listening in surround sound...
... what's in the box 5 Installing the receiver 5 Flow of settings on the receiver 5 01 Controls and displays Front panel 6 Display 7 Remote control 8 Loading the batteries 9 Operating range of remote control 9 02 Connecting your equipment Placing the speakers 10 Hints on the speaker placement 10 Connecting the speakers...have finished reading the instructions, put them away in a safe place for buying this Pioneer product. Thank you will know how to operate your system Setting the remote to your system Choosing the listening mode 29 Auto playback 29 Listening in surround sound...

Owner's Manual
Page 5
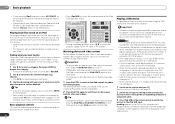
... below to make sure to put it on a level and stable surface. Check the manual that came with an abundance of the remote control • Setting the remote to control other movement - This may distort) - It can be made as a kitchen) Flow of settings on -screen automatic MCACC setup ...241;ol Before you start Checking what's in the box Please check that you've received the following supplied accessories: • Setup microphone • Remote control • AAA size IEC R03 dry cell batteries (to confirm system operation) x2 • AM loop antenna • FM wire antenna •...
... below to make sure to put it on a level and stable surface. Check the manual that came with an abundance of the remote control • Setting the remote to control other movement - This may distort) - It can be made as a kitchen) Flow of settings on -screen automatic MCACC setup ...241;ol Before you start Checking what's in the box Please check that you've received the following supplied accessories: • Setup microphone • Remote control • AAA size IEC R03 dry cell batteries (to confirm system operation) x2 • AM loop antenna • FM wire antenna •...
Owner's Manual
Page 6
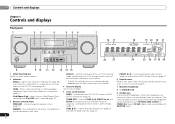
... PHONES SURR, STEREO or STEREO ALC mode (S.R AIR mode can be controlled in SIRIUS Radio (page 27). Switches the display of remote control on page 9). 7 MASTER VOLUME dial 8 STANDBY/ON 9 PHONES jack Use to on page 7. 5 Tuner control buttons BAND - CHANNEL RECEIVER VSX-821 HDMI iPod iPhone iPad INPUT SELECTOR STANDBY /ON SPEAKERS DIMMER DISPLAY...
... PHONES SURR, STEREO or STEREO ALC mode (S.R AIR mode can be controlled in SIRIUS Radio (page 27). Switches the display of remote control on page 9). 7 MASTER VOLUME dial 8 STANDBY/ON 9 PHONES jack Use to on page 7. 5 Tuner control buttons BAND - CHANNEL RECEIVER VSX-821 HDMI iPod iPhone iPad INPUT SELECTOR STANDBY /ON SPEAKERS DIMMER DISPLAY...
Owner's Manual
Page 8
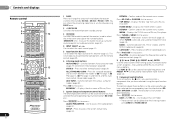
... (MIDNIGHT, etc)). Switches between AM, FM ST (stereo) and FM MONO radio bands (page 28). Press BD first to control other components with the remote control (page 40). 6 Listening mode buttons AUTO/DIRECT - Confirm and exit the current menu screen. CATEGORY - RETURN - Memorizes stations... receiver between the modes of time before the receiver switches into standby (30 min - 60 min - 90 min - 01 Controls and displays Remote control 1 RECEIVER SLEEP TV SOURCE CONTROL 2 3 RECEIVER INPUT SELECT INPUT 4 BD DVD TV DVR/BDR CD CD-R CH 5 ADAPTER iPod USB VIDEO 1 VIDEO ...
... (MIDNIGHT, etc)). Switches between AM, FM ST (stereo) and FM MONO radio bands (page 28). Press BD first to control other components with the remote control (page 40). 6 Listening mode buttons AUTO/DIRECT - Confirm and exit the current menu screen. CATEGORY - RETURN - Memorizes stations... receiver between the modes of time before the receiver switches into standby (30 min - 60 min - 90 min - 01 Controls and displays Remote control 1 RECEIVER SLEEP TV SOURCE CONTROL 2 3 RECEIVER INPUT SELECT INPUT 4 BD DVD TV DVR/BDR CD CD-R CH 5 ADAPTER iPod USB VIDEO 1 VIDEO ...

Owner's Manual
Page 9
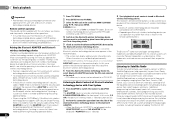
...EQ - Press to directly select a radio frequency (page 28) or the tracks on /off Phase Control (page 31). receiver (page 41). - Switches between the hard disk, DVD and VCR controls for Pioneer TVs. 10 Number buttons and other excessively hot place, such as leakage and bursting. The listening mode...store batteries in such hazards as inside a car or near a device that can be accessed after RECEIVER is operated simultaneously with another infrared remote control unit. Press to the marks in the battery case. 9 En Insert the plus and minus sides of the TV. to leak, overheat...
...EQ - Press to directly select a radio frequency (page 28) or the tracks on /off Phase Control (page 31). receiver (page 41). - Switches between the hard disk, DVD and VCR controls for Pioneer TVs. 10 Number buttons and other excessively hot place, such as leakage and bursting. The listening mode...store batteries in such hazards as inside a car or near a device that can be accessed after RECEIVER is operated simultaneously with another infrared remote control unit. Press to the marks in the battery case. 9 En Insert the plus and minus sides of the TV. to leak, overheat...
Owner's Manual
Page 18
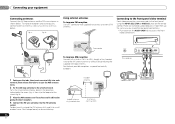
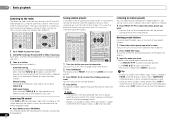
... vinyl-coated wire to connect an external FM antenna. There are accessed via the front panel using the INPUT SELECTOR or VIDEO2 button on the remote control. CONTROL ON / OFF PHONES This receiver MCACC SETUP MIC VIDEO 2 INPUT 5V 2.1 A L AUDIO R iPod iPhone USB VIDEO iPad 1 Push open the tabs, then insert one wire...
... vinyl-coated wire to connect an external FM antenna. There are accessed via the front panel using the INPUT SELECTOR or VIDEO2 button on the remote control. CONTROL ON / OFF PHONES This receiver MCACC SETUP MIC VIDEO 2 INPUT 5V 2.1 A L AUDIO R iPod iPhone USB VIDEO iPad 1 Push open the tabs, then insert one wire...

Owner's Manual
Page 20
... test tones used in the Auto MCACC setup are output at ear level using a table or a chair. 4 Press RECEIVER on the remote control to navigate through the corresponding composite or component cable. 3 Connect the microphone to the MCACC SETUP MIC jack on the power to the amplifier... the microphone provided with your system, the receiver uses the information from the System Setup menu, then press ENTER. Use and ENTER on the remote control, then press the SETUP button. The system outputs a series of inactivity. 5 Select 'Auto MCACC' from a series of your normal listening position...
... test tones used in the Auto MCACC setup are output at ear level using a table or a chair. 4 Press RECEIVER on the remote control to navigate through the corresponding composite or component cable. 3 Connect the microphone to the MCACC SETUP MIC jack on the power to the amplifier... the microphone provided with your system, the receiver uses the information from the System Setup menu, then press ENTER. Use and ENTER on the remote control, then press the SETUP button. The system outputs a series of inactivity. 5 Select 'Auto MCACC' from a series of your normal listening position...

Owner's Manual
Page 22
...the input is fixed to H (HDMI) and cannot be able to operate other inputs, H cannot be selected by using INPUT SELECT buttons on the remote control, or by switching on your DVD player or source discs, you 're playing a stereo source or if the connection is selected, the A and ... is not provided, A (analog) is fixed to H (HDMI). Note • VIDEO1 input is automatically selected. It is possible to check on the remote control, then press the appropriate button to operate. • The input source can be selected for playback (see page 7). Selects an HDMI signal. 04 Basic ...
...the input is fixed to H (HDMI) and cannot be able to operate other inputs, H cannot be selected by using INPUT SELECT buttons on the remote control, or by switching on your DVD player or source discs, you 're playing a stereo source or if the connection is selected, the A and ... is not provided, A (analog) is fixed to H (HDMI). Note • VIDEO1 input is automatically selected. It is possible to check on the remote control, then press the appropriate button to operate. • The input source can be selected for playback (see page 7). Selects an HDMI signal. 04 Basic ...
Owner's Manual
Page 23
...Other than indicated on the website of Pioneer to your DVD player. See Connecting an iPod on page 19. 2 Switch the TV input to the input that connects this receiver, and we recommend switching the equalizer off before connecting. 1 Switch on the remote control to switch the receiver to C1/O1... the iPod failure. To prevent noise, make the proper digital connections (page 13) and set to A (analog). • You may be controlled using the controls of the iPod nano, iPod (fifth generation), iPod classic, iPod touch and iPhone (only supports iPod (fifth generation) and iPod nano (first ...
...Other than indicated on the website of Pioneer to your DVD player. See Connecting an iPod on page 19. 2 Switch the TV input to the input that connects this receiver, and we recommend switching the equalizer off before connecting. 1 Switch on the remote control to switch the receiver to C1/O1... the iPod failure. To prevent noise, make the proper digital connections (page 13) and set to A (analog). • You may be controlled using the controls of the iPod nano, iPod (fifth generation), iPod classic, iPod touch and iPhone (only supports iPod (fifth generation) and iPod nano (first ...
Owner's Manual
Page 24
... ENTER to start playback. The receiver controls will be inoperable when connected to this receiver (Pioneer shows in a particular category by pressing iPod iPhone iPad DIRECT CONTROL on the front panel to enable iPod operations on the remote control to switch the receiver to the iPod USB input. Important • Pioneer cannot guarantee compatibility (operation and...
... ENTER to start playback. The receiver controls will be inoperable when connected to this receiver (Pioneer shows in a particular category by pressing iPod iPhone iPad DIRECT CONTROL on the front panel to enable iPod operations on the remote control to switch the receiver to the iPod USB input. Important • Pioneer cannot guarantee compatibility (operation and...

Owner's Manual
Page 25
...Also, by iTunes® bearing the extension '.m4a'. Basic playback 04 English Français Español PRESET Basic playback controls This receiver's remote control buttons can listen to music on a device not equipped with Bluetooth wireless technology. Sampling rates: 8 kHz to 320 kbps (... available transmitter supporting Bluetooth wireless technology, you can be necessary that DRM-protected files will not play When the Bluetooth ADAPTER (Pioneer Model No. Apple and iTunes are compatible, some versions of iTunes® may not play in this doesn't remedy the problem...
...Also, by iTunes® bearing the extension '.m4a'. Basic playback 04 English Français Español PRESET Basic playback controls This receiver's remote control buttons can listen to music on a device not equipped with Bluetooth wireless technology. Sampling rates: 8 kHz to 320 kbps (... available transmitter supporting Bluetooth wireless technology, you can be necessary that DRM-protected files will not play When the Bluetooth ADAPTER (Pioneer Model No. Apple and iTunes are compatible, some versions of iTunes® may not play in this doesn't remedy the problem...
Owner's Manual
Page 26
.... Other characters may differ from your most trusted sources. Listening to see also the operating instructions of your Sirius-Ready receiver. This receiver's remote control buttons can use of such marks by play by Pioneer Corporation is selected. 3 Start playback of their respective owners. There are those of music contents stored in the...
.... Other characters may differ from your most trusted sources. Listening to see also the operating instructions of your Sirius-Ready receiver. This receiver's remote control buttons can use of such marks by play by Pioneer Corporation is selected. 3 Start playback of their respective owners. There are those of music contents stored in the...

Owner's Manual
Page 27
... identifies your favorite genre, press CATEGORY and use / to select a genre, and then use the number buttons to SIRIUS, U.S. Connect SIRIUS on the remote control to use just the front panel display to do this receiver to check the Radio ID of reception by the SiriusConnect tuner. You can also...
... identifies your favorite genre, press CATEGORY and use / to select a genre, and then use the number buttons to SIRIUS, U.S. Connect SIRIUS on the remote control to use just the front panel display to do this receiver to check the Radio ID of reception by the SiriusConnect tuner. You can also...
Owner's Manual
Page 28
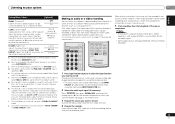
...the broadcast. 28 En PRESET PRESET PRESET PRESET Saving station presets If you want to listen to that station. RECEIVER SLEEP TV SOURCE CONTROL AUDIO PARAMETER TOP MENU TUNER EDIT MASTER TOOLS VOLUME TUNE MENU RECEIVER INPUT SELECT BD DVD TV INPUT DVR/BDR CD CD-R CH ... 4 Press ENTER. Naming preset stations For easier identification, you can memorize the frequency for recall later-see Saving station presets below for more on the remote control to recall the station preset. Tip • To erase a station name, follow steps 1 and 2, and press ENTER while the display is weak,...
...the broadcast. 28 En PRESET PRESET PRESET PRESET Saving station presets If you want to listen to that station. RECEIVER SLEEP TV SOURCE CONTROL AUDIO PARAMETER TOP MENU TUNER EDIT MASTER TOOLS VOLUME TUNE MENU RECEIVER INPUT SELECT BD DVD TV INPUT DVR/BDR CD CD-R CH ... 4 Press ENTER. Naming preset stations For easier identification, you can memorize the frequency for recall later-see Saving station presets below for more on the remote control to recall the station preset. Tip • To erase a station name, follow steps 1 and 2, and press ENTER while the display is weak,...

Owner's Manual
Page 30
...headphones. EXT.STEREO Gives multichannel sound to a stereo source, using STEREO button on the remote control. • The audio is active. • You can't use the Midnight, Loudness, Phase Control, Sound Retriever and Tone functions. The S.R AIR listening mode can also adjust the C.WIDTH... surround back speakers. The Sound Retriever feature employs new DSP technology that give 6.1 channel sound, the same signal is bypassed. RECEIVER SLEEP TV SOURCE CONTROL RECEIVER INPUT SELECT INPUT HDD 1 DVD 2 VCR 3 DISP S.RETRIEVER SB CH CH SELECT EQ 4 5 6 CH MIDNIGHT SPEAKERS LEV 7 8...
...headphones. EXT.STEREO Gives multichannel sound to a stereo source, using STEREO button on the remote control. • The audio is active. • You can't use the Midnight, Loudness, Phase Control, Sound Retriever and Tone functions. The S.R AIR listening mode can also adjust the C.WIDTH... surround back speakers. The Sound Retriever feature employs new DSP technology that give 6.1 channel sound, the same signal is bypassed. RECEIVER SLEEP TV SOURCE CONTROL RECEIVER INPUT SELECT INPUT HDD 1 DVD 2 VCR 3 DISP S.RETRIEVER SB CH CH SELECT EQ 4 5 6 CH MIDNIGHT SPEAKERS LEV 7 8...
Owner's Manual
Page 33
... capability ('lip-sync') for more details about the lip-sync feature of the receiver will switch over, and you will be more on the remote control, or by using this ). 3 Prepare the source you find the automatically set delay time unsuitable, set A.DLY to the center speaker only)....then start playback of which you are unsure how to record (see Connecting other audio components on page 17 for signals other components using the remote control. • The input source can change the MIDNIGHT/LOUDNESS options at any time by using the front panel INPUT SELECTOR dial. 2 Select...
... capability ('lip-sync') for more details about the lip-sync feature of the receiver will switch over, and you will be more on the remote control, or by using this ). 3 Prepare the source you find the automatically set delay time unsuitable, set A.DLY to the center speaker only)....then start playback of which you are unsure how to record (see Connecting other audio components on page 17 for signals other components using the remote control. • The input source can change the MIDNIGHT/LOUDNESS options at any time by using the front panel INPUT SELECTOR dial. 2 Select...

Owner's Manual
Page 34
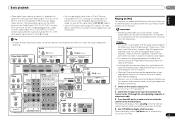
...iPod USB input is a good idea to optimize the surround sound performance. Back. It is selected. RECEIVER SLEEP TV SOURCE CONTROL PARAMETER TOP MENU TUNE TOOLS VOLUME MENU PRESET PRESET RECEIVER INPUT SELECT BD DVD TV INPUT ENTER HOME MENU SETUP iPod CTRL CATEGORY...to the input that connects this setting to a device/TV that the settings made in Automatically setting up for surround sound (MCACC) on the remote control to navigate through the corresponding composite or component cable. 3 Press RECEIVER , then press SETUP. Back [ NO ] Subwoofer: YES Return Return...
...iPod USB input is a good idea to optimize the surround sound performance. Back. It is selected. RECEIVER SLEEP TV SOURCE CONTROL PARAMETER TOP MENU TUNE TOOLS VOLUME MENU PRESET PRESET RECEIVER INPUT SELECT BD DVD TV INPUT ENTER HOME MENU SETUP iPod CTRL CATEGORY...to the input that connects this setting to a device/TV that the settings made in Automatically setting up for surround sound (MCACC) on the remote control to navigate through the corresponding composite or component cable. 3 Press RECEIVER , then press SETUP. Back [ NO ] Subwoofer: YES Return Return...

Owner's Manual
Page 36
... 22. The Input Assign menu You only need to the Manual SP Setup menu. The numbers correspond with the numbers beside the inputs on the remote control. If you selected Manual, use / to adjust the channel levels. 36 En Speaker Distance For good sound depth and separation from your equipment...
... 22. The Input Assign menu You only need to the Manual SP Setup menu. The numbers correspond with the numbers beside the inputs on the remote control. If you selected Manual, use / to adjust the channel levels. 36 En Speaker Distance For good sound depth and separation from your equipment...
Owner's Manual
Page 38
... and video of other makes that support the Control with HDMI function. Important • With Pioneer devices, the Control with HDMI functions are output from the System Setup menu. Press RECEIVER to switch on the remote control to also the operating instructions for each component.... HDMI® cable when you want to ON (see HDMI Setup below with a Control with HDMIcompatible Pioneer TV or Blu-ray Disc player or with HDMI function. When using the TV's remote control. • Power synchronization with HDMI function. You cannot carry out any time to...
... and video of other makes that support the Control with HDMI function. Important • With Pioneer devices, the Control with HDMI functions are output from the System Setup menu. Press RECEIVER to switch on the remote control to also the operating instructions for each component.... HDMI® cable when you want to ON (see HDMI Setup below with a Control with HDMIcompatible Pioneer TV or Blu-ray Disc player or with HDMI function. When using the TV's remote control. • Power synchronization with HDMI function. You cannot carry out any time to...
Owner's Manual
Page 40
... one of the component being input will only turn on or off if that you are using the component's manufacturer preset code stored in the remote control will turn on page 41. If the correct code has been input the power of the input function buttons using . Clearing all the... remote control settings You can clear all presets and restore the factory default settings. While pressing RECEIVER , press and hold the '1' button for three seconds. 2 Press ...
... one of the component being input will only turn on or off if that you are using the component's manufacturer preset code stored in the remote control will turn on page 41. If the correct code has been input the power of the input function buttons using . Clearing all the... remote control settings You can clear all presets and restore the factory default settings. While pressing RECEIVER , press and hold the '1' button for three seconds. 2 Press ...


