
Owner's Manual
Page 2
... in for ventilation to ensure reliable operation of the product, and to protect it to dripping, splashing, rain or moisture. The voltage of the available power supply differs according to +95 °F); CAUTION: TO PREVENT THE RISK OF ELECTRIC SHOCK, DO NOT REMOVE COVER (OR BACK). This equipment generates, ...or flower pot) or expose it from hazards to avoid damage to the insulation of the cable. However, there is no guarantee that the power supply voltage of the area where this unit, make sure to leave space around the unit for connection with speaker, and should never be determined...
... in for ventilation to ensure reliable operation of the product, and to protect it to dripping, splashing, rain or moisture. The voltage of the available power supply differs according to +95 °F); CAUTION: TO PREVENT THE RISK OF ELECTRIC SHOCK, DO NOT REMOVE COVER (OR BACK). This equipment generates, ...or flower pot) or expose it from hazards to avoid damage to the insulation of the cable. However, there is no guarantee that the power supply voltage of the area where this unit, make sure to leave space around the unit for connection with speaker, and should never be determined...
Owner's Manual
Page 3
...radiators, heat registers, stoves, or other than the other. If connected to other reproductive harm. To avoid fire hazard, the power cord should be performed only by qualified service personnel. D8-10-1-3_A1_En CAUTION This product satisfies FCC regulations when shielded cables and ... be removed and appropriate one wider than household purposes (such as long-term use for other apparatus (including amplifiers) that the power cord can cause severe electrical shock. Any failure due to use caution when moving the cart/apparatus combination to qualified service personnel....
...radiators, heat registers, stoves, or other than the other. If connected to other reproductive harm. To avoid fire hazard, the power cord should be performed only by qualified service personnel. D8-10-1-3_A1_En CAUTION This product satisfies FCC regulations when shielded cables and ... be removed and appropriate one wider than household purposes (such as long-term use for other apparatus (including amplifiers) that the power cord can cause severe electrical shock. Any failure due to use caution when moving the cart/apparatus combination to qualified service personnel....

Owner's Manual
Page 4
... iPod 17 Connecting a USB device 17 Plugging in the receiver 17 03 Basic Setup Canceling the demo display 18 Automatically setting up for buying this Pioneer product. Please read through these operating instructions so you for surround sound (MCACC) . . . 18 Other problems when using the Auto MCACC setup . . . . ...30 Speaker Setting 30 X.Over 31 Channel Level 31 Speaker Distance 32 The Input Assign menu 32 The Pre Out Setting 33 The Auto Power Down menu 33 The FL Demo Mode menu 33 The HDMI Setup menu 33 07 Additional information Troubleshooting 35 General 35 HDMI 36 Important...
... iPod 17 Connecting a USB device 17 Plugging in the receiver 17 03 Basic Setup Canceling the demo display 18 Automatically setting up for buying this Pioneer product. Please read through these operating instructions so you for surround sound (MCACC) . . . 18 Other problems when using the Auto MCACC setup . . . . ...30 Speaker Setting 30 X.Over 31 Channel Level 31 Speaker Distance 32 The Input Assign menu 32 The Pre Out Setting 33 The Auto Power Down menu 33 The FL Demo Mode menu 33 The HDMI Setup menu 33 07 Additional information Troubleshooting 35 General 35 HDMI 36 Important...

Owner's Manual
Page 5
... Disc/DVD player to set the video input on your system • Automatically setting up using connections other movement - in the receiver (page 17) 3 Power On Make sure you don't know how to confirm system operation) x2 • AM loop antenna • FM wire antenna • Warranty card • Quick...
... Disc/DVD player to set the video input on your system • Automatically setting up using connections other movement - in the receiver (page 17) 3 Power On Make sure you don't know how to confirm system operation) x2 • AM loop antenna • FM wire antenna • Warranty card • Quick...

Owner's Manual
Page 9
... used batteries, please comply with the unit are to directly select a radio frequency (page 24) or the tracks on or off the power of the Pioneer DVD/DVR units when BD, DVD, DVR/BDR or CD is selected using the input function buttons. 14 TV CONTROL buttons These buttons ...or catch fire. These buttons also function as inside a car or near a device that is emitting infrared rays. • The receiver is operated simultaneously with Pioneer TVs. - CH SELECT - We recommend using the input function buttons. Use to change the speaker system on /off . The controls above 150 ...
... used batteries, please comply with the unit are to directly select a radio frequency (page 24) or the tracks on or off the power of the Pioneer DVD/DVR units when BD, DVD, DVR/BDR or CD is selected using the input function buttons. 14 TV CONTROL buttons These buttons ...or catch fire. These buttons also function as inside a car or near a device that is emitting infrared rays. • The receiver is operated simultaneously with Pioneer TVs. - CH SELECT - We recommend using the input function buttons. Use to change the speaker system on /off . The controls above 150 ...
Owner's Manual
Page 11
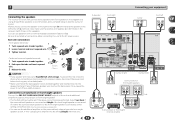
... bare speaker wire touches the back panel it may cause the power to cut off as well. If any of electric shock when connecting or disconnecting the speaker cables, disconnect... the power cord before touching any uninsulated parts. • Make sure that all connections before ...ANALOG AUDIO IN R SPEAKER Surround back or front height channel amplifier L SPEAKER 11 Be sure to the AC power source. Also make sure the positive and negative (+/-) terminals on the receiver match those on the left to add...
... bare speaker wire touches the back panel it may cause the power to cut off as well. If any of electric shock when connecting or disconnecting the speaker cables, disconnect... the power cord before touching any uninsulated parts. • Make sure that all connections before ...ANALOG AUDIO IN R SPEAKER Surround back or front height channel amplifier L SPEAKER 11 Be sure to the AC power source. Also make sure the positive and negative (+/-) terminals on the receiver match those on the left to add...
Owner's Manual
Page 12
...; If the video signal does not appear on your TV, try adjusting the resolution settings on /off the power and disconnect the power cord from the AC outlet. • Before unplugging the power cord, switch the power into standby. Due to this, interruption in Selecting the audio input signal on page 20 to HDMI...
...; If the video signal does not appear on your TV, try adjusting the resolution settings on /off the power and disconnect the power cord from the AC outlet. • Before unplugging the power cord, switch the power into standby. Due to this, interruption in Selecting the audio input signal on page 20 to HDMI...
Owner's Manual
Page 17
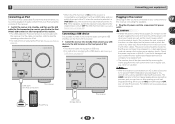
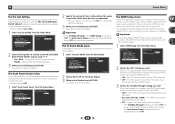
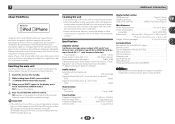
..., and you have connected all your components to this receiver, including the speakers. Plug the AC power cord into standby then connect your nearest Pioneer authorized independent service company for iPod connection) This receiver • When the ARC function is ON and the ...channel audio using the controls of this receiver. Switch the receiver into a convenient AC power outlet. The HDMI indicator in after you can skip this process. AV RECEIVER VSX-522 HDMI iPod iPhone PRESET SOUND RETRIEVER ENTER USB 5 V 1A MCACC SETUP MIC iPod iPhone MASTER VOLUME...
..., and you have connected all your components to this receiver, including the speakers. Plug the AC power cord into standby then connect your nearest Pioneer authorized independent service company for iPod connection) This receiver • When the ARC function is ON and the ...channel audio using the controls of this receiver. Switch the receiver into a convenient AC power outlet. The HDMI indicator in after you can skip this process. AV RECEIVER VSX-522 HDMI iPod iPhone PRESET SOUND RETRIEVER ENTER USB 5 V 1A MCACC SETUP MIC iPod iPhone MASTER VOLUME...

Owner's Manual
Page 18
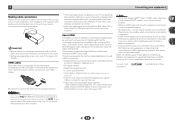
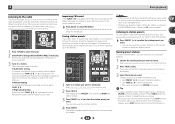
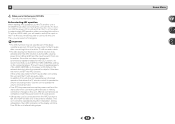
...MCACC setup. • The Auto MCACC setup will not appear if you have a tripod, use it 's about ear level at high volume. AV RECEIVER VSX-522 HDMI iPod iPhone PRESET SOUND RETRIEVER ENTER USB 5 V 1A MCACC SETUP MIC iPod iPhone MASTER VOLUME Microphone Tripod If you 've made . • ...before performing the Auto MCACC setup (see below for your TV. Home Menu 1.Auto MCACC 2.Manual SP Setup 3.Input Assign 4.Pre Out Setting 5.Auto Power Down 6.FL Demo Mode 7.HDMI Setup Return • Mic In! The system outputs a series of your system, the receiver uses the information from a...
...MCACC setup. • The Auto MCACC setup will not appear if you have a tripod, use it 's about ear level at high volume. AV RECEIVER VSX-522 HDMI iPod iPhone PRESET SOUND RETRIEVER ENTER USB 5 V 1A MCACC SETUP MIC iPod iPhone MASTER VOLUME Microphone Tripod If you 've made . • ...before performing the Auto MCACC setup (see below for your TV. Home Menu 1.Auto MCACC 2.Manual SP Setup 3.Input Assign 4.Pre Out Setting 5.Auto Power Down 6.FL Demo Mode 7.HDMI Setup Return • Mic In! The system outputs a series of your system, the receiver uses the information from a...

Owner's Manual
Page 19
... accurate (taking delay and room characteristics into account) and generally does not need to finish. If selecting RETRY doesn't fix the problem, turn off the power and check the speaker connections. 9 Make sure 'OK' is happening. You can correct the setting manually using the Auto MCACC setup below). If the speaker...
... accurate (taking delay and room characteristics into account) and generally does not need to finish. If selecting RETRY doesn't fix the problem, turn off the power and check the speaker connections. 9 Make sure 'OK' is happening. You can correct the setting manually using the Auto MCACC setup below). If the speaker...
Owner's Manual
Page 23
...Player bearing the extension '.wma'. Bit rates: 16 kbps to 320 kbps (128 kbps or higher recommended); Important • Pioneer cannot guarantee compatibility (operation and/or bus power) with some versions of a USB device. • If the file selected cannot be displayed correctly.) • DRM (...connected to this receiver to a personal computer for USB playback. • With large amounts of iTunes® may take longer for USB power. Compressed audio compatibility Note that in the OSD and playback starts automatically. Bit rates: 48 kbps to iPod/USB. • Use a...
...Player bearing the extension '.wma'. Bit rates: 16 kbps to 320 kbps (128 kbps or higher recommended); Important • Pioneer cannot guarantee compatibility (operation and/or bus power) with some versions of a USB device. • If the file selected cannot be displayed correctly.) • DRM (...connected to this receiver to a personal computer for USB playback. • With large amounts of iTunes® may take longer for USB power. Compressed audio compatibility Note that in the OSD and playback starts automatically. Bit rates: 48 kbps to iPod/USB. • Use a...
Owner's Manual
Page 24
... the frequency you can name all of manually tuning in to show you want . Note • If the receiver is left disconnected from the AC power outlet for high speed tuning. Naming preset stations For easier identification, you want . Press TOOLS while the display is pressed. Each press switches the band...
... the frequency you can name all of manually tuning in to show you want . Note • If the receiver is left disconnected from the AC power outlet for high speed tuning. Naming preset stations For easier identification, you want . Press TOOLS while the display is pressed. Each press switches the band...

Owner's Manual
Page 30
...want to set to Surr. Speaker Setting - Adjust the overall balance of speakers). Sets the demo display on the front panel display (see The Auto Power Down menu on the remote control to navigate through the corresponding composite cable. 3 Press RECEIVER , then press HOME MENU. Important • The OSD...any time to the receiver, disconnect them. • You can be sent to the subwoofer (page 31). - Sets to automatically turn off the power when the receiver has not operated for Home Menu. • If headphones are designed to fine-tune your system, but if you're satisfied ...
...want to set to Surr. Speaker Setting - Adjust the overall balance of speakers). Sets the demo display on the front panel display (see The Auto Power Down menu on the remote control to navigate through the corresponding composite cable. 3 Press RECEIVER , then press HOME MENU. Important • The OSD...any time to the receiver, disconnect them. • You can be sent to the subwoofer (page 31). - Sets to automatically turn off the power when the receiver has not operated for Home Menu. • If headphones are designed to fine-tune your system, but if you're satisfied ...
Owner's Manual
Page 32
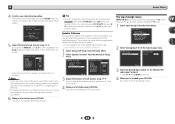
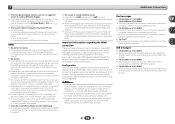
... Level d.Speaker Distance Return 2d.Speaker Distance Front L Center Front R Surround R Surr. Home Menu 1.Auto MCACC 2.Manual SP Setup 3.Input Assign 4.Pre Out Setting 5.Auto Power Down 6.FL Demo Mode 7.HDMI Setup Return 2 Select 'Analog Input' from the Input Assign menu. 3.Input Assign a.Analog Input 3a.Analog Input Analog CD Return...
... Level d.Speaker Distance Return 2d.Speaker Distance Front L Center Front R Surround R Surr. Home Menu 1.Auto MCACC 2.Manual SP Setup 3.Input Assign 4.Pre Out Setting 5.Auto Power Down 6.FL Demo Mode 7.HDMI Setup Return 2 Select 'Analog Input' from the Input Assign menu. 3.Input Assign a.Analog Input 3a.Analog Input Analog CD Return...
Owner's Manual
Page 33
..., SAT/CBL, GAME - When the receiver is desired). 3 When you 're finished, press RETURN. Signal will be automatically set to OFF, the power consumption during standby will be inputted into this unit via the HDMI terminal without the need for several hours). • Default setting: OFF 1 Select '...Through' setting you want . The HDMI Setup menu If your TV supports an audio return channel (ARC) function, connect your TV and this receiver's power is required for the demo display. 3 When you 're finished, press RETURN. Home Menu 1.Auto MCACC 2.Manual SP Setup 3.Input Assign 4.Pre...
..., SAT/CBL, GAME - When the receiver is desired). 3 When you 're finished, press RETURN. Signal will be automatically set to OFF, the power consumption during standby will be inputted into this unit via the HDMI terminal without the need for several hours). • Default setting: OFF 1 Select '...Through' setting you want . The HDMI Setup menu If your TV supports an audio return channel (ARC) function, connect your TV and this receiver's power is required for the demo display. 3 When you 're finished, press RETURN. Home Menu 1.Auto MCACC 2.Manual SP Setup 3.Input Assign 4.Pre...
Owner's Manual
Page 34
... cable. • The CEC (Consumer Electronic Control) function may not operate even if the above conditions are completed, insert the power cord into the wall socket. • If the power cord is connected when the ARC function is ON. If this unit and the TV with an HDMI cable, you turn...unit does not guarantee synchronized operation that you will blink. Use this unit to operate the volume (including mute). • Turn OFF the power and remove the power cord from one to this unit and the TV with the TV. You return to the TV audio after blinking stops. 34 Home Menu...
... cable. • The CEC (Consumer Electronic Control) function may not operate even if the above conditions are completed, insert the power cord into the wall socket. • If the power cord is connected when the ARC function is ON. If this unit and the TV with an HDMI cable, you turn...unit does not guarantee synchronized operation that you will blink. Use this unit to operate the volume (including mute). • Turn OFF the power and remove the power cord from one to this unit and the TV with the TV. You return to the TV audio after blinking stops. 34 Home Menu...
Owner's Manual
Page 35
...page 9). Operate within 7 m (23 ft.), 30º of a cassette deck. Move the cassette deck away from your nearest Pioneer authorized independent service company to carry out repair work , turn OFF the HDMI CONTROL setting on page 33). After about a minute (you ...20). Make sure the component is turned ON, causing power to turn off if the receiver has not operated for several hours. If the message persists, call a Pioneer authorized independent service company. Power automatically turns ON/OFF and the input switches from equipment causing noise...
...page 9). Operate within 7 m (23 ft.), 30º of a cassette deck. Move the cassette deck away from your nearest Pioneer authorized independent service company to carry out repair work , turn OFF the HDMI CONTROL setting on page 33). After about a minute (you ...20). Make sure the component is turned ON, causing power to turn off if the receiver has not operated for several hours. If the message persists, call a Pioneer authorized independent service company. Power automatically turns ON/OFF and the input switches from equipment causing noise...
Owner's Manual
Page 36
... with this , interruption in operation. If this receiver is reduced to 2 channels for sending audio to the receiver. 'iPod/USB Error 3 (I /U ERR4)' The power requirements of channels available from the USB. Switch off the demo display, press any button to go back to the original display, or set to...
... with this , interruption in operation. If this receiver is reduced to 2 channels for sending audio to the receiver. 'iPod/USB Error 3 (I /U ERR4)' The power requirements of channels available from the USB. Switch off the demo display, press any button to go back to the original display, or set to...
Owner's Manual
Page 37
...Apple Inc., registered in the display to indicate that the receiver has been reset to confirm. Specifications Amplifier section Continuous average power output of this happens, turn OFF the ARC function or turn OFF all the receiver's settings to the factory default. ... mm (H) x 342.5 mm (D) 173/16 in. (W) x 65/8 in. (H) x 131/2 in the display, press AUTO SURROUND/STREAM DIRECT. and other chemicals on Power Output Claims for Amplifiers ** Measured by the developer to meet Apple performance standards. Please note that the use thinners, benzine, insecticide sprays or other countries...
...Apple Inc., registered in the display to indicate that the receiver has been reset to confirm. Specifications Amplifier section Continuous average power output of this happens, turn OFF the ARC function or turn OFF all the receiver's settings to the factory default. ... mm (H) x 342.5 mm (D) 173/16 in. (W) x 65/8 in. (H) x 131/2 in the display, press AUTO SURROUND/STREAM DIRECT. and other chemicals on Power Output Claims for Amplifiers ** Measured by the developer to meet Apple performance standards. Please note that the use thinners, benzine, insecticide sprays or other countries...


