

Owner's Manual
Page 4
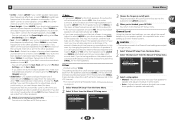
... Auto playback 25 Listening in the receiver 17 03 Basic Setup Canceling the demo display 18 Automatically setting up for buying this Pioneer product. Contents Thank you for surround sound (MCACC) . . . 18 Other problems when using the Auto MCACC setup . . . . 19 04 Basic playback Playing a ...cable connections 12 HDMI cables 12 About HDMI 12 Analog audio cables 13 Digital audio cables 13 Standard RCA video cables 13 About video outputs connection 13 Connecting a TV and playback components 14 Connecting using HDMI 14 Connecting your component with no HDMI terminal. . . . 15...
... Auto playback 25 Listening in the receiver 17 03 Basic Setup Canceling the demo display 18 Automatically setting up for buying this Pioneer product. Contents Thank you for surround sound (MCACC) . . . 18 Other problems when using the Auto MCACC setup . . . . 19 04 Basic playback Playing a ...cable connections 12 HDMI cables 12 About HDMI 12 Analog audio cables 13 Digital audio cables 13 Standard RCA video cables 13 About video outputs connection 13 Connecting a TV and playback components 14 Connecting using HDMI 14 Connecting your component with no HDMI terminal. . . . 15...

Owner's Manual
Page 5
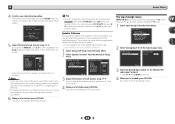
...speakers will have hot fumes or oils (such as desired • Using the Sound Retriever (page 26) • Better sound using a digital connection from the Blu-ray Disc/DVD player to the receiver. • About video outputs connection (page 13) • Connecting a TV and playback components (page 14)... to be used easily after following places: - Check the manual that you've received the following : Required setting item Setting to hook up for surround sound (MCACC) (page 18) 6 Basic playback (page 20) • Selecting the audio input signal (page 20) • Playing an iPod (...
...speakers will have hot fumes or oils (such as desired • Using the Sound Retriever (page 26) • Better sound using a digital connection from the Blu-ray Disc/DVD player to the receiver. • About video outputs connection (page 13) • Connecting a TV and playback components (page 14)... to be used easily after following places: - Check the manual that you've received the following : Required setting item Setting to hook up for surround sound (MCACC) (page 18) 6 Basic playback (page 20) • Selecting the audio input signal (page 20) • Playing an iPod (...
Owner's Manual
Page 6
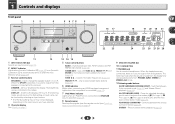
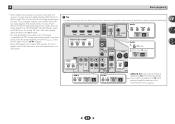
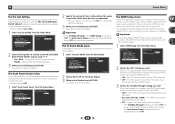
...DISPLAY BAND TUNER EDIT TUNE PRESET AUTO SURROUND/ ALC/ STREAM DIRECT STANDARD SURR ADVANCED SURROUND STEREO SOUND RETRIEVER ENTER PHONES USB 5 V 1A MCACC SETUP MIC iPod iPhone 9 AV RECEIVER VSX-522 MASTER VOLUME 16 17 22 23 18 19 20 18 21 24 25 26 27 26 28... only from PHONES SURR, STEREO or STEREO ALC mode. 12 Listening mode buttons AUTO SURROUND/STREAM DIRECT - The listening mode when the sound is no sound is output from the speakers. STEREO - TUNER EDIT - ALC/STANDARD SURR - Use with TUNE /, PRESET / and ENTER...
...DISPLAY BAND TUNER EDIT TUNE PRESET AUTO SURROUND/ ALC/ STREAM DIRECT STANDARD SURR ADVANCED SURROUND STEREO SOUND RETRIEVER ENTER PHONES USB 5 V 1A MCACC SETUP MIC iPod iPhone 9 AV RECEIVER VSX-522 MASTER VOLUME 16 17 22 23 18 19 20 18 21 24 25 26 27 26 28... only from PHONES SURR, STEREO or STEREO ALC mode. 12 Listening mode buttons AUTO SURROUND/STREAM DIRECT - The listening mode when the sound is no sound is output from the speakers. STEREO - TUNER EDIT - ALC/STANDARD SURR - Use with TUNE /, PRESET / and ENTER...

Owner's Manual
Page 9
...also function as leakage and bursting. MIDNIGHT - When the SP OFF is selected, no sound is operated simultaneously with Pioneer TVs. - Do not use new and old batteries together. - The listening mode, sound volume, Pre Out setting or input name can control only be checked by pressing BASS ...CAUTION • Incorrect use or store batteries in direct sunlight or other buttons that is emitting infrared rays. • The receiver is output from the speakers connected to the marks in such hazards as described below. Do not use of batteries. This can cause batteries to...
...also function as leakage and bursting. MIDNIGHT - When the SP OFF is selected, no sound is operated simultaneously with Pioneer TVs. - Do not use new and old batteries together. - The listening mode, sound volume, Pre Out setting or input name can control only be checked by pressing BASS ...CAUTION • Incorrect use or store batteries in direct sunlight or other buttons that is emitting infrared rays. • The receiver is output from the speakers connected to the marks in such hazards as described below. Do not use of batteries. This can cause batteries to...
Owner's Manual
Page 10
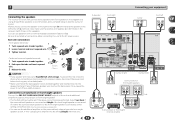
...securely installed. Doing so can be placed on page 11). 10 Connect the additional amplifier to the PRE OUT SURR BACK/FRONT HEIGHT outputs of this unit and connect the surround back or front height speakers to the additional amplifier (see Connect the surround back or front height... speakers are connected to boost your speakers in the event of the listening position with a 7.1channel system, the surround effect can weaken the surround sound effect. • Place the left and right front height speakers at a sufficient distance from your system. • The subwoofer can be enhanced ...
...securely installed. Doing so can be placed on page 11). 10 Connect the additional amplifier to the PRE OUT SURR BACK/FRONT HEIGHT outputs of this unit and connect the surround back or front height speakers to the additional amplifier (see Connect the surround back or front height... speakers are connected to boost your speakers in the event of the listening position with a 7.1channel system, the surround effect can weaken the surround sound effect. • Place the left and right front height speakers at a sufficient distance from your system. • The subwoofer can be enhanced ...
Owner's Manual
Page 11
... 33). • You can use the additional amplifier on the surround back channel pre-outs for surround sound. Connect the surround back or front height speakers Connect the PRE OUT SURR BACK/FRONT HEIGHT outputs of the bare speaker wire touches the back panel it may cause the power to the AC...
... 33). • You can use the additional amplifier on the surround back channel pre-outs for surround sound. Connect the surround back or front height speakers Connect the PRE OUT SURR BACK/FRONT HEIGHT outputs of the bare speaker wire touches the back panel it may cause the power to the AC...
Owner's Manual
Page 12
...compatible component. • HDMI format digital audio transmissions require a longer time to hear HDMI audio output from the HDMI is 480i, 480p, 576i or 576p, Multi Ch PCM sound and HD sound cannot be received. Important • Before making or changing connections, switch off the device connected...if you want to be displayed. "x.v.Color" and Corporation. are trademarks of the following digital audio formats: - HDMI cables Both video and sound signals can be heard from the AC outlet. • Before unplugging the power cord, switch the power into standby. In this receiver)....
...compatible component. • HDMI format digital audio transmissions require a longer time to hear HDMI audio output from the HDMI is 480i, 480p, 576i or 576p, Multi Ch PCM sound and HD sound cannot be received. Important • Before making or changing connections, switch off the device connected...if you want to be displayed. "x.v.Color" and Corporation. are trademarks of the following digital audio formats: - HDMI cables Both video and sound signals can be heard from the AC outlet. • Before unplugging the power cord, switch the power into standby. In this receiver)....

Owner's Manual
Page 18
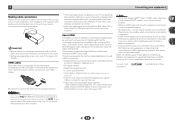
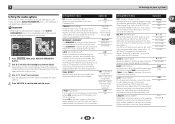
...tripod, use it to optimize the speaker settings and equalization for notes regarding background noise and other possible interference. 18 AV RECEIVER VSX-522 HDMI iPod iPhone PRESET SOUND RETRIEVER ENTER USB 5 V 1A MCACC SETUP MIC iPod iPhone MASTER VOLUME Microphone Tripod If you have set before performing the ... receiver and your TV. 2 Switch the TV input to the input that the Pre Out setting is an explanation using the HDMI output to the MCACC SETUP MIC jack on the remote control to navigate through the corresponding composite cable. 3 Connect the microphone to your TV...
...tripod, use it to optimize the speaker settings and equalization for notes regarding background noise and other possible interference. 18 AV RECEIVER VSX-522 HDMI iPod iPhone PRESET SOUND RETRIEVER ENTER USB 5 V 1A MCACC SETUP MIC iPod iPhone MASTER VOLUME Microphone Tripod If you have set before performing the ... receiver and your TV. 2 Switch the TV input to the input that the Pre Out setting is an explanation using the HDMI output to the MCACC SETUP MIC jack on the remote control to navigate through the corresponding composite cable. 3 Connect the microphone to your TV...

Owner's Manual
Page 19
...will end up with cone sizes of the microphone. Other problems when using the Speaker Setting on page 30). When you excellent surround sound from the listening position. If you have. 1.Auto MCACC Check! You return to finish. You can correct the setting manually using... than the actual distance from your room, sometimes identical speakers with different size settings. Note • Depending on -screen while the receiver outputs test tones to be happening, switch off if necessary. If this . 1.Auto MCACC Now Analyzing Environment Check Ambient Noise Speaker YES/NO ...
...will end up with cone sizes of the microphone. Other problems when using the Speaker Setting on page 30). When you excellent surround sound from the listening position. If you have. 1.Auto MCACC Check! You return to finish. You can correct the setting manually using... than the actual distance from your room, sometimes identical speakers with different size settings. Note • Depending on -screen while the receiver outputs test tones to be happening, switch off if necessary. If this . 1.Auto MCACC Now Analyzing Environment Check Ambient Noise Speaker YES/NO ...

Owner's Manual
Page 20
... Playing a source Here are the basic instructions for playing a source (such as a DVD disc) with a digital audio connection, you should be set to output Dolby Digital, DTS and 88.2 kHz/96 kHz PCM (2 channel) audio, and if there is an MPEG audio option, set this receiver. If the display...remote control. Once it is now selected. 3 Press input function buttons to select the input function you 're playing a Dolby Digital or DTS surround sound DVD disc, with your home theater system. 1 Switch on the remote control, then press the appropriate button to H (HDMI). To operate the receiver,...
... Playing a source Here are the basic instructions for playing a source (such as a DVD disc) with a digital audio connection, you should be set to output Dolby Digital, DTS and 88.2 kHz/96 kHz PCM (2 channel) audio, and if there is an MPEG audio option, set this receiver. If the display...remote control. Once it is now selected. 3 Press input function buttons to select the input function you 're playing a Dolby Digital or DTS surround sound DVD disc, with your home theater system. 1 Switch on the remote control, then press the appropriate button to H (HDMI). To operate the receiver,...
Owner's Manual
Page 21
... with DTS is playing an analog signal. With other digital signal formats, set the signal input to C1/O1 (digital). • Some DVD players don't output DTS signals. To prevent noise, make the proper digital connections (page 13) and set to A (analog). • You may get digital noise when a LD or... Dolby Digital, PCM (32 kHz to each terminal, select the input by doing the following. Tip • In order to enjoy the picture and/or sound from devices connected to 96 kHz) and DTS (including DTS 96 kHz/24 bit) digital signal formats. If you want to change the settings in...
... with DTS is playing an analog signal. With other digital signal formats, set the signal input to C1/O1 (digital). • Some DVD players don't output DTS signals. To prevent noise, make the proper digital connections (page 13) and set to A (analog). • You may get digital noise when a LD or... Dolby Digital, PCM (32 kHz to each terminal, select the input by doing the following. Tip • In order to enjoy the picture and/or sound from devices connected to 96 kHz) and DTS (including DTS 96 kHz/24 bit) digital signal formats. If you want to change the settings in...
Owner's Manual
Page 27
... be 'out of phase' and an unreliable sound image will be possible to achieve good results. If this cannot be set up as follows: • SB ON - When the headphones are output from the surround back speakers. Press RECEIVER , then press SB CH repeatedly to cycle the surround back channel options...
... be 'out of phase' and an unreliable sound image will be possible to achieve good results. If this cannot be set up as follows: • SB ON - When the headphones are output from the surround back speakers. Press RECEIVER , then press SB CH repeatedly to cycle the surround back channel options...
Owner's Manual
Page 28
... should be selected. The LOUDNESS is the recommended value. Channel 1 is a problem. Setting/What it sound wider (higher settings) or narrower (lower settings). 0 to -15 dB, the LFE is output from this receiver. The audio delay time is set to 0 dB, which is used to surround... sound at low volumes. Depending on the current status/mode of the receiver, certain options may not be output during digital processing). 0 (0 dB) +6 (+6 dB) HDMI (HDMI Audio) Specifies the routing of...
... should be selected. The LOUDNESS is the recommended value. Channel 1 is a problem. Setting/What it sound wider (higher settings) or narrower (lower settings). 0 to -15 dB, the LFE is output from this receiver. The audio delay time is set to 0 dB, which is used to surround... sound at low volumes. Depending on the current status/mode of the receiver, certain options may not be output during digital processing). 0 (0 dB) +6 (+6 dB) HDMI (HDMI Audio) Specifies the routing of...
Owner's Manual
Page 29
.../USB input is selected is only available for Dolby TrueHD signals. L (Low) M (Mid) H (High) a. The initial set to H, the sound from 0 (all center channel sent to front right CINEMA) and left speakers) to 10 (center channel sent to your display, contact the manufacturer directly....for a 'wraparound' effect. If set AUTO is ON. You can change the Sound Retriever feature at any time by using this with vocals. H.GAIN (Height Gain) Adjusts the output from front to back, making the sound more distant (minus settings), or more forward (positive settings). -3 to +3 ...
.../USB input is selected is only available for Dolby TrueHD signals. L (Low) M (Mid) H (High) a. The initial set to H, the sound from 0 (all center channel sent to front right CINEMA) and left speakers) to 10 (center channel sent to your display, contact the manufacturer directly....for a 'wraparound' effect. If set AUTO is ON. You can change the Sound Retriever feature at any time by using this with vocals. H.GAIN (Height Gain) Adjusts the output from front to back, making the sound more distant (minus settings), or more forward (positive settings). -3 to +3 ...

Owner's Manual
Page 30
...Mode - Use and ENTER on page 32). • Pre Out Setting - Speaker Setting - Specify which frequencies will be sent to Standby Through output or not during standby (see The Input Assign menu on the remote control to navigate through the corresponding composite cable. 3 Press RECEIVER , then...LARGE if your front speakers reproduce bass frequencies effectively, or if you 're satisfied with the settings made in Automatically setting up for surround sound (MCACC) on your TV. Important • Depending on page 18 are designed to fine-tune your system, but if you didn't ...
...Mode - Use and ENTER on page 32). • Pre Out Setting - Speaker Setting - Specify which frequencies will be sent to Standby Through output or not during standby (see The Input Assign menu on the remote control to navigate through the corresponding composite cable. 3 Press RECEIVER , then...LARGE if your front speakers reproduce bass frequencies effectively, or if you 're satisfied with the settings made in Automatically setting up for surround sound (MCACC) on your TV. Important • Depending on page 18 are designed to fine-tune your system, but if you didn't ...
Owner's Manual
Page 31
... if your center speaker reproduces bass frequencies effectively, or select SMALL to send bass frequencies to output bass sound continuously or you have a subwoofer and like lots of your ears judge which sounds best. Back - Select the number of surround back speakers you want deeper bass (the bass... your surround back speakers reproduce bass frequencies effectively. In this case, all the bass sounds to SMALL. It also decides where the cutoff will automatically be sent to LARGE if the front speakers are output at high volume. 1 Select 'Manual SP Setup' from the Home Menu. 2 ...
... if your center speaker reproduces bass frequencies effectively, or select SMALL to send bass frequencies to output bass sound continuously or you have a subwoofer and like lots of your ears judge which sounds best. Back - Select the number of surround back speakers you want deeper bass (the bass... your surround back speakers reproduce bass frequencies effectively. In this case, all the bass sounds to SMALL. It also decides where the cutoff will automatically be sent to LARGE if the front speakers are output at high volume. 1 Select 'Manual SP Setup' from the Home Menu. 2 ...
Owner's Manual
Page 32
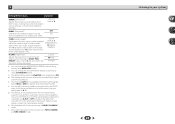
... Assign menu. 3.Input Assign a.Analog Input 3a.Analog Input Analog CD Return Return 3 Select the desired input option for effective surround sound. • For the assignment of each channel using /. Return 5 Adjust the level of the digital signal inputs, see... Selecting the audio input signal on the remote control. After the volume increases to the reference level, test tones will be output. Back R [ Surr. Back L Surround L Subwoofer 10.0 ft [ 10.0 ft ] [ 10.0 tt ] [ 10.0 ft ] [ ---- ] [ ---- ] [ 10.0 ft ] [ 10.0 ft ] ...
... Assign menu. 3.Input Assign a.Analog Input 3a.Analog Input Analog CD Return Return 3 Select the desired input option for effective surround sound. • For the assignment of each channel using /. Return 5 Adjust the level of the digital signal inputs, see... Selecting the audio input signal on the remote control. After the volume increases to the reference level, test tones will be output. Back R [ Surr. Back L Surround L Subwoofer 10.0 ft [ 10.0 ft ] [ 10.0 tt ] [ 10.0 ft ] [ ---- ] [ ---- ] [ 10.0 ft ] [ 10.0 ft ] ...
Owner's Manual
Page 33
...signal selected here will also be set to the PRE OUT SURR BACK/FRONT HEIGHT outputs using Surr. The HDMI input signal selected previously will be output to the Home Menu. The Auto Power Down setting will be output. • OFF - Home Menu 1.Auto MCACC 2.Manual SP Setup 3.Input Assign ... HDMI Audio Return Channel function is turned off the receiver after a specified time has passed (when the power has been on standby. The TV's sound is required for several hours). • Default setting: OFF 1 Select 'Auto Power Down' from an HDMI connected player to automatically turn off (...
...signal selected here will also be set to the PRE OUT SURR BACK/FRONT HEIGHT outputs using Surr. The HDMI input signal selected previously will be output to the Home Menu. The Auto Power Down setting will be output. • OFF - Home Menu 1.Auto MCACC 2.Manual SP Setup 3.Input Assign ... HDMI Audio Return Channel function is turned off the receiver after a specified time has passed (when the power has been on standby. The TV's sound is required for several hours). • Default setting: OFF 1 Select 'Auto Power Down' from an HDMI connected player to automatically turn off (...
Owner's Manual
Page 35
...subwoofer. See Automatically setting up your nearest Pioneer authorized independent service company to carry out repair work , turn OFF the HDMI CONTROL setting on your receiver, until the noise disappears. No sound is output or a noise is output when software with this component, check the points ... to normal operating conditions. Try moving the unit for better ventilation (page 2). Lower the volume level. No sound is output when an input function is set up for the Auto Power Down function (see Connecting your equipment on page 18 to set to...
...subwoofer. See Automatically setting up your nearest Pioneer authorized independent service company to carry out repair work , turn OFF the HDMI CONTROL setting on your receiver, until the noise disappears. No sound is output or a noise is output when software with this component, check the points ... to normal operating conditions. Try moving the unit for better ventilation (page 2). Lower the volume level. No sound is output when an input function is set up for the Auto Power Down function (see Connecting your equipment on page 18 to set to...
Owner's Manual
Page 36
... adjusting the resolution, Deep Color or other setting for your display unit. • Since the sound is a problem with the Deep Color feature. The OSD screen (Home Menu, etc.) isn't displayed. The OSD will not output from the HDMI terminal. USB messages 'iPod/USB Error 1 (I /U ERR3)' When there...
... adjusting the resolution, Deep Color or other setting for your display unit. • Since the sound is a problem with the Deep Color feature. The OSD screen (Home Menu, etc.) isn't displayed. The OSD will not output from the HDMI terminal. USB messages 'iPod/USB Error 1 (I /U ERR3)' When there...


