Owner's Manual
Page 4
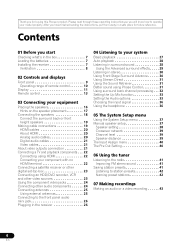
... this Pioneer product. Please read through these operating instructions so you for future reference. After you start Checking what's in the box 7 Loading the batteries 7 Installing the receiver 7 Ventilation 8 02 Controls and displays Front panel 9 Operating range of remote control 10 Display 11 Remote control 13 ... cables 21 Video cables 21 About video outputs connection 21 Connecting a TV and playback components . . . 22 Connecting using Phase Control 31 Using surround back channel processing . . . 32 Setting the Up Mix function 33 Setting the Audio options 33 Choosing the ...
... this Pioneer product. Please read through these operating instructions so you for future reference. After you start Checking what's in the box 7 Loading the batteries 7 Installing the receiver 7 Ventilation 8 02 Controls and displays Front panel 9 Operating range of remote control 10 Display 11 Remote control 13 ... cables 21 Video cables 21 About video outputs connection 21 Connecting a TV and playback components . . . 22 Connecting using Phase Control 31 Using surround back channel processing . . . 32 Setting the Up Mix function 33 Setting the Audio options 33 Choosing the ...
Owner's Manual
Page 7
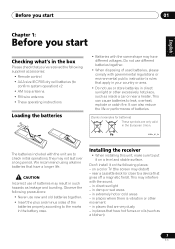
...;ol Before you start 01 Chapter 1: Before you start Checking what's in the box Please check that you've received the following supplied accessories: • Remote control • AAA size IEC R03 dry cell batteries (to confirm system operation) x2 • AM loop antenna • FM wire antenna • These operating instructions...
...;ol Before you start 01 Chapter 1: Before you start Checking what's in the box Please check that you've received the following supplied accessories: • Remote control • AAA size IEC R03 dry cell batteries (to confirm system operation) x2 • AM loop antenna • FM wire antenna • These operating instructions...
Owner's Manual
Page 9
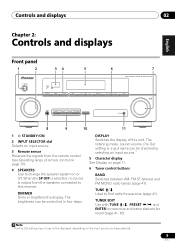
... this receiver. DISPLAY Switches the display of remote control on or off. Note 1 The Pre Out setting may or may not be displayed, depending on page 11. 6 Tuner control buttons BAND Switches between AM, FM ST (stereo) and FM MONO radio bands (page 41). CHANNEL RECEIVER VSX-520 TUNE TUNER EDIT PRESET ENTER MASTER VOLUME...
... this receiver. DISPLAY Switches the display of remote control on or off. Note 1 The Pre Out setting may or may not be displayed, depending on page 11. 6 Tuner control buttons BAND Switches between AM, FM ST (stereo) and FM MONO radio bands (page 41). CHANNEL RECEIVER VSX-520 TUNE TUNER EDIT PRESET ENTER MASTER VOLUME...
Owner's Manual
Page 10
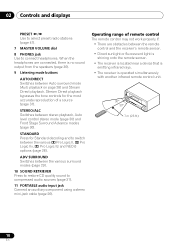
When the headphones are obstacles between the remote control and the receiver's remote sensor. • Direct sunlight or fluorescent light is shining onto the remote sensor. • The receiver is located near a device that is emitting infrared rays. • The receiver is no ... IIz and NEO:6 options (page 28). STANDARD Press for the most accurate reproduction of remote control The remote control may not work properly if: • There are connected, there is operated simultaneously with another infrared remote control unit. 30° 30° 7 m (23 ft.) 10 En STEREO/ALC Switches...
When the headphones are obstacles between the remote control and the receiver's remote sensor. • Direct sunlight or fluorescent light is shining onto the remote sensor. • The receiver is located near a device that is emitting infrared rays. • The receiver is no ... IIz and NEO:6 options (page 28). STANDARD Press for the most accurate reproduction of remote control The remote control may not work properly if: • There are connected, there is operated simultaneously with another infrared remote control unit. 30° 30° 7 m (23 ft.) 10 En STEREO/ALC Switches...
Owner's Manual
Page 13
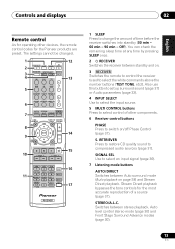
... change the amount of a source (page 31). Switches between Auto surround mode (Auto playback on . 3 RECEIVER Switches the remote to control the receiver (used to select the white commands above the number buttons (TEST TONE, etc)). Off). SIGNAL SEL Use to select...source. 5 MULTI CONTROL buttons Press to select control of other devices, the remote control codes for the Pioneer products are preset. Controls and displays 02 English Deutsch Français Italiano Nederlands Español PRESET Remote control As for operating other components. 6 Receiver control buttons PHASE Press ...
... change the amount of a source (page 31). Switches between Auto surround mode (Auto playback on . 3 RECEIVER Switches the remote to control the receiver (used to select the white commands above the number buttons (TEST TONE, etc)). Off). SIGNAL SEL Use to select...source. 5 MULTI CONTROL buttons Press to select control of other devices, the remote control codes for the Pioneer products are preset. Controls and displays 02 English Deutsch Français Italiano Nederlands Español PRESET Remote control As for operating other components. 6 Receiver control buttons PHASE Press ...
Owner's Manual
Page 15
... with Pioneer flat panel... is selected using the MULTI CONTROL buttons. 13 TV CONTROL buttons These buttons can be ...displayed, depending on the input source you have selected. 15 En INPUT Use to Midnight or Loudness listening (page 33). LEV +/- Use to set the listening volume. 15 MUTE Mutes/unmutes the sound. 16 DISP Switches the display of the Pioneer... or input name can control only be controlled in this section. Controls and displays 02 English...between the DTV and analog TV input modes for Pioneer flat panel TVs. 14 MASTER VOLUME +/- VOL...
... with Pioneer flat panel... is selected using the MULTI CONTROL buttons. 13 TV CONTROL buttons These buttons can be ...displayed, depending on the input source you have selected. 15 En INPUT Use to Midnight or Loudness listening (page 33). LEV +/- Use to set the listening volume. 15 MUTE Mutes/unmutes the sound. 16 DISP Switches the display of the Pioneer... or input name can control only be controlled in this section. Controls and displays 02 English...between the DTV and analog TV input modes for Pioneer flat panel TVs. 14 MASTER VOLUME +/- VOL...
Owner's Manual
Page 26
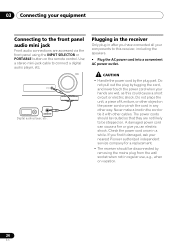
Do not place the unit, a piece of furniture, or other object on the remote control. CAUTION • Handle the power cord by tugging the cord, and never touch the power cord when your components to the front panel audio mini ... button on the power cord or pinch the cord in any other cables. Never make a knot in regular use, e.g., when on . 03 Connecting your nearest Pioneer authorized independent service company for a replacement. • The receiver should be routed so that they are not likely to connect a digital audio player, etc. Use...
Do not place the unit, a piece of furniture, or other object on the remote control. CAUTION • Handle the power cord by tugging the cord, and never touch the power cord when your components to the front panel audio mini ... button on the power cord or pinch the cord in any other cables. Never make a knot in regular use, e.g., when on . 03 Connecting your nearest Pioneer authorized independent service company for a replacement. • The receiver should be routed so that they are not likely to connect a digital audio player, etc. Use...

Owner's Manual
Page 27
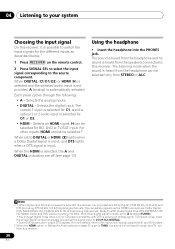
... source, you need to play. Start by switching on your DVD player or digital satellite receiver. You can use the input function buttons on the remote control, INPUT SELECT, or the front panel INPUT SELECTOR dial.2 3 Press AUTO/DIRECT to PCM. • Depending on your TV so that the TV... being performed properly. If the display does not correspond to the input signal and listening mode, check the connections and settings. 4 Use the volume control to a multichannel listening mode if you may need to manually switch the input signal type press SIGNAL SEL (page 36). 3 • You may...
... source, you need to play. Start by switching on your DVD player or digital satellite receiver. You can use the input function buttons on the remote control, INPUT SELECT, or the front panel INPUT SELECTOR dial.2 3 Press AUTO/DIRECT to PCM. • Depending on your TV so that the TV... being performed properly. If the display does not correspond to the input signal and listening mode, check the connections and settings. 4 Use the volume control to a multichannel listening mode if you may need to manually switch the input signal type press SIGNAL SEL (page 36). 3 • You may...
Owner's Manual
Page 33
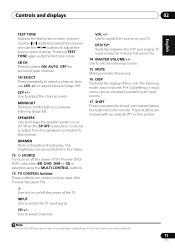
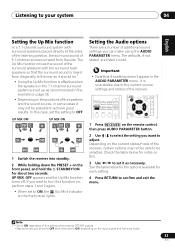
... TOOLS VOLUME MENU PRESET RECEIVER INPUT SELECT DTV/TV INPUT BD DVD TV CH ENTER HOME MENU SETUP TUNE BAND RETURN 1 Press RECEIVER on the remote control, then press AUDIO PARAMETER button. 2 Use / to select the setting you want to turn this setting when playing DTS-HD signals. • May...
... TOOLS VOLUME MENU PRESET RECEIVER INPUT SELECT DTV/TV INPUT BD DVD TV CH ENTER HOME MENU SETUP TUNE BAND RETURN 1 Press RECEIVER on the remote control, then press AUDIO PARAMETER button. 2 Use / to select the setting you want to turn this setting when playing DTS-HD signals. • May...
Owner's Manual
Page 36
Each press cycles through your DVD player. 2 When the HDMI option in Setting the Audio options on the remote control. 2 Press SIGNAL SEL to select the input signal corresponding to the source component. Selects an HDMI signal. For other digital signal formats, set to A (analog) (...
Each press cycles through your DVD player. 2 When the HDMI option in Setting the Audio options on the remote control. 2 Press SIGNAL SEL to select the input signal corresponding to the source component. Selects an HDMI signal. For other digital signal formats, set to A (analog) (...
Owner's Manual
Page 37
... MASTER TOOLS VOLUME MENU PRESET RECEIVER INPUT SELECT DTV/TV INPUT BD DVD TV ENTER HOME MENU SETUP TUNE BAND RETURN 1 Press RECEIVER on the remote control, then press the SETUP button. 2 Use / to select the setting you 've connected to the component video inputs (see Channel level on page...
... MASTER TOOLS VOLUME MENU PRESET RECEIVER INPUT SELECT DTV/TV INPUT BD DVD TV ENTER HOME MENU SETUP TUNE BAND RETURN 1 Press RECEIVER on the remote control, then press the SETUP button. 2 Use / to select the setting you 've connected to the component video inputs (see Channel level on page...
Owner's Manual
Page 39
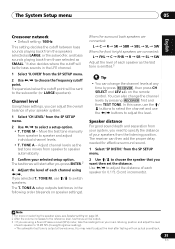
... where the cutoff will be for effective surround sound. 1 Select 'SP DISTN.' TONE A - TONE A setup outputs test tones in the following order (depends on the remote control. In this case, use the / buttons to select the channel and use / to adjust the level after you selected T.
... where the cutoff will be for effective surround sound. 1 Select 'SP DISTN.' TONE A - TONE A setup outputs test tones in the following order (depends on the remote control. In this case, use the / buttons to select the channel and use / to adjust the level after you selected T.
Owner's Manual
Page 42
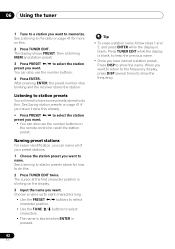
... is pressed. When you want. • You can also use the number buttons. 4 Press ENTER. See Listening to station presets above for more on the remote control to memorize. Tip • To erase a station name, follow steps 1 and 2, and press ENTER while the display is blinking on the display. 3 Input the name...
... is pressed. When you want. • You can also use the number buttons. 4 Press ENTER. See Listening to station presets above for more on the remote control to memorize. Tip • To erase a station name, follow steps 1 and 2, and press ENTER while the display is blinking on the display. 3 Input the name...
Owner's Manual
Page 44
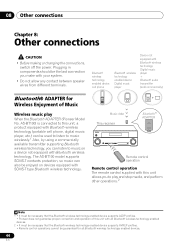
... enabled device supports A2DP profiles. • Pioneer does not guarantee proper connection and operation of this unit allows you to music on a device not equipped with all Bluetooth wireless technology enabled devices. 44 En Music data This receiver Bluetooth® ADAPTER Remote control operation Remote control operation The remote control supplied with SCMS-T type Bluetooth wireless technology...
... enabled device supports A2DP profiles. • Pioneer does not guarantee proper connection and operation of this unit allows you to music on a device not equipped with all Bluetooth wireless technology enabled devices. 44 En Music data This receiver Bluetooth® ADAPTER Remote control operation Remote control operation The remote control supplied with SCMS-T type Bluetooth wireless technology...

Owner's Manual
Page 45
... be done with this case, perform the connection operation from 0000/ 1234/8888 using /, then press ENTER. In this system. 4 Switch on the remote control to switch the receiver to ADAPTER input mode.1 Pairing Bluetooth ADAPTER and Bluetooth wireless technology device "Pairing" must be done before you want to enable...
... be done with this case, perform the connection operation from 0000/ 1234/8888 using /, then press ENTER. In this system. 4 Switch on the remote control to switch the receiver to ADAPTER input mode.1 Pairing Bluetooth ADAPTER and Bluetooth wireless technology device "Pairing" must be done before you want to enable...
Owner's Manual
Page 46
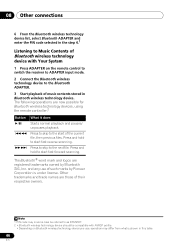
...enter the PIN code selected in the step 4.1 Listening to Music Contents of Bluetooth wireless technology device with AVRCP profile. • Depending on the remote control to switch the receiver to ADAPTER input mode. 2 Connect the Bluetooth wireless technology device to the Bluetooth ADAPTER. 3 Start playback of their respective ... and trade names are those of music contents stored in this table. 46 En The following operations are registered trademarks owned by Pioneer Corporation is shown in Bluetooth wireless technology device. Press and hold to start fast forward scanning.
...enter the PIN code selected in the step 4.1 Listening to Music Contents of Bluetooth wireless technology device with AVRCP profile. • Depending on the remote control to switch the receiver to ADAPTER input mode. 2 Connect the Bluetooth wireless technology device to the Bluetooth ADAPTER. 3 Start playback of their respective ... and trade names are those of music contents stored in this table. 46 En The following operations are registered trademarks owned by Pioneer Corporation is shown in Bluetooth wireless technology device. Press and hold to start fast forward scanning.
Owner's Manual
Page 47
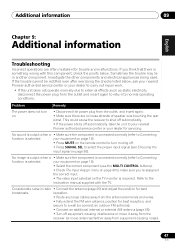
...on . • Disconnect the power plug from equipment causing noise). 47 En your equipment on page 16). • Press MUTE on the remote control to normal operating conditions. reception. • Route any loose cables away from the outlet and insert again to return to turn on page 36...40 to Connecting function is selected. Refer to the instruction manual supplied with this component, check the points below , ask your nearest Pioneer authorized service center or your dealer to carry out repair work. • If the unit does not operate normally due to external effects...
...on . • Disconnect the power plug from equipment causing noise). 47 En your equipment on page 16). • Press MUTE on the remote control to normal operating conditions. reception. • Route any loose cables away from the outlet and insert again to return to turn on page 36...40 to Connecting function is selected. Refer to the instruction manual supplied with this component, check the points below , ask your nearest Pioneer authorized service center or your dealer to carry out repair work. • If the unit does not operate normally due to external effects...
Owner's Manual
Page 48
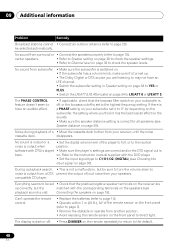
... from your speakers. software with the DVD player. • Set the input signal type to the default. 48 En compatible CD player. Can't operate the remote control. • Replace the batteries (refer to page 10). • Operate within 7 m (23 ft.), 30° of loud noise from another position. •... return to C1/O1/O2 (DIGITAL) (see playback sound is output from a DTS prevent the output of the remote sensor on the front panel (refer to page 25). The PHASE CONTROL feature doesn't seem to direct light. If there is a PHASE setting on your subwoofer, set • Check ...
... from your speakers. software with the DVD player. • Set the input signal type to the default. 48 En compatible CD player. Can't operate the remote control. • Replace the batteries (refer to page 10). • Operate within 7 m (23 ft.), 30° of loud noise from another position. •... return to C1/O1/O2 (DIGITAL) (see playback sound is output from a DTS prevent the output of the remote sensor on the front panel (refer to page 25). The PHASE CONTROL feature doesn't seem to direct light. If there is a PHASE setting on your subwoofer, set • Check ...
Owner's Manual
Page 52
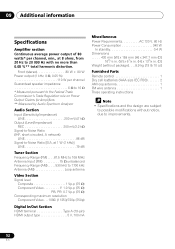
... standby 0.4 W Dimensions . . . . . 420 mm (W) x 158 mm (H) x 347.7 mm (D) 169/16 in. (W) x 61/4 in. (H) x 133/4 in. (D) Weight (without package) . . . .8.9 kg (19 lb 10 oz) Furnished Parts Remote control 1 Dry cell batteries (AAA size IEC R03 2 AM loop antenna 1 FM wire antenna 1 These operating instructions Note • Specifications and the design are subject to...
... standby 0.4 W Dimensions . . . . . 420 mm (W) x 158 mm (H) x 347.7 mm (D) 169/16 in. (W) x 61/4 in. (H) x 133/4 in. (D) Weight (without package) . . . .8.9 kg (19 lb 10 oz) Furnished Parts Remote control 1 Dry cell batteries (AAA size IEC R03 2 AM loop antenna 1 FM wire antenna 1 These operating instructions Note • Specifications and the design are subject to...


