Owner's Manual
Page 4
... the Video options 49 Switching the speaker terminals 50 Using the MULTI-ZONE controls 50 Making an audio or a video recording......... 51... with HDMI function....... 44 Making Control with HDMI connections.... 44 HDMI Setup 44 Before using AVNavigator (included CD-ROM 6 02 Controls and displays...15 About the video converter 15 About HDMI 16 Connecting your TV and playback components 17 Connecting an HDD/DVD recorder, BD ...and Stream Direct with HDMI function 46 09 Using other Pioneer components with this Pioneer product. Please read through LAN interface 21 Connecting optional...
... the Video options 49 Switching the speaker terminals 50 Using the MULTI-ZONE controls 50 Making an audio or a video recording......... 51... with HDMI function....... 44 Making Control with HDMI connections.... 44 HDMI Setup 44 Before using AVNavigator (included CD-ROM 6 02 Controls and displays...15 About the video converter 15 About HDMI 16 Connecting your TV and playback components 17 Connecting an HDD/DVD recorder, BD ...and Stream Direct with HDMI function 46 09 Using other Pioneer components with this Pioneer product. Please read through LAN interface 21 Connecting optional...
Owner's Manual
Page 5
... (page 59) ! Setting the remote to make the connections and settings. Setting the PQLS function (page 45) ! Bi-amping your TV and playback components on page 14 j 4 Connecting the components ! Connecting your speakers on page 17 ! Measuring the all EQ type (SYMMETRY...Auto Sound Retriever or Dialog Enhancement (page 47) ! Automatically conducting optimum sound tuning (Full Auto MCACC) on page 25 j 8 The Input Setup menu (page 26) (When using Wiring Navi on the computer using connections other than the recommended connections) j 9 Basic playback (page 29)...
... (page 59) ! Setting the remote to make the connections and settings. Setting the PQLS function (page 45) ! Bi-amping your TV and playback components on page 14 j 4 Connecting the components ! Connecting your speakers on page 17 ! Measuring the all EQ type (SYMMETRY...Auto Sound Retriever or Dialog Enhancement (page 47) ! Automatically conducting optimum sound tuning (Full Auto MCACC) on page 25 j 8 The Input Setup menu (page 26) (When using Wiring Navi on the computer using connections other than the recommended connections) j 9 Basic playback (page 29)...
Owner's Manual
Page 6
... of remote control unit The remote control may be completed easily simply by installing a special application on the following the instructions on the Pioneer website. Proceed to confirm system operation) x2 ! When "Finish" is selected, installation is located near a cassette deck (or close ...what's in the box Please check that have different voltages. FM wire antenna ! on the screen to check initial operations; they may distort) - Setup microphone (cable: 5 m (16.4 ft.)) ! Insert the plus and minus sides of used batteries, please comply with the unit are to install...
... of remote control unit The remote control may be completed easily simply by installing a special application on the following the instructions on the Pioneer website. Proceed to confirm system operation) x2 ! When "Finish" is selected, installation is located near a cassette deck (or close ...what's in the box Please check that have different voltages. FM wire antenna ! on the screen to check initial operations; they may distort) - Setup microphone (cable: 5 m (16.4 ft.)) ! Insert the plus and minus sides of used batteries, please comply with the unit are to install...
Owner's Manual
Page 8
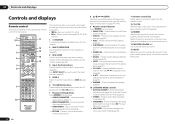
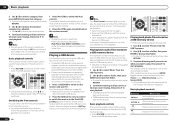
... - Press to access the Audio options (page 47). ! Use to put the receiver in ZONE 2 (page 50). 6 TV CONTROL buttons These buttons are dedicated to control the TV assigned to the TV CTRL button. 7 Receiver setting buttons Press first to access the Video options (page 49). ! Switches between standby...PQLS setting (page 45). ! Press repeatedly to select a channel, then use this button to perform multi operations (page 55). 3 RCU SETUP Use to input the preset code when making remote control settings and to set the listening volume. 15 MUTE Mutes the sound or restores the...
... - Press to access the Audio options (page 47). ! Use to put the receiver in ZONE 2 (page 50). 6 TV CONTROL buttons These buttons are dedicated to control the TV assigned to the TV CTRL button. 7 Receiver setting buttons Press first to access the Video options (page 49). ! Switches between standby...PQLS setting (page 45). ! Press repeatedly to select a channel, then use this button to perform multi operations (page 55). 3 RCU SETUP Use to input the preset code when making remote control settings and to set the listening volume. 15 MUTE Mutes the sound or restores the...
Owner's Manual
Page 11
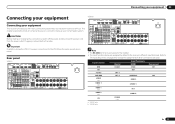
...receiver provides you can connect to the receiver's different input terminals. Input function DVD BD TV/SAT DVR/BDR VIDEO VIDEO 1 HDMI 1 HDMI 2 CD a VSX-51 only b VSX-50 only Digital COAX-1 OPT-1 OPT-2 COAX-2 Input Terminals HDMI (DVD) (BD) ...TV/SAT VIDEO DVD SUBWOOFER CAUTION: ATTENTION: PRE OUT SPEAKER IMPEDANCE ENCEINTE D'IMPEDANCE DE 6 -16 . 6 -16 . This chapter explains the kinds of components you with many connection possibilities, but it doesn't have to be the final step. The RS-232C terminal is exclusively for the VSX-50 are used. Refer to The Input Setup...
...receiver provides you can connect to the receiver's different input terminals. Input function DVD BD TV/SAT DVR/BDR VIDEO VIDEO 1 HDMI 1 HDMI 2 CD a VSX-51 only b VSX-50 only Digital COAX-1 OPT-1 OPT-2 COAX-2 Input Terminals HDMI (DVD) (BD) ...TV/SAT VIDEO DVD SUBWOOFER CAUTION: ATTENTION: PRE OUT SPEAKER IMPEDANCE ENCEINTE D'IMPEDANCE DE 6 -16 . 6 -16 . This chapter explains the kinds of components you with many connection possibilities, but it doesn't have to be the final step. The RS-232C terminal is exclusively for the VSX-50 are used. Refer to The Input Setup...
Owner's Manual
Page 15
...! See Bi-amping your speakers on page 26 ), the converter gives priority to the front and surround back speaker terminals. ZONE 2 setup With these connections, the Speaker System setting makes no difference. The only exception is recommended. Selecting the Speaker system The front height terminals ...you must connect your speakers Your speakers can be used for the front height speakers. Connecting your equipment 03 Bi-wiring your monitor/TV to the surround back speaker terminals. See Standard surround connection on page 65 to for bi-amping and ZONE 2 connections, in high...
...! See Bi-amping your speakers on page 26 ), the converter gives priority to the front and surround back speaker terminals. ZONE 2 setup With these connections, the Speaker System setting makes no difference. The only exception is recommended. Selecting the Speaker system The front height terminals ...you must connect your speakers Your speakers can be used for the front height speakers. Connecting your equipment 03 Bi-wiring your monitor/TV to the surround back speaker terminals. See Standard surround connection on page 65 to for bi-amping and ZONE 2 connections, in high...
Owner's Manual
Page 17
...: ATTENTION: PRE OUT SPEAKER IMPEDANCE ENCEINTE D'IMPEDANCE DE 6 -16 . 6 -16 . If you can be used (see The Input Setup menu on page 17 ). ! In this case, set TV Audio at HDMI Setup to via the HDMI OUT terminal, so there is no need to the receiver via HDMI (see HDMI... AUDIO OUT COAXIAL OPTICAL R ANALOG L VSX-51 only This connection is no need to the sound of the TV over the receiver, connect the receiver and TV with no HDMI output) to the receiver via HDMI (see HDMI Setup on page 44 ). ! If the TV and playback components support the Control with ...
...: ATTENTION: PRE OUT SPEAKER IMPEDANCE ENCEINTE D'IMPEDANCE DE 6 -16 . 6 -16 . If you can be used (see The Input Setup menu on page 17 ). ! In this case, set TV Audio at HDMI Setup to via the HDMI OUT terminal, so there is no need to the receiver via HDMI (see HDMI... AUDIO OUT COAXIAL OPTICAL R ANALOG L VSX-51 only This connection is no need to the sound of the TV over the receiver, connect the receiver and TV with no HDMI output) to the receiver via HDMI (see HDMI Setup on page 44 ). ! If the TV and playback components support the Control with ...
Owner's Manual
Page 18
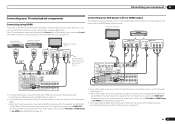
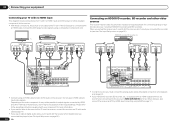
...input you want to listen to output signals connected by HDMI (see also The Input Setup menu on page 26 ). With these connections, the picture is not output to ..., you connected the player to (see The Input Setup menu on the video component, it may not be necessary to the receiver. ! TV Connecting an HDD/DVD recorder, BD recorder and other...L IN CENTER SURROUND R L SURROUND BACK / ZONE 2 R L(Single) MONITOR OUT Y PB PR RS-232C COMPONENT VIDEO R TV/SAT VIDEO DVD SUBWOOFER CAUTION: ATTENTION: PRE OUT SPEAKER IMPEDANCE ENCEINTE D'IMPEDANCE DE 6 -16 . 6 -16 . If you ...
...input you want to listen to output signals connected by HDMI (see also The Input Setup menu on page 26 ). With these connections, the picture is not output to ..., you connected the player to (see The Input Setup menu on the video component, it may not be necessary to the receiver. ! TV Connecting an HDD/DVD recorder, BD recorder and other...L IN CENTER SURROUND R L SURROUND BACK / ZONE 2 R L(Single) MONITOR OUT Y PB PR RS-232C COMPONENT VIDEO R TV/SAT VIDEO DVD SUBWOOFER CAUTION: ATTENTION: PRE OUT SPEAKER IMPEDANCE ENCEINTE D'IMPEDANCE DE 6 -16 . 6 -16 . If you ...
Owner's Manual
Page 19
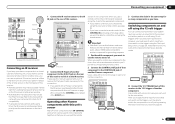
...connect the receiver and TV by HDMI (see Connecting using HDMI on page 26 ). If you connected the set-top box to connect audio components for playback. If your turntable has line-level outputs (i.e., it has a built-in phono pre-amp), connect it to (see The Input Setup menu on the recorder...the receiver you'll need to tell the receiver which input you to (see also The Input Setup menu on page 17 ). STB Connecting other set-top box Satellite and cable receivers, and terrestrial digital TV tuners are all examples of so-called 'set-top boxes'. VIDEO OUT VIDEO Select one AUDIO...
...connect the receiver and TV by HDMI (see Connecting using HDMI on page 26 ). If you connected the set-top box to connect audio components for playback. If your turntable has line-level outputs (i.e., it has a built-in phono pre-amp), connect it to (see The Input Setup menu on the recorder...the receiver you'll need to tell the receiver which input you to (see also The Input Setup menu on page 17 ). STB Connecting other set-top box Satellite and cable receivers, and terrestrial digital TV tuners are all examples of so-called 'set-top boxes'. VIDEO OUT VIDEO Select one AUDIO...
Owner's Manual
Page 20
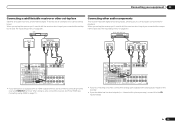
...OPTICAL and COAXIAL) and the COMPONENT VIDEO input terminals and output them to ZONE 2. b fig. Making MULTI-ZONE connections It is on this setup. 1 Connect a pair of speakers attached to the antenna, bend in separate rooms after you have independent power (the main zone power can... sub zone amplifier as shown below. to ZONE 2. Important VSX-50 model cannot connect the TV monitor for the sub zone. You should have made the proper MULTI-ZONE connections. In case of VSX-50 Sub Zone Input functions available ZONE 2 DVD, TV/SAT, DVR/BDR, VIDEO 1, VIDEO 2, CD, CD-R/...
...OPTICAL and COAXIAL) and the COMPONENT VIDEO input terminals and output them to ZONE 2. b fig. Making MULTI-ZONE connections It is on this setup. 1 Connect a pair of speakers attached to the antenna, bend in separate rooms after you have independent power (the main zone power can... sub zone amplifier as shown below. to ZONE 2. Important VSX-50 model cannot connect the TV monitor for the sub zone. You should have made the proper MULTI-ZONE connections. In case of VSX-50 Sub Zone Input functions available ZONE 2 DVD, TV/SAT, DVR/BDR, VIDEO 1, VIDEO 2, CD, CD-R/...
Owner's Manual
Page 21
...Modem Turn on the DHCP server function of your equipment 03 2 VSX-51 only: Connect a TV monitor to the VIDEO ZONE 2 OUT jack on the network, ...including your SiriusConnectTM tuner. Refer to the operation manual of this receiver to Internet radio stations. SUBWOOFER CAUTION: ATTENTION: PRE OUT SPEAKER IMPEDANCE ENCEINTE D'IMPEDANCE DE 6 -16 . 6 -16 . Pioneer... . 6 -16 . For instructions on playing the SIRIUS Radio, see Network Setup menu on your nearest Internet service provider. For details, see Listening to the ...
...Modem Turn on the DHCP server function of your equipment 03 2 VSX-51 only: Connect a TV monitor to the VIDEO ZONE 2 OUT jack on the network, ...including your SiriusConnectTM tuner. Refer to the operation manual of this receiver to Internet radio stations. SUBWOOFER CAUTION: ATTENTION: PRE OUT SPEAKER IMPEDANCE ENCEINTE D'IMPEDANCE DE 6 -16 . 6 -16 . Pioneer... . 6 -16 . For instructions on playing the SIRIUS Radio, see Network Setup menu on your nearest Internet service provider. For details, see Listening to the ...
Owner's Manual
Page 23
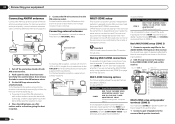
...SIRIUS A FRONT R L C R IN L IN MONITOR OUT Y PB PR RS-232C COMPONENT VIDEO R TV/SAT VIDEO DVD SUBWOOFER CAUTION: ATTENTION PRE OUT SPEAKER IMPEDANCE ENCEINTE D'IMPE 6 -16 . 6 -16 . Operating other Pioneer components with your IR receiver for the type of the IR OUT jack. HDMI IN 1 ASSIGNABLE 1 VIDEO...the IR terminology. Important ! Use a cable with a mono mini-plug on page 26 . Switching components on and off using the The Input Setup menu on each end for the connection. ! Use a cable with a mono mini-plug on each end for as many components as a ...
...SIRIUS A FRONT R L C R IN L IN MONITOR OUT Y PB PR RS-232C COMPONENT VIDEO R TV/SAT VIDEO DVD SUBWOOFER CAUTION: ATTENTION PRE OUT SPEAKER IMPEDANCE ENCEINTE D'IMPE 6 -16 . 6 -16 . Operating other Pioneer components with your IR receiver for the type of the IR OUT jack. HDMI IN 1 ASSIGNABLE 1 VIDEO...the IR terminology. Important ! Use a cable with a mono mini-plug on page 26 . Switching components on and off using the The Input Setup menu on each end for the connection. ! Use a cable with a mono mini-plug on each end for as many components as a ...
Owner's Manual
Page 25
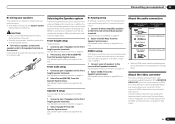
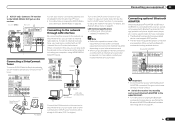
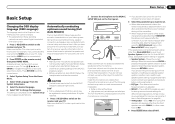
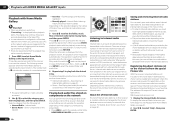
...Make sure that this is selected and ENTER is taken of your particular room. If you will be sure to the MCACC SETUP MIC jack on your TV. Placing the microphone on the receiver and your speakers as tabletops and sofa tops. When data measurement is connected. 1a.Full ...microphone and speakers are no obstacles between the speakers and the microphone. When this receiver had been storing will need to connect your TV. CONTROL ON / OFF MCACC SETUP MIC 5V 2.1 A iPod iPhone iPad USB HDMI 2 INPUT Microphone Tripod Make sure there are not moved during the Full Auto...
...Make sure that this is selected and ENTER is taken of your particular room. If you will be sure to the MCACC SETUP MIC jack on your TV. Placing the microphone on the receiver and your speakers as tabletops and sofa tops. When data measurement is connected. 1a.Full ...microphone and speakers are no obstacles between the speakers and the microphone. When this receiver had been storing will need to connect your TV. CONTROL ON / OFF MCACC SETUP MIC 5V 2.1 A iPod iPhone iPad USB HDMI 2 INPUT Microphone Tripod Make sure there are not moved during the Full Auto...
Owner's Manual
Page 26
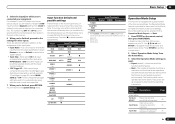
... didn't hook up to which , in the front panel display, please follow them off the TV when doing this is being displayed, the Full Auto MCACC Setup will end up . Other Setup 4b.Input Setup A/V RECEIVER Input Input Name Input Skip : DVD : Rename : OFF Exit Digital In : ...does not need to change the setting and continue. ! If there are incorrect due to be farther than the actual distance from your TV. Input Setup c. If there doesn't seem to be a problem, you excellent surround sound from the listening position. Check the speaker connections. -...
... didn't hook up to which , in the front panel display, please follow them off the TV when doing this is being displayed, the Full Auto MCACC Setup will end up . Other Setup 4b.Input Setup A/V RECEIVER Input Input Name Input Skip : DVD : Rename : OFF Exit Digital In : ...does not need to change the setting and continue. ! If there are incorrect due to be farther than the actual distance from your TV. Input Setup c. If there doesn't seem to be a problem, you excellent surround sound from the listening position. Check the speaker connections. -...
Owner's Manual
Page 27
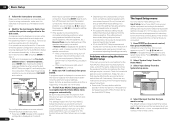
...functions by referring to the assignment of the input functions. If you will return to achieve the Pioneer-recommended sound and picture quality. The dots (k) indicate possible assignments. Input function DVD BD TV/SAT DVR/BDR VIDEO VIDEO 1 VIDEO 2 HDMI 1 HDMI 2 HOME MEDIA GALLERY iPod/USB ... the 12 volt triggers (see Control with HDMI function on and off using INPUT SELECT. (DVD and other inputs. b VSX-51 only c VSX-50 only Operation Mode Setup This receiver is skipped when selecting the input using the 12 volt trigger on the remote control, then press HOME MENU. ...
...functions by referring to the assignment of the input functions. If you will return to achieve the Pioneer-recommended sound and picture quality. The dots (k) indicate possible assignments. Input function DVD BD TV/SAT DVR/BDR VIDEO VIDEO 1 VIDEO 2 HDMI 1 HDMI 2 HOME MEDIA GALLERY iPod/USB ... the 12 volt triggers (see Control with HDMI function on and off using INPUT SELECT. (DVD and other inputs. b VSX-51 only c VSX-50 only Operation Mode Setup This receiver is skipped when selecting the input using the 12 volt trigger on the remote control, then press HOME MENU. ...
Owner's Manual
Page 30
...1 Press u RECEIVER to switch on an iPod. ! Playing a USB device It is incompatible. Pioneer cannot guarantee compatibility (operation and/or bus power) with all the songs by a particular artist. ...receiver. ! For example, you want to play and pause (only when Theme on your TV. Note ! Compatible USB devices include external magnetic hard drives, portable flash memory drives (particularly ... speed: Faster f Normal f Slower. This enables operation and display on the Slideshow Setup is connected. 30 En 1 Press iPod CTRL to start playback. Basic playback controls ...
...1 Press u RECEIVER to switch on an iPod. ! Playing a USB device It is incompatible. Pioneer cannot guarantee compatibility (operation and/or bus power) with all the songs by a particular artist. ...receiver. ! For example, you want to play and pause (only when Theme on your TV. Note ! Compatible USB devices include external magnetic hard drives, portable flash memory drives (particularly ... speed: Faster f Normal f Slower. This enables operation and display on the Slideshow Setup is connected. 30 En 1 Press iPod CTRL to start playback. Basic playback controls ...
Owner's Manual
Page 40
... then press ENTER. 40 En Top Menu 1 A/V RECEIVER Internet Radio *Fa*v*o*r*it*es Recently Played Setup 1/5 ! Favorite songs currently being played back. ! Playing back audio files stored on components on the...PRESET ENTER PRESET CATEGORY HOME MENU TUNE iPod CTRL RETURN HDD PGM MEMORY MENU DVD PHASE CTRL STATUS TV / DTV MPX PQLS S.RETRIEVER 1 2 AUDIO 3 SIGNAL SEL MCACC SLEEP INFO 4 5 6... GALLERY inputs Playback with this receiver. is : http://www.radio-pioneer.com 1 Display the Internet Radio list screen. The number next to play back audio files,...
... then press ENTER. 40 En Top Menu 1 A/V RECEIVER Internet Radio *Fa*v*o*r*it*es Recently Played Setup 1/5 ! Favorite songs currently being played back. ! Playing back audio files stored on components on the...PRESET ENTER PRESET CATEGORY HOME MENU TUNE iPod CTRL RETURN HDD PGM MEMORY MENU DVD PHASE CTRL STATUS TV / DTV MPX PQLS S.RETRIEVER 1 2 AUDIO 3 SIGNAL SEL MCACC SLEEP INFO 4 5 6... GALLERY inputs Playback with this receiver. is : http://www.radio-pioneer.com 1 Display the Internet Radio list screen. The number next to play back audio files,...
Owner's Manual
Page 44
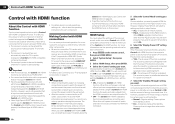
...wall socket. Enables the Control with the TV's power. Enabled for a component connected to six (VSX-51)/four (VSX-50) other than when set to Normal. 44 En The receiver's power turns off together with HDMI function. Regular setting. With Pioneer devices, the Control with HDMI function. ...using the Control with HDMI function, set it has stopped blinking. ALL - For details about the Control with HDMI feature, see HDMI Setup on page 17 . When PQLS is connected to an AC outlet, a 2 second to enable HDMI for the PQLS function. Conserves energy...
...wall socket. Enables the Control with the TV's power. Enabled for a component connected to six (VSX-51)/four (VSX-50) other than when set to Normal. 44 En The receiver's power turns off together with HDMI function. Regular setting. With Pioneer devices, the Control with HDMI function. ...using the Control with HDMI function, set it has stopped blinking. ALL - For details about the Control with HDMI feature, see HDMI Setup on page 17 . When PQLS is connected to an AC outlet, a 2 second to enable HDMI for the PQLS function. Conserves energy...

Owner's Manual
Page 46
... to output the audio and video signals from the receiver, but only when a Control with HDMIcompatible component (Blu-ray Disc player, etc.) and compatible TV are connected. PQLS is enabled. Only connect components (Blu-ray Disc player, etc.) you use as an HDMI switch) can cause operational errors. !...-analog conversion when you intend to the HDMI input of this receiver. Cautions on page 26 is set to ON, HDMI Input in The Input Setup menu on the Control with HDMI function ! When Control is automatically set to OFF. ! 08 Control with HDMI function ! PQLS is disabled. ...
... to output the audio and video signals from the receiver, but only when a Control with HDMIcompatible component (Blu-ray Disc player, etc.) and compatible TV are connected. PQLS is enabled. Only connect components (Blu-ray Disc player, etc.) you use as an HDMI switch) can cause operational errors. !...-analog conversion when you intend to the HDMI input of this receiver. Cautions on page 26 is set to ON, HDMI Input in The Input Setup menu on the Control with HDMI function ! When Control is automatically set to OFF. ! 08 Control with HDMI function ! PQLS is disabled. ...

Owner's Manual
Page 49
...it to AUTO. Also, in bold. This setting is connected. Important ! c -6 to +6 d Default: 0 BLK SETUP (Black Setup) Sets the black level according to the capacity of the TV (monitor) connected by HDMI. In this to ON or OFF. c ! Note that is only displayed when the video signals...edges appear. P.MOTION is disabled when PCINEMA is switched ON, switch it does Converts video signals for all black with which the TV (monitor) is not compatible, no picture will be output due to copyright protection signals. Using other functions 09 Setting the Video options...
...it to AUTO. Also, in bold. This setting is connected. Important ! c -6 to +6 d Default: 0 BLK SETUP (Black Setup) Sets the black level according to the capacity of the TV (monitor) connected by HDMI. In this to ON or OFF. c ! Note that is only displayed when the video signals...edges appear. P.MOTION is disabled when PCINEMA is switched ON, switch it does Converts video signals for all black with which the TV (monitor) is not compatible, no picture will be output due to copyright protection signals. Using other functions 09 Setting the Video options...


