Owner's Manual
Page 1
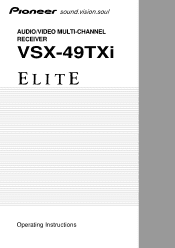
AUDIO/VIDEO MULTI-CHANNEL RECEIVER VSX-49TXi Operating Instructions
AUDIO/VIDEO MULTI-CHANNEL RECEIVER VSX-49TXi Operating Instructions
Owner's Manual
Page 5
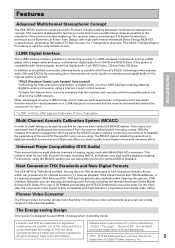
...-A, and allows very high quality digital processing. Features PREPARATION PREPARATION Advanced Multichannel Stereophonic Concept The VSX-49TXi receiver is possible with Pioneer's PQLS* technology when playing audio CDs and SACDs. In addition to make this receiver for ultra realistic sound. Multi-Channel Acoustic Calibration System (MCACC) In order to simplified connection, jitterless audio is constructed with...
...-A, and allows very high quality digital processing. Features PREPARATION PREPARATION Advanced Multichannel Stereophonic Concept The VSX-49TXi receiver is possible with Pioneer's PQLS* technology when playing audio CDs and SACDs. In addition to make this receiver for ultra realistic sound. Multi-Channel Acoustic Calibration System (MCACC) In order to simplified connection, jitterless audio is constructed with...

Owner's Manual
Page 6
... 31 Displays & Controls 32 Front Panel 32 Back Panel 34 Remote Control 36 Basic Receiver LCD Screens 37 Receiver MAIN Screen 37 Receiver SUB Screen 38 Display 39 Setting Up for Surround Sound ........ 40 SPEAKER SYSTEMS 41 CHANNEL LEVEL (channel balance 43 SPEAKER DISTANCE 44 Acoustic Calibration EQ 45 Data Copy of Acoustic Calibration EQ...
... 31 Displays & Controls 32 Front Panel 32 Back Panel 34 Remote Control 36 Basic Receiver LCD Screens 37 Receiver MAIN Screen 37 Receiver SUB Screen 38 Display 39 Setting Up for Surround Sound ........ 40 SPEAKER SYSTEMS 41 CHANNEL LEVEL (channel balance 43 SPEAKER DISTANCE 44 Acoustic Calibration EQ 45 Data Copy of Acoustic Calibration EQ...

Owner's Manual
Page 12
...channel sound. These are explained below and in the "Quick Start Guide" and you can use seven speakers and a subwoofer. If this little guide should give you an understanding of sound you choose on any of the information presented here check the main section of your system is the VSX-49TXi receiver... modes and they offer excellent sound and picture quality, and allow users to enjoy home theater soundtracks with more details on the VSX-49TXi receiver. Let's start with STANDARD 7.1 mode. Also, a DVD player is very flexible in getting multichannel home theater-like your DVDs...
...channel sound. These are explained below and in the "Quick Start Guide" and you can use seven speakers and a subwoofer. If this little guide should give you an understanding of sound you choose on any of the information presented here check the main section of your system is the VSX-49TXi receiver... modes and they offer excellent sound and picture quality, and allow users to enjoy home theater soundtracks with more details on the VSX-49TXi receiver. Let's start with STANDARD 7.1 mode. Also, a DVD player is very flexible in getting multichannel home theater-like your DVDs...

Owner's Manual
Page 14
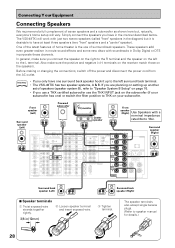
...the single speaker as "FRONT." If you only have a center speaker you must tell the receiver the center channel is off or when you do not have two speakers hook them to take full advantage of the receiver. If you listen to the A speaker terminals on the back of all your speakers. ...The diagram below in this receiver with five, or seven speakers (front left & right; PRE OUT 2 SURROUND ...
...the single speaker as "FRONT." If you only have a center speaker you must tell the receiver the center channel is off or when you do not have two speakers hook them to take full advantage of the receiver. If you listen to the A speaker terminals on the back of all your speakers. ...The diagram below in this receiver with five, or seven speakers (front left & right; PRE OUT 2 SURROUND ...

Owner's Manual
Page 18
...for the basic surround sound setting. or other error message on the OSD during the setup, the settings made up to establish the proper channel level, channel delay and acoustic calibration EQ. After it has finished, you leave CHECK!! If not, simply go to the next step. 13 Select... and press ENTER repeatedly. You should now have settings that may be affecting the environment and switch them off after three minutes and the receiver will output another series of the mic. The system will automatically exit from the microphone, etc.) the final settings may interfere with Surround...
...for the basic surround sound setting. or other error message on the OSD during the setup, the settings made up to establish the proper channel level, channel delay and acoustic calibration EQ. After it has finished, you leave CHECK!! If not, simply go to the next step. 13 Select... and press ENTER repeatedly. You should now have settings that may be affecting the environment and switch them off after three minutes and the receiver will output another series of the mic. The system will automatically exit from the microphone, etc.) the final settings may interfere with Surround...

Owner's Manual
Page 24
...-A or SACD compatible player, or are using an external Dolby Digital/DTS decoder, connect it is caused by leakage flux from the receiver. To be able to hear MULTI CH INPUT sources the proper mode has to the multichannel analog inputs as shown below. Before making...the AC outlet. *The arrows indicate the direction of your DVD-A, SACD compatible player or decoder which is possible to create a 6 or 7 channel environment with 7.1 (5.1) channel analog output jack FRONT SURROUND ANALOG CENTER SUB WOOFER SURROUND BACK L L L R R R memo If you use only one surround back input hook...
...-A or SACD compatible player, or are using an external Dolby Digital/DTS decoder, connect it is caused by leakage flux from the receiver. To be able to hear MULTI CH INPUT sources the proper mode has to the multichannel analog inputs as shown below. Before making...the AC outlet. *The arrows indicate the direction of your DVD-A, SACD compatible player or decoder which is possible to create a 6 or 7 channel environment with 7.1 (5.1) channel analog output jack FRONT SURROUND ANALOG CENTER SUB WOOFER SURROUND BACK L L L R R R memo If you use only one surround back input hook...
Owner's Manual
Page 28
...8226; If you use a THX certified subwoofer use of surround back speakers. In general, make sure the positive and negative (+/-) terminals on the receiver match those on the subwoofer (if your subwoofer. These speakers add even greater realism in movie sound effects and some new discs with a nominal ..." on page 76. • If you only have in (10mm) 3 Tighten terminal. The VSX-49TXi will work with just two stereo speakers (called "front" speakers in Dolby Digital or DTS incorporate these channels. L LR MULTI CH INPUT SUB W. Also make sure you have one ) or switch the filter...
...8226; If you use a THX certified subwoofer use of surround back speakers. In general, make sure the positive and negative (+/-) terminals on the receiver match those on the subwoofer (if your subwoofer. These speakers add even greater realism in movie sound effects and some new discs with a nominal ..." on page 76. • If you only have in (10mm) 3 Tighten terminal. The VSX-49TXi will work with just two stereo speakers (called "front" speakers in Dolby Digital or DTS incorporate these channels. L LR MULTI CH INPUT SUB W. Also make sure you have one ) or switch the filter...

Owner's Manual
Page 29
... placement If you can cause the amplifier to realize the best sound from the wall socket when not in the color of the center channel is extremely important. Be sure to be sure to secure it is very important for more details see page 109. PREPARATION PREPARATION Connecting Your...off the floor. For more information see pages 105 and 108. AC Outlet [switched 100 W max] Power supplied through this unit. • The receiver should not exceed 100 W. Some speakers are just a rough guide, for speaker placement to read the instructions that the sound of the TV screen. ...
... placement If you can cause the amplifier to realize the best sound from the wall socket when not in the color of the center channel is extremely important. Be sure to be sure to secure it is very important for more details see page 109. PREPARATION PREPARATION Connecting Your...off the floor. For more information see pages 105 and 108. AC Outlet [switched 100 W max] Power supplied through this unit. • The receiver should not exceed 100 W. Some speakers are just a rough guide, for speaker placement to read the instructions that the sound of the TV screen. ...

Owner's Manual
Page 33
...optical digital connection. Press SIGNAL SELECT repeatedly to select the function or use the multi room feature (requires an optional PIONEER Multi-Room Remote Sensor Unit MR-100 or another IR receiver). To select an optical or coaxial digital signal. 2 RF - A is very important for setting up your ...system to get proper surround sound. 26 Front VIDEO INPUT jacks (see p.80-84) Press to use with the INPUT SELECTOR to select one of channels used for playback ...
...optical digital connection. Press SIGNAL SELECT repeatedly to select the function or use the multi room feature (requires an optional PIONEER Multi-Room Remote Sensor Unit MR-100 or another IR receiver). To select an optical or coaxial digital signal. 2 RF - A is very important for setting up your ...system to get proper surround sound. 26 Front VIDEO INPUT jacks (see p.80-84) Press to use with the INPUT SELECTOR to select one of channels used for playback ...

Owner's Manual
Page 36
... screen. INPUT : Press to select the input source for a variety of the TV. 36 9 INPUT button Press to adjust CHANNEL DELAY or CHANNEL LEVEL. The button will turn off in two ways. In the SYSTEM SETUP menu, the 5˜∞ buttons can select station... you to control your TV and VCR, pressing the SYSTEM OFF button will cycle through all PIONEER components. These buttons are the basic controls that has programmed into receiver mode or to change the channel of the receiver. - FUNCTION 8 9 ENTER STANDBY/ON MULTI SYSTEM OPERATION OFF MUTING MASTER VOLUME + - !...
... screen. INPUT : Press to select the input source for a variety of the TV. 36 9 INPUT button Press to adjust CHANNEL DELAY or CHANNEL LEVEL. The button will turn off in two ways. In the SYSTEM SETUP menu, the 5˜∞ buttons can select station... you to control your TV and VCR, pressing the SYSTEM OFF button will cycle through all PIONEER components. These buttons are the basic controls that has programmed into receiver mode or to change the channel of the receiver. - FUNCTION 8 9 ENTER STANDBY/ON MULTI SYSTEM OPERATION OFF MUTING MASTER VOLUME + - !...

Owner's Manual
Page 37
...button Press this button to select the MAIN receiver screen (above) when the remote control is on or off for the function (DVD/LD, CD, etc.) they point to the MULTI CH INPUT terminals. 6 LISTENING CH SEL. ADVANCED CINEMA: Press to select a listening channel (5.1, 7.1, or AUTO) 7 ACOUSTIC CAL.... button (see p.50 & 59) Use this button to select the component (for all modes except THX). 3 DIGITAL NR button (see p.59) Use this button to put the receiver into STEREO mode if it was in a ...
...button Press this button to select the MAIN receiver screen (above) when the remote control is on or off for the function (DVD/LD, CD, etc.) they point to the MULTI CH INPUT terminals. 6 LISTENING CH SEL. ADVANCED CINEMA: Press to select a listening channel (5.1, 7.1, or AUTO) 7 ACOUSTIC CAL.... button (see p.50 & 59) Use this button to select the component (for all modes except THX). 3 DIGITAL NR button (see p.59) Use this button to put the receiver into STEREO mode if it was in a ...

Owner's Manual
Page 39
...during Dolby Pro Logic II processing. TUNED : Lights when a broadcast is set to receive FM broadcasts and when selected MPX mode. AUTO : Lights when the receiver is received in the auto stereo mode. Center channel. S - STEREO : Lights when a FM stereo broadcast is set to select ...an i.LINK component. Right surround channel. DISC : Lights during DTS ES matrix processing. ANALOG ...
...during Dolby Pro Logic II processing. TUNED : Lights when a broadcast is set to receive FM broadcasts and when selected MPX mode. AUTO : Lights when the receiver is received in the auto stereo mode. Center channel. S - STEREO : Lights when a FM stereo broadcast is set to select ...an i.LINK component. Right surround channel. DISC : Lights during DTS ES matrix processing. ANALOG ...

Owner's Manual
Page 40
...for Surround Sound To ensure the best possible surround sound, complete the following setup operations. These setup operations use on-screen displays (OSDs) on the receiver screen. 3 Press the SYSTEM SETUP button. Expert Setup ] [4. Use the 5∞ and 2 3 buttons to set up and that time were... you think the ones you made in a particular menu, press ENTER. Adding a slight delay to the next setting here. TV CONTROL use it. CHANNEL LEVEL (see p.41 & 42) Use to specify the type and number of room equalizer for achieving a surround sound effect. LOUDNESS TAPE 2 MONITOR...
...for Surround Sound To ensure the best possible surround sound, complete the following setup operations. These setup operations use on-screen displays (OSDs) on the receiver screen. 3 Press the SYSTEM SETUP button. Expert Setup ] [4. Use the 5∞ and 2 3 buttons to set up and that time were... you think the ones you made in a particular menu, press ENTER. Adding a slight delay to the next setting here. TV CONTROL use it. CHANNEL LEVEL (see p.41 & 42) Use to specify the type and number of room equalizer for achieving a surround sound effect. LOUDNESS TAPE 2 MONITOR...

Owner's Manual
Page 41
... if there is hooked up to the front panel and in order to use the 5∞ buttons to select it depends on setting up the receiver to match the speakers you have . The auto setup from the microphone may not properly assess the size of deep bass sounds. • If ... the appropriate position before starting. Make sure the microphone is background noise, from an air conditioner or refrigerator, for more information on settings of the channel set to SMALL. Also, the center and surround speakers cannot be hooked up to the left surround back terminal. • Select LARGE if your ...
... if there is hooked up to the front panel and in order to use the 5∞ buttons to select it depends on setting up the receiver to match the speakers you have . The auto setup from the microphone may not properly assess the size of deep bass sounds. • If ... the appropriate position before starting. Make sure the microphone is background noise, from an air conditioner or refrigerator, for more information on settings of the channel set to SMALL. Also, the center and surround speakers cannot be hooked up to the left surround back terminal. • Select LARGE if your ...
Owner's Manual
Page 43
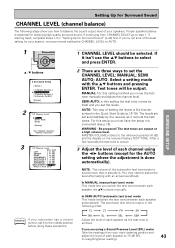
...tones. AUTO. SEMI AUTO: in this setting the test tone moves by the receiver as the test tone is emitted. WARNING : Be prepared! If continuing from your system, we recommend setting the CHANNEL LEVEL to 75 dB SPL 43 (C-weighting/slow reading). MANUAL: For this ... the test tone between each speaker the 5∞ buttons manually. If you how to the reference position (0 dB) and the display on the receiver flashes TEST TONE. Channel Level [Manual] [Semi Auto] [Auto] Normal Surround [Return] Your Speaker Systems " Normal Surround " 3 2.2. In MANUAL (manual test tone...
...tones. AUTO. SEMI AUTO: in this setting the test tone moves by the receiver as the test tone is emitted. WARNING : Be prepared! If continuing from your system, we recommend setting the CHANNEL LEVEL to 75 dB SPL 43 (C-weighting/slow reading). MANUAL: For this ... the test tone between each speaker the 5∞ buttons manually. If you how to the reference position (0 dB) and the display on the receiver flashes TEST TONE. Channel Level [Manual] [Semi Auto] [Auto] Normal Surround [Return] Your Speaker Systems " Normal Surround " 3 2.2. In MANUAL (manual test tone...

Owner's Manual
Page 44
... delay. Setting Up for Surround Sound" (p.40) first. 1 ENTER STANDBY/O 5˜∞ buttons 2.Surround Setup [ Check ] [ 1.Speaker Systems ] [ 2.Channel Level ] [ 3.Speaker Distance ] [ 4.Acoustic Cal EQ] [Return] 2 2.3. The display on your speakers to the reference position (0 dB) and the display...Once you use with the 5∞ buttons and press ENTER. If starting fresh, complete steps 1-4 in the Quick Start Guide), the receiver calculates the correct delay times automatically. Speaker Distance [Manual] [Auto] [Return] Your Speaker Systems " Normal Surround " 44 1 ...
... delay. Setting Up for Surround Sound" (p.40) first. 1 ENTER STANDBY/O 5˜∞ buttons 2.Surround Setup [ Check ] [ 1.Speaker Systems ] [ 2.Channel Level ] [ 3.Speaker Distance ] [ 4.Acoustic Cal EQ] [Return] 2 2.3. The display on your speakers to the reference position (0 dB) and the display...Once you use with the 5∞ buttons and press ENTER. If starting fresh, complete steps 1-4 in the Quick Start Guide), the receiver calculates the correct delay times automatically. Speaker Distance [Manual] [Auto] [Return] Your Speaker Systems " Normal Surround " 44 1 ...

Owner's Manual
Page 46
... is the most direct representation of Acoustic Calibration EQ, select CHECK, press ENTER and proceed to enjoy a sound balance defined by the receiver (see p.48). If this setting is a possibility the sound will result in accordance with the 5∞ buttons when done and press... to select the frequency and 5∞ buttons to an extreme frequency balance. memo 46 The message OVER !! You will return to any channel over any other channel so this message appears, adjust the frequency balance accordingly. 7 Select RETURN with the settings of one and press ENTER. 4 2.4. WARNING ...
... is the most direct representation of Acoustic Calibration EQ, select CHECK, press ENTER and proceed to enjoy a sound balance defined by the receiver (see p.48). If this setting is a possibility the sound will result in accordance with the 5∞ buttons when done and press... to select the frequency and 5∞ buttons to an extreme frequency balance. memo 46 The message OVER !! You will return to any channel over any other channel so this message appears, adjust the frequency balance accordingly. 7 Select RETURN with the settings of one and press ENTER. 4 2.4. WARNING ...

Owner's Manual
Page 48
... 5 2.Surround Setup [ Check ] [ 1.Speaker Systems ] [ 2.Channel Level ] [ 3.Speaker Distance ] [ 4.Acoustic Cal EQ ] [Return] 6 The first menu in which you can do it following the steps below. 1 3 2 RECEIVER DVD/LD Receiver TONE BASS/ ATREBLE VCR1 /DVR VCR2 VCR3 TV DISPLAY DIMMER STATUS SYSTEM... SETUP VIDEO SELECT SPEAKER A/B MAIN SUB EFFECT/ CH SEL. Channel Delay; Expert Setup ] [4. Channel Level; Then select EXIT and press ...
... 5 2.Surround Setup [ Check ] [ 1.Speaker Systems ] [ 2.Channel Level ] [ 3.Speaker Distance ] [ 4.Acoustic Cal EQ ] [Return] 6 The first menu in which you can do it following the steps below. 1 3 2 RECEIVER DVD/LD Receiver TONE BASS/ ATREBLE VCR1 /DVR VCR2 VCR3 TV DISPLAY DIMMER STATUS SYSTEM... SETUP VIDEO SELECT SPEAKER A/B MAIN SUB EFFECT/ CH SEL. Channel Delay; Expert Setup ] [4. Channel Level; Then select EXIT and press ...

Owner's Manual
Page 49
...i.LINK-equipped components the receiver INPUT FUNCTION automatically switches to turn . • When an i.LINK-Audio-equipped component is particularly important to select speaker A or if you want to select the source. Be sure to achieve a surround sound effect with the VSX-49TXi. A play automatically....see page 12 (Home Theater: The Basics) and for an explanation of the models are connected, please refer to select the channel. 49 BASIC For background information on this method. Listening Modes available to play instruction is connected (see pages 52-55. STANDBY...
...i.LINK-equipped components the receiver INPUT FUNCTION automatically switches to turn . • When an i.LINK-Audio-equipped component is particularly important to select speaker A or if you want to select the source. Be sure to achieve a surround sound effect with the VSX-49TXi. A play automatically....see page 12 (Home Theater: The Basics) and for an explanation of the models are connected, please refer to select the channel. 49 BASIC For background information on this method. Listening Modes available to play instruction is connected (see pages 52-55. STANDBY...

