Owner's Manual
Page 4
... network 47 Glossary 47 About playable file formats 48 07 Home Menu Using the Home Menu 49 Manual speaker setup 49 Speaker Setting 49 X.Over 50 Channel Level 50 Speaker Distance 51 The Input Assign menu 51 Analog Input ... 33 Naming preset stations 33 05 Listening to your favorite songs 42 The Network Setup menu 42 Network Configuration 42 Language 43 Firmware Update 43 Network setting using Safari browser 44 Friendly Name setting using Safari browser 44 Firmware ...Connecting your equipment Determining the speakers' application 11 Some tips for buying this Pioneer product.
... network 47 Glossary 47 About playable file formats 48 07 Home Menu Using the Home Menu 49 Manual speaker setup 49 Speaker Setting 49 X.Over 50 Channel Level 50 Speaker Distance 51 The Input Assign menu 51 Analog Input ... 33 Naming preset stations 33 05 Listening to your favorite songs 42 The Network Setup menu 42 Network Configuration 42 Language 43 Firmware Update 43 Network setting using Safari browser 44 Friendly Name setting using Safari browser 44 Firmware ...Connecting your equipment Determining the speakers' application 11 Some tips for buying this Pioneer product.
Owner's Manual
Page 5
... listening 54 Making MULTI-ZONE connections 54 Using the MULTI-ZONE controls 54 09 Control with HDMI function Making Control with HDMI connections 55 HDMI Setup 55 Before using synchronization 56 About synchronized operations 56 Cautions on the Control with HDMI function 56 10 Controlling the rest of your system Setting...
... listening 54 Making MULTI-ZONE connections 54 Using the MULTI-ZONE controls 54 09 Control with HDMI function Making Control with HDMI connections 55 HDMI Setup 55 Before using synchronization 56 About synchronized operations 56 Cautions on the Control with HDMI function 56 10 Controlling the rest of your system Setting...
Owner's Manual
Page 6
... setting item Setting to be used easily after following the procedure below to make sure to put it on the following supplied accessories: • Setup microphone • Remote control • AAA size IEC R03 dry cell batteries (to confirm system operation) x2 • AM loop antenna ... back channel processing (page 36) • Setting the Up Mix function (page 36) • Setting the Audio options (page 37) • Manual speaker setup (page 49) 8 Making maximum use of functions and terminals. on a color TV (the screen may interfere with the sound. - in direct sunlight...
... setting item Setting to be used easily after following the procedure below to make sure to put it on the following supplied accessories: • Setup microphone • Remote control • AAA size IEC R03 dry cell batteries (to confirm system operation) x2 • AM loop antenna ... back channel processing (page 36) • Setting the Up Mix function (page 36) • Setting the Audio options (page 37) • Manual speaker setup (page 49) 8 Making maximum use of functions and terminals. on a color TV (the screen may interfere with the sound. - in direct sunlight...
Owner's Manual
Page 7
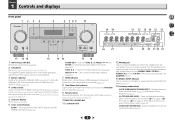
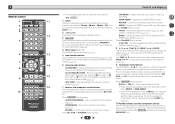
The listening mode when the sound is automatically set to on after the Auto MCACC setup (page 23)). 4 ZONE controls If you have selected. 3 MCACC indicator Lights when Acoustic Calibration EQ (page 36) is on page 8. 6 Tuner control buttons BAND - The ... MASTER VOLUME dial 11 STANDBY/ON 12 PHONES jack Use to connect headphones. Use with ADAPTER input). 13 MCACC SETUP MIC jack Use to connect a microphone when performing Auto MCACC setup (page 23). 14 Listening mode buttons AUTO SURROUND/STREAM DIRECT - Used to select preset radio stations (page 33). 7 HDMI indicator...
The listening mode when the sound is automatically set to on after the Auto MCACC setup (page 23)). 4 ZONE controls If you have selected. 3 MCACC indicator Lights when Acoustic Calibration EQ (page 36) is on page 8. 6 Tuner control buttons BAND - The ... MASTER VOLUME dial 11 STANDBY/ON 12 PHONES jack Use to connect headphones. Use with ADAPTER input). 13 MCACC SETUP MIC jack Use to connect a microphone when performing Auto MCACC setup (page 23). 14 Listening mode buttons AUTO SURROUND/STREAM DIRECT - Used to select preset radio stations (page 33). 7 HDMI indicator...
Owner's Manual
Page 9
... find radio frequencies and PRESET / can check the remaining sleep time at SMALL in the Speaker Setting (or automatically via the Auto MCACC setup) and the X.Over is set above 150 Hz, the subwoofer channel level will enable you to control a component after RECEIVER is pressed. (For example MIDNIGHT...
... find radio frequencies and PRESET / can check the remaining sleep time at SMALL in the Speaker Setting (or automatically via the Auto MCACC setup) and the X.Over is set above 150 Hz, the subwoofer channel level will enable you to control a component after RECEIVER is pressed. (For example MIDNIGHT...
Owner's Manual
Page 11
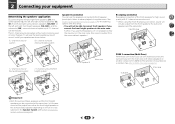
... back speaker.) R L Speaker B Main zone Bi-amping connection Bi-amping connection of input devices is the most commonly-used in the main zone. In this setup. • You will only be enjoyed. Further, if you connect the front height speakers in home theaters. Main zone Sub zone R L Important • Both the...
... back speaker.) R L Speaker B Main zone Bi-amping connection Bi-amping connection of input devices is the most commonly-used in the main zone. In this setup. • You will only be enjoyed. Further, if you connect the front height speakers in home theaters. Main zone Sub zone R L Important • Both the...
Owner's Manual
Page 12
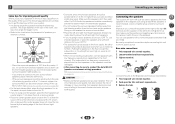
... receiver match those on the speakers. Make sure the speakers don't face each other speakers should be at least three speakers is recommended, and a complete setup is localized at least one surround back speakers, place it directly behind the listener than for home theater playback. • Try not to place speakers...
... receiver match those on the speakers. Make sure the speakers don't face each other speakers should be at least three speakers is recommended, and a complete setup is localized at least one surround back speakers, place it directly behind the listener than for home theater playback. • Try not to place speakers...
Owner's Manual
Page 17
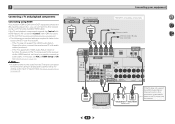
..., set-up for analog audio input is required (see Control with HDMI function on page 55). In this case, set ARC at HDMI Setup to ON (see HDMI Setup on page 55). • The following connection/setting is required to listen to the sound of the TV can be used (see The...
..., set-up for analog audio input is required (see Control with HDMI function on page 55). In this case, set ARC at HDMI Setup to ON (see HDMI Setup on page 55). • The following connection/setting is required to listen to the sound of the TV can be used (see The...
Owner's Manual
Page 19
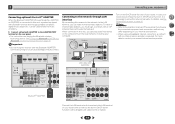
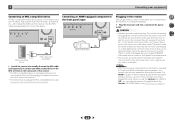
...Refer to the ADAPTER PORT terminal on the rear panel. • For instructions on playing the Bluetooth wireless technology device, see The Network Setup menu on page 30. For more details, contact your nearest Internet service provider. 4 7 62 LAN cable (sold separately) Bluetooth®...wirelessly. Connect a Bluetooth ADAPTER to the operation manual of your equipment Connecting optional Bluetooth® ADAPTER When the Bluetooth ADAPTER (Pioneer Model No. Important • Do not move the receiver with a straight LAN cable (CAT 5 or higher). 19 When connected in ...
...Refer to the ADAPTER PORT terminal on the rear panel. • For instructions on playing the Bluetooth wireless technology device, see The Network Setup menu on page 30. For more details, contact your nearest Internet service provider. 4 7 62 LAN cable (sold separately) Bluetooth®...wirelessly. Connect a Bluetooth ADAPTER to the operation manual of your equipment Connecting optional Bluetooth® ADAPTER When the Bluetooth ADAPTER (Pioneer Model No. Important • Do not move the receiver with a straight LAN cable (CAT 5 or higher). 19 When connected in ...
Owner's Manual
Page 21
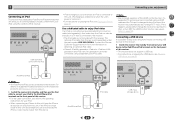
...cable (sold separately), then video from this device. USB cable that comes with this happens, please either change to TV input. Contact the Pioneer Customer Support division for your iPod. • When connecting an iPhone to this unit, keep the iPhone at least 20 cm away from ...7th generation cannot be connected using the controls of this receiver. For details on supported models and versions of the respective products, see HDMI Setup on page 27. 2 Connecting your equipment Connecting an iPod This receiver has a dedicated iPod/iPhone/iPad terminals that will allow you to ...
...cable (sold separately), then video from this device. USB cable that comes with this happens, please either change to TV input. Contact the Pioneer Customer Support division for your iPod. • When connecting an iPhone to this unit, keep the iPhone at least 20 cm away from ...7th generation cannot be connected using the controls of this receiver. For details on supported models and versions of the respective products, see HDMI Setup on page 27. 2 Connecting your equipment Connecting an iPod This receiver has a dedicated iPod/iPhone/iPad terminals that will allow you to ...
Owner's Manual
Page 22
.... Note • After this unit. (Recharging is enabled only when the unit's power is recharged whenever it damaged, ask your nearest PIONEER authorized service center or your MHL enabled device to 10 second HDMI initialization process begins. Use the MHL cable (sold separately) ...this receiver. • The MHL-compatible device is turned on.) • For instructions on playing the MHL-compatible device, see HDMI Setup on vacation. Connecting an HDMI-equipped component to the front panel input MHL-compatible device MHL cable (sold separately) to enjoy full-HD ...
.... Note • After this unit. (Recharging is enabled only when the unit's power is recharged whenever it damaged, ask your nearest PIONEER authorized service center or your MHL enabled device to 10 second HDMI initialization process begins. Use the MHL cable (sold separately) ...this receiver. • The MHL-compatible device is turned on.) • For instructions on playing the MHL-compatible device, see HDMI Setup on vacation. Connecting an HDMI-equipped component to the front panel input MHL-compatible device MHL cable (sold separately) to enjoy full-HD ...

Owner's Manual
Page 23
...settings and equalization for your particular room. Use and ENTER on the remote control, then press the HOME MENU button. Manual SP Setup 3 . Network Standby 7. OSD Setup 4 7 62 • Mic In! Important • The OSD will overwrite any time to your TV. Otherwise, place the... microphone at any existing speaker settings you have connected using the Auto MCACC setup, the NETRADIO, PANDORA, M.SERVER, FAVORITE, iPod/USB or ADAPTER input should not be made. • The screensaver automatically starts after pressing ...
...settings and equalization for your particular room. Use and ENTER on the remote control, then press the HOME MENU button. Manual SP Setup 3 . Network Standby 7. OSD Setup 4 7 62 • Mic In! Important • The OSD will overwrite any time to your TV. Otherwise, place the... microphone at any existing speaker settings you have connected using the Auto MCACC setup, the NETRADIO, PANDORA, M.SERVER, FAVORITE, iPod/USB or ADAPTER input should not be made. • The screensaver automatically starts after pressing ...
Owner's Manual
Page 24
... EQ Return A progress report is displayed on page 49). If you excellent surround sound from your system, but it 's doing the Auto MCACC setup. 4 7 62 24 Check for channel level, speaker distance, X.Over, and Acoustic Calibration EQ. The configuration shown on-screen should reflect the ...household appliances (air conditioner, fridge, fan, etc.), that may interfere with the speaker connection. Other problems when using the Auto MCACC setup If the room environment is not optimal for 10 seconds and ENTER is selected, then press ENTER. If this is also possible to...
... EQ Return A progress report is displayed on page 49). If you excellent surround sound from your system, but it 's doing the Auto MCACC setup. 4 7 62 24 Check for channel level, speaker distance, X.Over, and Acoustic Calibration EQ. The configuration shown on-screen should reflect the ...household appliances (air conditioner, fridge, fan, etc.), that may interfere with the speaker connection. Other problems when using the Auto MCACC setup If the room environment is not optimal for 10 seconds and ENTER is selected, then press ENTER. If this is also possible to...
Owner's Manual
Page 25
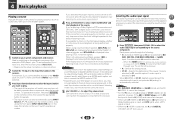
... a source (such as a DVD disc) with a digital audio connection, you have one), then the receiver (press RECEIVER). • Make sure the setup microphone is possible to operate other inputs, H cannot be selected. - If you're playing a Dolby Digital or DTS surround sound DVD disc, with your DVD...are displayed when playing Dolby Digital 5.1channel signals, and DTS+NEO:6 is displayed when playing Dolby Digital signals. However, if the ARC at HDMI Setup is set to ON, the input is set to a multichannel listening mode if you want to play. • The input of the receiver ...
... a source (such as a DVD disc) with a digital audio connection, you have one), then the receiver (press RECEIVER). • Make sure the setup microphone is possible to operate other inputs, H cannot be selected. - If you're playing a Dolby Digital or DTS surround sound DVD disc, with your DVD...are displayed when playing Dolby Digital 5.1channel signals, and DTS+NEO:6 is displayed when playing Dolby Digital signals. However, if the ARC at HDMI Setup is set to ON, the input is set to a multichannel listening mode if you want to play. • The input of the receiver ...
Owner's Manual
Page 31
... select one unit at a time. • When connecting this receiver by Bluetooth connection to see that the Bluetooth ADAPTER is detected by PIONEER CORPORATION is selected. 3 Start playback of the Bluetooth wireless technology device. 7 From the Bluetooth wireless technology device list, select Bluetooth ADAPTER...in the remote control buttons. In this receiver. 1 Press ADAPTER to switch the receiver to ADAPTER input. 2 Press TOP MENU to select Bluetooth Setup. 3 Use / to select PIN, then press ENTER. 4 Use / to as PASSKEY. When this receiver and on...
... select one unit at a time. • When connecting this receiver by Bluetooth connection to see that the Bluetooth ADAPTER is detected by PIONEER CORPORATION is selected. 3 Start playback of the Bluetooth wireless technology device. 7 From the Bluetooth wireless technology device list, select Bluetooth ADAPTER...in the remote control buttons. In this receiver. 1 Press ADAPTER to switch the receiver to ADAPTER input. 2 Press TOP MENU to select Bluetooth Setup. 3 Use / to select PIN, then press ENTER. 4 Use / to as PASSKEY. When this receiver and on...
Owner's Manual
Page 34
... encoded, the proper decoding format will hear the source through just the front left and right speakers (and possibly your subwoofer depending on your speaker setup and the type of source you're listening to see how the source is being processed. The following modes provide basic surround sound for more...
... encoded, the proper decoding format will hear the source through just the front left and right speakers (and possibly your subwoofer depending on your speaker setup and the type of source you're listening to see how the source is being processed. The following modes provide basic surround sound for more...

Owner's Manual
Page 35
... INPUT 1 2 3 DISP 4 5 6 CH 7 8 9 CH SHIFT CLR 0 ENTER Press RECEIVER , then press S.RETRIEVER to hear the truest possible reproduction of channels in the Manual SP Setup (speaker setting, channel level, speaker distance), as well as with various soundtracks to NO, DOLBY PLIIx becomes DOLBY PLII (5.1 channel sound). Back (see Setting the...
... INPUT 1 2 3 DISP 4 5 6 CH 7 8 9 CH SHIFT CLR 0 ENTER Press RECEIVER , then press S.RETRIEVER to hear the truest possible reproduction of channels in the Manual SP Setup (speaker setting, channel level, speaker distance), as well as with various soundtracks to NO, DOLBY PLIIx becomes DOLBY PLII (5.1 channel sound). Back (see Setting the...
Owner's Manual
Page 39
... connection over the network to Pandora Internet Radio on the type of your router. If not, please authorize this DMR function. See The Network Setup menu on page 42 for access varies depending on page 41. The authorization (or permission) method for more information on the DHCP server function ... or later, Mac with OS X Mountain Lion, and Mac and PC with iPod, iPhone, iPad or iTunes software versions other components with the Pioneer products. Using AirPlay on page 42. AirPlay may be interrupted when the volume is in the DMR mode, such operations as the receiver.
... connection over the network to Pandora Internet Radio on the type of your router. If not, please authorize this DMR function. See The Network Setup menu on page 42 for access varies depending on page 41. The authorization (or permission) method for more information on the DHCP server function ... or later, Mac with OS X Mountain Lion, and Mac and PC with iPod, iPhone, iPad or iTunes software versions other components with the Pioneer products. Using AirPlay on page 42. AirPlay may be interrupted when the volume is in the DMR mode, such operations as the receiver.
Owner's Manual
Page 42
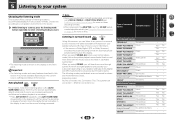
... DNS Server In case there is only one DNS server address provided by your favorite songs Up to 64 favorite tracks on paper. Network Setup menu appears on the remote control to navigate through the screens and select menu items. Press RETURN to exit the current menu. •... Configuration - Restricts usage of your network component. • IP Address The IP address to be entered must set the NETWORK function OSD screen (page 43). • Firmware Update - Also, enter the port number of files stored on the following devices: • PCs running Microsoft Windows Vista or XP...
... DNS Server In case there is only one DNS server address provided by your favorite songs Up to 64 favorite tracks on paper. Network Setup menu appears on the remote control to navigate through the screens and select menu items. Press RETURN to exit the current menu. •... Configuration - Restricts usage of your network component. • IP Address The IP address to be entered must set the NETWORK function OSD screen (page 43). • Firmware Update - Also, enter the port number of files stored on the following devices: • PCs running Microsoft Windows Vista or XP...
Owner's Manual
Page 43
... to follow Steps 4. You return to update the receiver's firmware. Firmware Update Use this receiver will be confirmed at our Pioneer website. 43 If an update file does not exist in the System Info menu before saving it onto your receiver can be inserted into ...from the Network Configuration menu. 3 Select the DHCP setting you want . In case you want to "0000". 1 Select 'Network Configuration' from the Network Setup menu. 2 Select 'Parental Lock' from the Network Configuration menu. 3 Input the password. Internet services are not restricted. • ON - Whether this ...
... to follow Steps 4. You return to update the receiver's firmware. Firmware Update Use this receiver will be confirmed at our Pioneer website. 43 If an update file does not exist in the System Info menu before saving it onto your receiver can be inserted into ...from the Network Configuration menu. 3 Select the DHCP setting you want . In case you want to "0000". 1 Select 'Network Configuration' from the Network Setup menu. 2 Select 'Parental Lock' from the Network Configuration menu. 3 Input the password. Internet services are not restricted. • ON - Whether this ...


