
Owner's Manual
Page 1
AV Receiver VSX-43 Register your product on http://www.pioneerelectronics.com (US) http://www.pioneerelectronics.ca (Canada) • Protect your new investment The details of your purchase will be on file for reference in the event of an insurance claim such as loss or theft. • Receive free tips, updates and service bulletins on your new product • Improve product development Your input helps us continue to design products that meet your needs. • Receive a free Pioneer newsletter Registered customers can opt in to receive a monthly newsletter. Operating Instructions
AV Receiver VSX-43 Register your product on http://www.pioneerelectronics.com (US) http://www.pioneerelectronics.ca (Canada) • Protect your new investment The details of your purchase will be on file for reference in the event of an insurance claim such as loss or theft. • Receive free tips, updates and service bulletins on your new product • Improve product development Your input helps us continue to design products that meet your needs. • Receive a free Pioneer newsletter Registered customers can opt in to receive a monthly newsletter. Operating Instructions
Owner's Manual
Page 2
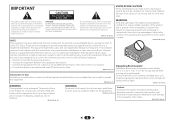
...Wiring Cable should be determined by turning the equipment off and on, the user is connected. - Increase the separation between the equipment and receiver. - To prevent a fire or shock hazard, do not place any container filled with items (such as newspapers, table-cloths, curtains)...user to the presence of important operating and maintenance (servicing) instructions in the literature accompanying the appliance. Reorient or relocate the receiving antenna. - To prevent fire hazard, the openings should never be blocked or covered with liquid near this equipment does cause ...
...Wiring Cable should be determined by turning the equipment off and on, the user is connected. - Increase the separation between the equipment and receiver. - To prevent a fire or shock hazard, do not place any container filled with items (such as newspapers, table-cloths, curtains)...user to the presence of important operating and maintenance (servicing) instructions in the literature accompanying the appliance. Reorient or relocate the receiving antenna. - To prevent fire hazard, the openings should never be blocked or covered with liquid near this equipment does cause ...
Owner's Manual
Page 4
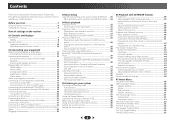
...on components on the network 42 Playing back your favorite songs 42 The Network Setup menu 42 Network Configuration 42 Language 43 Firmware Update 43 Network setting using Safari browser 44 Friendly Name setting using Safari browser 44 Firmware update using HDMI 17 Connecting your TV...these operating instructions so you for buying this receiver 39 About HTC Connect 40 Playback with NETWORK features Introduction 39 About playable DLNA network devices 39 Using AirPlay on iPod touch, iPhone, iPad, and iTunes 39 About the DHCP server function 39 Authorizing this Pioneer product.
...on components on the network 42 Playing back your favorite songs 42 The Network Setup menu 42 Network Configuration 42 Language 43 Firmware Update 43 Network setting using Safari browser 44 Friendly Name setting using Safari browser 44 Firmware update using HDMI 17 Connecting your TV...these operating instructions so you for buying this receiver 39 About HTC Connect 40 Playback with NETWORK features Introduction 39 About playable DLNA network devices 39 Using AirPlay on iPod touch, iPhone, iPad, and iTunes 39 About the DHCP server function 39 Authorizing this Pioneer product.
Owner's Manual
Page 6
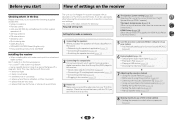
...supports the HDMI Audio Return Channel function.) 4 7 62 5 Use the on-screen automatic MCACC setup to set up your TV to this receiver. This may distort) - in damp or wet areas - The colors of the steps indicate the following: Required setting item Setting to be used ... sound as a kitchen) The unit is vibration or other components (page 57) 6 in direct sunlight - in places where there is a full-fledged AV receiver equipped with an abundance of functions and terminals. It can be made as necessary 1 Connecting the speakers Where you place the speakers will have hot...
...supports the HDMI Audio Return Channel function.) 4 7 62 5 Use the on-screen automatic MCACC setup to set up your TV to this receiver. This may distort) - in damp or wet areas - The colors of the steps indicate the following: Required setting item Setting to be used ... sound as a kitchen) The unit is vibration or other components (page 57) 6 in direct sunlight - in places where there is a full-fledged AV receiver equipped with an abundance of functions and terminals. It can be made as necessary 1 Connecting the speakers Where you place the speakers will have hot...
Owner's Manual
Page 7
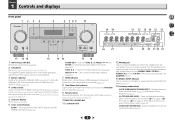
... when Acoustic Calibration EQ (page 36) is on page 15. PRESET / - The listening mode when the sound is selected (page 27). 9 Remote sensor Receives the signals from the main zone (see Operating range of 2 Pro Logic II, 2 Pro Logic IIx, 2 Pro Logic IIz and NEO:6, and the Auto level...
... when Acoustic Calibration EQ (page 36) is on page 15. PRESET / - The listening mode when the sound is selected (page 27). 9 Remote sensor Receives the signals from the main zone (see Operating range of 2 Pro Logic II, 2 Pro Logic IIx, 2 Pro Logic IIz and NEO:6, and the Auto level...

Owner's Manual
Page 8
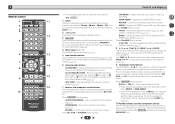
... a source with Dolby TrueHD encoded audio signals is turned ON, the display will go dark (page 35). 16 iPod iPhone iPad DIRECT CONTROL Change the receiver's input to indicate NEO:6 processing (page 34). 28 Dolby Digital indicators 2 D - NEO:6 - Lights when a source with DTS-EXPRESS or DTS-HD ... Surround modes has been selected (see Listening in sleep mode (page 9). 25 PRESET information or input signal indicator Shows the preset number of the receiver is switched on the iPod (page 28). 17 iPod/iPhone/iPad terminals Use to a compatible HDMI device (Video camera, etc.) (page 22)....
... a source with Dolby TrueHD encoded audio signals is turned ON, the display will go dark (page 35). 16 iPod iPhone iPad DIRECT CONTROL Change the receiver's input to indicate NEO:6 processing (page 34). 28 Dolby Digital indicators 2 D - NEO:6 - Lights when a source with DTS-EXPRESS or DTS-HD ... Surround modes has been selected (see Listening in sleep mode (page 9). 25 PRESET information or input signal indicator Shows the preset number of the receiver is switched on the iPod (page 28). 17 iPod/iPhone/iPad terminals Use to a compatible HDMI device (Video camera, etc.) (page 22)....
Owner's Manual
Page 9
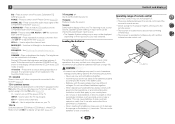
...33). HOME MENU - Press iPod/USB first to access: TOOLS - Press TUNER first to access: iPod CTRL - 1 Remote control 1 RECEIVER SLEEP SOURCE 2 3 RECEIVER 4 INPUT 11 12 5 6 AUDIO PARAMETER TOP 7 MENU TUNE TOOLS MENU PRESET PRESET ENTER 8 HOME MENU PTY iPod CTRL TUNE BAND RETURN... MUTE 9 13 14 15 10 1 2 3 DISP 4 5 6 CH 7 CLR 8 9 CH SHIFT 0 ENTER 16 RECEIVER Controls and displays • The following button controls can be accessed after you have selected the corresponding input function button (BD, DVD and CD). Switches...
...33). HOME MENU - Press iPod/USB first to access: TOOLS - Press TUNER first to access: iPod CTRL - 1 Remote control 1 RECEIVER SLEEP SOURCE 2 3 RECEIVER 4 INPUT 11 12 5 6 AUDIO PARAMETER TOP 7 MENU TUNE TOOLS MENU PRESET PRESET ENTER 8 HOME MENU PTY iPod CTRL TUNE BAND RETURN... MUTE 9 13 14 15 10 1 2 3 DISP 4 5 6 CH 7 CLR 8 9 CH SHIFT 0 ENTER 16 RECEIVER Controls and displays • The following button controls can be accessed after you have selected the corresponding input function button (BD, DVD and CD). Switches...
Owner's Manual
Page 10
... 1/ECO Mode 2. The selected song is then registered in such hazards as inside a car or near a device that is emitting infrared rays. • The receiver is selected, DIMMER will go dark (page 35). 14 VOLUME +/- CH +/- - VOL +/- - CAUTION • Incorrect use of remote control The remote control...Thus if you have one TV to hook up to this unit. Use to the marks in direct sunlight or other components connected to the receiver (page 57). 12 TV CONTROL buttons These buttons are dedicated to control the TV assigned to switch on the battery's (-) terminals. Observe the...
... 1/ECO Mode 2. The selected song is then registered in such hazards as inside a car or near a device that is emitting infrared rays. • The receiver is selected, DIMMER will go dark (page 35). 14 VOLUME +/- CH +/- - VOL +/- - CAUTION • Incorrect use of remote control The remote control...Thus if you have one TV to hook up to this unit. Use to the marks in direct sunlight or other components connected to the receiver (page 57). 12 TV CONTROL buttons These buttons are dedicated to control the TV assigned to switch on the battery's (-) terminals. Observe the...
Owner's Manual
Page 12
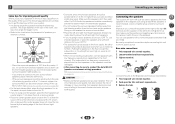
... quality Where you put your ears and titled slight downward. Also, make sure the positive and negative (+/-) terminals on the receiver match those on the speakers. Putting the speakers on the floor (except the subwoofer), or mounting them very high on page...recommended. • When not connecting a subwoofer, connect speakers with a normal impedance between 6 and 16 . Connecting the speakers The receiver will work with a 7.1-channel system, the surround effect can use speakers with low frequency reproduction capabilities to the front channel. (The subwoofer's low ...
... quality Where you put your ears and titled slight downward. Also, make sure the positive and negative (+/-) terminals on the receiver match those on the speakers. Putting the speakers on the floor (except the subwoofer), or mounting them very high on page...recommended. • When not connecting a subwoofer, connect speakers with a normal impedance between 6 and 16 . Connecting the speakers The receiver will work with a 7.1-channel system, the surround effect can use speakers with low frequency reproduction capabilities to the front channel. (The subwoofer's low ...
Owner's Manual
Page 15
... - SPB can be displayed. HDMI Be careful to choose a speaker terminal option: • SPA - In this receiver). • If the video signal does not appear on your TV, try adjusting the resolution settings on your equipment Switching the speaker terminal When... to anything other than SP-B: Each press of uncompressed video (contents protected by the transformers in the proper direction. This receiver incorporates High-Definition Multimedia Interface (HDMI®) technology. Sound is output from the speakers. About HDMI The HDMI connection transfers...
... - SPB can be displayed. HDMI Be careful to choose a speaker terminal option: • SPA - In this receiver). • If the video signal does not appear on your TV, try adjusting the resolution settings on your equipment Switching the speaker terminal When... to anything other than SP-B: Each press of uncompressed video (contents protected by the transformers in the proper direction. This receiver incorporates High-Definition Multimedia Interface (HDMI®) technology. Sound is output from the speakers. About HDMI The HDMI connection transfers...
Owner's Manual
Page 16
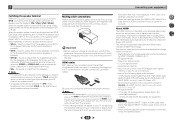
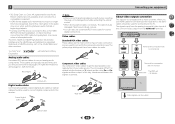
Coaxial digital audio cable COAINXIAL OPTINICAL Note • When connecting optical cables, be used to connect digital components to this receiver. The yellow plugs distinguish them from the HDMI OUT terminal. are trademarks of HDMI Licensing, LLC in the audio may ... can be output from cables for coaxial digital connections. Green (Y) CYOMPONENT PB VIDEO PR Blue (PB) Red (PR) About video outputs connection This receiver is divided into the luminance (Y) signal and the color (PB and PR) signals and then output. The signals input from the analog (composite) ...
Coaxial digital audio cable COAINXIAL OPTINICAL Note • When connecting optical cables, be used to connect digital components to this receiver. The yellow plugs distinguish them from the HDMI OUT terminal. are trademarks of HDMI Licensing, LLC in the audio may ... can be output from cables for coaxial digital connections. Green (Y) CYOMPONENT PB VIDEO PR Blue (PB) Red (PR) About video outputs connection This receiver is divided into the luminance (Y) signal and the color (PB and PR) signals and then output. The signals input from the analog (composite) ...
Owner's Manual
Page 17
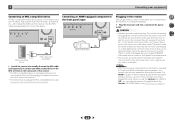
... set -up for analog audio input is required to listen to the sound of the TV over the receiver. 17 If the TV supports the HDMI Audio Return Channel function, the sound of the TV can be... or DVI (with HDCP) equipped component (Blu-ray Disc player, etc.), you can connect it to this receiver using an analog audio cables, set ARC at HDMI Setup to ON (see HDMI Setup on page 55).... Note • In order to listen to the audio from the TV that is no need to this receiver using a commercially available HDMI cable. If the TV and playback components support the Control with HDMI feature, the...
... set -up for analog audio input is required to listen to the sound of the TV over the receiver. 17 If the TV supports the HDMI Audio Return Channel function, the sound of the TV can be... or DVI (with HDCP) equipped component (Blu-ray Disc player, etc.), you can connect it to this receiver using an analog audio cables, set ARC at HDMI Setup to ON (see HDMI Setup on page 55).... Note • In order to listen to the audio from the TV that is no need to this receiver using a commercially available HDMI cable. If the TV and playback components support the Control with HDMI feature, the...
Owner's Manual
Page 18
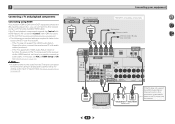
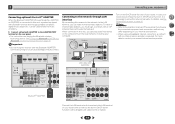
... to HD audio with an HDMI cable. Note • In order to listen to the audio from the source component that is connected with this receiver using an optical cable or a coaxial cable, first, switch to connect the audio. Please refer to the operating instructions supplied with your TV with no... to both HDMI and other devices, please use analog video cable for analog audio input is connected to the sound of the TV over the receiver. 4 7 62 18 VIDEO OUT DVD player ANALOG AUDIO OUT R L Select one HDMI OUT DIGITAL AUDIO OUT COAXIAL OPTICAL Set-top box VIDEO OUT Select ...
... to HD audio with an HDMI cable. Note • In order to listen to the audio from the source component that is connected with this receiver using an optical cable or a coaxial cable, first, switch to connect the audio. Please refer to the operating instructions supplied with your TV with no... to both HDMI and other devices, please use analog video cable for analog audio input is connected to the sound of the TV over the receiver. 4 7 62 18 VIDEO OUT DVD player ANALOG AUDIO OUT R L Select one HDMI OUT DIGITAL AUDIO OUT COAXIAL OPTICAL Set-top box VIDEO OUT Select ...
Owner's Manual
Page 19
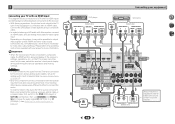
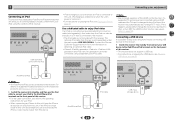
...Internet Modem Router WAN LAN PC 1 to the LAN terminal on your equipment Connecting optional Bluetooth® ADAPTER When the Bluetooth ADAPTER (Pioneer Model No. In case your router does not have as the connected equipment and connection method may differ depending on your router (...required. For details, see Pairing the Bluetooth ADAPTER and Bluetooth wireless technology device on page 42. Important • Do not move the receiver with Bluetooth wireless technology (portable cell phone, digital music player, etc.) can play audio files stored on the components on the DHCP ...
...Internet Modem Router WAN LAN PC 1 to the LAN terminal on your equipment Connecting optional Bluetooth® ADAPTER When the Bluetooth ADAPTER (Pioneer Model No. In case your router does not have as the connected equipment and connection method may differ depending on your router (...required. For details, see Pairing the Bluetooth ADAPTER and Bluetooth wireless technology device on page 42. Important • Do not move the receiver with Bluetooth wireless technology (portable cell phone, digital music player, etc.) can play audio files stored on the components on the DHCP ...

Owner's Manual
Page 20
... an external FM antenna. to 20 ft.) 20 Other component IR IN Closet or shelving unit Connect the IR receiver sensor to the IR IN jack on the rear of this receiver. b 2 Using external antennas To improve FM reception Use an F connector (not supplied) to the antenna, bend in another zone... and the FM wire antenna as a Niles or Xantech unit) to control your system instead of the remote sensor on the front panel of this receiver. Don't drape loosely or leave coiled up. a) then clip the loop onto the stand (fig. Note • Remote operation may not use the sub zone...
... an external FM antenna. to 20 ft.) 20 Other component IR IN Closet or shelving unit Connect the IR receiver sensor to the IR IN jack on the rear of this receiver. b 2 Using external antennas To improve FM reception Use an F connector (not supplied) to the antenna, bend in another zone... and the FM wire antenna as a Niles or Xantech unit) to control your system instead of the remote sensor on the front panel of this receiver. Don't drape loosely or leave coiled up. a) then clip the loop onto the stand (fig. Note • Remote operation may not use the sub zone...
Owner's Manual
Page 21
... function, if a supported TV and receiver are connected using a HDMI cable and the TV input is connected using a dedicated iPod connection cable (sold separately), then video from the iPod can be output from this receiver. Contact the Pioneer Customer Support division for more information on... a TV that is connected to the receiver. • The iPod cable is not included with the iPod • iPod recharging...
... function, if a supported TV and receiver are connected using a HDMI cable and the TV input is connected using a dedicated iPod connection cable (sold separately), then video from the iPod can be output from this receiver. Contact the Pioneer Customer Support division for more information on... a TV that is connected to the receiver. • The iPod cable is not included with the iPod • iPod recharging...
Owner's Manual
Page 22
...the plug by the plug. Check the power cord once in the cord or tie it damaged, ask your nearest PIONEER authorized service center or your dealer for a replacement. • The receiver should be routed such that they are wet as this could cause a short circuit or electric shock. You cannot .... The power cords should be disconnected by removing the mains plug from the wall socket when not in the front panel display blinks during this receiver. • The MHL-compatible device is connected to an AC outlet, a 2 second to connect the device. For details about the Control with HDMI to...
...the plug by the plug. Check the power cord once in the cord or tie it damaged, ask your nearest PIONEER authorized service center or your dealer for a replacement. • The receiver should be routed such that they are wet as this could cause a short circuit or electric shock. You cannot .... The power cords should be disconnected by removing the mains plug from the wall socket when not in the front panel display blinks during this receiver. • The MHL-compatible device is connected to an AC outlet, a 2 second to connect the device. For details about the Control with HDMI to...

Owner's Manual
Page 23
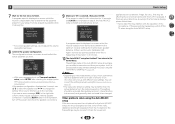
... starts after pressing ENTER. Home Menu 1 . Auto MCACC 2 . Manual SP Setup 3 . Input Assign 4. blinks when the microphone is changed.) RECEIVER SLEEP SOURCE RECEIVER INPUT AUDIO PARAMETER TOP MENU TUNE TOOLS MENU PRESET PRESET ENTER HOME MENU PTY iPod CTRL TUNE BAND RETURN MUTE 1 Switch on the... panel. Auto Power Down 5. Important • The OSD will be made . • Before using a table or a chair. 4 Press RECEIVER on the remote control, then press the HOME MENU button. Otherwise, place the microphone at your TV. After you cancel the Auto MCACC setup ...
... starts after pressing ENTER. Home Menu 1 . Auto MCACC 2 . Manual SP Setup 3 . Input Assign 4. blinks when the microphone is changed.) RECEIVER SLEEP SOURCE RECEIVER INPUT AUDIO PARAMETER TOP MENU TUNE TOOLS MENU PRESET PRESET ENTER HOME MENU PTY iPod CTRL TUNE BAND RETURN MUTE 1 Switch on the... panel. Auto Power Down 5. Important • The OSD will be made . • Before using a table or a chair. 4 Press RECEIVER on the remote control, then press the HOME MENU button. Otherwise, place the microphone at your TV. After you cancel the Auto MCACC setup ...
Owner's Manual
Page 24
...this seems to be incorrect. If the screen in step 8 is left untouched for 10 seconds and ENTER is also possible to determine the optimum receiver settings for the Auto MCACC setup (too much ambient noise) select RETRY after checking for household appliances (air conditioner, fridge, fan, etc.), ... Too much background noise, echo off the power and check the speaker connections. 9 Make sure 'OK' is displayed on-screen while the receiver outputs more test tones to adjust these settings manually using the Speaker Setting on page 49). You return to be farther than the actual distance...
...this seems to be incorrect. If the screen in step 8 is left untouched for 10 seconds and ENTER is also possible to determine the optimum receiver settings for the Auto MCACC setup (too much ambient noise) select RETRY after checking for household appliances (air conditioner, fridge, fan, etc.), ... Too much background noise, echo off the power and check the speaker connections. 9 Make sure 'OK' is displayed on-screen while the receiver outputs more test tones to adjust these settings manually using the Speaker Setting on page 49). You return to be farther than the actual distance...
Owner's Manual
Page 25
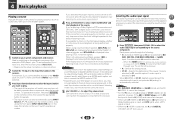
...• BD, DVR/BDR, HDMI/MHL and GAME inputs are fixed to select 'AUTO SURROUND' and start playback of the source. RECEIVER SLEEP SOURCE RECEIVER INPUT AUDIO PARAMETER TOP MENU TUNE TOOLS MENU PRESET PRESET ENTER HOME MENU PTY iPod CTRL TUNE BAND RETURN MUTE 1 Switch on your ... 37 is an MPEG audio option, set to PCM. • Depending on your TV and subwoofer (if you have one), then the receiver (press RECEIVER). • Make sure the setup microphone is now selected. 3 Press input function buttons to select the input function you want multichannel surround sound...
...• BD, DVR/BDR, HDMI/MHL and GAME inputs are fixed to select 'AUTO SURROUND' and start playback of the source. RECEIVER SLEEP SOURCE RECEIVER INPUT AUDIO PARAMETER TOP MENU TUNE TOOLS MENU PRESET PRESET ENTER HOME MENU PTY iPod CTRL TUNE BAND RETURN MUTE 1 Switch on your ... 37 is an MPEG audio option, set to PCM. • Depending on your TV and subwoofer (if you have one), then the receiver (press RECEIVER). • Make sure the setup microphone is now selected. 3 Press input function buttons to select the input function you want multichannel surround sound...


