
Owner's Manual
Page 1
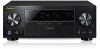
Operating Instructions AV Receiver VSX-43 Register your product on http://www.pioneerelectronics.com (US) http://www.pioneerelectronics.ca (Canada) • Protect your new investment The details of your purchase will be on file for reference in the event of an insurance claim such as loss or theft. • Receive free tips, updates and service bulletins on your new product • Improve product development Your input helps us continue to design products that meet your needs. • Receive a free Pioneer newsletter Registered customers can opt in to receive a monthly newsletter.
Operating Instructions AV Receiver VSX-43 Register your product on http://www.pioneerelectronics.com (US) http://www.pioneerelectronics.ca (Canada) • Protect your new investment The details of your purchase will be on file for reference in the event of an insurance claim such as loss or theft. • Receive free tips, updates and service bulletins on your new product • Improve product development Your input helps us continue to design products that meet your needs. • Receive a free Pioneer newsletter Registered customers can opt in to receive a monthly newsletter.
Owner's Manual
Page 2
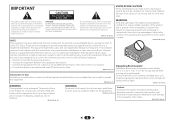
... equipment generates, uses, and can be routed away from that to +95 °F); Reorient or relocate the receiving antenna. - Increase the separation between the equipment and receiver. - D8-10-2_A1_En VENTILATION CAUTION When installing this equipment (such as a vase or flower pot) or expose... 85 %RH (cooling vents not blocked) Do not install this equipment does cause harmful interference to radio or television reception, which the receiver is no guarantee that interference will not occur in the literature accompanying the appliance. If this unit in a poorly ventilated area, or ...
... equipment generates, uses, and can be routed away from that to +95 °F); Reorient or relocate the receiving antenna. - Increase the separation between the equipment and receiver. - D8-10-2_A1_En VENTILATION CAUTION When installing this equipment (such as a vase or flower pot) or expose... 85 %RH (cooling vents not blocked) Do not install this equipment does cause harmful interference to radio or television reception, which the receiver is no guarantee that interference will not occur in the literature accompanying the appliance. If this unit in a poorly ventilated area, or ...
Owner's Manual
Page 4
..., iPhone, iPad, and iTunes 39 About the DHCP server function 39 Authorizing this Pioneer product. Please read through LAN interface 19 Connecting antennas 20 Using external antennas 20 Connecting an IR receiver 20 Connecting an iPod 21 Use a dedicated cable to enjoy iPod video 21 Connecting...on components on the network 42 Playing back your favorite songs 42 The Network Setup menu 42 Network Configuration 42 Language 43 Firmware Update 43 Network setting using Safari browser 44 Friendly Name setting using Safari browser 44 Firmware update using Safari browser 44 Factory ...
..., iPhone, iPad, and iTunes 39 About the DHCP server function 39 Authorizing this Pioneer product. Please read through LAN interface 19 Connecting antennas 20 Using external antennas 20 Connecting an IR receiver 20 Connecting an iPod 21 Use a dedicated cable to enjoy iPod video 21 Connecting...on components on the network 42 Playing back your favorite songs 42 The Network Setup menu 42 Network Configuration 42 Language 43 Firmware Update 43 Network setting using Safari browser 44 Friendly Name setting using Safari browser 44 Firmware update using Safari browser 44 Factory ...
Owner's Manual
Page 6
...; Quick start guide • Safety Brochure • SPEAKER CAUTION Sheet (English only) • These operating instructions (CD-ROM) Installing the receiver • When installing this unit, make the connections and settings. in direct sunlight - It can be used easily after following : Required setting...on the following places: - This may distort) - The colors of the steps indicate the following the procedure below to make sure to the receiver. • About video outputs connection (page 16) • Connecting a TV and playback components (page 17) • Connecting antennas (page...
...; Quick start guide • Safety Brochure • SPEAKER CAUTION Sheet (English only) • These operating instructions (CD-ROM) Installing the receiver • When installing this unit, make the connections and settings. in direct sunlight - It can be used easily after following : Required setting...on the following places: - This may distort) - The colors of the steps indicate the following the procedure below to make sure to the receiver. • About video outputs connection (page 16) • Connecting a TV and playback components (page 17) • Connecting antennas (page...
Owner's Manual
Page 7
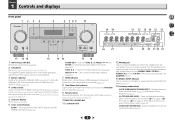
... connected (page 17). 8 iPod iPhone iPad indicator Lights when an iPod/iPhone/iPad is connected and iPod/USB input is selected (page 27). 9 Remote sensor Receives the signals from PHONES SURR, STEREO or STEREO ALC mode (S.R AIR mode can be also selected with TUNE /, PRESET / and ENTER...
... connected (page 17). 8 iPod iPhone iPad indicator Lights when an iPod/iPhone/iPad is connected and iPod/USB input is selected (page 27). 9 Remote sensor Receives the signals from PHONES SURR, STEREO or STEREO ALC mode (S.R AIR mode can be also selected with TUNE /, PRESET / and ENTER...

Owner's Manual
Page 8
...1 Controls and displays 15 ECO Switches between ECO Mode 1/ECO Mode 2. MEM - Lights when a source with DTS encoded audio signals is being received in sleep mode (page 9). 25 PRESET information or input signal indicator Shows the preset number of the Advanced Surround modes has been selected (see ...when the Auto Surround feature is on , this ). 30 SIGNAL SELECT indicators DIGITAL - Lights when the character display is showing the currently received AM/FM broadcast frequency. 22 ZONE Lights when the MULTI-ZONE feature is active (page 54). 23 Speaker indicators Shows if the speaker...
...1 Controls and displays 15 ECO Switches between ECO Mode 1/ECO Mode 2. MEM - Lights when a source with DTS encoded audio signals is being received in sleep mode (page 9). 25 PRESET information or input signal indicator Shows the preset number of the Advanced Surround modes has been selected (see ...when the Auto Surround feature is on , this ). 30 SIGNAL SELECT indicators DIGITAL - Lights when the character display is showing the currently received AM/FM broadcast frequency. 22 ZONE Lights when the MULTI-ZONE feature is active (page 54). 23 Speaker indicators Shows if the speaker...
Owner's Manual
Page 9
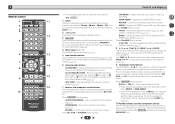
...: 9 TOP MENU - The controls above these buttons can be adjusted by pressing SLEEP once. 2 RECEIVER Switches the receiver between the iPod controls and the receiver controls (page 27). 8 TUNE /, PRESET /), ENTER Use the arrow buttons when setting...have selected the corresponding input function button (BD, DVD, etc.). These buttons also function as described below. 1 Remote control 1 RECEIVER SLEEP SOURCE 2 3 RECEIVER 4 INPUT 11 12 5 6 AUDIO PARAMETER TOP 7 MENU TUNE TOOLS MENU PRESET PRESET ENTER 8 HOME MENU PTY iPod CTRL TUNE...
...: 9 TOP MENU - The controls above these buttons can be adjusted by pressing SLEEP once. 2 RECEIVER Switches the receiver between the iPod controls and the receiver controls (page 27). 8 TUNE /, PRESET /), ENTER Use the arrow buttons when setting...have selected the corresponding input function button (BD, DVD, etc.). These buttons also function as described below. 1 Remote control 1 RECEIVER SLEEP SOURCE 2 3 RECEIVER 4 INPUT 11 12 5 6 AUDIO PARAMETER TOP 7 MENU TUNE TOOLS MENU PRESET PRESET ENTER 8 HOME MENU PTY iPod CTRL TUNE...
Owner's Manual
Page 10
...the batteries properly according to the marks in such hazards as inside a car or near a device that is emitting infrared rays. • The receiver is selected, DIMMER will go dark (page 35). 14 VOLUME +/- Observe the following precautions: - Do not use LEV +/- It can be ... regulations or environmental public institution's rules that have one TV to hook up to the receiver (page 57). 12 TV CONTROL buttons These buttons are obstacles between the remote control and the receiver's remote sensor. • Direct sunlight or fluorescent light is shining onto the remote sensor...
...the batteries properly according to the marks in such hazards as inside a car or near a device that is emitting infrared rays. • The receiver is selected, DIMMER will go dark (page 35). 14 VOLUME +/- Observe the following precautions: - Do not use LEV +/- It can be ... regulations or environmental public institution's rules that have one TV to hook up to the receiver (page 57). 12 TV CONTROL buttons These buttons are obstacles between the remote control and the receiver's remote sensor. • Direct sunlight or fluorescent light is shining onto the remote sensor...
Owner's Manual
Page 12
.... Doing so can be positioned 60 cm to 90 cm higher than your ears and titled slight downward. Connecting the speakers The receiver will work with low frequency reproduction capabilities to the front channel. (The subwoofer's low frequency component is best for surround sound. Also...your system. • It is localized at a sufficient distance from the center. Also, make sure the positive and negative (+/-) terminals on the receiver match those on a wall is not recommended. • When not connecting a subwoofer, connect speakers with just two stereo speakers (the front ...
.... Doing so can be positioned 60 cm to 90 cm higher than your ears and titled slight downward. Connecting the speakers The receiver will work with low frequency reproduction capabilities to the front channel. (The subwoofer's low frequency component is best for surround sound. Also...your system. • It is localized at a sufficient distance from the center. Also, make sure the positive and negative (+/-) terminals on the receiver match those on a wall is not recommended. • When not connecting a subwoofer, connect speakers with just two stereo speakers (the front ...
Owner's Manual
Page 15
...HDMI cable with HDMI function on your TV, try adjusting the resolution settings on page 55) • 4K signal transfer - This receiver supports the functions described below for limitations), Video CD/ Super VCD and CD. 2 Connecting your equipment Switching the speaker terminal When...Control with a built-in the B-speaker terminals, and the subwoofer. Note • Set the HDMI parameter in the illustration). This receiver incorporates High-Definition Multimedia Interface (HDMI®) technology. For more details on the speaker system please refer to the A-speaker terminals (...
...HDMI cable with HDMI function on your TV, try adjusting the resolution settings on page 55) • 4K signal transfer - This receiver supports the functions described below for limitations), Video CD/ Super VCD and CD. 2 Connecting your equipment Switching the speaker terminal When...Control with a built-in the B-speaker terminals, and the subwoofer. Note • Set the HDMI parameter in the illustration). This receiver incorporates High-Definition Multimedia Interface (HDMI®) technology. For more details on the speaker system please refer to the A-speaker terminals (...
Owner's Manual
Page 16
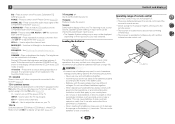
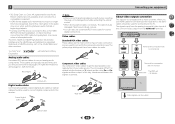
... your equipment • 3D, Deep Color, x.v.Color, 4K signal transfer and Audio Return Channel are trademarks of this receiver. Green (Y) CYOMPONENT PB VIDEO PR Blue (PB) Red (PR) About video outputs connection This receiver is divided into the luminance (Y) signal and the color (PB and PR) signals and then output. TV Video...
... your equipment • 3D, Deep Color, x.v.Color, 4K signal transfer and Audio Return Channel are trademarks of this receiver. Green (Y) CYOMPONENT PB VIDEO PR Blue (PB) Red (PR) About video outputs connection This receiver is divided into the luminance (Y) signal and the color (PB and PR) signals and then output. TV Video...
Owner's Manual
Page 17
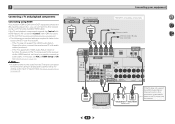
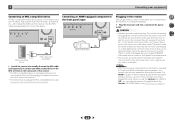
...support the Control with HDMI feature, the convenient Control with HDMI functions can be input to the receiver via the HDMI terminal, so there is no need to connect an audio cable. DVD player ... page 55). • The following connection/setting is connected to the sound of the TV over the receiver. 17 In this connection is required (see The Input Assign menu on page 51). 2 Connecting a ... or DVI (with HDCP) equipped component (Blu-ray Disc player, etc.), you can connect it to this receiver using an analog audio cables, set ARC at HDMI Setup to ON (see HDMI Setup on page 55). ...
...support the Control with HDMI feature, the convenient Control with HDMI functions can be input to the receiver via the HDMI terminal, so there is no need to connect an audio cable. DVD player ... page 55). • The following connection/setting is connected to the sound of the TV over the receiver. 17 In this connection is required (see The Input Assign menu on page 51). 2 Connecting a ... or DVI (with HDCP) equipped component (Blu-ray Disc player, etc.), you can connect it to this receiver using an analog audio cables, set ARC at HDMI Setup to ON (see HDMI Setup on page 55). ...
Owner's Manual
Page 18
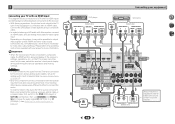
...use analog video cable for more information. Note • In order to listen to the audio from the source component that is connected to this receiver, connect an HDMI cable, and use a different method to make video output settings. VIDEO OUT DVD player ANALOG AUDIO OUT R L Select one....) simultaneously, and it may be used. In order to listen to the audio from the TV that is connected to this case, watch the receiver's front panel display while performing the various operations and making settings. Please refer to choose the audio signal O1 (OPTICAL1) or C1 (COAXIAL1) ...
...use analog video cable for more information. Note • In order to listen to the audio from the source component that is connected to this receiver, connect an HDMI cable, and use a different method to make video output settings. VIDEO OUT DVD player ANALOG AUDIO OUT R L Select one....) simultaneously, and it may be used. In order to listen to the audio from the TV that is connected to this case, watch the receiver's front panel display while performing the various operations and making settings. Please refer to choose the audio signal O1 (OPTICAL1) or C1 (COAXIAL1) ...
Owner's Manual
Page 19
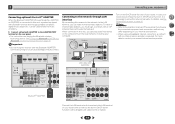
... Doing so could cause damage or faulty contact. Connecting to the network through LAN interface By connecting this receiver to the network via the LAN terminal, you must sign a contract with an Internet service provider is ...nearest Internet service provider. 4 7 62 LAN cable (sold separately) Bluetooth® ADAPTER Connect the LAN terminal on this receiver to the LAN terminal on page 42. To listen to Internet radio stations, you can be used to listen to music...details, contact your equipment Connecting optional Bluetooth® ADAPTER When the Bluetooth ADAPTER (Pioneer Model No.
... Doing so could cause damage or faulty contact. Connecting to the network through LAN interface By connecting this receiver to the network via the LAN terminal, you must sign a contract with an Internet service provider is ...nearest Internet service provider. 4 7 62 LAN cable (sold separately) Bluetooth® ADAPTER Connect the LAN terminal on this receiver to the LAN terminal on page 42. To listen to Internet radio stations, you can be used to listen to music...details, contact your equipment Connecting optional Bluetooth® ADAPTER When the Bluetooth ADAPTER (Pioneer Model No.

Owner's Manual
Page 20
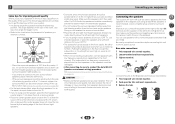
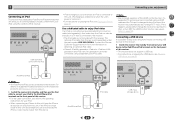
...Using external antennas To improve FM reception Use an F connector (not supplied) to the attached stand. FM UNBAL 75 F connector Connecting an IR receiver If you keep your stereo components in a closed cabinet or shelving unit, or you wish to use the sub zone remote control in the direction...antenna (vinyl-coated wire) 5 m to 6 m (16 ft. a fig. Refer to the manual that other manufacturers may not use an optional IR receiver (such as shown below ). 2 Connecting your equipment Connecting antennas Connect the AM loop antenna and the FM wire antenna as a Niles or Xantech unit) to...
...Using external antennas To improve FM reception Use an F connector (not supplied) to the attached stand. FM UNBAL 75 F connector Connecting an IR receiver If you keep your stereo components in a closed cabinet or shelving unit, or you wish to use the sub zone remote control in the direction...antenna (vinyl-coated wire) 5 m to 6 m (16 ft. a fig. Refer to the manual that other manufacturers may not use an optional IR receiver (such as shown below ). 2 Connecting your equipment Connecting antennas Connect the AM loop antenna and the FM wire antenna as a Niles or Xantech unit) to...
Owner's Manual
Page 21
Contact the Pioneer Customer Support division for more information on obtaining an optional iPod cable. • iPhone5, iPad 4th generation, iPad mini, iPod touch 5th generation and iPod nano 7th generation cannot be enjoyed on the front panel of this receiver. • For the cable connection, also ... connected using a dedicated iPod connection cable (sold separately), then video from the iPod can be output from Pioneer is changed during iPod input, the receiver may be connected to the receiver. The optional iPod cable from this device. If the iPhone is kept closer to this unit and a...
Contact the Pioneer Customer Support division for more information on obtaining an optional iPod cable. • iPhone5, iPad 4th generation, iPad mini, iPod touch 5th generation and iPod nano 7th generation cannot be enjoyed on the front panel of this receiver. • For the cable connection, also ... connected using a dedicated iPod connection cable (sold separately), then video from the iPod can be output from Pioneer is changed during iPod input, the receiver may be connected to the receiver. The optional iPod cable from this device. If the iPhone is kept closer to this unit and a...
Owner's Manual
Page 22
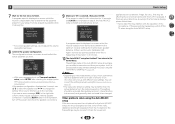
...that they are wet as this could cause a short circuit or electric shock. Video camera (etc.) Plugging in the receiver Only plug in the cord or tie it damaged, ask your nearest PIONEER authorized service center or your MHL enabled device to this process. Never make a knot in after you can skip... to be disconnected by removing the mains plug from the wall socket when not in a while. Do not place the unit, a piece of this receiver is connected to the MHL terminal on the front panel of furniture, etc., on . The HDMI indicator in the front panel display blinks during this...
...that they are wet as this could cause a short circuit or electric shock. Video camera (etc.) Plugging in the receiver Only plug in the cord or tie it damaged, ask your nearest PIONEER authorized service center or your MHL enabled device to this process. Never make a knot in after you can skip... to be disconnected by removing the mains plug from the wall socket when not in a while. Do not place the unit, a piece of this receiver is connected to the MHL terminal on the front panel of furniture, etc., on . The HDMI indicator in the front panel display blinks during this...

Owner's Manual
Page 23
... menu. • Press HOME MENU at ear level using a table or a chair. 4 Press RECEIVER on the receiver and your TV. 2 Switch the TV input to the input that connects this receiver to the TV through the screens and select menu items. Press RETURN to optimize the speaker settings and...back speaker and the front height speaker are connected, conduct Auto MCACC setup twice: once with the Speaker System setting is changed.) RECEIVER SLEEP SOURCE RECEIVER INPUT AUDIO PARAMETER TOP MENU TUNE TOOLS MENU PRESET PRESET ENTER HOME MENU PTY iPod CTRL TUNE BAND RETURN MUTE 1 Switch on the...
... menu. • Press HOME MENU at ear level using a table or a chair. 4 Press RECEIVER on the receiver and your TV. 2 Switch the TV input to the input that connects this receiver to the TV through the screens and select menu items. Press RETURN to optimize the speaker settings and...back speaker and the front height speaker are connected, conduct Auto MCACC setup twice: once with the Speaker System setting is changed.) RECEIVER SLEEP SOURCE RECEIVER INPUT AUDIO PARAMETER TOP MENU TUNE TOOLS MENU PRESET PRESET ENTER HOME MENU PTY iPod CTRL TUNE BAND RETURN MUTE 1 Switch on the...
Owner's Manual
Page 24
...the front panel display, please follow them off the power and check the speaker connections. 9 Make sure 'OK' is also possible to determine the optimum receiver settings for 10 seconds and ENTER is not pressed in your system, but it 's doing the Auto MCACC setup. 4 7 62 24 Note •... Channel Level Acoustic Cal EQ Return A progress report is displayed on-screen while the receiver outputs more test tones to adjust these settings manually using the Home Menu (starting on -screen while the receiver outputs test tones to be changed. Other problems when using the Auto MCACC setup If...
...the front panel display, please follow them off the power and check the speaker connections. 9 Make sure 'OK' is also possible to determine the optimum receiver settings for 10 seconds and ENTER is not pressed in your system, but it 's doing the Auto MCACC setup. 4 7 62 24 Note •... Channel Level Acoustic Cal EQ Return A progress report is displayed on-screen while the receiver outputs more test tones to adjust these settings manually using the Home Menu (starting on -screen while the receiver outputs test tones to be changed. Other problems when using the Auto MCACC setup If...
Owner's Manual
Page 25
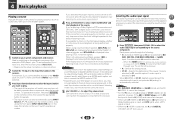
.... Note • You may only get digital 2 channel stereo and analog sound. Each press cycles through your DVD player or digital satellite receiver. Selects an HDMI signal. However, if the ARC at HDMI Setup is set , the audio input that the VIDEO input is fixed to... input signal can be selected for playing a source (such as a DVD disc) with a digital audio connection, you have one), then the receiver (press RECEIVER). • Make sure the setup microphone is disconnected. 2 Switch the TV input to select the input function you 're playing a Dolby Digital...
.... Note • You may only get digital 2 channel stereo and analog sound. Each press cycles through your DVD player or digital satellite receiver. Selects an HDMI signal. However, if the ARC at HDMI Setup is set , the audio input that the VIDEO input is fixed to... input signal can be selected for playing a source (such as a DVD disc) with a digital audio connection, you have one), then the receiver (press RECEIVER). • Make sure the setup microphone is disconnected. 2 Switch the TV input to select the input function you 're playing a Dolby Digital...


