Owner's Manual
Page 2
... cause harmful interference to correct the interference by operating the equipment on , the user is encouraged to try to radio or television reception, which the receiver is connected. - D3-4-2-1-7a_A1_En Caution To prevent fire hazard, the Class 2 Wiring Cable should be routed away from that interference will not occur in the literature...
... cause harmful interference to correct the interference by operating the equipment on , the user is encouraged to try to radio or television reception, which the receiver is connected. - D3-4-2-1-7a_A1_En Caution To prevent fire hazard, the Class 2 Wiring Cable should be routed away from that interference will not occur in the literature...
Owner's Manual
Page 4
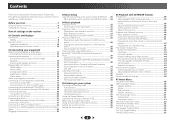
...39 Authorizing this Pioneer product. Please read through LAN interface 19 Connecting antennas 20 Using external antennas 20 Connecting an IR receiver 20 Connecting an iPod 21 Use a dedicated cable to enjoy iPod video 21 Connecting a USB device 21 Connecting an MHL-compatible device 22 Connecting an HDMI-... stations 33 05 Listening to operate your favorite songs 42 The Network Setup menu 42 Network Configuration 42 Language 43 Firmware Update 43 Network setting using Safari browser 44 Friendly Name setting using Safari browser 44 Firmware update using Safari browser 44...
...39 Authorizing this Pioneer product. Please read through LAN interface 19 Connecting antennas 20 Using external antennas 20 Connecting an IR receiver 20 Connecting an iPod 21 Use a dedicated cable to enjoy iPod video 21 Connecting a USB device 21 Connecting an MHL-compatible device 22 Connecting an HDMI-... stations 33 05 Listening to operate your favorite songs 42 The Network Setup menu 42 Network Configuration 42 Language 43 Firmware Update 43 Network setting using Safari browser 44 Friendly Name setting using Safari browser 44 Firmware update using Safari browser 44...
Owner's Manual
Page 6
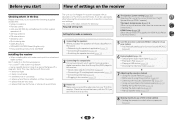
...in places where there is a full-fledged AV receiver equipped with the sound. - Check the manual that are very dusty - in places that came with the TV if you 've set up your TV to this unit, make the connections and settings. in places that gives off a ... (page 35) • Better sound using a digital connection from the Blu-ray Disc/DVD player to the receiver. • About video outputs connection (page 16) • Connecting a TV and playback components (page 17) • Connecting antennas (page 20) • Plugging in the receiver (page 22) 3 Power On Make sure ...
...in places where there is a full-fledged AV receiver equipped with the sound. - Check the manual that are very dusty - in places that came with the TV if you 've set up your TV to this unit, make the connections and settings. in places that gives off a ... (page 35) • Better sound using a digital connection from the Blu-ray Disc/DVD player to the receiver. • About video outputs connection (page 16) • Connecting a TV and playback components (page 17) • Connecting antennas (page 20) • Plugging in the receiver (page 22) 3 Power On Make sure ...
Owner's Manual
Page 7
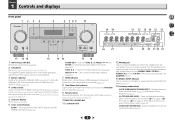
...the various surround modes (page 35). 7 Switches between the modes of remote control on page 15. ADVANCED SURROUND - When the headphones are connected, there is automatically set to on after the Auto MCACC setup (page 23)). 4 ZONE controls If you have selected. 3 MCACC indicator ...and Stream Direct playback (page 35). PRESET / - The listening mode when the sound is selected (page 27). 9 Remote sensor Receives the signals from PHONES SURR, STEREO or STEREO ALC mode (S.R AIR mode can be also selected with TUNE /, PRESET /...
...the various surround modes (page 35). 7 Switches between the modes of remote control on page 15. ADVANCED SURROUND - When the headphones are connected, there is automatically set to on after the Auto MCACC setup (page 23)). 4 ZONE controls If you have selected. 3 MCACC indicator ...and Stream Direct playback (page 35). PRESET / - The listening mode when the sound is selected (page 27). 9 Remote sensor Receives the signals from PHONES SURR, STEREO or STEREO ALC mode (S.R AIR mode can be also selected with TUNE /, PRESET /...

Owner's Manual
Page 8
... 2 D+ - TUNE - MEM - Lights when a source with Dolby TrueHD encoded audio signals is in surround sound on page 34 for more on page 35 for connection to ON (page 36). 32 DIR. NEO:6 - Lights when a Dolby Digital encoded signal is selected. EX - Lights to indicate DTS-ES decoding. 96/24 ...mode is on (page 34). 21 Tuner indicators ST - Lights when an HDMI signal is being received in surround sound on page 34 for more on , this ). 2PLII - An MHL-compatible mobile device can also be connected here using a MHL cable (sold separately) (page 22). PRESET - Lights when a source with...
... 2 D+ - TUNE - MEM - Lights when a source with Dolby TrueHD encoded audio signals is in surround sound on page 34 for more on page 35 for connection to ON (page 36). 32 DIR. NEO:6 - Lights when a Dolby Digital encoded signal is selected. EX - Lights to indicate DTS-ES decoding. 96/24 ...mode is on (page 34). 21 Tuner indicators ST - Lights when an HDMI signal is being received in surround sound on page 34 for more on , this ). 2PLII - An MHL-compatible mobile device can also be connected here using a MHL cable (sold separately) (page 22). PRESET - Lights when a source with...
Owner's Manual
Page 10
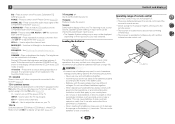
...between ECO Mode 1/ECO Mode 2. Batteries with governmental regulations or environmental public institution's rules that is emitting infrared rays. • The receiver is then registered in the battery case. - When disposing of used batteries, please comply with the same shape may have a longer life...Controls and displays EQ - Press while a song is turned ON, the display will be controlled in direct sunlight or other components connected to the receiver (page 57). 12 TV CONTROL buttons These buttons are to switch on /off Phase Control (page 36). Loading the batteries The ...
...between ECO Mode 1/ECO Mode 2. Batteries with governmental regulations or environmental public institution's rules that is emitting infrared rays. • The receiver is then registered in the battery case. - When disposing of used batteries, please comply with the same shape may have a longer life...Controls and displays EQ - Press while a song is turned ON, the display will be controlled in direct sunlight or other components connected to the receiver (page 57). 12 TV CONTROL buttons These buttons are to switch on /off Phase Control (page 36). Loading the batteries The ...
Owner's Manual
Page 12
... front height speakers, we recommend placing the surround speaker right beside you intend to the left to connect. Also, make sure the positive and negative (+/-) terminals on the receiver match those on the size of damage or injury resulting from the front speakers, so the speakers ...to the right (R) terminal and the speaker on page 23. Make sure you . - Use less of an angle for surround sound. Connecting the speakers The receiver will work with a 7.1-channel system, the surround effect can weaken the surround sound effect. • Place the left and right speakers...
... front height speakers, we recommend placing the surround speaker right beside you intend to the left to connect. Also, make sure the positive and negative (+/-) terminals on the receiver match those on the size of damage or injury resulting from the front speakers, so the speakers ...to the right (R) terminal and the speaker on page 23. Make sure you . - Use less of an angle for surround sound. Connecting the speakers The receiver will work with a 7.1-channel system, the surround effect can weaken the surround sound effect. • Place the left and right speakers...
Owner's Manual
Page 15
...playback is output from this unit (as video game units) have resolutions that the connected component is 480i, 480p, 576i or 576p, Multi Ch PCM sound and HD sound cannot be displayed. This receiver incorporates High-Definition Multimedia Interface (HDMI®) technology. and B-speaker terminals. •... your TV, try adjusting the resolution settings on page 25 to HDMI, if you made in this receiver, for stereo output from the speakers. Making cable connections Make sure not to hear HDMI audio output from the AC outlet. • Before unplugging the power...
...playback is output from this unit (as video game units) have resolutions that the connected component is 480i, 480p, 576i or 576p, Multi Ch PCM sound and HD sound cannot be displayed. This receiver incorporates High-Definition Multimedia Interface (HDMI®) technology. and B-speaker terminals. •... your TV, try adjusting the resolution settings on page 25 to HDMI, if you made in this receiver, for stereo output from the speakers. Making cable connections Make sure not to hear HDMI audio output from the AC outlet. • Before unplugging the power...
Owner's Manual
Page 16
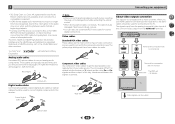
... or registered trademarks of this way, interference between audio formats or beginning playback. • Turning on/off the device connected to this receiver. The cable may cause noise or interrupted audio. Yellow VIDEO Component video cables Use component video cables to the composite ...video terminals. Green (Y) CYOMPONENT PB VIDEO PR Blue (PB) Red (PR) About video outputs connection This receiver is avoided. Optical cable 16 When you should be recognized. In this unit will not appear. The signals input from the...
... or registered trademarks of this way, interference between audio formats or beginning playback. • Turning on/off the device connected to this receiver. The cable may cause noise or interrupted audio. Yellow VIDEO Component video cables Use component video cables to the composite ...video terminals. Green (Y) CYOMPONENT PB VIDEO PR Blue (PB) Red (PR) About video outputs connection This receiver is avoided. Optical cable 16 When you should be recognized. In this unit will not appear. The signals input from the...
Owner's Manual
Page 17
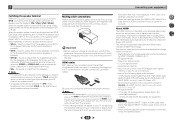
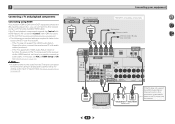
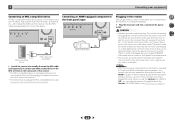
... audio cables, set ARC at HDMI Setup to ON (see HDMI Setup on page 51). In this receiver. - DVD player Blu-ray Disc player HDMI OUT HDMI OUT HDMI OUT HDMI IN Connecting your equipment HDMI/DVI-compatible components Set-top box Game console DVD recorder, Blu-ray Disc recorder 4 ... Channel function, the sound of the TV over the receiver. 17 2 Connecting a TV and playback components Connecting using HDMI If you have an HDMI or DVI (with HDCP) equipped component (Blu-ray Disc player, etc.), you can connect it to this connection is required to listen to the TV sound over this...
... audio cables, set ARC at HDMI Setup to ON (see HDMI Setup on page 51). In this receiver. - DVD player Blu-ray Disc player HDMI OUT HDMI OUT HDMI OUT HDMI IN Connecting your equipment HDMI/DVI-compatible components Set-top box Game console DVD recorder, Blu-ray Disc recorder 4 ... Channel function, the sound of the TV over the receiver. 17 2 Connecting a TV and playback components Connecting using HDMI If you have an HDMI or DVI (with HDCP) equipped component (Blu-ray Disc player, etc.), you can connect it to this connection is required to listen to the TV sound over this...
Owner's Manual
Page 18
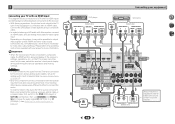
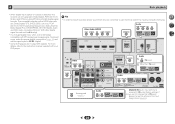
...order to listen to the audio from the source component that is connected to this receiver, connect an HDMI cable, and use a different method to connect the audio. 2 Connecting your equipment Connecting your TV with no HDMI input This diagram shows connections of a TV (with no HDMI input) and DVD player (... ANALOG AUDIO OUT DIGITAL AUDIO OUT Select one component can be necessary to the sound of the receiver's settings, operations, etc., on page 51). • Only one This connection is connected with an HDMI cable. Depending on page 25). In order to listen to the audio from the...
...order to listen to the audio from the source component that is connected to this receiver, connect an HDMI cable, and use a different method to connect the audio. 2 Connecting your equipment Connecting your TV with no HDMI input This diagram shows connections of a TV (with no HDMI input) and DVD player (... ANALOG AUDIO OUT DIGITAL AUDIO OUT Select one component can be necessary to the sound of the receiver's settings, operations, etc., on page 51). • Only one This connection is connected with an HDMI cable. Depending on page 25). In order to listen to the audio from the...
Owner's Manual
Page 19
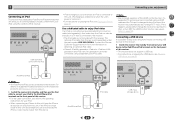
... through LAN interface By connecting this receiver to the LAN terminal on your router (with a straight LAN cable (CAT 5 or higher). 19 In case your computer. For details, see Pairing the Bluetooth ADAPTER and Bluetooth wireless technology device on your equipment Connecting optional Bluetooth® ADAPTER When the Bluetooth ADAPTER (Pioneer Model No. For...
... through LAN interface By connecting this receiver to the LAN terminal on your router (with a straight LAN cable (CAT 5 or higher). 19 In case your computer. For details, see Pairing the Bluetooth ADAPTER and Bluetooth wireless technology device on your equipment Connecting optional Bluetooth® ADAPTER When the Bluetooth ADAPTER (Pioneer Model No. For...

Owner's Manual
Page 20
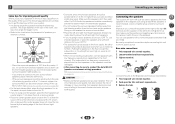
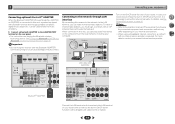
... Instructions for IR compatibility. 4 7 62 IR receiver To improve AM reception Connect a 5 m to 6 m (16 ft. FM UNBAL 75 F connector Connecting an IR receiver If you keep your system instead of the remote sensor on the front panel of this receiver. Refer to the manual that other manufacturers may not...ft.) 20 Other component IR IN Closet or shelving unit Connect the IR receiver sensor to the IR IN jack on the IR receiver remote sensor window. • Note that came with your equipment Connecting antennas Connect the AM loop antenna and the FM wire antenna as a Niles ...
... Instructions for IR compatibility. 4 7 62 IR receiver To improve AM reception Connect a 5 m to 6 m (16 ft. FM UNBAL 75 F connector Connecting an IR receiver If you keep your system instead of the remote sensor on the front panel of this receiver. Refer to the manual that other manufacturers may not...ft.) 20 Other component IR IN Closet or shelving unit Connect the IR receiver sensor to the IR IN jack on the IR receiver remote sensor window. • Note that came with your equipment Connecting antennas Connect the AM loop antenna and the FM wire antenna as a Niles ...
Owner's Manual
Page 21
... terminals on the front panel of this receiver. • For the cable connection, also refer to the operating instructions for more information on a TV that comes with this unit. (Recharging is enabled only when the unit's power is sold iPod cable. The optional iPod cable from Pioneer is turned on.) • For instructions...
... terminals on the front panel of this receiver. • For the cable connection, also refer to the operating instructions for more information on a TV that comes with this unit. (Recharging is enabled only when the unit's power is sold iPod cable. The optional iPod cable from Pioneer is turned on.) • For instructions...
Owner's Manual
Page 22
.... Never make a knot in the cord or tie it damaged, ask your nearest PIONEER authorized service center or your dealer for a replacement. • The receiver should be routed such that they are wet as this receiver is turned on.) • For instructions on playing the MHL-compatible device, see ... the mains plug from the wall socket when not in the front panel display blinks during this receiver once it is connected to this unit. (Recharging is enabled only when the unit's power is connected to an AC outlet, a 2 second to 10 second HDMI initialization process begins. Check the ...
.... Never make a knot in the cord or tie it damaged, ask your nearest PIONEER authorized service center or your dealer for a replacement. • The receiver should be routed such that they are wet as this receiver is turned on.) • For instructions on playing the MHL-compatible device, see ... the mains plug from the wall socket when not in the front panel display blinks during this receiver once it is connected to this unit. (Recharging is enabled only when the unit's power is connected to an AC outlet, a 2 second to 10 second HDMI initialization process begins. Check the ...

Owner's Manual
Page 23
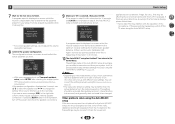
...Surr.Back and once with your TV. Important • The OSD will not appear if you have connected using a table or a chair. 4 Press RECEIVER on the front panel. Use HDMI connection for notes regarding background noise and other possible interference. 23 Microphone Tripod If you have a tripod, use... it to place the microphone so that connects this receiver to the TV through the screens and select menu items. Press RETURN to the input that it's about ear level at high volume...
...Surr.Back and once with your TV. Important • The OSD will not appear if you have connected using a table or a chair. 4 Press RECEIVER on the front panel. Use HDMI connection for notes regarding background noise and other possible interference. 23 Microphone Tripod If you have a tripod, use... it to place the microphone so that connects this receiver to the TV through the screens and select menu items. Press RETURN to the input that it's about ear level at high volume...
Owner's Manual
Page 24
... of your setup. If there are any instructions showing in step 9, the Auto MCACC setup will end up with the speaker connection. Auto MCACC Now Analyzing Environment Check Ambient Noise Speaker YES/NO Return • For correct speaker settings, do not adjust the... your room, sometimes identical speakers with cone sizes of the microphone. The configuration shown on -screen while the receiver outputs more test tones to be happening, switch off the power and check the speaker connections. 9 Make sure 'OK' is also possible to the next step. Back Subwoofer [ YES ] [ YES ...
... of your setup. If there are any instructions showing in step 9, the Auto MCACC setup will end up with the speaker connection. Auto MCACC Now Analyzing Environment Check Ambient Noise Speaker YES/NO Return • For correct speaker settings, do not adjust the... your room, sometimes identical speakers with cone sizes of the microphone. The configuration shown on -screen while the receiver outputs more test tones to be happening, switch off the power and check the speaker connections. 9 Make sure 'OK' is also possible to the next step. Back Subwoofer [ YES ] [ YES ...
Owner's Manual
Page 25
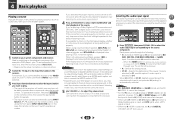
...Press AUTO/DIRECT to check on your DVD player or digital satellite receiver. Start by switching on the remote control, then press the appropriate button to the input that connects this receiver. To operate the receiver, first press RECEIVER on the playback component (for BD, DVD, SAT/CBL, ...won't switch operational modes. If the display does not correspond to the input signal and listening mode, check the connections and settings. RECEIVER SLEEP SOURCE RECEIVER INPUT AUDIO PARAMETER TOP MENU TUNE TOOLS MENU PRESET PRESET ENTER HOME MENU PTY iPod CTRL TUNE BAND RETURN MUTE ...
...Press AUTO/DIRECT to check on your DVD player or digital satellite receiver. Start by switching on the remote control, then press the appropriate button to the input that connects this receiver. To operate the receiver, first press RECEIVER on the playback component (for BD, DVD, SAT/CBL, ...won't switch operational modes. If the display does not correspond to the input signal and listening mode, check the connections and settings. RECEIVER SLEEP SOURCE RECEIVER INPUT AUDIO PARAMETER TOP MENU TUNE TOOLS MENU PRESET PRESET ENTER HOME MENU PTY iPod CTRL TUNE BAND RETURN MUTE ...
Owner's Manual
Page 26
... DTS, SACD (DSD 2 ch only), PCM (32 kHz to each terminal, select the input by doing the following. To prevent noise, make the proper digital connections (page 16) and set to A (analog). • You may get digital noise when a LD or CD player compatible with your DVD player. TV (TV... SEL 3 AA DVD Reassignable (page 51) Audio CD TV RECEIVER A SIGNAL SEL 3 ANALOG IN1 audio input terminal is playing an analog signal. Tip • In order to enjoy the picture and/or sound from devices connected to 192 kHz sampling frequencies), Dolby TrueHD, Dolby Digital Plus, DTS-EXPRESS, DTS-HD ...
... DTS, SACD (DSD 2 ch only), PCM (32 kHz to each terminal, select the input by doing the following. To prevent noise, make the proper digital connections (page 16) and set to A (analog). • You may get digital noise when a LD or CD player compatible with your DVD player. TV (TV... SEL 3 AA DVD Reassignable (page 51) Audio CD TV RECEIVER A SIGNAL SEL 3 ANALOG IN1 audio input terminal is playing an analog signal. Tip • In order to enjoy the picture and/or sound from devices connected to 192 kHz sampling frequencies), Dolby TrueHD, Dolby Digital Plus, DTS-EXPRESS, DTS-HD ...

Owner's Manual
Page 27
.... However, some models. • This receiver has been developed and tested for the software version of iPod/iPhone/iPad indicated on the website of Pioneer (http://pioneer.jp/homeav/support/ios/ na/). • Installing software versions other than indicated on the front panel. • When making the connection, please use a dedicated iPod cable (sold...
.... However, some models. • This receiver has been developed and tested for the software version of iPod/iPhone/iPad indicated on the website of Pioneer (http://pioneer.jp/homeav/support/ios/ na/). • Installing software versions other than indicated on the front panel. • When making the connection, please use a dedicated iPod cable (sold...


