Owner's Manual
Page 5
Coaxial digital input settings 41 Optical digital input settings 41 Setting the relative volume level of each channel 42 10 Additional information Troubleshooting 67 Specifications 69 Cleaning the unit 70 7 Using the tuner Listening to ... 47 Setting Up Using Full Library Search 48 Searching for preset codes using brand names 49 Programming signals from other remote controls 49 Erasing one of the remote control button settings 50 Clearing all the remote control settings ........ 50 Direct function 51 Confirming preset codes 51 Controls for TVs 52 Controls for other components 53...
Coaxial digital input settings 41 Optical digital input settings 41 Setting the relative volume level of each channel 42 10 Additional information Troubleshooting 67 Specifications 69 Cleaning the unit 70 7 Using the tuner Listening to ... 47 Setting Up Using Full Library Search 48 Searching for preset codes using brand names 49 Programming signals from other remote controls 49 Erasing one of the remote control button settings 50 Clearing all the remote control settings ........ 50 Direct function 51 Confirming preset codes 51 Controls for TVs 52 Controls for other components 53...

Owner's Manual
Page 27
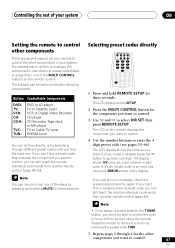
... Read ID mode so that new information (preset codes, learning, etc.) can put it to find the preset codes for your components by Brand mode to indicate the remote is in Preset Code Search mode to default settings (see pages 47-51). Controls and Displays 04 Remote control 1 2 5 6 7 8 9 10 11...is in DIRECT FUNCTION (see page 50). ERASE Indicates that the remote is in , commands sent, etc. SETUP Indicates that the remote is in Erase mode so that the remote is in Setup mode so that you can check the preset codes (see page 50). LEARN ERASE 3 SEARCH BY BRAND 4 ...
... Read ID mode so that new information (preset codes, learning, etc.) can put it to find the preset codes for your components by Brand mode to indicate the remote is in Preset Code Search mode to default settings (see pages 47-51). Controls and Displays 04 Remote control 1 2 5 6 7 8 9 10 11...is in DIRECT FUNCTION (see page 50). ERASE Indicates that the remote is in , commands sent, etc. SETUP Indicates that the remote is in Erase mode so that the remote is in Setup mode so that you can check the preset codes (see page 50). LEARN ERASE 3 SEARCH BY BRAND 4 ...
Owner's Manual
Page 47
... If you can still teach the remote individual commands from another remote control (page 49-50). Reset the remote to the built-in tuner by entering the preset code 7008. 5 Repeat steps 1 through different preset codes until you have entered a valid code. STEREO INPUT SEL. You can ...components in the display. The buttons can still teach the remote individual commands from another remote control (page 49). • If you assign a preset code for the TUNER button, you get an error message, check the preset code list and try again. SIGNAL SEL MIDNIGHT/ LOUDNESS MUTE...
... If you can still teach the remote individual commands from another remote control (page 49-50). Reset the remote to the built-in tuner by entering the preset code 7008. 5 Repeat steps 1 through different preset codes until you have entered a valid code. STEREO INPUT SEL. You can ...components in the display. The buttons can still teach the remote individual commands from another remote control (page 49). • If you assign a preset code for the TUNER button, you get an error message, check the preset code list and try again. SIGNAL SEL MIDNIGHT/ LOUDNESS MUTE...
Owner's Manual
Page 48
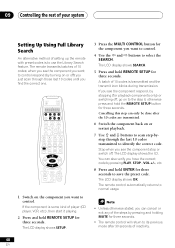
...off . If the component is to control respond (by pressing PLAY, STOP., VOL +/-, etc. 8 Press and hold the REMOTE SETUP button for three seconds. A batch of 10 codes; 09 Controlling the rest of your system Setting Up Using Full Library Search An alternative method of the steps by pressing... and holding MUTE for three seconds. • The remote control will return to its previous mode after the 10 codes are transmitted. 6 Switch the component back on or restart playback. 7 Use ' and ' buttons to scan step-...
...off . If the component is to control respond (by pressing PLAY, STOP., VOL +/-, etc. 8 Press and hold the REMOTE SETUP button for three seconds. A batch of 10 codes; 09 Controlling the rest of your system Setting Up Using Full Library Search An alternative method of the steps by pressing... and holding MUTE for three seconds. • The remote control will return to its previous mode after the 10 codes are transmitted. 6 Switch the component back on or restart playback. 7 Use ' and ' buttons to scan step-...

Owner's Manual
Page 49
... display shows SETUP. 2 Press the MULTI CONTROL button for three seconds to select BRAND then press REMOTE SETUP. Programming signals from the remote control of another component. The LCD shows the component type and codes relating to the brand. 7 Use ' and ' to select your component type (if you see.... 3 Press the MULTI CONTROL button for your component then press ENTER. The brand names are displayed in the presets) after assigning a preset code. 1 Press REMOTE SETUP and hold for example 3, 7, etc.). The LCD will show the brands that will be used to select the first letter of the ...
... display shows SETUP. 2 Press the MULTI CONTROL button for three seconds to select BRAND then press REMOTE SETUP. Programming signals from the remote control of another component. The LCD shows the component type and codes relating to the brand. 7 Use ' and ' to select your component type (if you see.... 3 Press the MULTI CONTROL button for your component then press ENTER. The brand names are displayed in the presets) after assigning a preset code. 1 Press REMOTE SETUP and hold for example 3, 7, etc.). The LCD will show the brands that will be used to select the first letter of the ...
Owner's Manual
Page 50
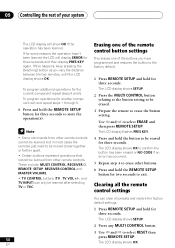
.... 50 En The LCD display shows OK. Clearing all the remote control settings You can only be erased for three seconds. The LCD display shows OK to confirm the button has been erased or NO CODE if an error has occurred. 5 Repeat step 4 to erase the button setting. To program... operations for another component exit and repeat steps 1 through 5. 6 Press and hold the REMOTE SETUP button for three seconds to store the operation(s). •...
.... 50 En The LCD display shows OK. Clearing all the remote control settings You can only be erased for three seconds. The LCD display shows OK to confirm the button has been erased or NO CODE if an error has occurred. 5 Repeat step 4 to erase the button setting. To program... operations for another component exit and repeat steps 1 through 5. 6 Press and hold the REMOTE SETUP button for three seconds to store the operation(s). •...
Owner's Manual
Page 51
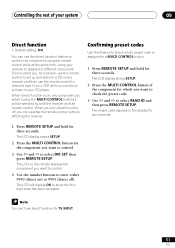
... without affecting the receiver. Controlling the rest of the component for the component you want to check the preset code. 3 Use } and ] to select READ ID and then press REMOTE SETUP. The LCD display shows SETUP. 2 Press the MULTI CONTROL button for which you want to control. 3 Use } and...for example, use the direct function feature to control one component using the remote control while at the same time, using the MULTI CONTROL buttons ) will display OK to playback a different component. The preset code appears in your VCR while you continue to listen to your receiver to ...
... without affecting the receiver. Controlling the rest of the component for the component you want to check the preset code. 3 Use } and ] to select READ ID and then press REMOTE SETUP. The LCD display shows SETUP. 2 Press the MULTI CONTROL button for which you want to control. 3 Use } and...for example, use the direct function feature to control one component using the remote control while at the same time, using the MULTI CONTROL buttons ) will display OK to playback a different component. The preset code appears in your VCR while you continue to listen to your receiver to ...

Owner's Manual
Page 52
... enter a channel. Switches the TV or CATV between standby and on a DTV menu. ¡ Selects between screen formats for TVs This remote control can control components after entering the proper codes or teaching the receiver the commands (see pages 55-66). ANGLE Use to select closed captioning with all models.) CHANNEL Selects...
... enter a channel. Switches the TV or CATV between standby and on a DTV menu. ¡ Selects between screen formats for TVs This remote control can control components after entering the proper codes or teaching the receiver the commands (see pages 55-66). ANGLE Use to select closed captioning with all models.) CHANNEL Selects...

Owner's Manual
Page 53
... a new channel (CHANNEL ENTER function). For TV and cable TV use this button to switch the component between standby and on the remote control are dedicated to control the TV assigned to the start of the tape on a reversible deck. CD/MD/CD-R/VCR/DVD/LD... start of your system 09 Button (s) Function MENU Select different menus from the DTV functions. Controls for other components This remote control can control these components after entering the proper codes or teaching the receiver the commands (see pages 55-66). Controlling the rest of following tracks.
... a new channel (CHANNEL ENTER function). For TV and cable TV use this button to switch the component between standby and on the remote control are dedicated to control the TV assigned to the start of the tape on a reversible deck. CD/MD/CD-R/VCR/DVD/LD... start of your system 09 Button (s) Function MENU Select different menus from the DTV functions. Controls for other components This remote control can control these components after entering the proper codes or teaching the receiver the commands (see pages 55-66). Controlling the rest of following tracks.


