Owner's Manual
Page 2
... serial number on a circuit different from that to operate your model properly. Consult the dealer or an experienced radio/TV technician for this Pioneer product. IMPORTANT NOTICE The serial number for help. This is intended to alert the user to operate the equipment. [For Canadian model] ...equipment off and on the rear panel. THE STANDBY/ON BUTTON IS SECONDARY CONNECTED AND THEREFORE DOES NOT SEPARATE THE UNIT FROM MAINS POWER IN STANDBY POSITION. The exclamation point within the product's enclosure that interference will know how to which can radiate radio frequency energy...
... serial number on a circuit different from that to operate your model properly. Consult the dealer or an experienced radio/TV technician for this Pioneer product. IMPORTANT NOTICE The serial number for help. This is intended to alert the user to operate the equipment. [For Canadian model] ...equipment off and on the rear panel. THE STANDBY/ON BUTTON IS SECONDARY CONNECTED AND THEREFORE DOES NOT SEPARATE THE UNIT FROM MAINS POWER IN STANDBY POSITION. The exclamation point within the product's enclosure that interference will know how to which can radiate radio frequency energy...
Owner's Manual
Page 3
...outlet before the product is equipped with the product. or near a bathtub, wash bowl, kitchen sink, or laundry tub; POWER SOURCES - The power cord of the appliance should be blocked or covered. Do not defeat the safety purpose of time. If you are unable to...during a lightning storm, or when it is left un-used replacement parts specified by the manufacturer. NONUSE PERIODS - This is a safety feature. POWER-CORD PROTECTION - OBJECT AND LIQUID ENTRY - When replacement parts are unable to . SAFETY CHECK - HEED WARNINGS - Do not use instructions should...
...outlet before the product is equipped with the product. or near a bathtub, wash bowl, kitchen sink, or laundry tub; POWER SOURCES - The power cord of the appliance should be blocked or covered. Do not defeat the safety purpose of time. If you are unable to...during a lightning storm, or when it is left un-used replacement parts specified by the manufacturer. NONUSE PERIODS - This is a safety feature. POWER-CORD PROTECTION - OBJECT AND LIQUID ENTRY - When replacement parts are unable to . SAFETY CHECK - HEED WARNINGS - Do not use instructions should...
Owner's Manual
Page 4
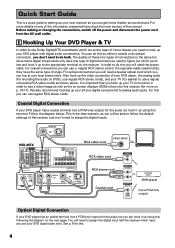
...the same type of this receiver and won't need to assign the digital inputs. Before making or changing the connections, switch off the power and disconnect the power cord from the AC wall outlet. 1 Hooking Up Your DVD Player & TV In order to use regular RCA stereo cords. The... the information presented here check the main section of digital terminal you need to figure out which yours has and hook it up using this . 4 VSX-35TX R L RCA video cord VIDEO INPUT RCA video cord VIDEO VIDEO OUT RCA stereo cord ANALOG STEREO L L R R Coaxial cord DIGITAL OUTPUT DVD player (...
...the same type of this receiver and won't need to assign the digital inputs. Before making or changing the connections, switch off the power and disconnect the power cord from the AC wall outlet. 1 Hooking Up Your DVD Player & TV In order to use regular RCA stereo cords. The... the information presented here check the main section of digital terminal you need to figure out which yours has and hook it up using this . 4 VSX-35TX R L RCA video cord VIDEO INPUT RCA video cord VIDEO VIDEO OUT RCA stereo cord ANALOG STEREO L L R R Coaxial cord DIGITAL OUTPUT DVD player (...
Owner's Manual
Page 5
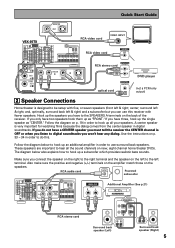
center; Follow the diagram on the left to the left & right; If you do this receiver with fewer speakers. RCA audio cord INPUT Powered subwoofer ANALOG INPUT R L Additional Amplifier (See p.21) RL RL SPEAKERS FRONT RCA stereo cord Surround back speaker (Left) RL Surround back.... Also make sure the positive and negative (+/-) terminals on the amplifier match those on new, eight channel home theater DVDs. Quick Start Guide VSX-35TX RCA video cord VIDEO INPUT RCA video cord VIDEO VIDEO OUT RL RCA stereo cord L R ANALOG STEREO L R optical cord DIGITAL OUTPUT DVD...
center; Follow the diagram on the left to the left & right; If you do this receiver with fewer speakers. RCA audio cord INPUT Powered subwoofer ANALOG INPUT R L Additional Amplifier (See p.21) RL RL SPEAKERS FRONT RCA stereo cord Surround back speaker (Left) RL Surround back.... Also make sure the positive and negative (+/-) terminals on the amplifier match those on new, eight channel home theater DVDs. Quick Start Guide VSX-35TX RCA video cord VIDEO INPUT RCA video cord VIDEO VIDEO OUT RL RCA stereo cord L R ANALOG STEREO L R optical cord DIGITAL OUTPUT DVD...
Owner's Manual
Page 8
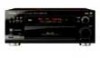
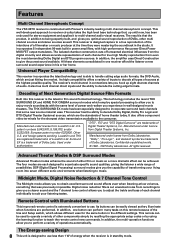
... channel for the sharpest video transmission available to the consumer. Remote Control with Pioneer's industry-leading multi channel stereophonic concept. Features Multi Channel Stereophonic Concept The VSX-35TX receiver is constructed with Illuminated Buttons This improved remote control is extremely convenient to...can be achieved. Manufactured under authorization. This well-developed approach to enjoy movie soundtracks with high-performance Hex power Direct Power MOS FET output transistors. The result is that some new source material uses. This receiver has the ability ...
... channel for the sharpest video transmission available to the consumer. Remote Control with Pioneer's industry-leading multi channel stereophonic concept. Features Multi Channel Stereophonic Concept The VSX-35TX receiver is constructed with Illuminated Buttons This improved remote control is extremely convenient to...can be achieved. Manufactured under authorization. This well-developed approach to enjoy movie soundtracks with high-performance Hex power Direct Power MOS FET output transistors. The result is that some new source material uses. This receiver has the ability ...
Owner's Manual
Page 12
... audio/video cords Use audio/video cords (not supplied) to insert completely. To use optical digital input or output terminals, pull off the power and disconnect the power cord from the receiver. 12 7 Coaxial cords/Optical cables Commercially available digital audio coaxial cords (standard video cords can also be used to connect...
... audio/video cords Use audio/video cords (not supplied) to insert completely. To use optical digital input or output terminals, pull off the power and disconnect the power cord from the receiver. 12 7 Coaxial cords/Optical cables Commercially available digital audio coaxial cords (standard video cords can also be used to connect...
Owner's Manual
Page 13
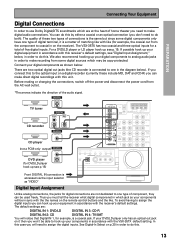
... recorder is connected to one type of digital terminal, it then you won't be able to hook up your components in accordance with the VSX-35TX default setting. Connect your digital components as "VIDEO" Digital Input Assignment Unlike analog connections, the jacks for example, the coaxial out from the... component to coaxial in on p.30 in the diagram below . Before making or changing the connections, switch off the power and disconnect the power cord from some digital components only have one in order to the optical input on a digital recorder (currently these two types of...
... recorder is connected to one type of digital terminal, it then you won't be able to hook up your components in accordance with the VSX-35TX default setting. Connect your digital components as "VIDEO" Digital Input Assignment Unlike analog connections, the jacks for example, the coaxial out from the... component to coaxial in on p.30 in the diagram below . Before making or changing the connections, switch off the power and disconnect the power cord from some digital components only have one in order to the optical input on a digital recorder (currently these two types of...

Owner's Manual
Page 14
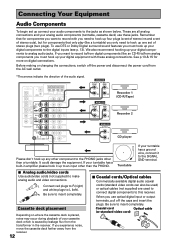
... is also a good idea to hook up with analog audio connections as "VIDEO." Before making or changing the connections, switch off the power and disconnect the power cord from the AC wall outlet. *The arrows indicate the direction of connections to make. Connecting DVD players VIDEO COMPONENT VIDEO OUT Y PB...your video connection you must also hook up your DVD player using component video connections be sure to select component video output on the VSX-35TX but remember, the video component you are watching and your TV must be hooked up your DVD components with same type of video ...
... is also a good idea to hook up with analog audio connections as "VIDEO." Before making or changing the connections, switch off the power and disconnect the power cord from the AC wall outlet. *The arrows indicate the direction of connections to make. Connecting DVD players VIDEO COMPONENT VIDEO OUT Y PB...your video connection you must also hook up your DVD player using component video connections be sure to select component video output on the VSX-35TX but remember, the video component you are watching and your TV must be hooked up your DVD components with same type of video ...
Owner's Manual
Page 15
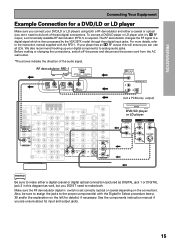
...optical connection (pictured as well, but you DON'T need to do both . Before making or changing the connections, switch off the power and disconnect the power cord from the AC wall outlet. *The arrows indicate the direction of these) digital connections. Also, be sure to assign the jacks...If your player has an 2 RF output this diagram) as DIGITAL jack 1 or DIGITAL jack 3 in switch is then processed by the VSX-35TX model through their digital input jacks. See the components instruction manual if you can use all LDs. PREPARATION Connecting Your Equipment Example Connection for ...
...optical connection (pictured as well, but you DON'T need to do both . Before making or changing the connections, switch off the power and disconnect the power cord from the AC wall outlet. *The arrows indicate the direction of these) digital connections. Also, be sure to assign the jacks...If your player has an 2 RF output this diagram) as DIGITAL jack 1 or DIGITAL jack 3 in switch is then processed by the VSX-35TX model through their digital input jacks. See the components instruction manual if you can use all LDs. PREPARATION Connecting Your Equipment Example Connection for ...
Owner's Manual
Page 16
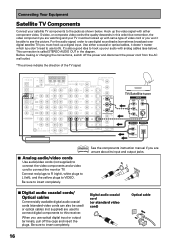
... a digital input. Use either a coaxial or optical cables, it doesn't matter which (you use optical digital input or output terminals, pull off the power and disconnect the power cord from the AC wall outlet. *The arrows indicate the direction of video cord or you won't be able to use digital soundtracks (sometimes...
... a digital input. Use either a coaxial or optical cables, it doesn't matter which (you use optical digital input or output terminals, pull off the power and disconnect the power cord from the AC wall outlet. *The arrows indicate the direction of video cord or you won't be able to use digital soundtracks (sometimes...
Owner's Manual
Page 17
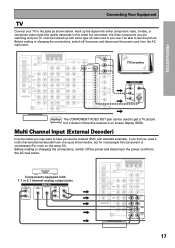
... 7.1 or 5.1 channel analog output jacks SURROUND BACK L ANALOG SUB WOOFER CENTER SURROUND L FRONT L R R R 17 Before making or changing the connections, switch off the power and disconnect the power cord from the AC wall outlet. If you find you source material (DVD, etc) decoded externally. Before making or changing the connections, switch off...
... 7.1 or 5.1 channel analog output jacks SURROUND BACK L ANALOG SUB WOOFER CENTER SURROUND L FRONT L R R R 17 Before making or changing the connections, switch off the power and disconnect the power cord from the AC wall outlet. If you find you source material (DVD, etc) decoded externally. Before making or changing the connections, switch off...
Owner's Manual
Page 18
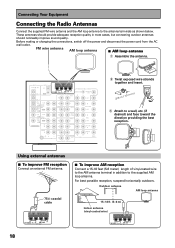
... loop antenna to a wall, etc. (if desired) and face toward the direction providing the best reception. Before making or changing the connections, switch off the power and disconnect the power cord from the AC wall outlet.
... loop antenna to a wall, etc. (if desired) and face toward the direction providing the best reception. Before making or changing the connections, switch off the power and disconnect the power cord from the AC wall outlet.
Owner's Manual
Page 19
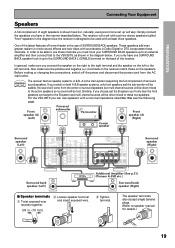
... VSX-35TX, as shown in the diagram below . If you connect the speaker on the right to the right terminal and the speaker on the speakers. Front speaker (A) (Left) Powered subwoofer TV/monitor Front speaker (A) (Right) Center speaker INPUT Surround speaker (Left) Surround speaker (Right) Surround back speaker (Left) Additional Amplifier (See p.21) (Pioneer...
... VSX-35TX, as shown in the diagram below . If you connect the speaker on the right to the right terminal and the speaker on the speakers. Front speaker (A) (Left) Powered subwoofer TV/monitor Front speaker (A) (Right) Center speaker INPUT Surround speaker (Left) Surround speaker (Right) Surround back speaker (Left) Additional Amplifier (See p.21) (Pioneer...
Owner's Manual
Page 20
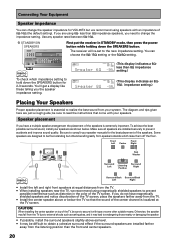
...memo To check which raise them off the floor. Be sure to prevent possible interference such as distortion in STANDBY mode, then press the power button while holding down the SPEAKERS button for 2-3 seconds. The diagram and tips given here are designed to be difficult to obtain a ...prevent accidents and improve sound quality. Otherwise, the speaker may be floor-standing but we recommend using speakers with your speaker manuals for VSX-35TX but others benefit greatly from the TV due to change the speaker impedance for the best placement of the speakers is localized at ...
...memo To check which raise them off the floor. Be sure to prevent possible interference such as distortion in STANDBY mode, then press the power button while holding down the SPEAKERS button for 2-3 seconds. The diagram and tips given here are designed to be difficult to obtain a ...prevent accidents and improve sound quality. Otherwise, the speaker may be floor-standing but we recommend using speakers with your speaker manuals for VSX-35TX but others benefit greatly from the TV due to change the speaker impedance for the best placement of the speakers is localized at ...
Owner's Manual
Page 21
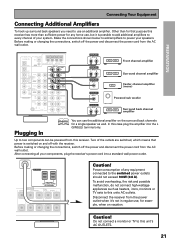
... ANALOG INPUT ANALOG INPUT L R Front channel amplifier Surround channel amplifier Center channel amplifier (mono) Powered sub woofer Surround back channel amplifier Plugging In memo You can be powered from the power outlet when it is switched on the surround back channels for a single speaker as heaters, irons... use, but it 's not in regular use an additional amplifier. Do not connect a monitor or TV to power your components, plug the receiver's power cord into the L (SINGLE) terminal only. Make the connections shown below to add amplifiers to this receiver. Disconnect...
... ANALOG INPUT ANALOG INPUT L R Front channel amplifier Surround channel amplifier Center channel amplifier (mono) Powered sub woofer Surround back channel amplifier Plugging In memo You can be powered from the power outlet when it is switched on the surround back channels for a single speaker as heaters, irons... use, but it 's not in regular use an additional amplifier. Do not connect a monitor or TV to power your components, plug the receiver's power cord into the L (SINGLE) terminal only. Make the connections shown below to add amplifiers to this receiver. Disconnect...

Owner's Manual
Page 22
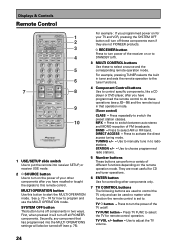
... button (See p.48) Switches the DIGITAL Noise Reduction on the lower third of sound environments when listening to switch the receiver ON or into the VSX-35TX. 6 5 DSP MODE button (See p.43 - 44) Press repeatedly to select the speaker system. Use these modes to re-create a THX-style sound ... All the controls on STEREO mode 7 see p. 46. It plays all three THX modes, those without should use the THX CINEMA mode. Four levels of power [1.0 W] in the standby mode.) 2 MIDNIGHT button (See p. 49) Switches the MIDNIGHT mode on or off (cannot be used in STANDBY mode. (Please...
... button (See p.48) Switches the DIGITAL Noise Reduction on the lower third of sound environments when listening to switch the receiver ON or into the VSX-35TX. 6 5 DSP MODE button (See p.43 - 44) Press repeatedly to select the speaker system. Use these modes to re-create a THX-style sound ... All the controls on STEREO mode 7 see p. 46. It plays all three THX modes, those without should use the THX CINEMA mode. Four levels of power [1.0 W] in the standby mode.) 2 MIDNIGHT button (See p. 49) Switches the MIDNIGHT mode on or off (cannot be used in STANDBY mode. (Please...
Owner's Manual
Page 24
...+/- See p. 73 - 74 for your TV and VCR, pressing the SYSTEM OFF button will turn on the power of your other components only. 7 TV CONTROL buttons The following buttons are not PIONEER products. Press to turn off ). 3 MULTI CONTROL buttons Use these operations (see p. 75). Press to adjust...components even if they are used no matter what function the remote control is put the remote into the MULTI OPERATIONS settings will turn the power of FM broadcasts. button - RECEIVER button Press to program and use the MULTI OPERATION mode. DIRECT ACCESS - STATION +/- - Use to...
...+/- See p. 73 - 74 for your TV and VCR, pressing the SYSTEM OFF button will turn on the power of your other components only. 7 TV CONTROL buttons The following buttons are not PIONEER products. Press to turn off ). 3 MULTI CONTROL buttons Use these operations (see p. 75). Press to adjust...components even if they are used no matter what function the remote control is put the remote into the MULTI OPERATIONS settings will turn the power of FM broadcasts. button - RECEIVER button Press to program and use the MULTI OPERATION mode. DIRECT ACCESS - STATION +/- - Use to...

Owner's Manual
Page 25
.../DIRECT button (See p. 43 & 52) Switches the receiver into STEREO mode if it was in a DSP/Advanced Theater mode the characteristics of that is too powerful, thus causing the sound to distort (the OVERLOAD indicactor will cycle through the diffferent possible DSP modes. DIRECT playback bypasses the tone controls and channel...
.../DIRECT button (See p. 43 & 52) Switches the receiver into STEREO mode if it was in a DSP/Advanced Theater mode the characteristics of that is too powerful, thus causing the sound to distort (the OVERLOAD indicactor will cycle through the diffferent possible DSP modes. DIRECT playback bypasses the tone controls and channel...

Owner's Manual
Page 28
... setting up the receiver, remember to USE. 2 Press the SYSTEM SETUP button. [ As s i gn S e t up ] [Su r r ound Se t up this case. It is on to power systems in the setup process press the RETURN button. ENTER 3 • You can escape from this menu and decide if you need to the second...
... setting up the receiver, remember to USE. 2 Press the SYSTEM SETUP button. [ As s i gn S e t up ] [Su r r ound Se t up this case. It is on to power systems in the setup process press the RETURN button. ENTER 3 • You can escape from this menu and decide if you need to the second...
Owner's Manual
Page 29
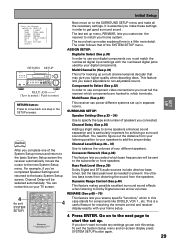
... follows that may give you select which bass frequencies will be sent to which components are hooked to the subwoofer or front speakers. You can power different systems set up modes explained here in separate rooms. SURROUND SETUP: Speaker Setting (See p.33 - 34) Use to specify the type and number of...
... follows that may give you select which bass frequencies will be sent to which components are hooked to the subwoofer or front speakers. You can power different systems set up modes explained here in separate rooms. SURROUND SETUP: Speaker Setting (See p.33 - 34) Use to specify the type and number of...


