
Owner's Manual
Page 6
...MCACC presets 89 Copying MCACC preset data 89 Clearing MCACC presets 89 11 The system and the other setup Making receiver settings from the System Setup menu 90 Manual speaker setup 90 Surround back speaker setting 91 Speaker Setting 91 Channel Level 92 Speaker Distance 93 X-Curve 93 ... control presets 74 Default preset codes 74 Controls the components 74 10 The Advanced MCACC menu Making receiver settings from the Advanced MCACC menu 77 Automatic MCACC (Expert 78 Manual MCACC setup 80 Fine Channel Level 81 Fine Speaker Distance 82 Standing Wave 82 Acoustic Calibration EQ ...
...MCACC presets 89 Copying MCACC preset data 89 Clearing MCACC presets 89 11 The system and the other setup Making receiver settings from the System Setup menu 90 Manual speaker setup 90 Surround back speaker setting 91 Speaker Setting 91 Channel Level 92 Speaker Distance 93 X-Curve 93 ... control presets 74 Default preset codes 74 Controls the components 74 10 The Advanced MCACC menu Making receiver settings from the Advanced MCACC menu 77 Automatic MCACC (Expert 78 Manual MCACC setup 80 Fine Channel Level 81 Fine Speaker Distance 82 Standing Wave 82 Acoustic Calibration EQ ...

Owner's Manual
Page 19
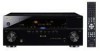
...and insert exposed wire. (fig. C 10 mm (3/8 in the event of the speaker terminal. Important • Please refer to the manual that came with the terminals on the speakers themselves. Bare wire connections 1 Twist exposed wire strands together. (fig. Connecting your equipment 03 ...Connecting the speakers Each speaker connection on how to connect the other end of the speaker cables to your speakers for details on the receiver comprises a positive (+) and negative (-) terminal. It is twisted together and inserted fully into the end of external shocks such as a...
...and insert exposed wire. (fig. C 10 mm (3/8 in the event of the speaker terminal. Important • Please refer to the manual that came with the terminals on the speakers themselves. Bare wire connections 1 Twist exposed wire strands together. (fig. Connecting your equipment 03 ...Connecting the speakers Each speaker connection on how to connect the other end of the speaker cables to your speakers for details on the receiver comprises a positive (+) and negative (-) terminal. It is twisted together and inserted fully into the end of external shocks such as a...
Owner's Manual
Page 21
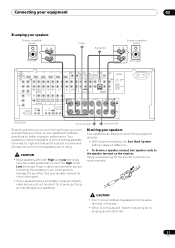
...different speakers from the same terminal in this (having separate terminals for high and low) and the sound improvement will depend on the receiver. Connecting your equipment 03 Bi-amping your speakers Bi-amp compatible speaker High Low Front left Center Subwoofer High Low Bi-amp compatible ... BACK / B LR L (Single) 12 V TRIGGER IR IN 1 IN 2 OUT (OUTPUT 12 V TOTAL 50 mA MAX) 1 2 AC IN VSX-23TXH Surround right Surround left . 21 En See your speaker manual for the second connection is when you 're using. CAUTION • Most speakers with both High and Low terminals have...
...different speakers from the same terminal in this (having separate terminals for high and low) and the sound improvement will depend on the receiver. Connecting your equipment 03 Bi-amping your speakers Bi-amp compatible speaker High Low Front left Center Subwoofer High Low Bi-amp compatible ... BACK / B LR L (Single) 12 V TRIGGER IR IN 1 IN 2 OUT (OUTPUT 12 V TOTAL 50 mA MAX) 1 2 AC IN VSX-23TXH Surround right Surround left . 21 En See your speaker manual for the second connection is when you 're using. CAUTION • Most speakers with both High and Low terminals have...

Owner's Manual
Page 25
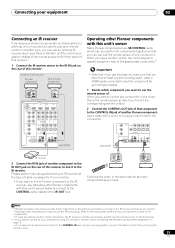
See the manuals that came with your TV and source component to check whether they are both compatible), which delivers a very stable, flicker-free ... L R L 12 V TRIGGER IR IN 1 IN 2 OUT (OUTPUT 12 V TOTAL 50 mA MAX) 1 2 VSX-23TXH • If you want to listen to the sound of the TV over the receiver, connect the receiver and TV with no HDMI output This diagram shows connections of progressive scan video (if your source...and DVD player (or other playback component with audio cables. • Component video should give superior picture quality when compared to the receiver.
See the manuals that came with your TV and source component to check whether they are both compatible), which delivers a very stable, flicker-free ... L R L 12 V TRIGGER IR IN 1 IN 2 OUT (OUTPUT 12 V TOTAL 50 mA MAX) 1 2 VSX-23TXH • If you want to listen to the sound of the TV over the receiver, connect the receiver and TV with no HDMI output This diagram shows connections of progressive scan video (if your source...and DVD player (or other playback component with audio cables. • Component video should give superior picture quality when compared to the receiver.

Owner's Manual
Page 26
...the manuals that came with your TV and source component to check whether they are both compatible), which delivers a very stable, flicker-free picture. See also Connecting the multichannel analog inputs on the receiver. 03...video component, it may not be possible to output signals connected by HDMI and other playback component) to the receiver. • With these instead. TV Select one COMPONENT VIDEO OUT PR PB Y VIDEO OUT VIDEO S-VIDEO ...V TRIGGER IR IN 1 IN 2 OUT (OUTPUT 12 V TOTAL 50 mA MAX) 1 2 VSX-23TXH • Connect using a composite, S-Video or component cord.
...the manuals that came with your TV and source component to check whether they are both compatible), which delivers a very stable, flicker-free picture. See also Connecting the multichannel analog inputs on the receiver. 03...video component, it may not be possible to output signals connected by HDMI and other playback component) to the receiver. • With these instead. TV Select one COMPONENT VIDEO OUT PR PB Y VIDEO OUT VIDEO S-VIDEO ...V TRIGGER IR IN 1 IN 2 OUT (OUTPUT 12 V TOTAL 50 mA MAX) 1 2 VSX-23TXH • Connect using a composite, S-Video or component cord.
Owner's Manual
Page 35
... using the remote sensor. 35 En MONITOR Y OUT VIDEO PB S-VIDEO PR RS-232C CONTROL IN OUT IR IN 1 IN 2 OUT VSX-23TXH VSX-23TXH IR receiver 2 Connect the IR IN jack of another Pioneer component. Refer to the manual that you won't be able to control this feature, make sure that came with this...
... using the remote sensor. 35 En MONITOR Y OUT VIDEO PB S-VIDEO PR RS-232C CONTROL IN OUT IR IN 1 IN 2 OUT VSX-23TXH VSX-23TXH IR receiver 2 Connect the IR IN jack of another Pioneer component. Refer to the manual that you won't be able to control this feature, make sure that came with this...

Owner's Manual
Page 40
...Select 'System Setup' from the HOME MENU. 4 Select 'OSD Language' from the System Setup menu. 4.SystemSetup A/V RECEIVER a.Manual SP Setup b. Use this setting if your TV. RECEIVER SOURCE DVD BD DVR HDMI TV CD CD-R VIDEO iPod USB TUNER XM SIRIUS AUDIO PARAMETER LIST VIDEO PARAMETER TUNE ... PQMLCSACC HDMI ENTER PRESET PRESET TUNER EDIT AUTO SURR/ALC/ STREAM DIRECT SPEASKTEERRSEO MULTI-ZONE CONTROL ON / OFF PHONES PUSH OPEN VSX-23TXH 1 Switch the receiver into standby. 2 While holding down ENTER on the remote control, then press HOME MENU. A Graphical User Interface (GUI)...
...Select 'System Setup' from the HOME MENU. 4 Select 'OSD Language' from the System Setup menu. 4.SystemSetup A/V RECEIVER a.Manual SP Setup b. Use this setting if your TV. RECEIVER SOURCE DVD BD DVR HDMI TV CD CD-R VIDEO iPod USB TUNER XM SIRIUS AUDIO PARAMETER LIST VIDEO PARAMETER TUNE ... PQMLCSACC HDMI ENTER PRESET PRESET TUNER EDIT AUTO SURR/ALC/ STREAM DIRECT SPEASKTEERRSEO MULTI-ZONE CONTROL ON / OFF PHONES PUSH OPEN VSX-23TXH 1 Switch the receiver into standby. 2 While holding down ENTER on the remote control, then press HOME MENU. A Graphical User Interface (GUI)...

Owner's Manual
Page 42
... R : SR : SBR : SBL : SL : SW : 10 OK 1a.Full Auto MCACC A/V RECEIVER YES YES YES YES YES YES YES YES RETRY Exit Cancel The configuration shown on-screen should give you can correct the setting manually using the Auto MCACC Setup below) and verifying the mic connection. or Check microphone... separate speaker system in another room, read through Surround back speaker setting on page 78 for more test tones to determine the optimum receiver settings for ambient noise (see an ERR message (or the speaker configuration displayed isn't correct), there may take 3 to finish, then...
... R : SR : SBR : SBL : SL : SW : 10 OK 1a.Full Auto MCACC A/V RECEIVER YES YES YES YES YES YES YES YES RETRY Exit Cancel The configuration shown on-screen should give you can correct the setting manually using the Auto MCACC Setup below) and verifying the mic connection. or Check microphone... separate speaker system in another room, read through Surround back speaker setting on page 78 for more test tones to determine the optimum receiver settings for ambient noise (see an ERR message (or the speaker configuration displayed isn't correct), there may take 3 to finish, then...

Owner's Manual
Page 43
...one of the 12 volt triggers (see Switching components on and off using the 12 volt trigger on page 36), select MAIN, ZONE 2, ZONE 3 (VSX-23TXH only) or OFF for the corresponding trigger setting to switch it to. Comp-1 OFF OFF Exit Finish 8 When you 're finished, proceed to the...confirm and exit the current menu. 3 Select 'System Setup' from the HOME MENU. 4 Select 'Input Setup' from the System Setup menu. 4.SystemSetup A/V RECEIVER a.Manual SP Setup b. You will need to make settings in the Input Setup menu if you didn't hook up . Check for household appliances (air conditioner, fridge...
...one of the 12 volt triggers (see Switching components on and off using the 12 volt trigger on page 36), select MAIN, ZONE 2, ZONE 3 (VSX-23TXH only) or OFF for the corresponding trigger setting to switch it to. Comp-1 OFF OFF Exit Finish 8 When you 're finished, proceed to the...confirm and exit the current menu. 3 Select 'System Setup' from the HOME MENU. 4 Select 'Input Setup' from the System Setup menu. 4.SystemSetup A/V RECEIVER a.Manual SP Setup b. You will need to make settings in the Input Setup menu if you didn't hook up . Check for household appliances (air conditioner, fridge...

Owner's Manual
Page 45
... video input is possible to adjust the volume level. Note 1 Make sure that the VIDEO input is now selected). 2 If you need to manually switch the input signal type press SIGNAL SEL (page 61). 3 • You may need to do this to convert the MPEG audio to ... option, set to PCM. • Depending on the playback component (for playing a source (such as video game units) have one), then the receiver (press RECEIVER). • Make sure the setup microphone is disconnected. 2 Select the input function you want to play. Basic playback 05 Chapter 5: Basic playback Playing...
... video input is possible to adjust the volume level. Note 1 Make sure that the VIDEO input is now selected). 2 If you need to manually switch the input signal type press SIGNAL SEL (page 61). 3 • You may need to do this to convert the MPEG audio to ... option, set to PCM. • Depending on the playback component (for playing a source (such as video game units) have one), then the receiver (press RECEIVER). • Make sure the setup microphone is disconnected. 2 Select the input function you want to play. Basic playback 05 Chapter 5: Basic playback Playing...

Owner's Manual
Page 51
...station. See Listening to the radio above ) is weak, press MPX to switch the receiver into mono reception mode. The display shows PRESET MEMORY, then a blinking memory class. 3 Press CLASS to select one of manually tuning in seven banks, or classes (A to G) of the station you want to listen...to enter the frequency of the station you to enjoy the broadcast. After pressing ENTER, the preset class and number stop blinking and the receiver stores the station. Tuning directly to a station Sometimes, you'll already know the frequency of 9 stations each time. This should improve the...
...station. See Listening to the radio above ) is weak, press MPX to switch the receiver into mono reception mode. The display shows PRESET MEMORY, then a blinking memory class. 3 Press CLASS to select one of manually tuning in seven banks, or classes (A to G) of the station you want to listen...to enter the frequency of the station you to enjoy the broadcast. After pressing ENTER, the preset class and number stop blinking and the receiver stores the station. Tuning directly to a station Sometimes, you'll already know the frequency of 9 stations each time. This should improve the...

Owner's Manual
Page 54
...channel preset you want. • You can check the strength of reception in the space provided near a window (refer to the manual for the SiriusConnect™ Home tuner for antenna placement recommendations).2 • If after pressing SIRIUS the display shows Antenna Error, try ...disconnecting the antenna and reconnecting.3 If the display shows Check Sirius Tuner, check the connection of this receiver to select channels and navigate categories using the GUI screen.4 The information displayed is stored. Choose from /to select a menu item...
...channel preset you want. • You can check the strength of reception in the space provided near a window (refer to the manual for the SiriusConnect™ Home tuner for antenna placement recommendations).2 • If after pressing SIRIUS the display shows Antenna Error, try ...disconnecting the antenna and reconnecting.3 If the display shows Check Sirius Tuner, check the connection of this receiver to select channels and navigate categories using the GUI screen.4 The information displayed is stored. Choose from /to select a menu item...
Owner's Manual
Page 61
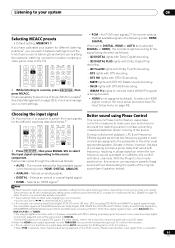
...to DIGITAL, HDMI or AUTO (only selected DIGITAL or HDMI), the indicators light according to select one of the six MCACC presets2. The receiver selects the first available signal in the following order: HDMI; During multichannel playback, LFE (Low-Frequency Effects) signals as well as low-... with your TV, not from a sofa, or playing a video game close to the source component. For more details, refer to the instruction manual supplied with DTS-HD decoding. - See Data Management on page 88 to THROUGH, the sound will be output during playback of the sound. ANALOG...
...to DIGITAL, HDMI or AUTO (only selected DIGITAL or HDMI), the indicators light according to select one of the six MCACC presets2. The receiver selects the first available signal in the following order: HDMI; During multichannel playback, LFE (Low-Frequency Effects) signals as well as low-... with your TV, not from a sofa, or playing a video game close to the source component. For more details, refer to the instruction manual supplied with DTS-HD decoding. - See Data Management on page 88 to THROUGH, the sound will be output during playback of the sound. ANALOG...

Owner's Manual
Page 67
...delay time.h C.WIDTHi Provides a better blend of the (Center front speakers by spreading the Width) center channel between components connected with the receiver's power in the standby mode. If you find the automatically set delay time unsuitable, set depending on page 65. i. Only when listening ...Setting What it only when sound wider (higher settings) or using a center speaker) Adjusts the center image to OFF and adjust the delay time manually. b.• This setting is only displayed when the listening mode is Stereo, Auto surround (STEREO) or ALC (STEREO). • This setting...
...delay time.h C.WIDTHi Provides a better blend of the (Center front speakers by spreading the Width) center channel between components connected with the receiver's power in the standby mode. If you find the automatically set delay time unsuitable, set depending on page 65. i. Only when listening ...Setting What it only when sound wider (higher settings) or using a center speaker) Adjusts the center image to OFF and adjust the delay time manually. b.• This setting is only displayed when the listening mode is Stereo, Auto surround (STEREO) or ALC (STEREO). • This setting...
Owner's Manual
Page 69
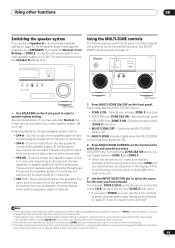
...• All speaker systems (except Speaker B connections) are for the Speaker B setting only.1 VSX-23TXH PQLS HDMI ENTER PRESET PRESET TUNER EDIT STANDARD SURROUND HOME THX SPEAKERS MULTI-ZONE CONTROL ON ...Use the INPUT SELECTOR dial to 5 channels, depending on the source), the two speakers in Manual speaker setup on the settings you made in speaker system B, and the subwoofer. The sound from...in the display. Switches the MULTI-ZONE feature off when headphones are connected. 2 If the receiver is in standby, the display is not downmixed). • Depending on the settings in ...
...• All speaker systems (except Speaker B connections) are for the Speaker B setting only.1 VSX-23TXH PQLS HDMI ENTER PRESET PRESET TUNER EDIT STANDARD SURROUND HOME THX SPEAKERS MULTI-ZONE CONTROL ON ...Use the INPUT SELECTOR dial to 5 channels, depending on the source), the two speakers in Manual speaker setup on the settings you made in speaker system B, and the subwoofer. The sound from...in the display. Switches the MULTI-ZONE feature off when headphones are connected. 2 If the receiver is in standby, the display is not downmixed). • Depending on the settings in ...
Owner's Manual
Page 70
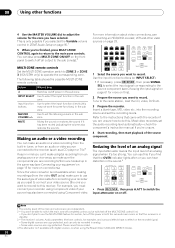
... the source component. MUTE Use to set the audio recording level automatically-check the component's instruction manual if you're unsure. 4 Start recording, then start playback of the main and sub zone...ZONE remote controls Set the MULTI-ZONE operation switch to ZONE 2 or ZONE 3 (VSX-23TXH only) to operate the corresponding zone. Refer to the instructions that the OVER indicator... this if you want to record. These cannot be recorded in standby. 3 • The receiver's volume, Audio parameters (the tone controls, for more on connections). The following table shows the...
... the source component. MUTE Use to set the audio recording level automatically-check the component's instruction manual if you're unsure. 4 Start recording, then start playback of the main and sub zone...ZONE remote controls Set the MULTI-ZONE operation switch to ZONE 2 or ZONE 3 (VSX-23TXH only) to operate the corresponding zone. Refer to the instructions that the OVER indicator... this if you want to record. These cannot be recorded in standby. 3 • The receiver's volume, Audio parameters (the tone controls, for more on connections). The following table shows the...

Owner's Manual
Page 77
...VSX-21TXH: When you can 't use the HOME MENU. 77 En Furthermore, while it was developed in Pioneer's laboratories with the aim of making it closer to perform adjustments of the same level as in either the main or sub zone). • VSX-23TXH: When you set ZONE 2 to the receiver...automatic analysis and optimal calibration of the listening environment are connected to calibrate the sound field automatically and fine-adjust the sound field data manually. Press RETURN to exit the HOME MENU. 3 Select 'Advanced MCACC' from the Advanced MCACC menu The Advanced MCACC (Multi Channel ...
...VSX-21TXH: When you can 't use the HOME MENU. 77 En Furthermore, while it was developed in Pioneer's laboratories with the aim of making it closer to perform adjustments of the same level as in either the main or sub zone). • VSX-23TXH: When you set ZONE 2 to the receiver...automatic analysis and optimal calibration of the listening environment are connected to calibrate the sound field automatically and fine-adjust the sound field data manually. Press RETURN to exit the HOME MENU. 3 Select 'Advanced MCACC' from the Advanced MCACC menu The Advanced MCACC (Multi Channel ...
Owner's Manual
Page 78
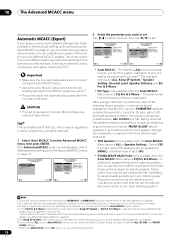
...NO. • STAND.WAVE Multi-Point (only available when the Auto MCACC Menu above is EQ Pro & S-Wave) - Full Auto MCACC b. Manual MCACC d. This is useful if you 're using THX speakers (set to have different listening positions depending on page 66. 5 The Keep SP ... ADJ : M2.MEMORY 2 FRONT ALIGN : M3.MEMORY 3 THX Speaker : NO Speaker Setting Channel Level Speaker Distance EQ Pro & S-Wave START 1b.Auto MCACC A/V RECEIVER ALL SYMMETRY : M1.MEMORY 1 ALL CH ADJ : M2.MEMORY 2 FRONT ALIGN : M3.MEMORY 3 THX Speaker : NO Speaker Setting Channel Level Speaker Distance EQ Pro...
...NO. • STAND.WAVE Multi-Point (only available when the Auto MCACC Menu above is EQ Pro & S-Wave) - Full Auto MCACC b. Manual MCACC d. This is useful if you 're using THX speakers (set to have different listening positions depending on page 66. 5 The Keep SP ... ADJ : M2.MEMORY 2 FRONT ALIGN : M3.MEMORY 3 THX Speaker : NO Speaker Setting Channel Level Speaker Distance EQ Pro & S-Wave START 1b.Auto MCACC A/V RECEIVER ALL SYMMETRY : M1.MEMORY 1 ALL CH ADJ : M2.MEMORY 2 FRONT ALIGN : M3.MEMORY 3 THX Speaker : NO Speaker Setting Channel Level Speaker Distance EQ Pro...
Owner's Manual
Page 80
... use / to select the speaker and / to adjust these settings manually using the Manual speaker setup on this ) • Speaker Distance - The distance of your speakers, there are properly connected. 2 • Depending on this receiver upon completion of your room (see page 83 for more on this , perform the...
... use / to select the speaker and / to adjust these settings manually using the Manual speaker setup on this ) • Speaker Distance - The distance of your speakers, there are properly connected. 2 • Depending on this receiver upon completion of your room (see page 83 for more on this , perform the...

Owner's Manual
Page 81
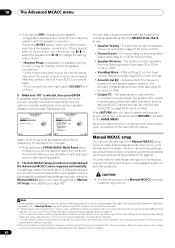
... you're using a subwoofer, switch it on page 82). EQ Adjust 5. EQ Professional 1c1.Fine Channel Level A/V RECEIVER CAUTION Loud test tones will return to the Manual MCACC setup menu. 81 En Control overly resonant low frequencies in your speaker system. The last two settings are the ... want to go back and adjust a channel, simply use / to select it. 4 When you're finished, press RETURN. Manual MCACC d. Demo 1c.Manual MCACC A/V RECEIVER 1. Standing Wave 4. You can achieve better surround sound by pressing MCACC before you connect the microphone to this...
... you're using a subwoofer, switch it on page 82). EQ Adjust 5. EQ Professional 1c1.Fine Channel Level A/V RECEIVER CAUTION Loud test tones will return to the Manual MCACC setup menu. 81 En Control overly resonant low frequencies in your speaker system. The last two settings are the ... want to go back and adjust a channel, simply use / to select it. 4 When you're finished, press RETURN. Manual MCACC d. Demo 1c.Manual MCACC A/V RECEIVER 1. Standing Wave 4. You can achieve better surround sound by pressing MCACC before you connect the microphone to this...


