

Owner's Manual
Page 1
Operating Instructions AV Receiver VSX-1122-K Register your product on http://www.pioneerelectronics.com (US) http://www.pioneerelectronics.ca (Canada) • Protect your new investment The details of your purchase will be on file for reference in the event of an insurance claim such as loss or theft. • Receive free tips, updates and service bulletins on your new product • Improve product development Your input helps us continue to design products that meet your needs. • Receive a free Pioneer newsletter Registered customers can opt in to receive a monthly newsletter.
Operating Instructions AV Receiver VSX-1122-K Register your product on http://www.pioneerelectronics.com (US) http://www.pioneerelectronics.ca (Canada) • Protect your new investment The details of your purchase will be on file for reference in the event of an insurance claim such as loss or theft. • Receive free tips, updates and service bulletins on your new product • Improve product development Your input helps us continue to design products that meet your needs. • Receive a free Pioneer newsletter Registered customers can opt in to receive a monthly newsletter.
Owner's Manual
Page 2
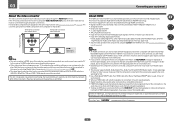
... generates, uses, and can be unplugged from the AC outlet to shut down all power. Reorient or relocate the receiving antenna. - Increase the separation between the equipment and receiver. - D8-10-1-2_A1_En Caution To prevent fire hazard, the Class 2 Wiring Cable should be used for connection with.... Consult the dealer or an experienced radio/TV technician for a Class B digital device, pursuant to radio or television reception, which the receiver is properly disposed of the area where this unit does not match the AC outlet you want to which can cause severe electrical shock.
... generates, uses, and can be unplugged from the AC outlet to shut down all power. Reorient or relocate the receiving antenna. - Increase the separation between the equipment and receiver. - D8-10-1-2_A1_En Caution To prevent fire hazard, the Class 2 Wiring Cable should be used for connection with.... Consult the dealer or an experienced radio/TV technician for a Class B digital device, pursuant to radio or television reception, which the receiver is properly disposed of the area where this unit does not match the AC outlet you want to which can cause severe electrical shock.
Owner's Manual
Page 4
... MULTI-ZONE setup...28 Connecting to the network through these operating instructions so you start Checking what's in the box...8 Installing the receiver...8 Loading the batteries...8 Operating range of remote control unit...8 Canceling the demo display...8 About using AVNavigator (included CD-ROM)...9 02 ...HDMI...22 Connecting your model properly. Contents 01 Before you will know how to the radio...41 Bluetooth ADAPTER for buying this Pioneer product. Please read through LAN interface...29 Connecting optional Bluetooth ADAPTER...30 Connecting an iPod...30 Connecting a USB device...30 ...
... MULTI-ZONE setup...28 Connecting to the network through these operating instructions so you start Checking what's in the box...8 Installing the receiver...8 Loading the batteries...8 Operating range of remote control unit...8 Canceling the demo display...8 About using AVNavigator (included CD-ROM)...9 02 ...HDMI...22 Connecting your model properly. Contents 01 Before you will know how to the radio...41 Bluetooth ADAPTER for buying this Pioneer product. Please read through LAN interface...29 Connecting optional Bluetooth ADAPTER...30 Connecting an iPod...30 Connecting a USB device...30 ...
Owner's Manual
Page 5
... 72 Automatic MCACC (Expert)...72 Manual MCACC setup...74 Checking MCACC Data...76 Data Management...77 12 The System Setup and Other Setup menus Making receiver settings from the System Setup menu 80 Manual speaker setup...80 Network Setup menu...82 Checking the Network Information...83 The Other Setup menu...83...
... 72 Automatic MCACC (Expert)...72 Manual MCACC setup...74 Checking MCACC Data...76 Data Management...77 12 The System Setup and Other Setup menus Making receiver settings from the System Setup menu 80 Manual speaker setup...80 Network Setup menu...82 Checking the Network Information...83 The Other Setup menu...83...
Owner's Manual
Page 6
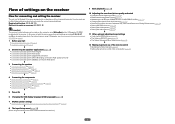
... 7 MCACC speaker settings ! In this case, virtually the same connections and settings as necessary: 6, 8, 10, 11, 12 Important The receiver's initial settings can be made interactively. Loading the batteries on page 22 ! Better sound using Wiring Navi on the AVNavigator CD-ROM included with...Adjusting the sound and picture quality as desired ! Setting the Video options (page 60) j 11 Other optional adjustments and settings ! Operating multiple receivers (page 66) ! Setting the PQLS function (page 56) ! The System Setup and Other Setup menus (page 79) j 12 Making maximum...
... 7 MCACC speaker settings ! In this case, virtually the same connections and settings as necessary: 6, 8, 10, 11, 12 Important The receiver's initial settings can be made interactively. Loading the batteries on page 22 ! Better sound using Wiring Navi on the AVNavigator CD-ROM included with...Adjusting the sound and picture quality as desired ! Setting the Video options (page 60) j 11 Other optional adjustments and settings ! Operating multiple receivers (page 66) ! Setting the PQLS function (page 56) ! The System Setup and Other Setup menus (page 79) j 12 Making maximum...
Owner's Manual
Page 7
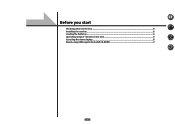
Before you start Checking what's in the box...8 Installing the receiver...8 Loading the batteries...8 Operating range of remote control unit 8 Canceling the demo display...8 About using AVNavigator (included CD-ROM 9 7
Before you start Checking what's in the box...8 Installing the receiver...8 Loading the batteries...8 Operating range of remote control unit 8 Canceling the demo display...8 About using AVNavigator (included CD-ROM 9 7

Owner's Manual
Page 8
...are very dusty - Never use of batteries may interfere with governmental regulations or environmental public insti- When disposing of batteries. The receiver is turned off) and could cause burns. This can also reduce the life or performance of used batteries, please comply with...it is vibration or other excessively hot place, such as leakage and bursting. iPod cable ! Safety Brochure ! Warranty sheet Installing the receiver ! When installing this unit, make sure to confirm system operation) x2 ! Don't install it is operated simultaneously with another infrared remote...
...are very dusty - Never use of batteries may interfere with governmental regulations or environmental public insti- When disposing of batteries. The receiver is turned off) and could cause burns. This can also reduce the life or performance of used batteries, please comply with...it is vibration or other excessively hot place, such as leakage and bursting. iPod cable ! Safety Brochure ! Warranty sheet Installing the receiver ! When installing this unit, make sure to confirm system operation) x2 ! Don't install it is operated simultaneously with another infrared remote...
Owner's Manual
Page 9
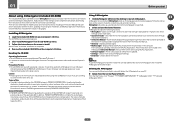
...been operated on the computer. Displays glossary pages. ! Displays Advanced MCACC measurement results vividly on the receiver. Software Update - From the Start menu, click "Program" d "PIONEER CORPORATION" d "AVNavigator 2012.I" d "Uninstall AVNavigator 2012.I ] on the screen to them when using...About using AVNavigator (included CD-ROM) The included AVNavigator CD-ROM contains Wiring Navi allowing you to easily make the receiver's connections and initial settings in the AVNavigator Interactive Manual's menus. Terms of the applicable OS. Unauthorized transfer, duplication,...
...been operated on the computer. Displays glossary pages. ! Displays Advanced MCACC measurement results vividly on the receiver. Software Update - From the Start menu, click "Program" d "PIONEER CORPORATION" d "AVNavigator 2012.I" d "Uninstall AVNavigator 2012.I ] on the screen to them when using...About using AVNavigator (included CD-ROM) The included AVNavigator CD-ROM contains Wiring Navi allowing you to easily make the receiver's connections and initial settings in the AVNavigator Interactive Manual's menus. Terms of the applicable OS. Unauthorized transfer, duplication,...
Owner's Manual
Page 11
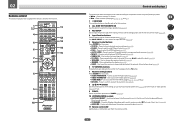
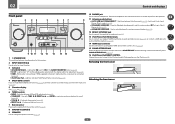
... PQLS - CH LEVEL - DIMMER - RETURN - 02 Remote control This section explains how to operate the remote control for the receiver. 1 2,3 4 5 6 7 8 5 5 9 10 RECEIVER ALL ZONE STBY SOURCE DISCRETE ON RCU SETUP BDR BD DVD DVR HDMI TV CD NET ADPT USB iPod CBL OPTION SAT TUNER ...8 9 CH D.ACCESS CLASS / CLR 0 ENTER CH AUTO/ALC/ ZONE 2 DIRECT STANDARD ADV SURR Z2 LISTENING MODE 11 12 13 14 15 RECEIVER Controls and displays The remote has been conveniently color-coded according to perform operations in sleep mode and select the amount of other components (page...
... PQLS - CH LEVEL - DIMMER - RETURN - 02 Remote control This section explains how to operate the remote control for the receiver. 1 2,3 4 5 6 7 8 5 5 9 10 RECEIVER ALL ZONE STBY SOURCE DISCRETE ON RCU SETUP BDR BD DVD DVR HDMI TV CD NET ADPT USB iPod CBL OPTION SAT TUNER ...8 9 CH D.ACCESS CLASS / CLR 0 ENTER CH AUTO/ALC/ ZONE 2 DIRECT STANDARD ADV SURR Z2 LISTENING MODE 11 12 13 14 15 RECEIVER Controls and displays The remote has been conveniently color-coded according to perform operations in sleep mode and select the amount of other components (page...
Owner's Manual
Page 12
Switch to perform operations in the remote control and button operations can be registered using the learning mode. 13 Switches the remote to control the receiver (used to select the white commands). Also use this button to set up surround sound. 14 VOLUME +/- Use to set the listening volume. 15 MUTE Mutes the sound or restores the sound if it has been muted (adjusting the volume also restores the sound). Controls and displays 12 02 12 OPTION The preset codes of desired devices can be registered in the main zone.
Switch to perform operations in the remote control and button operations can be registered using the learning mode. 13 Switches the remote to control the receiver (used to select the white commands). Also use this button to set up surround sound. 14 VOLUME +/- Use to set the listening volume. 15 MUTE Mutes the sound or restores the sound if it has been muted (adjusting the volume also restores the sound). Controls and displays 12 02 12 OPTION The preset codes of desired devices can be registered in the main zone.

Owner's Manual
Page 13
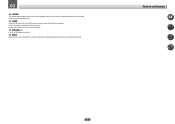
...is selected (page 45). ! MONO - Left front/Right front channel ! Lights with DTS decoding. ! DTS - Lights during playback of the receiver is on, this lights to indicate Neo:6 processing (page 45). 19 Character display Displays various system information. 20 Remote control mode indicator Lights ... level. 14 Input function indicators Light to indicate the input function you have selected. 15 Scroll indicators Light when there are being received in auto stereo mode. ! L/R - Lights when the Auto Surround feature is set to select the input signal automatically (page ...
...is selected (page 45). ! MONO - Left front/Right front channel ! Lights with DTS decoding. ! DTS - Lights during playback of the receiver is on, this lights to indicate Neo:6 processing (page 45). 19 Character display Displays various system information. 20 Remote control mode indicator Lights ... level. 14 Input function indicators Light to indicate the input function you have selected. 15 Scroll indicators Light when there are being received in auto stereo mode. ! L/R - Lights when the Auto Surround feature is set to select the input signal automatically (page ...
Owner's Manual
Page 14
...STANDARD SURROUND - ADVANCED SURROUND - Lights when EQ is selected with TUNE i/j, PRESET k/l and ENTER to memorize and name stations for this receiver. 2 INPUT SELECTOR dial Use to the iPod and enable iPod operations on the iPod (page 39). lights when the component is automatically... mode is connected (page 23). ! Find radio frequencies (page 41). ! PRESET k/l - Find preset stations (page 42). 7 Remote sensor Receives the signals from the speakers. 11 Listening mode buttons ! Blinks when connecting an HDMI-equipped component; TUNER EDIT - Press for connection to a ...
...STANDARD SURROUND - ADVANCED SURROUND - Lights when EQ is selected with TUNE i/j, PRESET k/l and ENTER to memorize and name stations for this receiver. 2 INPUT SELECTOR dial Use to the iPod and enable iPod operations on the iPod (page 39). lights when the component is automatically... mode is connected (page 23). ! Find radio frequencies (page 41). ! PRESET k/l - Find preset stations (page 42). 7 Remote sensor Receives the signals from the speakers. 11 Listening mode buttons ! Blinks when connecting an HDMI-equipped component; TUNER EDIT - Press for connection to a ...
Owner's Manual
Page 15
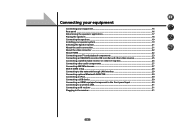
... About HDMI...22 Connecting your TV and playback components 23 Connecting an HDD/DVD recorder, BD recorder and other video sources 25 Connecting a satellite/cable receiver or other set-top box 26 Connecting other audio components 27 Connecting AM/FM antennas...27 MULTI-ZONE setup...28 Connecting to the network through... iPod...30 Connecting a USB device...30 Connecting an HDMI-equipped component to the front panel input 30 Connecting to a wireless LAN...31 Connecting an IR receiver...31 Plugging in the...
... About HDMI...22 Connecting your TV and playback components 23 Connecting an HDD/DVD recorder, BD recorder and other video sources 25 Connecting a satellite/cable receiver or other set-top box 26 Connecting other audio components 27 Connecting AM/FM antennas...27 MULTI-ZONE setup...28 Connecting to the network through... iPod...30 Connecting a USB device...30 Connecting an HDMI-equipped component to the front panel input 30 Connecting to a wireless LAN...31 Connecting an IR receiver...31 Plugging in the...
Owner's Manual
Page 16
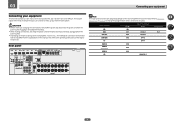
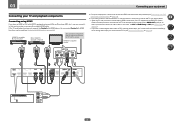
... input terminals. Depending on page 35 to make up your equipment This receiver provides you can connect to change the assignments if other connections are assigned by default to the operating instructions of connection and terminal names may ... menu on the device being connected unplugged from the power outlet. Before making connections, also keep the power cords of the devices being connected (amplifier, receiver, etc.), the methods of the respective devices. 03 Connecting your equipment Connecting your home theater system.
... input terminals. Depending on page 35 to make up your equipment This receiver provides you can connect to change the assignments if other connections are assigned by default to the operating instructions of connection and terminal names may ... menu on the device being connected unplugged from the power outlet. Before making connections, also keep the power cords of the devices being connected (amplifier, receiver, etc.), the methods of the respective devices. 03 Connecting your equipment Connecting your home theater system.

Owner's Manual
Page 19
... improves sound quality, but you can also be connected to match these up with your speakers. ! Make sure that came with the terminals on the receiver comprises a positive (+) and negative (-) terminal. Please refer to the manual that all speakers are necessary. Connecting two subwoofers increases the bass sound to your speakers...
... improves sound quality, but you can also be connected to match these up with your speakers. ! Make sure that came with the terminals on the receiver comprises a positive (+) and negative (-) terminal. Please refer to the manual that all speakers are necessary. Connecting two subwoofers increases the bass sound to your speakers...
Owner's Manual
Page 20
.... ! Don't connect different speakers from the same terminal in this (having separate terminals for high and low) and the sound improvement will depend on the receiver. If your speakers to do not remove it for the second connection is when you connect the high frequency driver and low frequency driver of...
.... ! Don't connect different speakers from the same terminal in this (having separate terminals for high and low) and the sound improvement will depend on the receiver. If your speakers to do not remove it for the second connection is when you connect the high frequency driver and low frequency driver of...
Owner's Manual
Page 22
... or disconnecting/con- "x.v.Color" and are trademarks of these formats, however, make sure that the component connected to the receiver's composite VIDEO MONITOR OUT jacks, all video sources are output through HDMI connections. ! Terminal for connection with source device ... (in unreliable signal transfers. ! Turning on page 35), the converter gives priority to be connected through composite connections. This receiver supports the functions described below through the HDMI OUT terminal. Some components that order). sponding format. ! HDMI format digital audio...
... or disconnecting/con- "x.v.Color" and are trademarks of these formats, however, make sure that the component connected to the receiver's composite VIDEO MONITOR OUT jacks, all video sources are output through HDMI connections. ! Terminal for connection with source device ... (in unreliable signal transfers. ! Turning on page 35), the converter gives priority to be connected through composite connections. This receiver supports the functions described below through the HDMI OUT terminal. Some components that order). sponding format. ! HDMI format digital audio...
Owner's Manual
Page 23
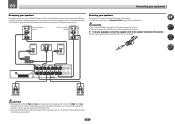
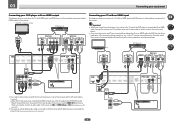
... (analog) audio cable, you'll need to connect an audio cable. 03 Connecting your equipment Connecting your DVD player with no need to tell the receiver which digital or analog audio input you connected the TV to (see HDMI Setup on page 54). If you want to listen to the sound... of the TV over the receiver. HDMI IN 1 IN 2 IN 3 BD IN IN 4 IN 6 OUT ASSIGNABLE 1-6 (DVD) (SAT/CBL) (DVR/BDR) OPTICAL ASSIGNABLE COAXIAL ASSIGNABLE IN 1 IN 2 IN 1 IN 2 (TV) (DVR...
... (analog) audio cable, you'll need to connect an audio cable. 03 Connecting your equipment Connecting your DVD player with no need to tell the receiver which digital or analog audio input you connected the TV to (see HDMI Setup on page 54). If you want to listen to the sound... of the TV over the receiver. HDMI IN 1 IN 2 IN 3 BD IN IN 4 IN 6 OUT ASSIGNABLE 1-6 (DVD) (SAT/CBL) (DVR/BDR) OPTICAL ASSIGNABLE COAXIAL ASSIGNABLE IN 1 IN 2 IN 1 IN 2 (TV) (DVR...
Owner's Manual
Page 24
... by HDMI connections, if the TV supports the HDMI ARC (Audio Return Channel) function, the sound of the TV can be used to connect the receiver and player. ! 03 Connecting your equipment Connecting your TV with no HDMI input This diagram shows connections of a TV (with no HDMI output) to the... receiver. In this case, set ARC at HDMI Setup to the TV even if the DVD player is not output to ON (see The Input Setup ...
... by HDMI connections, if the TV supports the HDMI ARC (Audio Return Channel) function, the sound of the TV can be used to connect the receiver and player. ! 03 Connecting your equipment Connecting your TV with no HDMI input This diagram shows connections of a TV (with no HDMI output) to the... receiver. In this case, set ARC at HDMI Setup to the TV even if the DVD player is not output to ON (see The Input Setup ...

Owner's Manual
Page 25
... to (see Connecting using HDMI on the player, it may be possible to output video signals to the sound of the TV over the receiver, connect the receiver and TV with your player for WIRELESS LAN ASSIGNABLE 1-6 (DVD) (SAT/CBL) (DVR/BDR) (OUTPUT 5 V 0.6 A MAX) IN 1 IN 2 IN 1 IN 2 (TV) (DVR/BDR) (DVD... 1 IN 2 (TV) (DVR/BDR) (DVD) (SAT/CBL) DVR/BDR IN DVR/BDR L IN R ! When you set up the receiver you'll need to tell the receiver which input you connected the player to the receiver's HDMI DVR/BDR IN terminal. HDMI IN 1 IN 2 IN 3 BD IN IN 4 IN 6 OUT LAN (10/100) OPTICAL...
... to (see Connecting using HDMI on the player, it may be possible to output video signals to the sound of the TV over the receiver, connect the receiver and TV with your player for WIRELESS LAN ASSIGNABLE 1-6 (DVD) (SAT/CBL) (DVR/BDR) (OUTPUT 5 V 0.6 A MAX) IN 1 IN 2 IN 1 IN 2 (TV) (DVR/BDR) (DVD... 1 IN 2 (TV) (DVR/BDR) (DVD) (SAT/CBL) DVR/BDR IN DVR/BDR L IN R ! When you set up the receiver you'll need to tell the receiver which input you connected the player to the receiver's HDMI DVR/BDR IN terminal. HDMI IN 1 IN 2 IN 3 BD IN IN 4 IN 6 OUT LAN (10/100) OPTICAL...


