

Owner's Manual
Page 1
AV Receiver VSX-1122-K Register your product on http://www.pioneerelectronics.com (US) http://www.pioneerelectronics.ca (Canada) • Protect your new investment The details of your purchase will be on file for reference in the event of an insurance claim such as loss or theft. • Receive free tips, updates and service bulletins on your new product • Improve product development Your input helps us continue to design products that meet your needs. • Receive a free Pioneer newsletter Registered customers can opt in to receive a monthly newsletter. Operating Instructions
AV Receiver VSX-1122-K Register your product on http://www.pioneerelectronics.com (US) http://www.pioneerelectronics.ca (Canada) • Protect your new investment The details of your purchase will be on file for reference in the event of an insurance claim such as loss or theft. • Receive free tips, updates and service bulletins on your new product • Improve product development Your input helps us continue to design products that meet your needs. • Receive a free Pioneer newsletter Registered customers can opt in to receive a monthly newsletter. Operating Instructions
Owner's Manual
Page 2
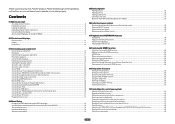
... plug must be unplugged from the AC outlet when left unused for a long period of the FCC Rules. Increase the separation between the equipment and receiver. - D8-10-2_A1_En WARNING: Handling the cord on this equipment does cause harmful interference to radio or television reception, which the... receiver is encouraged to try to correct the interference by removing the mains plug from tip-over. 13) Unplug this apparatus during lightning storms or when ...
... plug must be unplugged from the AC outlet when left unused for a long period of the FCC Rules. Increase the separation between the equipment and receiver. - D8-10-2_A1_En WARNING: Handling the cord on this equipment does cause harmful interference to radio or television reception, which the... receiver is encouraged to try to correct the interference by removing the mains plug from tip-over. 13) Unplug this apparatus during lightning storms or when ...
Owner's Manual
Page 4
...30 Connecting an HDMI-equipped component to the front panel input 30 Connecting to a wireless LAN...31 Connecting an IR receiver...31 Plugging in the receiver...31 04 Basic Setup Changing the OSD display language (OSD Language 33 Automatically conducting optimum sound tuning (Full Auto ......39 Playing a USB device...40 Listening to the radio...41 Bluetooth ADAPTER for buying this Pioneer product. Contents 01 Before you start Checking what's in the box...8 Installing the receiver...8 Loading the batteries...8 Operating range of remote control unit...8 Canceling the demo display...8 About ...
...30 Connecting an HDMI-equipped component to the front panel input 30 Connecting to a wireless LAN...31 Connecting an IR receiver...31 Plugging in the receiver...31 04 Basic Setup Changing the OSD display language (OSD Language 33 Automatically conducting optimum sound tuning (Full Auto ......39 Playing a USB device...40 Listening to the radio...41 Bluetooth ADAPTER for buying this Pioneer product. Contents 01 Before you start Checking what's in the box...8 Installing the receiver...8 Loading the batteries...8 Operating range of remote control unit...8 Canceling the demo display...8 About ...
Owner's Manual
Page 5
... 72 Automatic MCACC (Expert)...72 Manual MCACC setup...74 Checking MCACC Data...76 Data Management...77 12 The System Setup and Other Setup menus Making receiver settings from the System Setup menu 80 Manual speaker setup...80 Network Setup menu...82 Checking the Network Information...83 The Other Setup menu...83...
... 72 Automatic MCACC (Expert)...72 Manual MCACC setup...74 Checking MCACC Data...76 Data Management...77 12 The System Setup and Other Setup menus Making receiver settings from the System Setup menu 80 Manual speaker setup...80 Network Setup menu...82 Checking the Network Information...83 The Other Setup menu...83...
Owner's Manual
Page 6
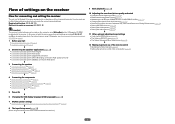
... (page 44) ! Connecting the speakers on page 19 ! Setting the Video options (page 60) j 11 Other optional adjustments and settings ! Operating multiple receivers (page 66) ! Required setting item: 1, 2, 3, 4, 5, 7, 9 Setting to make the connections and settings. Installing your speaker system on page ...the batteries on page 33 j 8 The Input Setup menu (page 35) (When using Phase Control (page 47) ! Plugging in the receiver on the AVNavigator CD-ROM included with HDMI function (page 54) ! Changing the channel level while listening (page 81) ! Setting the ...
... (page 44) ! Connecting the speakers on page 19 ! Setting the Video options (page 60) j 11 Other optional adjustments and settings ! Operating multiple receivers (page 66) ! Required setting item: 1, 2, 3, 4, 5, 7, 9 Setting to make the connections and settings. Installing your speaker system on page ...the batteries on page 33 j 8 The Input Setup menu (page 35) (When using Phase Control (page 47) ! Plugging in the receiver on the AVNavigator CD-ROM included with HDMI function (page 54) ! Changing the channel level while listening (page 81) ! Setting the ...
Owner's Manual
Page 7
Before you start Checking what's in the box...8 Installing the receiver...8 Loading the batteries...8 Operating range of remote control unit 8 Canceling the demo display...8 About using AVNavigator (included CD-ROM 9 7
Before you start Checking what's in the box...8 Installing the receiver...8 Loading the batteries...8 Operating range of remote control unit 8 Canceling the demo display...8 About using AVNavigator (included CD-ROM 9 7

Owner's Manual
Page 8
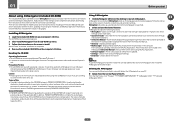
... the demo display, connect the power cord, then perform the operation below. ! FM wire antenna ! CD-ROM ! Warranty sheet Installing the receiver ! in damp or wet areas - The bottom panel becomes hot when the power is on (or right after it is operated simultaneously with another... a magnetic field). near a heater. Do not touch this unit, make sure to leak, overheat, explode or catch fire. When installing this receiver's bottom panel while the power is on the following supplied accessories: ! Quick start Checking what's in the box Please check that apply in direct...
... the demo display, connect the power cord, then perform the operation below. ! FM wire antenna ! CD-ROM ! Warranty sheet Installing the receiver ! in damp or wet areas - The bottom panel becomes hot when the power is on (or right after it is operated simultaneously with another... a magnetic field). near a heater. Do not touch this unit, make sure to leak, overheat, explode or catch fire. When installing this receiver's bottom panel while the power is on the following supplied accessories: ! Quick start Checking what's in the box Please check that apply in direct...
Owner's Manual
Page 9
... contains Wiring Navi allowing you to easily make the receiver's connections and initial settings in the AVNavigator Interactive Manual's menus. Handling the CD-ROM Operating Environment ! Precautions For Use ! License ! PIONEER CORPORATION does not guarantee the operation of software to ... on 3D graphs. puters using any compensation. From the Start menu, click "Program" d "PIONEER CORPORATION" d "AVNavigator 2012.I" d "Uninstall AVNavigator 2012.I ] on the receiver. There are also other entities described herein are special operating instructions for use the desired function. ...
... contains Wiring Navi allowing you to easily make the receiver's connections and initial settings in the AVNavigator Interactive Manual's menus. Handling the CD-ROM Operating Environment ! Precautions For Use ! License ! PIONEER CORPORATION does not guarantee the operation of software to ... on 3D graphs. puters using any compensation. From the Start menu, click "Program" d "PIONEER CORPORATION" d "AVNavigator 2012.I" d "Uninstall AVNavigator 2012.I ] on the receiver. There are also other entities described herein are special operating instructions for use the desired function. ...
Owner's Manual
Page 11
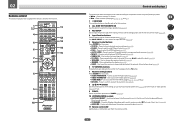
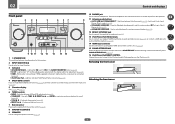
... 8 9 CH D.ACCESS CLASS / CLR 0 ENTER CH AUTO/ALC/ ZONE 2 DIRECT STANDARD ADV SURR Z2 LISTENING MODE 11 12 13 14 15 RECEIVER Controls and displays The remote has been conveniently color-coded according to component control using the following system: ! Other controls (See pages 39, 40, ...Stream Direct mode (page 46). ! PHASE - Press to access: ! Use INPUT SELECT c/ d to select the input function (page 38). 5 Receiver Control buttons Press first to select the PQLS setting (page 56). ! AUDIO PARAMETER - AUTO/ALC/DIRECT - 02 Remote control This section explains how ...
... 8 9 CH D.ACCESS CLASS / CLR 0 ENTER CH AUTO/ALC/ ZONE 2 DIRECT STANDARD ADV SURR Z2 LISTENING MODE 11 12 13 14 15 RECEIVER Controls and displays The remote has been conveniently color-coded according to component control using the following system: ! Other controls (See pages 39, 40, ...Stream Direct mode (page 46). ! PHASE - Press to access: ! Use INPUT SELECT c/ d to select the input function (page 38). 5 Receiver Control buttons Press first to select the PQLS setting (page 56). ! AUDIO PARAMETER - AUTO/ALC/DIRECT - 02 Remote control This section explains how ...
Owner's Manual
Page 12
Also use this button to set the listening volume. 15 MUTE Mutes the sound or restores the sound if it has been muted (adjusting the volume also restores the sound). Controls and displays 12 Switch to perform operations in the remote control and button operations can be registered using the learning mode. 13 Switches the remote to control the receiver (used to set up surround sound. 14 VOLUME +/- Use to select the white commands). 02 12 OPTION The preset codes of desired devices can be registered in the main zone.
Also use this button to set the listening volume. 15 MUTE Mutes the sound or restores the sound if it has been muted (adjusting the volume also restores the sound). Controls and displays 12 Switch to perform operations in the remote control and button operations can be registered using the learning mode. 13 Switches the remote to control the receiver (used to set up surround sound. 14 VOLUME +/- Use to select the white commands). 02 12 OPTION The preset codes of desired devices can be registered in the main zone.

Owner's Manual
Page 13
...TrueHD - AUTO SURROUND - STEREO - Lights when the mono mode is set to PCM conversion with DTS-HD decoding. ! 96/24 - When one of the receiver is active (page 58). 8 Listening mode indicators ! C - Light during DSD (Direct Stream Digital) to 1.) (page 84) 13 Lights during playback of ...PCM signals. ! STREAM DIRECT - SL/SR - MONO - AUTO lights when the receiver is being received in auto stereo mode. ! Either one of the Standard Surround modes is switched on (page 45). 9 (PHASE CONTROL) Lights when the...
...TrueHD - AUTO SURROUND - STEREO - Lights when the mono mode is set to PCM conversion with DTS-HD decoding. ! 96/24 - When one of the receiver is active (page 58). 8 Listening mode indicators ! C - Light during DSD (Direct Stream Digital) to 1.) (page 84) 13 Lights during playback of ...PCM signals. ! STREAM DIRECT - SL/SR - MONO - AUTO lights when the receiver is being received in auto stereo mode. ! Either one of the Standard Surround modes is switched on (page 45). 9 (PHASE CONTROL) Lights when the...
Owner's Manual
Page 14
...input function. 3 Indicators ! HDMI - Lights to indicate iPod/iPhone/iPad is selected with TUNE i/j, PRESET k/l and ENTER to memorize and name stations for this receiver. 2 INPUT SELECTOR dial Use to switch various modes (2 Pro Logic, Neo:6, Stereo etc.) (page 45). ! TUNER EDIT - 02 Controls and displays Front...If you've made MULTI-ZONE connections (page 28) use these controls to connect headphones. Find preset stations (page 42). 7 Remote sensor Receives the signals from the remote control (page 8). 8 MASTER VOLUME dial 9 SPEAKERS Use to change the speaker terminal (page 62). 10 PHONES ...
...input function. 3 Indicators ! HDMI - Lights to indicate iPod/iPhone/iPad is selected with TUNE i/j, PRESET k/l and ENTER to memorize and name stations for this receiver. 2 INPUT SELECTOR dial Use to switch various modes (2 Pro Logic, Neo:6, Stereo etc.) (page 45). ! TUNER EDIT - 02 Controls and displays Front...If you've made MULTI-ZONE connections (page 28) use these controls to connect headphones. Find preset stations (page 42). 7 Remote sensor Receives the signals from the remote control (page 8). 8 MASTER VOLUME dial 9 SPEAKERS Use to change the speaker terminal (page 62). 10 PHONES ...
Owner's Manual
Page 15
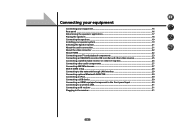
... About HDMI...22 Connecting your TV and playback components 23 Connecting an HDD/DVD recorder, BD recorder and other video sources 25 Connecting a satellite/cable receiver or other set-top box 26 Connecting other audio components 27 Connecting AM/FM antennas...27 MULTI-ZONE setup...28 Connecting to the network through... iPod...30 Connecting a USB device...30 Connecting an HDMI-equipped component to the front panel input 30 Connecting to a wireless LAN...31 Connecting an IR receiver...31 Plugging in the...
... About HDMI...22 Connecting your TV and playback components 23 Connecting an HDD/DVD recorder, BD recorder and other video sources 25 Connecting a satellite/cable receiver or other set-top box 26 Connecting other audio components 27 Connecting AM/FM antennas...27 MULTI-ZONE setup...28 Connecting to the network through... iPod...30 Connecting a USB device...30 Connecting an HDMI-equipped component to the front panel input 30 Connecting to a wireless LAN...31 Connecting an IR receiver...31 Plugging in the...
Owner's Manual
Page 16
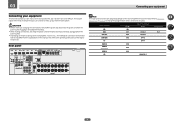
...with many connection possibilities, but it doesn't have to be the final step. ! 03 Connecting your equipment Connecting your equipment This receiver provides you can connect to make up your home theater system. When making or changing the connections, switch off the power and ...disconnect the power cord from the power outlet. Refer to the receiver's different input terminals. Plugging in this manual. Input function BD DVD SAT/CBL HDMI (BD) IN 1 IN 2 Input Terminals Audio COAX...
...with many connection possibilities, but it doesn't have to be the final step. ! 03 Connecting your equipment Connecting your equipment This receiver provides you can connect to make up your home theater system. When making or changing the connections, switch off the power and ...disconnect the power cord from the power outlet. Refer to the receiver's different input terminals. Plugging in this manual. Input function BD DVD SAT/CBL HDMI (BD) IN 1 IN 2 Input Terminals Audio COAX...

Owner's Manual
Page 19
... connect using speaker cables. ! If any uninsulated parts. ! Bare wire connections CAUTION Make sure that your equipment Connecting the speakers Each speaker connection on the receiver comprises a positive (+) and negative (-) terminal. Front right Front height setting Front height right Front wide setting Front wide right Speaker B setting Speaker B - right Front height...
... connect using speaker cables. ! If any uninsulated parts. ! Bare wire connections CAUTION Make sure that your equipment Connecting the speakers Each speaker connection on the receiver comprises a positive (+) and negative (-) terminal. Front right Front height setting Front height right Front wide setting Front wide right Speaker B setting Speaker B - right Front height...
Owner's Manual
Page 20
... of your speakers to different amplifiers for bi-amping shown above. % To bi-wire a speaker, connect two speaker cords to the speaker terminal on the receiver. Your speakers must be removed when you are bi-amping the speakers or you could severely damage the amplifier. Most speakers with both High and...
... of your speakers to different amplifiers for bi-amping shown above. % To bi-wire a speaker, connect two speaker cords to the speaker terminal on the receiver. Your speakers must be removed when you are bi-amping the speakers or you could severely damage the amplifier. Most speakers with both High and...
Owner's Manual
Page 22
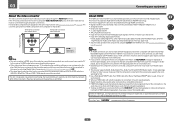
... with HDMI func- About HDMI The HDMI connection transfers uncompressed digital video, as well as there is not a malfunction. ! This receiver supports the functions described below through composite connections. ARC (Audio Return Channel) ! Synchronized operation with a built-in the audio may ... PR COMPONENT VIDEO IN VIDEO IN VIDEO MONITOR OUT Video signals can be converted. If an HDMI cable other countries. This receiver incorporates High-Definition Multimedia Interface (HDMI®) technology. Input of multi-channel linear PCM digital audio signals (192 kHz or...
... with HDMI func- About HDMI The HDMI connection transfers uncompressed digital video, as well as there is not a malfunction. ! This receiver supports the functions described below through composite connections. ARC (Audio Return Channel) ! Synchronized operation with a built-in the audio may ... PR COMPONENT VIDEO IN VIDEO IN VIDEO MONITOR OUT Video signals can be converted. If an HDMI cable other countries. This receiver incorporates High-Definition Multimedia Interface (HDMI®) technology. Input of multi-channel linear PCM digital audio signals (192 kHz or...
Owner's Manual
Page 23
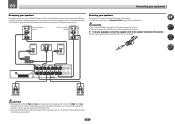
... L OPTICAL COAXIAL ! HDMI/DVI-compatible Blu-ray Disc player Other HDMI/DVIequipped component This connection is no HDMI output on page 35). In this receiver using HDMI If you have an HDMI or DVI (with HDMI functions can be used (see HDMI Setup on page 54). If the TV and... connections are connected by HDMI connections, if the TV supports the HDMI ARC (Audio Return Channel) function, the sound of the TV over the receiver, connect the receiver and TV with HDMI function on page 55). - If you use a coaxial digital audio cable or RCA (analog) audio cable, you'll ...
... L OPTICAL COAXIAL ! HDMI/DVI-compatible Blu-ray Disc player Other HDMI/DVIequipped component This connection is no HDMI output on page 35). In this receiver using HDMI If you have an HDMI or DVI (with HDMI functions can be used (see HDMI Setup on page 54). If the TV and... connections are connected by HDMI connections, if the TV supports the HDMI ARC (Audio Return Channel) function, the sound of the TV over the receiver, connect the receiver and TV with HDMI function on page 55). - If you use a coaxial digital audio cable or RCA (analog) audio cable, you'll ...
Owner's Manual
Page 24
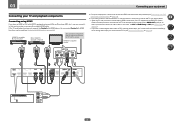
... on page 55). ! If you use an optical digital audio cable, you want to listen to the sound of the TV over the receiver, connect the receiver and TV with an HDMI cable. HDMI IN Select one VIDEO OUT VIDEO COMPONENT VIDEO OUT Y PB PR Select one DIGITAL OUT AUDIO OUT... connected by HDMI connections, if the TV supports the HDMI ARC (Audio Return Channel) function, the sound of the TV can be used to the receiver. HDMI/DVI-compatible monitor DVD player, etc. Important ! 03 Connecting your equipment Connecting your TV with no HDMI input This diagram shows connections of a...
... on page 55). ! If you use an optical digital audio cable, you want to listen to the sound of the TV over the receiver, connect the receiver and TV with an HDMI cable. HDMI IN Select one VIDEO OUT VIDEO COMPONENT VIDEO OUT Y PB PR Select one DIGITAL OUT AUDIO OUT... connected by HDMI connections, if the TV supports the HDMI ARC (Audio Return Channel) function, the sound of the TV can be used to the receiver. HDMI/DVI-compatible monitor DVD player, etc. Important ! 03 Connecting your equipment Connecting your TV with no HDMI input This diagram shows connections of a...

Owner's Manual
Page 25
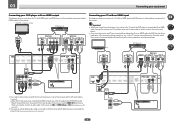
... and other video output (composite, etc.) simultaneously, and it may be possible to output video signals to both HDMI and other video sources This receiver has audio/video inputs suitable for connecting analog or digital video devices, including HDD/DVD recorders and BD recorders. HDD/DVD recorder, BD recorder, ...etc. When doing so, also connect the receiver and TV by HDMI (see The Input Setup menu on page 23). HDMI OUT HDD/DVD recorder, BD recorder, etc. In order to listening ...
... and other video output (composite, etc.) simultaneously, and it may be possible to output video signals to both HDMI and other video sources This receiver has audio/video inputs suitable for connecting analog or digital video devices, including HDD/DVD recorders and BD recorders. HDD/DVD recorder, BD recorder, ...etc. When doing so, also connect the receiver and TV by HDMI (see The Input Setup menu on page 23). HDMI OUT HDD/DVD recorder, BD recorder, etc. In order to listening ...


