
Owner's Manual
Page 5
...32 Connecting a USB device 32 Connecting a USB device for Advanced MCACC output 33 Connecting an IR receiver 33 Operating other Pioneer components with this Pioneer product. After you will know how to the network through these operating instructions so you have finished reading the instructions, put... the speakers' application 16 Other speaker connections 17 Placing the speakers 17 THX speaker system setup 17 Some tips for improving sound quality 17 Connecting the speakers 18 Installing your speaker system 19 Standard surround connection 19 Bi-amping your speakers 20 Bi-wiring...
...32 Connecting a USB device 32 Connecting a USB device for Advanced MCACC output 33 Connecting an IR receiver 33 Operating other Pioneer components with this Pioneer product. After you will know how to the network through these operating instructions so you have finished reading the instructions, put... the speakers' application 16 Other speaker connections 17 Placing the speakers 17 THX speaker system setup 17 Some tips for improving sound quality 17 Connecting the speakers 18 Installing your speaker system 19 Standard surround connection 19 Bi-amping your speakers 20 Bi-wiring...
Owner's Manual
Page 6
06 Listening to your system Auto playback 48 Listening in surround sound 48 Standard surround sound 48 Using the Home THX modes 49 Using the Advanced surround effects 49 Listening in stereo 50 Using Front Stage Surround Advance 50 Using Stream ...Direct 50 Selecting MCACC presets 51 Choosing the input signal 51 Better sound using Phase Control 51 07 Control with HDMI function Making Control with HDMI connections 52 HDMI Setup 52 Before using synchronization 53 About synchronized operations...
06 Listening to your system Auto playback 48 Listening in surround sound 48 Standard surround sound 48 Using the Home THX modes 49 Using the Advanced surround effects 49 Listening in stereo 50 Using Front Stage Surround Advance 50 Using Stream ...Direct 50 Selecting MCACC presets 51 Choosing the input signal 51 Better sound using Phase Control 51 07 Control with HDMI function Making Control with HDMI connections 52 HDMI Setup 52 Before using synchronization 53 About synchronized operations...
Owner's Manual
Page 7
12 Additional information Speaker Setting Guide 84 Positional relationship between speakers and monitor 85 Troubleshooting 85 Power 85 No sound 86 Other audio problems 87 ADAPTER PORT 88 Video 88 Settings 89 Professional Calibration EQ graphical output . . . . . 89 Display 89 Remote control ...90 Web Control 90 HDMI 91 Important information regarding the HDMI connection 92 USB interface 92 Internet radio 93 SIRIUS radio messages 94 Surround sound formats 94 Dolby 94 DTS 94 Windows Media Audio 9 Professional 94 About THX 95 About iPod 96 About SIRIUS 96 Auto Surround, ALC...
12 Additional information Speaker Setting Guide 84 Positional relationship between speakers and monitor 85 Troubleshooting 85 Power 85 No sound 86 Other audio problems 87 ADAPTER PORT 88 Video 88 Settings 89 Professional Calibration EQ graphical output . . . . . 89 Display 89 Remote control ...90 Web Control 90 HDMI 91 Important information regarding the HDMI connection 92 USB interface 92 Internet radio 93 SIRIUS radio messages 94 Surround sound formats 94 Dolby 94 DTS 94 Windows Media Audio 9 Professional 94 About THX 95 About iPod 96 About SIRIUS 96 Auto Surround, ALC...
Owner's Manual
Page 8
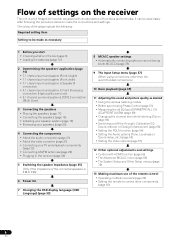
...937;) 6 Power On 7 Changing the OSD display language (OSD Language) (page 35) 8 MCACC speaker settings • Automatically conducting optimum sound tuning (Auto MCACC) (page 35) 9 The Input Setup menu (page 37) (When using connections other than the recommended connections) 10 Basic playback ... 13 Making maximum use of functions and terminals. Flow of settings on /off the Acoustic Calibration EQ, Sound retriever or Dialog Enhancement (page 55) • Setting the PQLS function (page 54) • Setting the Audio options (Tone, Loudness or...
...937;) 6 Power On 7 Changing the OSD display language (OSD Language) (page 35) 8 MCACC speaker settings • Automatically conducting optimum sound tuning (Auto MCACC) (page 35) 9 The Input Setup menu (page 37) (When using connections other than the recommended connections) 10 Basic playback ... 13 Making maximum use of functions and terminals. Flow of settings on /off the Acoustic Calibration EQ, Sound retriever or Dialog Enhancement (page 55) • Setting the PQLS function (page 54) • Setting the Audio options (Tone, Loudness or...
Owner's Manual
Page 9
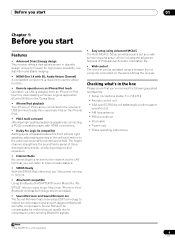
... feature employs DSP technology to restore sound pressure and smooth jagged artifacts left and right speakers adds expressiveness in no time. • Bluetooth compatible Using the Bluetooth ADAPTER (Pioneer Model No. Before you start 01 Chapter 1: Before you start Features • Advanced ...Direct Energy design This receiver offers a new advancement in discrete design unique to Pioneer for reduced sound quality due to compression when sending Bluetooth signals. • Easy setup using a browser from the iTunes Store. • iPhone...
... feature employs DSP technology to restore sound pressure and smooth jagged artifacts left and right speakers adds expressiveness in no time. • Bluetooth compatible Using the Bluetooth ADAPTER (Pioneer Model No. Before you start 01 Chapter 1: Before you start Features • Advanced ...Direct Energy design This receiver offers a new advancement in discrete design unique to Pioneer for reduced sound quality due to compression when sending Bluetooth signals. • Easy setup using a browser from the iTunes Store. • iPhone...

Owner's Manual
Page 10
... batteries to the marks in places that have hot fumes or oils (such as leakage and bursting. in the battery case. • Batteries with the sound. - in direct sunlight - they may distort) - Observe the following places: - near a heater. in direct sunlight or other movement - in your country or area. • WARNING...
... batteries to the marks in places that have hot fumes or oils (such as leakage and bursting. in the battery case. • Batteries with the sound. - in direct sunlight - they may distort) - Observe the following places: - near a heater. in direct sunlight or other movement - in your country or area. • WARNING...
Owner's Manual
Page 11
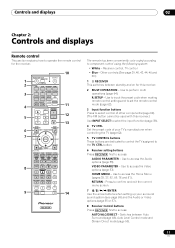
... code when making remote control settings and to set the remote control mode (page 62). 3 Input function buttons Press to select control of your surround sound system (see page 69) and the Audio or Video options (page 55 or 57). 8 Receiver Control buttons Press RECEIVER first to access: AUTO/ALC/DIRECT...
... code when making remote control settings and to set the remote control mode (page 62). 3 Input function buttons Press to select control of your surround sound system (see page 69) and the Audio or Video options (page 55 or 57). 8 Receiver Control buttons Press RECEIVER first to access: AUTO/ALC/DIRECT...

Owner's Manual
Page 12
... listening mode (page 49). Use to put the receiver in sleep mode and select the amount of an analog input signal to set up surround sound. 12 MASTER VOLUME +/- CH LEVEL - Switch to switch between on /off Phase Control (page 51). Use to prevent distortion (page 59). Front panel 1 2 3 4 5... to control the receiver (used with this button to set the listening volume. 13 MUTE Mutes the sound or restores the sound if it has been muted (adjusting the volume also restores the sound). 14 Press to select a channel, then use this receiver. Press to select the PQLS setting (page...
... listening mode (page 49). Use to put the receiver in sleep mode and select the amount of an analog input signal to set up surround sound. 12 MASTER VOLUME +/- CH LEVEL - Switch to switch between on /off Phase Control (page 51). Use to prevent distortion (page 59). Front panel 1 2 3 4 5... to control the receiver (used with this button to set the listening volume. 13 MUTE Mutes the sound or restores the sound if it has been muted (adjusting the volume also restores the sound). 14 Press to select a channel, then use this receiver. Press to select the PQLS setting (page...

Owner's Manual
Page 13
... indicators Light to indicate the channels to connect headphones. Either one channel other than the ones above XC - Lights to indicate iPod/iPhone is no sound output from the remote control (see Using the MULTI-ZONE controls on page 10). 8 MASTER VOLUME dial 9 PHONES jack Use to which digital signals are... STEREO STANDARD SP AB SLEEP R 2DIGITAL PLUS DSD PCM TUNED SR 2TrueHD WMA9Pro DTS HD ES 96/24 MULTI-ZONE PQLS ALC ATT STEREO S.RTRV SOUND UP MIX OVER MONO XR MSTR CD TUNER SIRIUS CD-R iPod DVD TV VIDEO BD DVR HDMI [ 2 ] USB [ 3 ] [ 4 ] 7 15 16 17 18 dB 19 1 ...
... indicators Light to indicate the channels to connect headphones. Either one channel other than the ones above XC - Lights to indicate iPod/iPhone is no sound output from the remote control (see Using the MULTI-ZONE controls on page 10). 8 MASTER VOLUME dial 9 PHONES jack Use to which digital signals are... STEREO STANDARD SP AB SLEEP R 2DIGITAL PLUS DSD PCM TUNED SR 2TrueHD WMA9Pro DTS HD ES 96/24 MULTI-ZONE PQLS ALC ATT STEREO S.RTRV SOUND UP MIX OVER MONO XR MSTR CD TUNER SIRIUS CD-R iPod DVD TV VIDEO BD DVR HDMI [ 2 ] USB [ 3 ] [ 4 ] 7 15 16 17 18 dB 19 1 ...

Owner's Manual
Page 14
...Remote control mode indicator Lights to indicate the receiver's remote control mode setting. (Not displayed when set using MPX. 11 Lights when the sound is being received. STEREO - "---" indicates the minimum level, and "+12dB" indicates the maximum level. 13 Input function indicators Light to ...with SACDs. Lights with DTS-HD decoding. 96/24 - PCM - Lights when Dialog Enhancement is switched on. 6 S.RTRV Lights when the Sound Retriever function is switched on (page 50). Lights when the Auto Surround feature is active (page 55). 7 Listening mode indicators AUTO SURROUND -...
...Remote control mode indicator Lights to indicate the receiver's remote control mode setting. (Not displayed when set using MPX. 11 Lights when the sound is being received. STEREO - "---" indicates the minimum level, and "+12dB" indicates the maximum level. 13 Input function indicators Light to ...with SACDs. Lights with DTS-HD decoding. 96/24 - PCM - Lights when Dialog Enhancement is switched on. 6 S.RTRV Lights when the Sound Retriever function is switched on (page 50). Lights when the Auto Surround feature is active (page 55). 7 Listening mode indicators AUTO SURROUND -...
Owner's Manual
Page 16
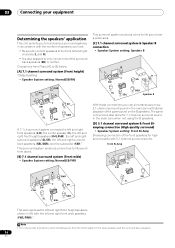
...speakers (SL/SR), the left and right surround back speakers (SBL/SBR), and the subwoofer (SW).1 This surround system produces a more true-to-life sound from above. [B] 7.1 channel surround system (Front wide) • Speaker System setting: Normal(SB/FW) L SW FWL SL R FWR C SR... SBL SBR This surround system produces a true-to-life sound over a wider area. [C] 7.1 channel surround system & Speaker B connection • Speaker System setting: Speaker B R L C SW SL SBL R SR L SBR Speaker B...
...speakers (SL/SR), the left and right surround back speakers (SBL/SBR), and the subwoofer (SW).1 This surround system produces a more true-to-life sound from above. [B] 7.1 channel surround system (Front wide) • Speaker System setting: Normal(SB/FW) L SW FWL SL R FWR C SR... SBL SBR This surround system produces a true-to-life sound over a wider area. [C] 7.1 channel surround system & Speaker B connection • Speaker System setting: Speaker B R L C SW SL SBL R SR L SBR Speaker B...

Owner's Manual
Page 17
...For the best stereo effect, place the front speakers 2 m to conduct the Auto MCACC (speaker environment setting) procedure. Some tips for improving sound quality Where you put your speakers in ZONE 2. (The selection of input devices is played from your system. • The subwoofer can ...simultaneously enjoy 5.1-channel surround sound in the main zone with low frequency reproduction capabilities to the front channel. (The subwoofer's low frequency component is limited.) Placing the...
...For the best stereo effect, place the front speakers 2 m to conduct the Auto MCACC (speaker environment setting) procedure. Some tips for improving sound quality Where you put your speakers in ZONE 2. (The selection of input devices is played from your system. • The subwoofer can ...simultaneously enjoy 5.1-channel surround sound in the main zone with low frequency reproduction capabilities to the front channel. (The subwoofer's low frequency component is limited.) Placing the...

Owner's Manual
Page 18
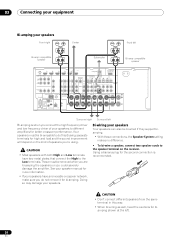
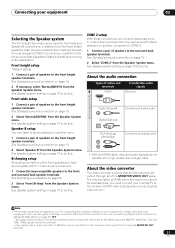
... CAUTION • These speaker terminals carry HAZARDOUS LIVE voltage. A) 2 Loosen terminal and insert exposed wire. (fig. This not only improves sound quality, but also reduces the risk of the center channel is best to connect using speaker cables. Make sure the speakers don't face each...banana plugs, screw the speaker terminal fully shut, then plug the banana plug into the speaker terminal. Doing so can weaken the surround sound effect. B) 3 Tighten terminal. (fig. Connecting the speakers Each speaker connection on how to connect the other . To prevent the ...
... CAUTION • These speaker terminals carry HAZARDOUS LIVE voltage. A) 2 Loosen terminal and insert exposed wire. (fig. This not only improves sound quality, but also reduces the risk of the center channel is best to connect using speaker cables. Make sure the speakers don't face each...banana plugs, screw the speaker terminal fully shut, then plug the banana plug into the speaker terminal. Doing so can weaken the surround sound effect. B) 3 Tighten terminal. (fig. Connecting the speakers Each speaker connection on how to connect the other . To prevent the ...
Owner's Manual
Page 20
... may damage your speakers. CAUTION • Don't connect different speakers from the same terminal in this (having separate terminals for high and low) and the sound improvement will depend on the receiver. CAUTION • Most speakers with both High and Low terminals have a removable crossover network, make sure you could severely...
... may damage your speakers. CAUTION • Don't connect different speakers from the same terminal in this (having separate terminals for high and low) and the sound improvement will depend on the receiver. CAUTION • Most speakers with both High and Low terminals have a removable crossover network, make sure you could severely...
Owner's Manual
Page 21
...front height speaker terminals. About the video converter The video converter ensures that all of cables and terminals HDMI Transferable audio signals HD audio Sound signal priority Digital (Coaxial) Conventional digital audio Digital (Optical) RCA (Analog) (White/Red) Conventional analog audio • With... a pair of speakers to the front height speaker terminals. Bi-Amping setup Bi-amping connection of the front speakers for high sound quality with an input resolution of 480i/576i can be converted from the component video input for the composite MONITOR OUT terminals. ...
...front height speaker terminals. About the video converter The video converter ensures that all of cables and terminals HDMI Transferable audio signals HD audio Sound signal priority Digital (Coaxial) Conventional digital audio Digital (Optical) RCA (Analog) (White/Red) Conventional analog audio • With... a pair of speakers to the front height speaker terminals. Bi-Amping setup Bi-amping connection of the front speakers for high sound quality with an input resolution of 480i/576i can be converted from the component video input for the composite MONITOR OUT terminals. ...
Owner's Manual
Page 23
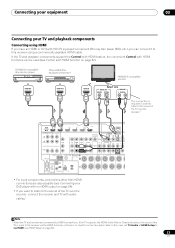
... HDMI cable. If the TV and playback components support the Control with HDMI feature, the convenient Control with HDMI functions can connect it to the sound of the TV over the receiver.1 HDMI BD IN IN 1 ASSIGNABLE 14 COMPONENTVIDEO ASSIGNABLE Y PB PR IN 1 (DVD) IN 2 (DVR/BDR) ZONE2 ... For input components, connections other than HDMI connections are connected by HDMI connections, if the TV supports the HDMI Audio Return Channel function, the sound of the TV over the receiver, connect the receiver and TV with HDCP) equipped component (Blu-ray disc player (BD), etc.), you want ...
... HDMI cable. If the TV and playback components support the Control with HDMI feature, the convenient Control with HDMI functions can connect it to the sound of the TV over the receiver.1 HDMI BD IN IN 1 ASSIGNABLE 14 COMPONENTVIDEO ASSIGNABLE Y PB PR IN 1 (DVD) IN 2 (DVR/BDR) ZONE2 ... For input components, connections other than HDMI connections are connected by HDMI connections, if the TV supports the HDMI Audio Return Channel function, the sound of the TV over the receiver, connect the receiver and TV with HDCP) equipped component (Blu-ray disc player (BD), etc.), you want ...

Owner's Manual
Page 24
Note 1 When the TV and receiver are connected by HDMI connections, if the TV supports the HDMI Audio Return Channel function, the sound of a TV (with HDMI input) and DVD player (or other playback component with no need to tell the receiver which digital input you 'll need ... L CENTER R SURROUND L R SURROUND BACK Class 2 Wiring (OUTPUT 5 V 150 mA MAX) IN IN OUT OUT EXTENSION CONTROL IR • If you want to listen to the sound of the TV over the receiver, connect the receiver and TV with audio cables (page 23).1 • If you use an optical digital audio cable...
Note 1 When the TV and receiver are connected by HDMI connections, if the TV supports the HDMI Audio Return Channel function, the sound of a TV (with HDMI input) and DVD player (or other playback component with no need to tell the receiver which digital input you 'll need ... L CENTER R SURROUND L R SURROUND BACK Class 2 Wiring (OUTPUT 5 V 150 mA MAX) IN IN OUT OUT EXTENSION CONTROL IR • If you want to listen to the sound of the TV over the receiver, connect the receiver and TV with audio cables (page 23).1 • If you use an optical digital audio cable...

Owner's Manual
Page 25
... Setup menu on page 37). 25 En Connecting your equipment 03 Connecting your component for more information. • If you want to listen to the sound of a TV (with no HDMI input) and DVD player (or other methods simultaneously, and it may be possible to output signals connected by HDMI and...
... Setup menu on page 37). 25 En Connecting your equipment 03 Connecting your component for more information. • If you want to listen to the sound of a TV (with no HDMI input) and DVD player (or other methods simultaneously, and it may be possible to output signals connected by HDMI and...

Owner's Manual
Page 28
... speaker setting (see Speaker Setting on page 79) to LARGE. If you have configured the Speaker system setting on page 79. • To hear sound only from the pre-outs, switch the speaker system to OFF, or simply disconnect any home use the additional amplifier on the surround back channel...so it 's possible to add additional amplifiers to every channel of Microsoft Corporation in the United States and/or other countries. • With WMA9 Pro, sound problems may occur depending on your computer system. In this case plug the amplifier into the left (L (Single)) terminal only. • The...
... speaker setting (see Speaker Setting on page 79) to LARGE. If you have configured the Speaker system setting on page 79. • To hear sound only from the pre-outs, switch the speaker system to OFF, or simply disconnect any home use the additional amplifier on the surround back channel...so it 's possible to add additional amplifiers to every channel of Microsoft Corporation in the United States and/or other countries. • With WMA9 Pro, sound problems may occur depending on your computer system. In this case plug the amplifier into the left (L (Single)) terminal only. • The...

Owner's Manual
Page 29
.... Connecting your equipment 03 Connecting AM/FM antennas Connect the AM loop antenna and the FM wire antenna as shown below ). To improve reception and sound quality, connect external antennas (see Connecting external antennas below . Connecting external antennas To improve FM reception, connect an external FM antenna to a wall or other...
.... Connecting your equipment 03 Connecting AM/FM antennas Connect the AM loop antenna and the FM wire antenna as shown below ). To improve reception and sound quality, connect external antennas (see Connecting external antennas below . Connecting external antennas To improve FM reception, connect an external FM antenna to a wall or other...


